You can build a patio yourself in a weekend or two by excavating the site, compacting a 4–6 inch gravel base, screeding 1 inch of bedding sand, and laying your chosen surface material. The keys are getting the base right, sloping everything away from the house at about 1/4 inch per foot, and keeping your surface level as you go. Get those three things correct and you'll have a patio that holds up for decades without sinking, shifting, or flooding.
How to Build Patios: Step-by-Step DIY Guide
Nolan Carver
30 Apr 2026
Step 1: Decide on patio type, size, and layout
Before you touch a shovel, sketch your patio on paper. Measure the space you have and decide on a shape. Rectangular is the easiest for beginners because squaring it up is straightforward. Note any slopes, nearby doors, drainage paths, or obstacles like tree roots and utility lines. Call 811 (in the US) before digging so you know where buried lines are.
For size, think about how you'll actually use the space. A dining set needs at least a 12x14 foot area. A simple seating area with a couple of chairs can work in 10x10. Bigger is usually better if you have the yard for it, because patios almost always feel smaller once the furniture goes in.
Decide your surface type early because it affects every other decision downstream: how deep you excavate, what base materials you need, whether you need forms, and what tools you'll rent or buy. The three main options are concrete pavers, poured concrete, and natural stone. Each has a different installation process and cost profile.
Once you have your sketch, convert it to a square footage number. Multiply length by width for a rectangle, or break irregular shapes into rectangles and add them together. Add 10% to whatever number you get to account for cuts and waste. This square footage number drives your material order.
Step 2: Site prep, grading, drainage, and removing topsoil
This is the step most DIYers underestimate, and it's the one that determines whether your patio stays flat or turns into a rollercoaster in five years. Do not skip or rush site prep.
Mark the perimeter and set your slope
Drive stakes at each corner of your planned patio and run string lines between them. Use a line level or laser level to check your strings are level, then drop one end slightly to set your drainage slope. The target is 1/4 inch of drop for every foot of patio length away from the house. So a 12-foot-deep patio needs to drop 3 inches from the house edge to the far edge. This slope is what keeps rain from pooling against your foundation.
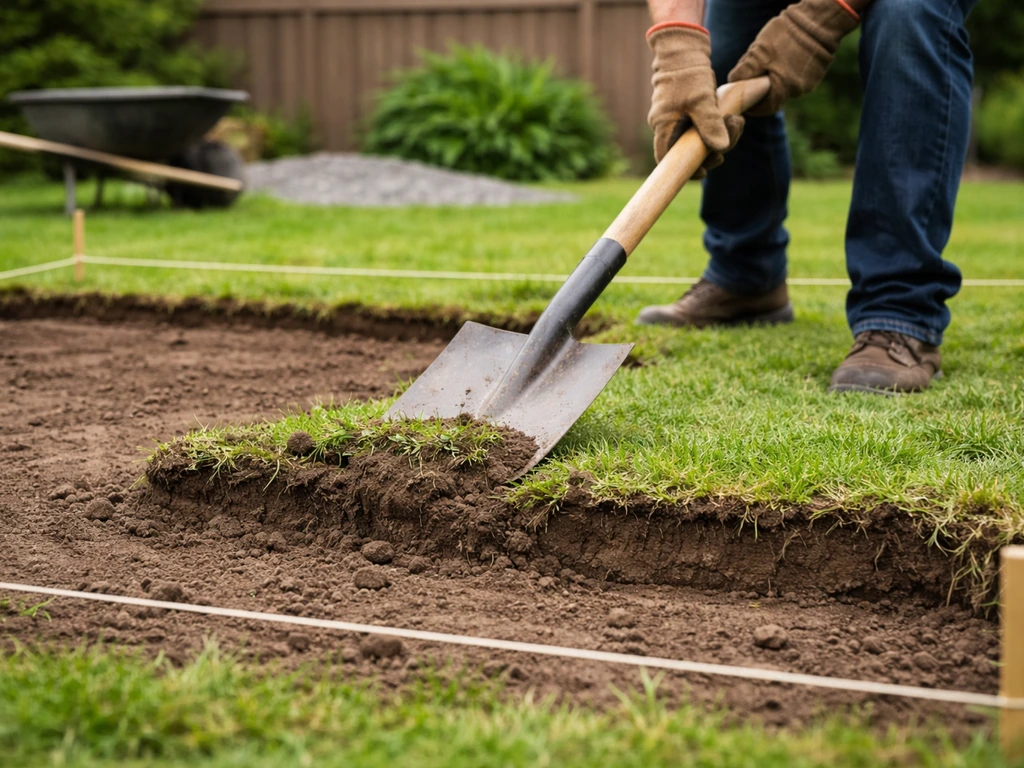
Excavate to the right depth
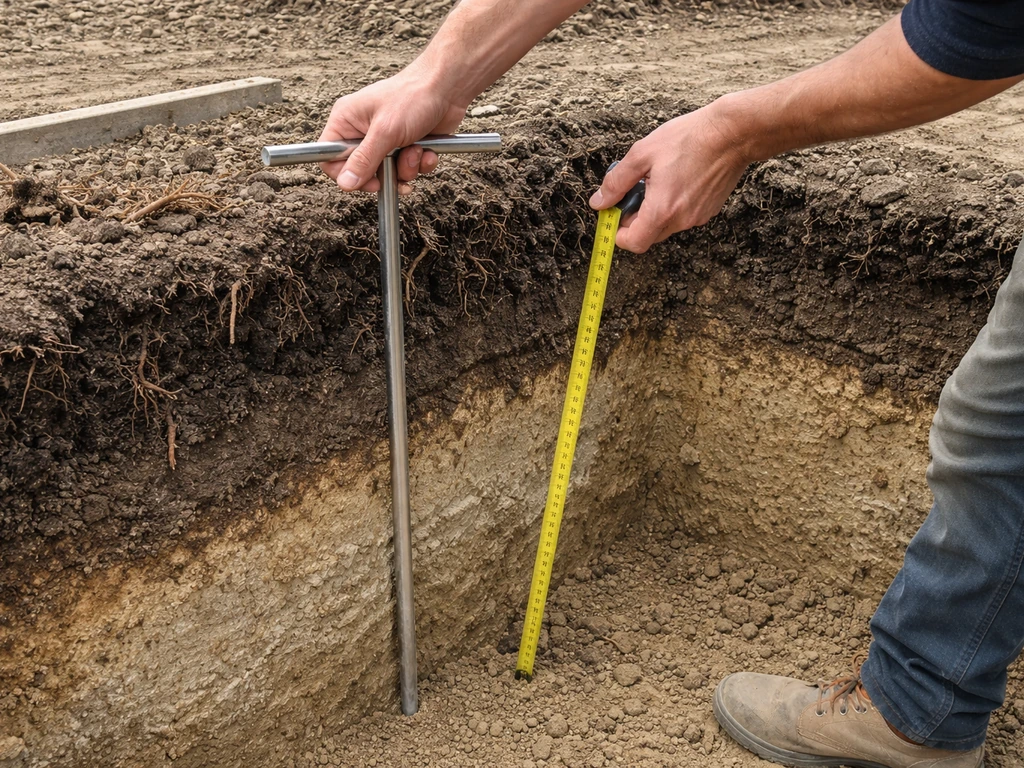
Remove all grass and topsoil. Topsoil is full of organic material that compresses and decomposes over time, which causes settling. You need to dig down to stable, undisturbed subgrade. For a paver or natural stone patio, that typically means excavating 7–9 inches below your finished surface height (6 inches of gravel base, 1 inch of bedding sand, plus the thickness of your pavers, usually 2.375 inches or 60mm for standard concrete pavers). For a poured concrete patio, you're excavating to allow for 4–6 inches of slab thickness and a 4-inch gravel base beneath it.
If you hit soft or spongy spots when you're digging, keep going until you find firm soil. Soft spots are often caused by old root systems or pockets of organic matter. Fill those spots back with compactable gravel, not dirt. Soil that isn't firm will cause your patio to sink unevenly no matter how good your base layer is.
Check your grading
After excavation, recheck your slope with a long level or laser. The slope you set in the string lines needs to carry through every layer all the way to the finished surface. A lot of people get this right at the start and then accidentally level out their gravel layer, losing the slope. Keep checking throughout the build.
Step 3: Choose your materials and tools
Each surface material has real tradeoffs in cost, durability, installation difficulty, and what happens when something goes wrong. Here's a direct comparison to help you pick.
| Material | Cost (installed DIY) | Skill Level | Repairability | Best For |
|---|---|---|---|---|
| Concrete pavers | $8–$20/sq ft | Beginner–Intermediate | Excellent (replace individual pieces) | Most DIYers, any yard size |
| Poured concrete | $6–$12/sq ft | Intermediate–Advanced | Difficult (patch or resurface) | Large flat areas, low-maintenance finish |
| Natural stone (flagstone) | $15–$30/sq ft | Intermediate | Good (reset individual stones) | Irregular, natural aesthetic |
For most DIYers, concrete pavers are the best starting point. They're forgiving, you can adjust individual pieces if something shifts, and you don't need to rent a concrete mixer or work against a curing clock. Poured concrete is cheaper per square foot in materials but harder to get right without experience, and cracking is nearly inevitable without proper joint placement. Natural flagstone looks great but fitting irregular pieces takes patience and a lot of cuts.
Tools you'll need
- Tape measure, stakes, and string line (layout)
- Line level or laser level
- Flat spade and square shovel (excavation)
- Wheelbarrow
- Plate compactor (rent this — do not skip it)
- Screed board and screed rails or pipes
- Rubber mallet
- Paver or masonry saw (rent if needed for cuts)
- Hand tamper (for tight spots the plate compactor can't reach)
- Long level (4-foot or longer)
- Push broom (for sweeping in joint sand)
- Safety glasses and gloves
Materials checklist
- Pavers, stone, or concrete (surface quantity plus 10% overage)
- Crushed stone or gravel aggregate for base (calculate cubic yards: length x width x 0.5 ft depth divided by 27)
- Coarse concrete sand for bedding layer
- Polymeric sand or regular joint sand for filling joints
- Plastic or aluminum paver edging with spikes
- Landscape fabric (optional, for weed suppression under base in some installs)
- Concrete sealer (optional but recommended for concrete slabs)
Step 4: Build the base and underlayment
A solid base is the whole game. Everything that goes wrong with patios, sinking, tilting, cracking, drainage problems, traces back to a bad base. This step is worth doing slowly and doing right.
Compact the subgrade
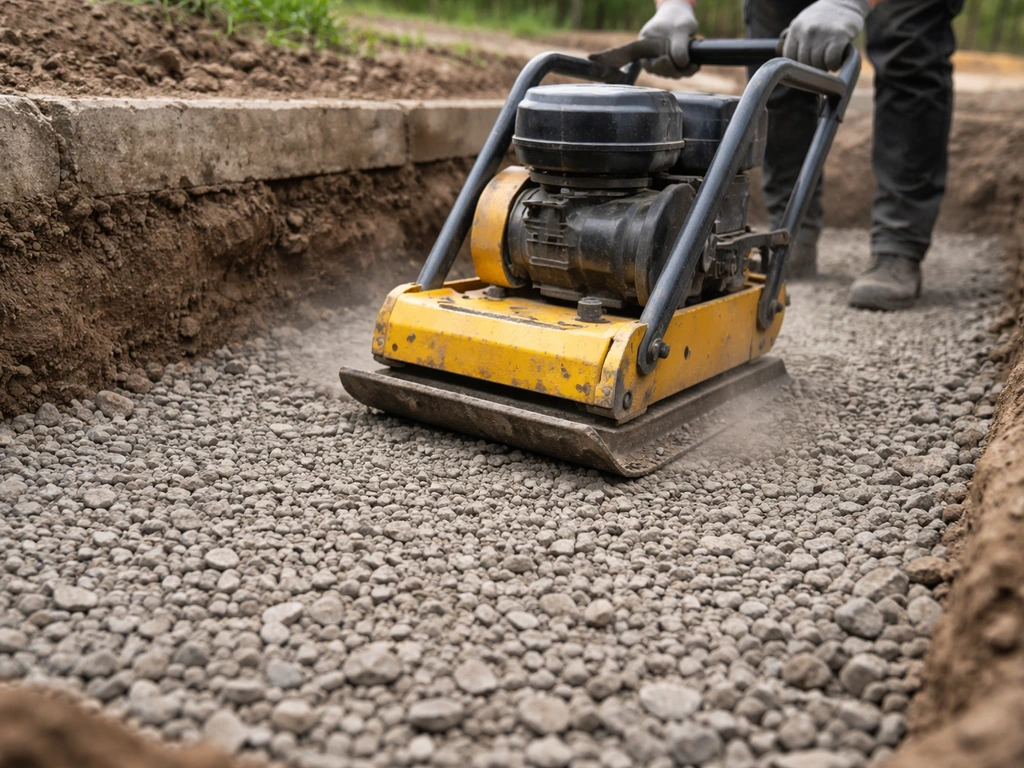
Before adding any gravel, compact the bare soil at the bottom of your excavation with the plate compactor. Make at least two passes in perpendicular directions. The target is a firm, stable surface that doesn't give underfoot. ICPI guidelines for pedestrian patio applications call for compacting the subgrade to at least 95% standard Proctor density, which in practical terms means the plate compactor leaves no wheel ruts and the soil feels hard when you walk on it.
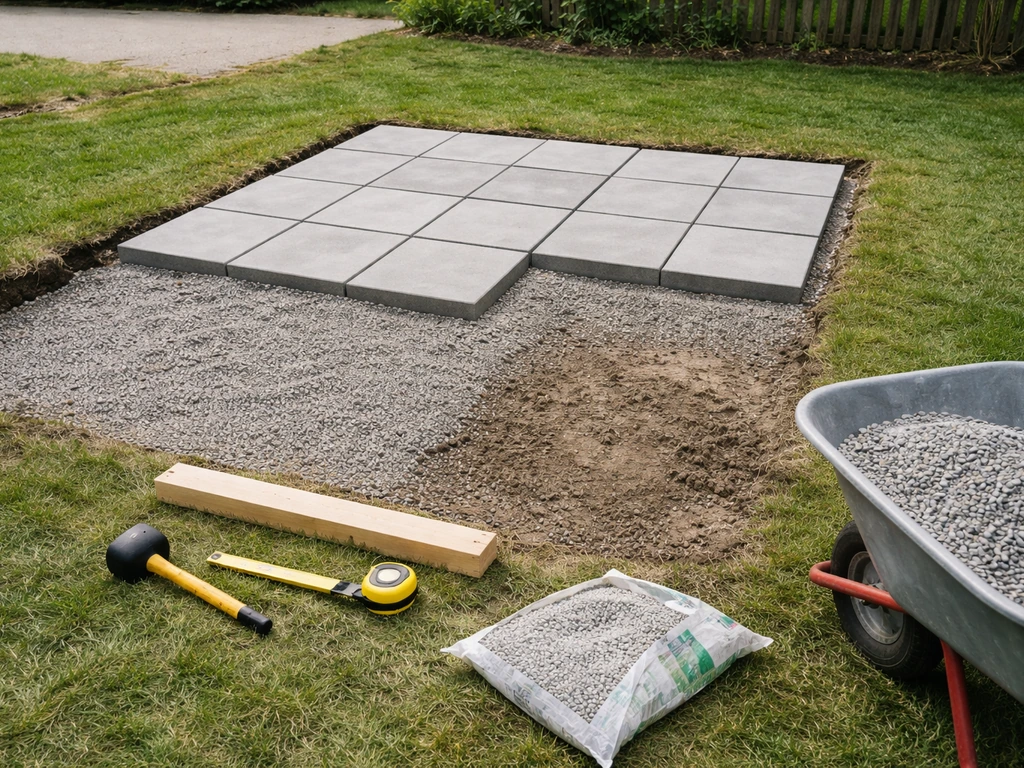
Add and compact the gravel base
Spread your crushed stone aggregate in 2–3 inch lifts. Do not dump the full 6 inches in at once, it won't compact evenly. Add a 2–3 inch layer, compact it thoroughly, then add the next layer and compact again. Extend the gravel about 8 inches beyond your perimeter string lines so the edges of your patio surface have support all the way to the boundary. Your finished, compacted gravel base should be 4–6 inches deep for pedestrian patio applications.
After compacting each lift, check that your slope is still tracking at 1/4 inch per foot away from the house. It's easy to lose the slope as you add material. Recheck with your level and string lines after every lift.
Screed the bedding sand layer (paver and stone installs)
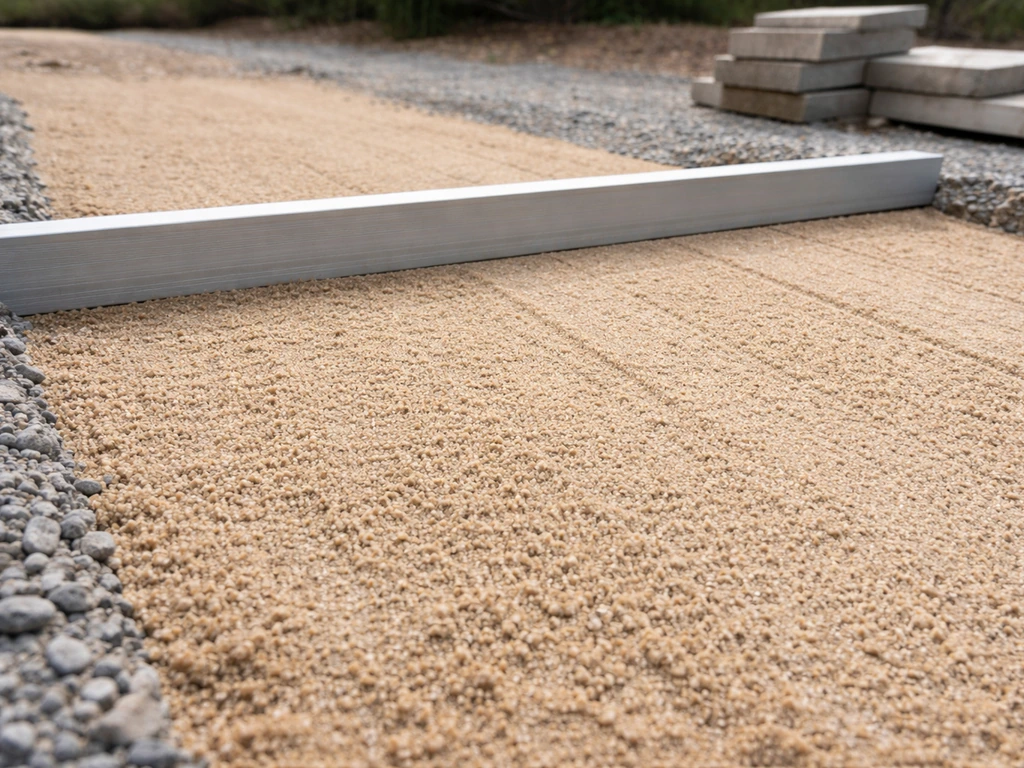
For paver and natural stone installs, you add a 1-inch layer of coarse sand on top of the compacted gravel. This bedding sand is not structural, it's there to give you a fine, adjustable surface to set pavers into. Lay two sections of 1-inch diameter pipe or conduit on the compacted gravel parallel to each other, separated by a few feet. Fill between them with sand, then drag a straight 2x4 screed board across the pipes to create a perfectly flat, 1-inch-deep sand layer. Pull the pipes out and fill those channels with sand by hand.
Only screed as much area as you can pave in a single session. If you screed too far ahead and have to walk on the sand to retrieve tools or haul materials, you'll disturb the surface. ICPI guidance specifically calls out protecting unfinished screeded bedding if the installation takes more than one day.
Step 5: Install edging and set the patio surface
Set your edging or forms first
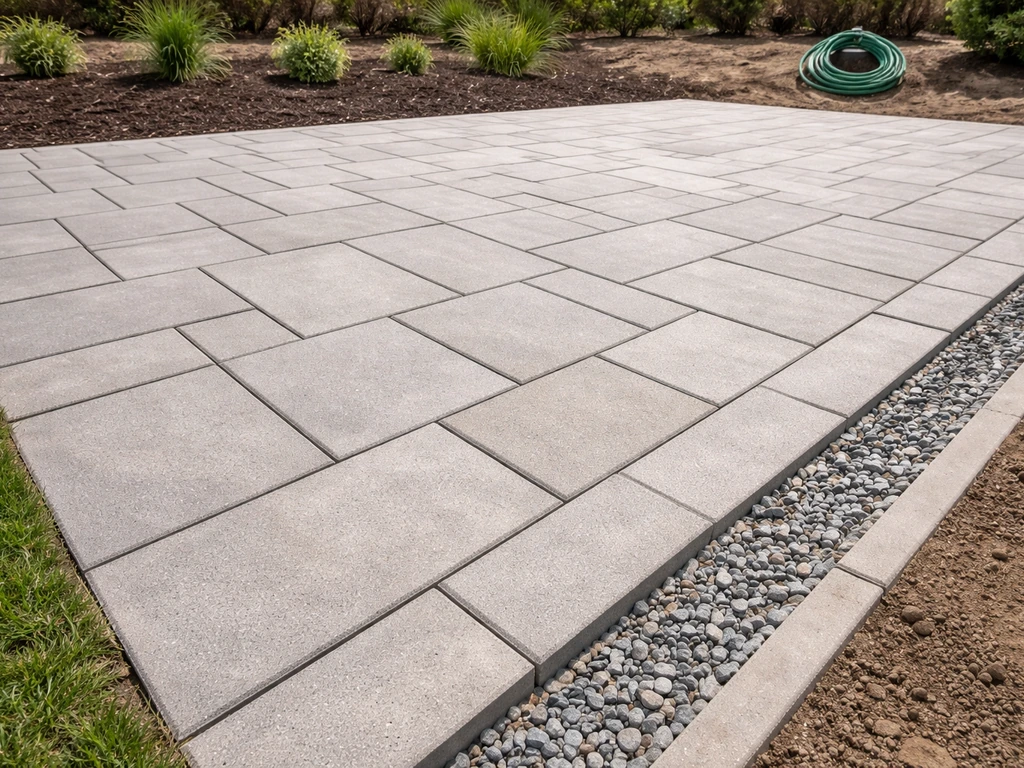
For paver patios, install your edging restraints along the perimeter before laying pavers. Plastic or aluminum paver edging stakes into the gravel base and holds the border of your patio from spreading outward over time. Without edging, pavers gradually migrate and you get gaps at the edges. Position the edging at the height of your finished surface and spike it securely into the base.
For poured concrete, build your wood or metal forms along the perimeter to contain the pour. The top of the forms is your finished slab height. Install any expansion joint material (foam backer strips) where the slab meets the house foundation, existing concrete, or other fixed structures. Set the top of the expansion joint material flush with the planned surface height of the pour.
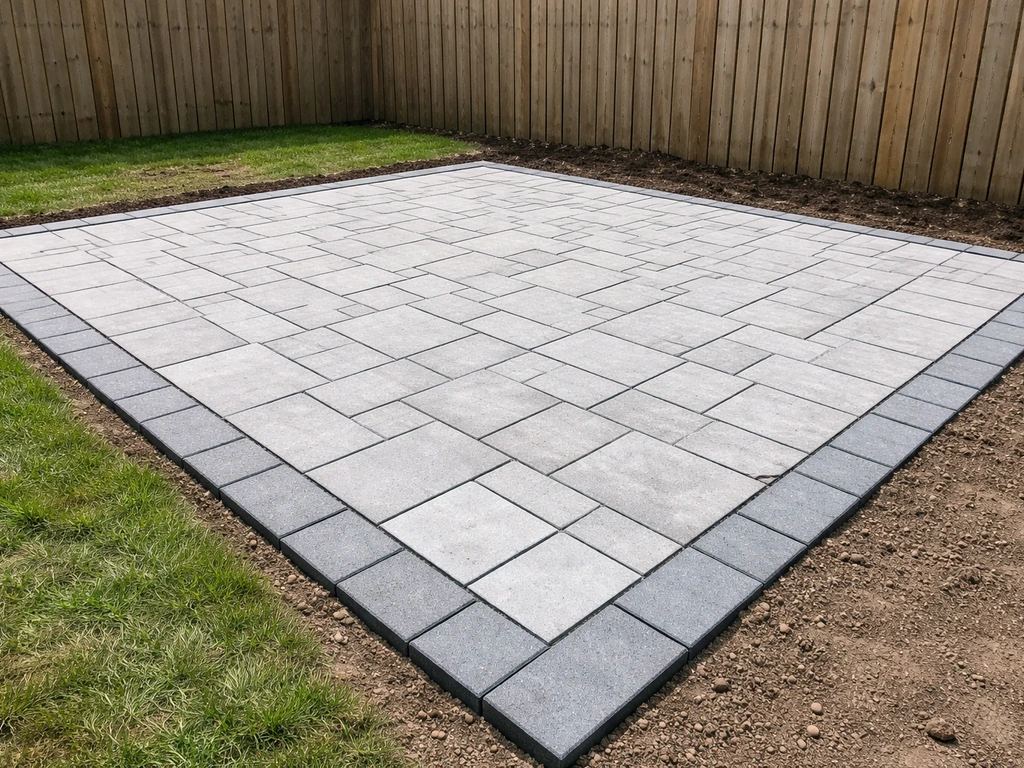
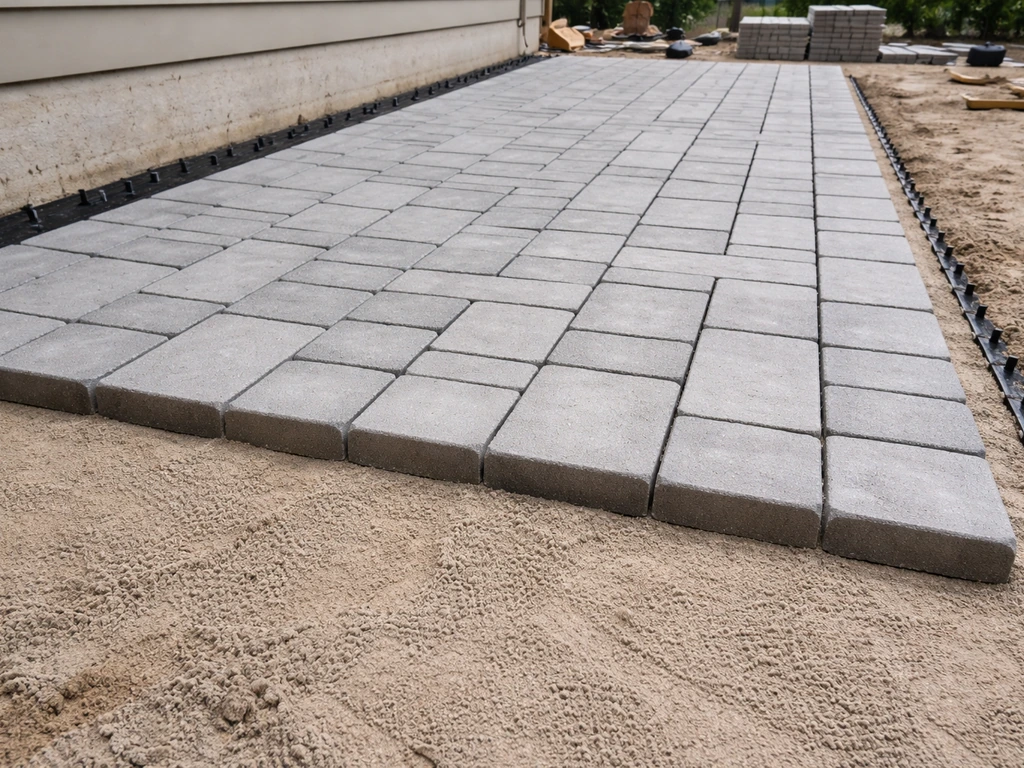
Lay the patio surface
For pavers, start at the corner nearest the house and work outward. Set each paver with a firm press straight down (don't slide them into place, as that disturbs the sand bed). Use a string line across the surface every few rows to keep your lines straight. Tap each paver lightly with a rubber mallet to set it firmly into the sand. Check level across pavers frequently, every 3–4 rows at minimum.
Lay out your pattern on paper before you start setting pavers so you know where cuts will fall. Unilock and other major manufacturers recommend measuring square footage from a diagram and planning the layout with string lines before cutting anything, which saves a lot of wasted material.
For poured concrete, pour and spread the concrete within the forms, screed it level with a 2x4 pulled across the form tops, then run a bull float across the surface to push aggregate down and bring cream to the top. This is time-sensitive work, concrete starts curing fast, especially in warm weather. If you're pouring more than about 50 square feet, seriously consider getting a few helpers.
Step 6: Leveling, cutting, joints, sand, and sealing
Cutting pavers and stone
Cut pavers last, after you've laid all the full pieces. Measure and mark each cut piece individually rather than assuming all border cuts are the same width, they rarely are. A rented paver saw or angle grinder with a diamond blade makes clean cuts. Always wear eye and ear protection when cutting. For natural flagstone, a chisel and hammer can score and split pieces along natural lines, which gives a more organic look than a saw cut.
Final leveling and compaction
Once all pavers are set, run the plate compactor over the entire surface to bed them firmly and evenly into the sand. Place a piece of plywood or a rubber pad on the compactor plate so you don't chip or crack the pavers. Do two passes in perpendicular directions. This step seats everything and reveals any pavers that are slightly high or low.
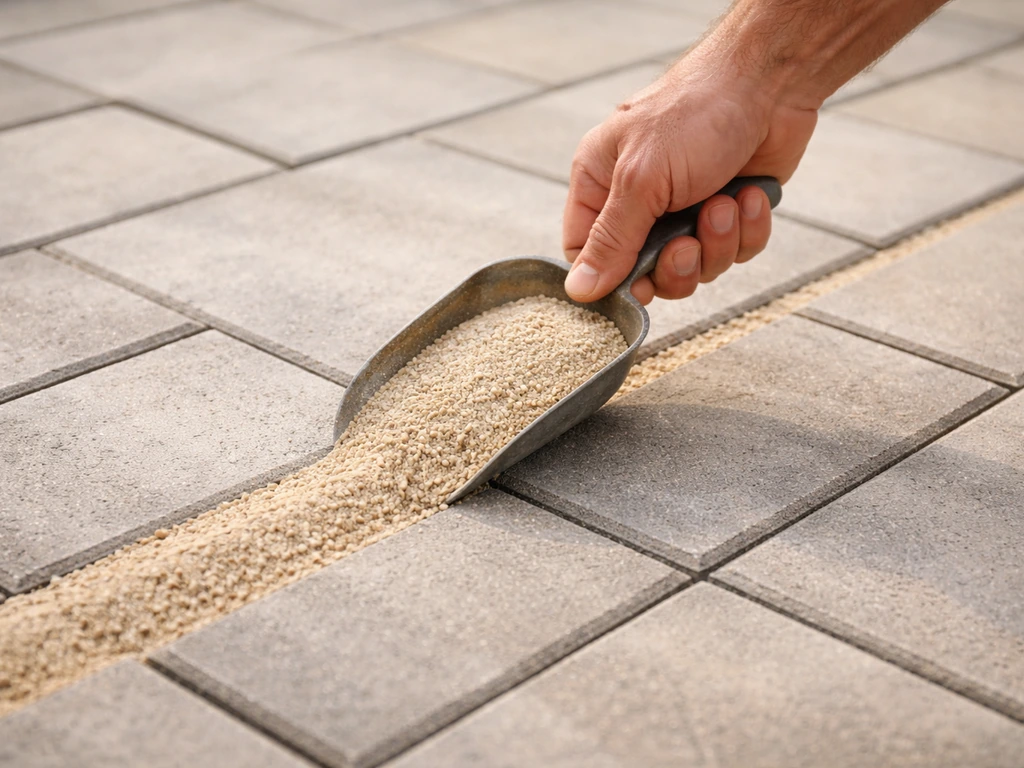
Fill joints with sand
Pour joint sand (or polymeric sand if you want a harder, weed-resistant joint) over the paver surface and sweep it across with a push broom, working it into every joint. Polymeric sand is worth the extra cost in most climates, it hardens when wet and significantly reduces weed intrusion and ant activity. Fill joints to their full designed depth. Compact again lightly, add more sand, sweep, and repeat until joints are packed full. For polymeric sand, follow the manufacturer's activation instructions, which usually involve a light misting to trigger the binding agent.
Control joints for concrete slabs
If you poured concrete, you need to cut control joints into the slab to control where cracking happens (concrete will crack, the goal is to control where). Use a concrete saw to cut joints to about 1/3 of the slab's total thickness. So for a 4-inch slab, cut 1.25–1.5 inches deep. Space joints roughly every 8–10 feet, or every 2–3 times the slab thickness in feet. Cut them within 6–24 hours of pouring, before random cracking starts.
Sealing
Sealing is optional for pavers but highly recommended for poured concrete. Wait at least 28 days after a concrete pour before applying sealer so the slab has fully cured. For pavers, a wet-look or natural sealer protects against stains and helps lock in polymeric sand. Apply sealer in mild temperatures (not below 50°F or above 90°F) and avoid sealing if rain is forecast within 24 hours.
Common mistakes and how to troubleshoot them
Almost every patio problem can be traced to one of the same handful of mistakes. Here's what goes wrong most often and what to do about it.
| Problem | Likely Cause | Fix |
|---|---|---|
| Pavers sinking in spots | Insufficient base compaction or topsoil left in place | Pull up sinking pavers, add and compact more base material, relay |
| Water pooling on surface | Slope insufficient or slopes toward house | Relay affected section with corrected slope; recheck every 2 feet with a level |
| Pavers shifting or spreading at edges | No edge restraint installed, or restraint not spiked deep enough | Install or re-spike paver edging all along the perimeter |
| Cracking in concrete slab | Control joints missing or spaced too far apart; shrinkage cracking from drying too fast | Saw-cut control joints within 24 hours of pour; use curing compound to slow drying |
| Uneven surface after compaction | Pavers set at slightly different heights in bedding sand | Pull high or low pavers, adjust sand depth by hand, relay and recheck |
| Joint sand washing out | Regular sand used instead of polymeric; no final compaction pass | Remove surface sand, sweep in polymeric sand, compact and activate per instructions |
| Gap or heave near house foundation | No expansion joint installed; frost heave in freeze-thaw climates | Install closed-cell foam expansion joint between house and slab; allow a 1/2-inch gap minimum |
The most common mistake by far is not spending enough time on the base. It's tempting to rush through excavation and compaction to get to the part where the patio actually looks like something, but every hour you invest in a solid, well-compacted, properly sloped base pays back tenfold in a surface that stays flat for years. If you want the full step-by-step, see our guide on how to make a base for a patio solid, well-compacted, properly sloped base. The finishing steps (which are the fun part) go much faster and easier when the foundation is solid.
Before you call it done: a final checklist
Run through these checks before you move any furniture out and declare the project finished.
- Slope check: place a level with a known slope reference across the surface in multiple spots. Confirm you have at least 1/4 inch per foot dropping away from the house.
- Square check: measure diagonally from corner to corner both ways. If the two measurements match, the patio is square.
- Level check: lay a 4-foot level across rows of pavers in multiple directions. No paver should rock or sit more than 1/8 inch above or below its neighbor.
- Edge check: walk the perimeter and confirm edging is flush with the surface and fully spiked down.
- Joint check: all joints should be filled to full depth with no voids. No individual paver should rock when you press a corner.
- Drainage check: pour a bucket of water near the house-side edge and watch it flow toward the outer edge. If it pools anywhere on the surface, that spot needs correction.
Building a patio is one of the most satisfying DIY projects a homeowner can tackle because the results are immediate, tangible, and built to last. If you want to improve your results even further, review these tips for building a patio before you start. The process covers related challenges many builders want to dig deeper on: getting the base depth exactly right, choosing the best overall method for your situation, and nailing the finer points of a clean, professional-looking finish. The process covers related challenges many builders want to dig deeper on: getting the base depth exactly right, choosing the best overall method for your situation, and nailing the finer points of a clean, professional-looking finish best way to build a patio. If you're still deciding between concrete pavers, poured concrete, or natural stone, this guide on how to construct a patio can help you pick the right approach and materials choosing the best overall method. If any of those sub-topics are relevant to your project, there's more detailed guidance available to help you go deeper on each one.
FAQ
How low should my patio be compared to a door threshold or steps?
For patios, you typically want a finished surface that sits below thresholds by keeping the planned drop from the house and maintaining the specified total buildup (base plus sand plus paver thickness, or slab plus gravel base). Measure from a doorway or step down to your target finished height before digging, then add the full layer thicknesses back into your excavation depth plan.
What should I do if I find tree roots or organic pockets during excavation?
If you have trees nearby, plan for root pruning and removal before excavation, and line the perimeter edges where pavers or stone meet soil with edging restraints so pieces cannot migrate. Also keep the gravel base uncompromised, if you hit roots and only partially clear them, you can create future soft spots under the slab.
Do I need the patio to be level or sloped, and how do I keep the slope through every layer?
Not necessarily. Your drainage slope should start at the house side and fall away, but the base and each layer must preserve that same slope. A common mistake is to level the gravel or sand “to look flat,” which reduces the grade even if your strings were correct initially.
How do I handle interrupted workdays without ruining the bedding sand surface?
Start from a dry run. Set your tools and material staging so you can screed and pave in one continuous block, then stop the process cleanly at the end of the day. If you cannot complete the bedding sand installation in one sitting, protect the screeded sand from being walked on, disturbed, or watered.
How can I tell if my paver joints are filled correctly (and won’t wash out)?
For pavers, avoid using joint sand that is not designed for patio joints, and never overfill joints right away. Compact lightly after the first sweep, then add more sand in cycles until joints reach the designed depth, and keep the area dry until polymeric sand has been activated and bonded properly.
Can I use polymeric sand in any climate or on any paver type?
Yes, but only if the product and subgrade conditions are appropriate. Polymerized sand needs joint depth and surface temperature conditions to activate and cure, and it can be a poor choice if you regularly have heavy runoff that washes joints before activation. If you choose polymeric, follow the manufacturer’s misting and timing instructions exactly.
Where should I place control joints in a patio, especially near corners and the house?
Control joints for poured concrete should align with your slab’s geometry, include any changes in direction, and be cut at the depth percentage appropriate for your slab thickness. If your patio borders fixed structures or steps, plan joints and expansion locations there too, otherwise cracks often follow the nearest restraint.
What’s the best way to troubleshoot a sinking or rocking paver later on?
For pavers, a typical maintenance cue is to check for rocking or gaps after the first wet season. If you notice uneven movement, remove the affected pavers, fix any localized soft base by excavating back to stable material, then rebuild the gravel and sand layers before resetting.
Do I really need paver edging, and what happens if I skip it?
Edging determines how the edges behave under loading and freeze-thaw. If you install edging too low or too loose, you will eventually get edge gaps or outward spreading even with a good base. Set edging to match the planned finished surface height, and spike it securely into the base.
Can I park on or frequently drag heavy items across my patio, and do I need a different build?
Choose a thickness and buildup based on expected use. Pedestrian patios generally use the standard base depth discussed in the guide, but if you plan to roll a grill, move heavy furniture frequently, or drive over the slab, you may need a stronger design with deeper or reinforced base and a different concrete thickness.
What are the most important concrete curing and early protection steps for a DIY patio?
For poured concrete, protect the fresh slab from rapid drying and temperature extremes, and consider using a curing compound or wet curing method if conditions are dry or windy. Always plan to cut control joints quickly, because late cutting can lead to more random cracking.