You can build a patio yourself in a weekend or two by following a straightforward sequence: plan the layout, pick your material, excavate and compact a solid base, lay the surface, and lock everything in place. The biggest mistakes people make are skipping proper base depth, ignoring drainage slope, and rushing through compaction. Nail those three things and your patio will stay flat, firm, and water-free for years.
How to Make a Patio: Step-by-Step DIY Guide

Nolan Carver
29 Apr 2026
Start with planning and measurements
Before you touch a shovel, call 811. This is the free national utility-locating service, and it's not optional. They'll send someone out to mark underground gas, water, and electrical lines so you don't accidentally hit one during excavation. It usually takes a few business days, so make this your very first step.
Once utilities are marked, walk your yard and pick the site. You want level or gently sloping ground, ideally within easy reach of a back door, and with enough sun or shade for how you plan to use the space. Avoid spots that already collect standing water after rain, those areas need serious drainage work before a patio makes sense.
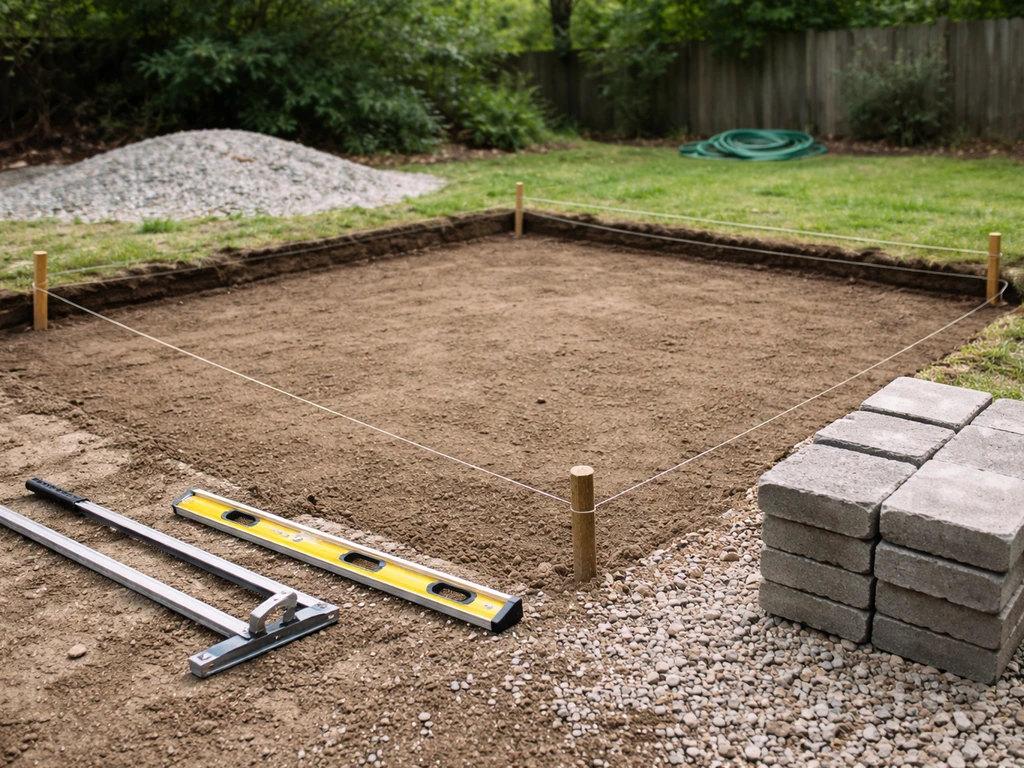
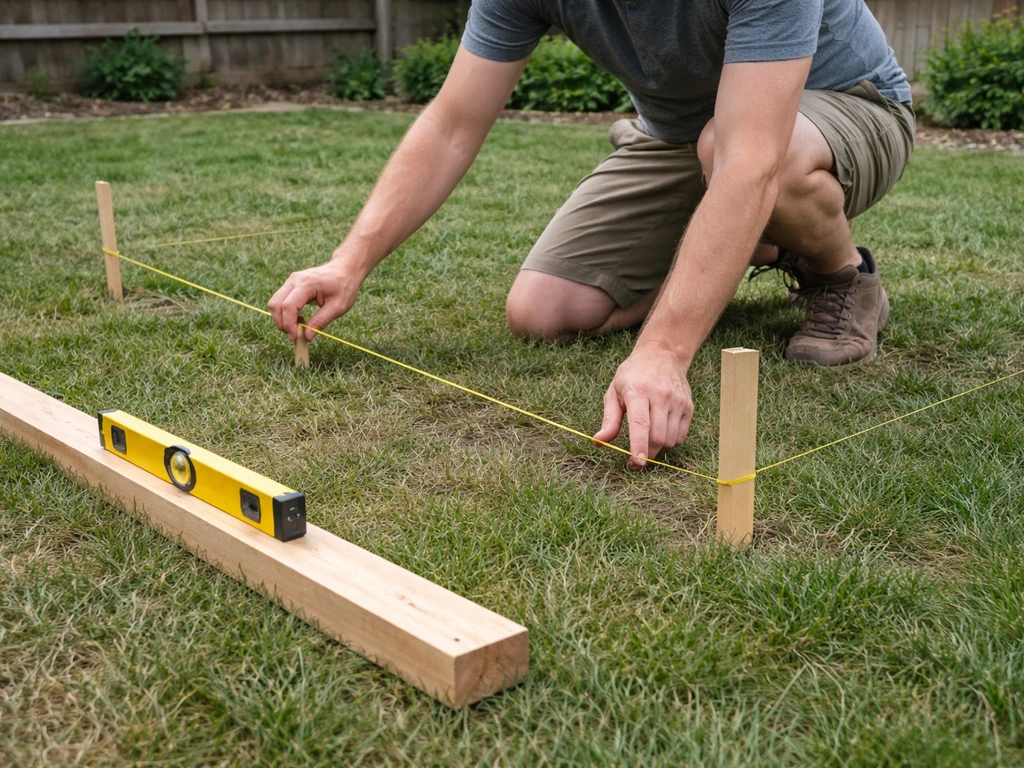
Measure the space carefully. Grab a tape measure, some wooden stakes, and mason's line to outline the shape. For a rectangle or square, use the 3-4-5 triangle method to confirm your corners are actually 90 degrees: measure 3 feet along one side, 4 feet along the adjacent side, and if the diagonal between those two points is exactly 5 feet, the corner is square. For irregular or curved shapes, sketch the outline on graph paper first. A typical starter patio is around 10x12 or 12x16 feet, which gives enough room for a table and chairs without being overwhelming to build.
Slope is a planning decision, not an afterthought. A flat patio with zero slope traps water, causes freeze-thaw damage in colder climates, and can redirect water toward your foundation. The standard rule is a 1/8-inch drop per foot away from any structure. So a 10-foot-wide patio should drop about 1.25 inches from the house edge to the outer edge. Use stakes and string set level to measure your existing ground slope: drive a stake near the house and one at the outer edge of the planned patio, tie a string level between them, then measure how far the string is above the ground at each point. That tells you how much grading you need to do.
Choose your patio style and materials
The material you pick drives everything else: the base depth, the tools you need, the cost, and how forgiving the project is for a first-timer. Here are the four most common DIY options.
| Material | Skill Level | Approx. Cost (per sq ft) | Durability | Best For |
|---|---|---|---|---|
| Concrete pavers | Beginner-friendly | $8–$20 | Excellent | Most DIYers, any style |
| Natural stone (flagstone) | Intermediate | $15–$30 | Excellent | Rustic or organic looks |
| Poured concrete | Intermediate–Advanced | $6–$12 | Excellent | Clean modern look, large patios |
| Gravel/decomposed granite | Beginner | $2–$6 | Moderate | Budget builds, informal spaces |
For most first-time builders, concrete pavers are the sweet spot. They're forgiving because you can pull and reset individual pieces if something's off, they come in consistent thickness (usually 2 3/8 inches for standard pavers or 3 1/8 inches for heavy-duty), and they look great with minimal finishing work. Poured concrete gives a clean, seamless look but requires mixing, forming, and finishing skills, plus control joints for anything larger than 10x10 feet to prevent cracking. Gravel is the fastest and cheapest path if you want a simple, low-key outdoor area and don't mind occasional raking. Flagstone is beautiful but irregular thickness means more fussing during leveling.
If budget is your main constraint, you have real options. Gravel patios can cost under $500 for a modest space, and mixing paver styles or using basic concrete pavers instead of premium tumbled stone can cut material costs by 40% or more. There are full guides on making an inexpensive patio and building a patio on a budget elsewhere on this site if you want to dig deeper into cost-saving strategies.
There are full guides on making an inexpensive patio and building a patio on a budget elsewhere on this site if you want to dig deeper into cost-saving strategies. If you want more step-by-step help, this guide on how to build a patio on a budget walks through the key cost-saving choices.
Gather your tools and supplies
Having everything on-site before you start saves a ton of time. Nothing stalls a project faster than a mid-excavation run to the hardware store.
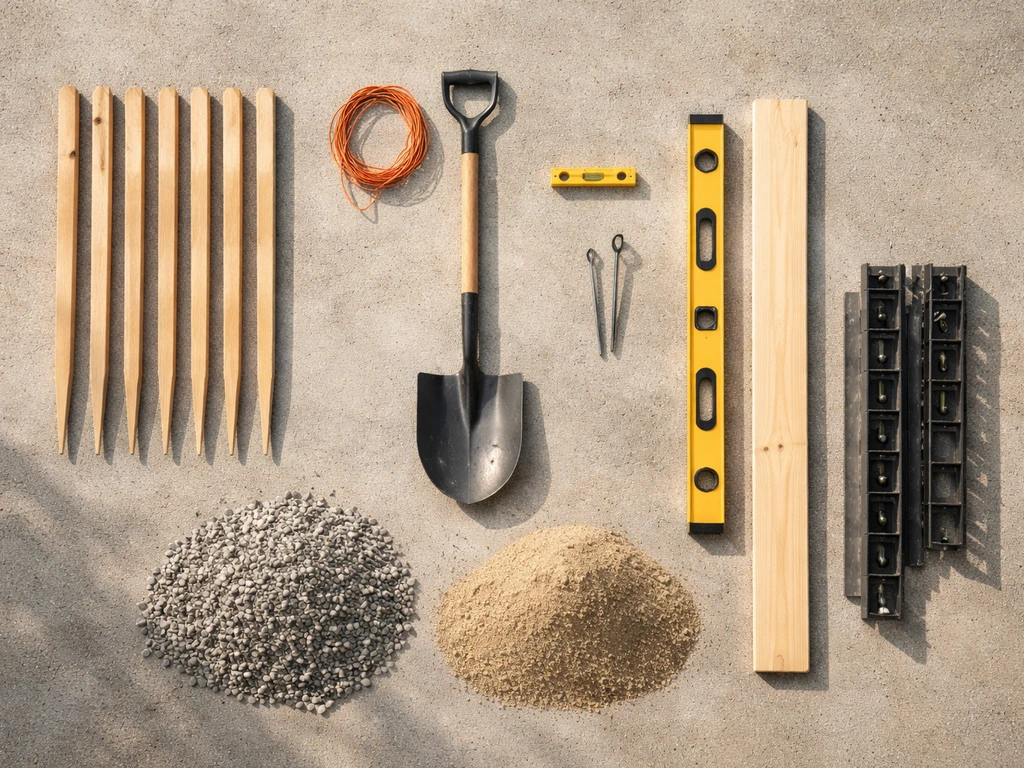
- Measuring tape, wooden stakes, and mason's line (for layout)
- Line level or a standard level and straight board
- Shovel (flat spade for edging, round for bulk digging)
- Plate compactor (rent one for $50–$80/day — this is non-negotiable for a stable base)
- Hand tamper (for tight corners the plate compactor can't reach)
- Rubber mallet
- Paver/masonry saw or angle grinder with diamond blade (for cutting pavers to fit edges)
- Screed pipes or 1-inch conduit (for leveling the sand layer)
- Bull float or screed board
- Broom and leaf blower
- Wheelbarrow
- Safety glasses, work gloves, and ear protection for cutting
For materials, you'll need: crushed gravel or crushed stone for the base (3/4-inch clean crushed stone is ideal), coarse sand or stone dust for the setting bed, your chosen patio surface material, edge restraints (plastic or metal paver edging), galvanized spikes to secure the edging, and polymeric sand for filling joints between pavers. If you're using a weed barrier, get a commercial-grade landscape fabric, not the thin garden-center stuff.
Excavate, grade, and prep the base
With your layout marked using stakes and string, start digging. For a concrete paver patio, you need to excavate deep enough to fit: 4–6 inches of compacted gravel base, 1 inch of sand setting bed, and the paver thickness (typically 2 3/8 to 3 1/8 inches). That works out to roughly 7.5 to 10 inches total depth below your finished surface height. Mark that depth on your stakes so you're not guessing as you dig.
As you excavate, remove all organic material, roots, and soft soil. Don't leave any sod or topsoil in the excavated area, organic material compresses and decomposes over time, which causes settling. If you hit a soft or spongy spot in the subgrade, dig out an extra few inches and fill it with gravel before compacting.
Grade the base as you go. Your finished excavation should already slope 1/8 inch per foot away from the house. Use your string lines as a reference and check with a level frequently. It's much easier to fix the grade now than after you've laid the gravel base. Once the excavation looks right, run the plate compactor over the exposed soil in overlapping passes until it feels firm underfoot and doesn't shift when you step on it.
Build the subbase and drainage layer correctly
This is the most important part of the whole project. A bad surface can be fixed later. A bad base means the entire patio shifts, cracks, or settles unevenly, and there's no easy fix for that.
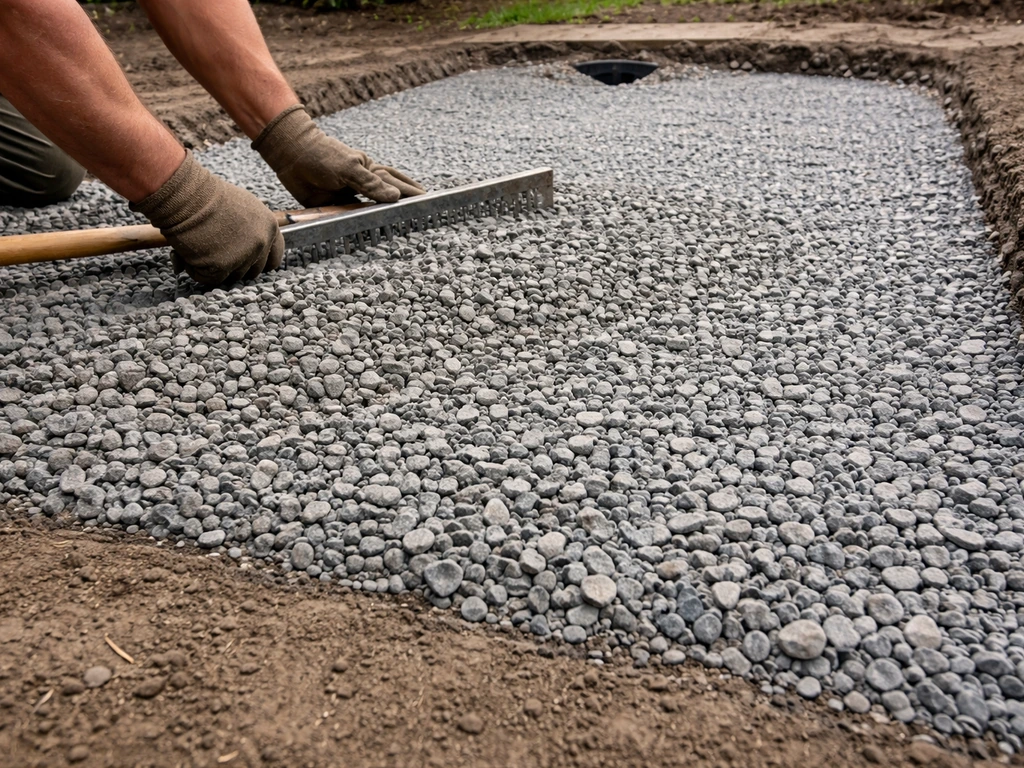
Spread your first 2–3 inches of 3/4-inch crushed stone (also sold as road base or Class II base) over the compacted subgrade. Rake it roughly level, then run the plate compactor over it in two directions (lengthwise and widthwise) for complete coverage. Then add the remaining crushed stone to reach your target depth of 4 inches for a standard residential patio or 6 inches if you have soft soil or live in a freeze-thaw climate. Compact again. The compacted base should be tight, gritty, and not shift when you stand on it.
Whether to use a weed barrier depends on your setup. Landscape fabric placed on top of the compacted gravel base (under the sand layer) helps suppress weeds without interfering with drainage. Don't put it below the gravel, it traps water. Cut it to fit and overlap seams by at least 6 inches.
On top of the compacted gravel, spread 1 inch of coarse sand or stone dust as your setting bed. Use two 1-inch-diameter pipes or conduit as screed guides: lay them parallel across the surface, pour sand between them, and drag a straight 2x4 board across the pipes to create a perfectly even, 1-inch-thick sand layer. Pull the pipes out carefully and fill those channels with sand. Do not compact the sand layer before laying pavers, it needs to stay loose and workable so you can make small adjustments as you set each piece.
Install and level the patio surface
Start laying pavers from a corner or a straight edge, typically at the house or a door threshold, and work outward. Set each paver gently onto the sand without sliding it, sliding disrupts your screeded surface. Press it down firmly and check it with a level both side-to-side and front-to-back. Use a rubber mallet to tap it down if it's high; add a small pinch of sand underneath if it's low.
Keep consistent spacing between pavers, usually 1/8 to 1/4 inch for a tight joint that gets filled with polymeric sand. Use plastic paver spacers if you want perfectly even gaps. Check the overall surface level every few rows by laying a long straightedge across multiple pavers. Small corrections are easy when you're in the middle of the job; they're a pain if you catch them after everything is set.
When you reach the edges, measure and cut pavers to fit using a paver saw or angle grinder with a diamond blade. Wear eye protection and a dust mask, paver cutting produces fine silica dust. For curves, score the cut line first, then make the full cut.
Install edge restraints along all open sides of the patio (sides not bordered by a wall or structure). These plastic or metal edging pieces are spiked into the ground every 12 inches and prevent the entire patio from slowly spreading outward over time. Set them tight against the last row of pavers, make sure they follow the correct slope, and drive the spikes through the pre-drilled holes until flush. Edge restraints are one of those things that look optional until your patio starts shifting after the first winter.
Locking in the surface with polymeric sand
Once all pavers are set and edge restraints are installed, pour polymeric sand over the surface and sweep it into the joints with a stiff broom. Make sure the joints are filled all the way to the top. Then run the plate compactor over the entire patio one final time to seat the pavers firmly and work the sand down into the joints. Add more sand if the joints look low after compacting, then compact once more.
Finish by lightly misting the surface with water to activate the polymer binders in the sand, which harden and lock the joints so weeds and ants can't easily move in. Pavestone’s PolySand instructions say to lightly mist the surface with water to activate the polymer binders and that the sand cures within about 24 to 36 hours depending on conditions lightly misting the surface with water to activate the polymer binders.
Let it cure for 24 hours before heavy use.
Finishing touches, cleanup, and basic maintenance
Once the polymeric sand has cured, sweep away any residue and give the surface a good rinse. Check that water is running toward the outer edge and not pooling anywhere. Walk the whole patio and press on any pavers that feel loose or rocking, those need to come up, get a little sand adjusted underneath, and get reset.
For the first month or so, keep an eye on the joints. Some polymeric sand settles and you may need to add a second thin layer and re-mist it. This is totally normal, especially in patios with wider joints or high foot traffic areas.
Long-term maintenance is pretty low-effort. Sweep the patio regularly to prevent organic debris from breaking down in the joints and feeding weeds. Re-apply polymeric sand every 3–5 years or whenever joints look worn and hollow. If you live somewhere with hard winters, avoid metal shovels and harsh chemical ice melters directly on the paver surface, they scratch and stain. Use a plastic shovel and sand or calcium chloride instead of rock salt.
If you notice a section sinking or shifting, the fix is usually straightforward: pull up the affected pavers, add or regrade the sand, and reset. Because the pavers aren't mortared, individual repairs don't require demolition. That's one of the biggest advantages of a paver patio over poured concrete.
Your action plan for today
- Call 811 now to schedule utility marking before anything else.
- Sketch your patio layout on paper with dimensions and check your slope with a string line and level.
- Decide on your material (pavers are the best starting point for most DIYers).
- Calculate how much base gravel, sand, pavers, and edging you need based on your square footage.
- Rent a plate compactor for the weekend you plan to dig and lay.
- Buy or gather all tools before starting excavation so you don't lose momentum mid-project.
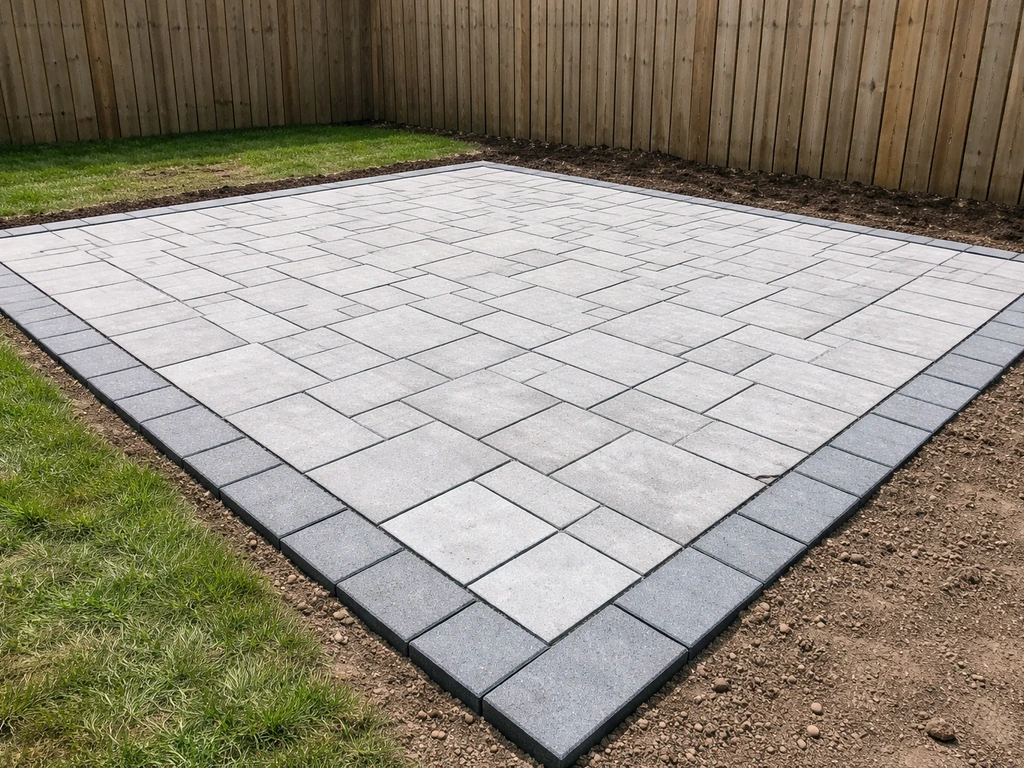
Building a patio yourself is genuinely one of the most satisfying outdoor projects you can take on. It's physical work, but none of the individual steps are complicated once you understand why each one matters. Get the base right, maintain your slope, and don't skip the edge restraints, do those three things and you'll end up with a patio that looks like a pro installed it. If you want to take it further, you can also learn how to make patio pond designs that work with the same base and drainage principles.
FAQ
How much slope do I really need, and how do I measure it accurately during grading?
Plan for 1/8 inch drop per foot away from the house, but measure from a fixed reference (string line tied to stakes). Don’t rely on eyesight or a single level check, re-measure at multiple points along the outer edge so the entire patio drains consistently, not just one corner.
Do I need a weed barrier, and what’s the common mistake to avoid?
You can use landscape fabric on top of the compacted gravel and under the sand, as long as it’s commercial-grade. The common mistake is placing fabric below the gravel, which can trap water and increase freeze-thaw stress or make the base harder to keep dry.
Can I install pavers directly on sand or patio blocks if I want to make it faster?
For most DIY builds, no. Pavers on sand alone typically move, because they lack a compacted crushed-stone base that distributes load. If you’re tempted to reduce excavation, aim to keep the full base-and-sand profile (and compact it), otherwise settling and rocking pavers are likely.
What happens if I skip compaction or don’t compact enough between layers?
If the subgrade or gravel isn’t compacted, the patio can settle unevenly even if the pavers look level at first. A quick field check is pressing your weight in different spots after compaction, the surface should feel firm and not shift or pump.
How deep should I excavate if my pavers are a different thickness than the typical 2 3/8 to 3 1/8 inches?
Use the same layering logic: compacted gravel base depth (often 4 inches for normal conditions), plus a 1-inch setting bed, plus your actual paver thickness. Then total that depth below your finished patio height, mark it on stakes, and excavate to that line.
Should I compact the sand setting layer before laying pavers?
No. Keep the sand loose and workable so you can fine-tune each paver as you place it. Compaction of the sand layer reduces adjustability and can lock in small height errors, leading to lippage or dips that are difficult to correct later.
How do I cut pavers safely and avoid ruining the joint spacing on edges?
Dry-fit your edge layout first so you minimize tiny slivers. Use a paver saw or diamond blade with eye protection and a dust mask, then re-check spacing after cutting because cut edges can shift slightly when tapped into place.
What if my patio area has standing water after rain, can I still build pavers there?
You can build it, but you should treat it as a drainage problem first. If water pools, correct the site grading and consider increasing base depth or addressing the slope before you lay pavers, otherwise trapped water will stress the base and joints.
Is polymeric sand required, and can I replace it with regular sand?
Polymeric sand is strongly recommended for locking pavers and reducing weed growth. Regular sand washes out and lets joints loosen, which increases movement over freeze-thaw cycles; if you use regular sand anyway, plan for more frequent joint maintenance.
How do I know I activated the polymeric sand correctly without over-wetting?
Mist lightly after sweeping the sand into joints, the goal is to activate binders, not soak the pavers. If you flood the surface, you can weaken the joint fill before it cures, leaving joints hollow or sandy later.
How long should I wait before using the patio after compacting and misting?
Let it cure for about 24 hours before heavy use. If rain is forecast during curing, protect the surface so water doesn’t wash polymeric sand out of joints or interrupt the hardening process.
What should I do if a few pavers are rocking after the final compaction?
Mark the affected spots and lift the pavers, then adjust the sand underneath and reset them. Don’t just tap them harder, rocking usually indicates a local high or low area in the setting bed that needs correction.
How do I maintain the joints without damaging pavers in winter?
Sweep debris before it breaks down in joints, and reapply polymeric sand when joints look worn or hollow (often every few years). Avoid metal shovels and aggressive ice melters on the paver surface because they can scratch and stain; use plastic shovels and sand or a less damaging alternative like calcium chloride.
If a section sinks, is the only fix jackhammering and redoing everything?
Usually no. Because pavers are not mortared, localized repairs typically involve lifting the affected pavers, adding or regrading the sand and base as needed, then resetting the stones and topping up joints with polymeric sand.
Do I need to plan for borders or stairs, or can the patio be open at all sides?
You should install edge restraints on any open sides, not just at the ends. Without restraints the patio can gradually spread outward, and even a well-built base can shift if the perimeter isn’t held tight to the correct slope.