You can absolutely build a fire pit patio yourself, even as a beginner, as long as you nail three things: a solid compacted base that won't settle, proper clearances from structures and property lines, and a fire pit interior that's lined with heat-resistant material. Skip any one of those and you'll end up with cracked pavers, a smoking fire too close to your fence, or a fire pit that starts spalling and crumbling after a season.
Do It Yourself Fire Pit Patio: Step-by-Step Guide

Nolan Carver
5 May 2026
Do them right and you've got a patio and fire feature that will last for decades. If you want to double-check the layout and build approach after locking in these fundamentals, see our guide on how to build fire pit patio for more step-by-step planning. If you want the full DIY process, follow a step-by-step patio fire pit plan from layout and site prep through lining, assembly, and finishing touches.
Choose the right DIY fire pit patio layout
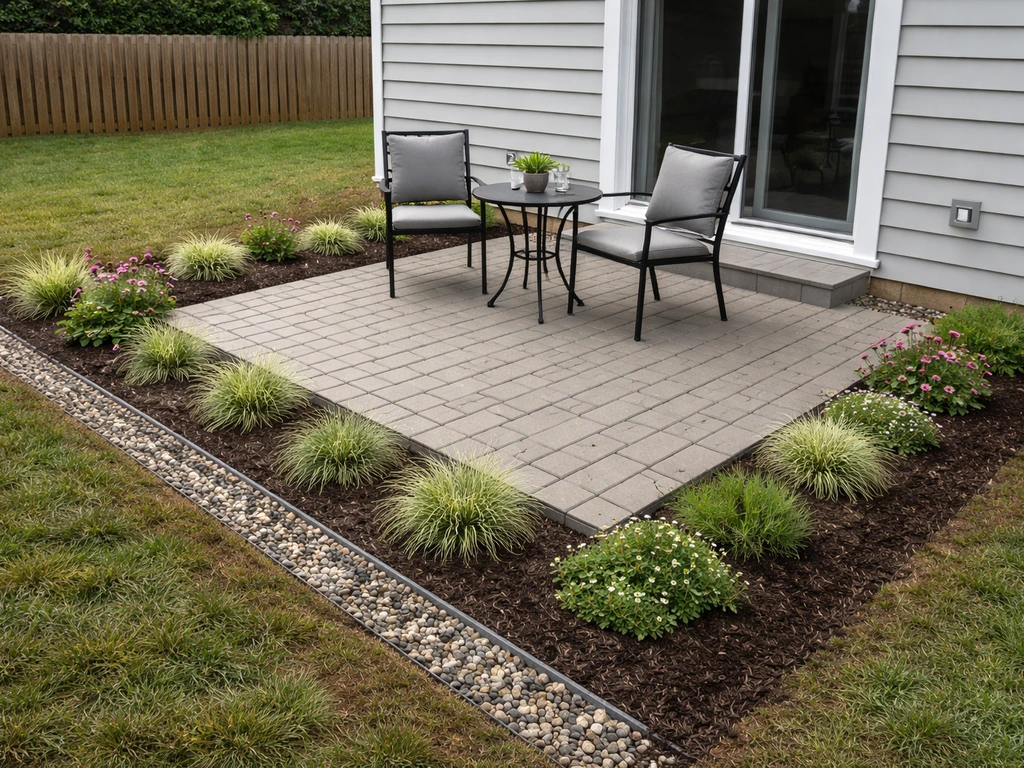
Before you order a single paver, sketch out your layout on paper. The two most common DIY approaches are a standalone fire pit sitting on an existing or new patio, and a fully integrated design where the fire pit is built into the patio surface from the start. Both work well, but they require slightly different planning. An integrated fire pit patio looks cleaner, keeps everything at a consistent height, and is usually the better long-term investment. A standalone pit dropped onto an existing patio is faster and cheaper upfront.
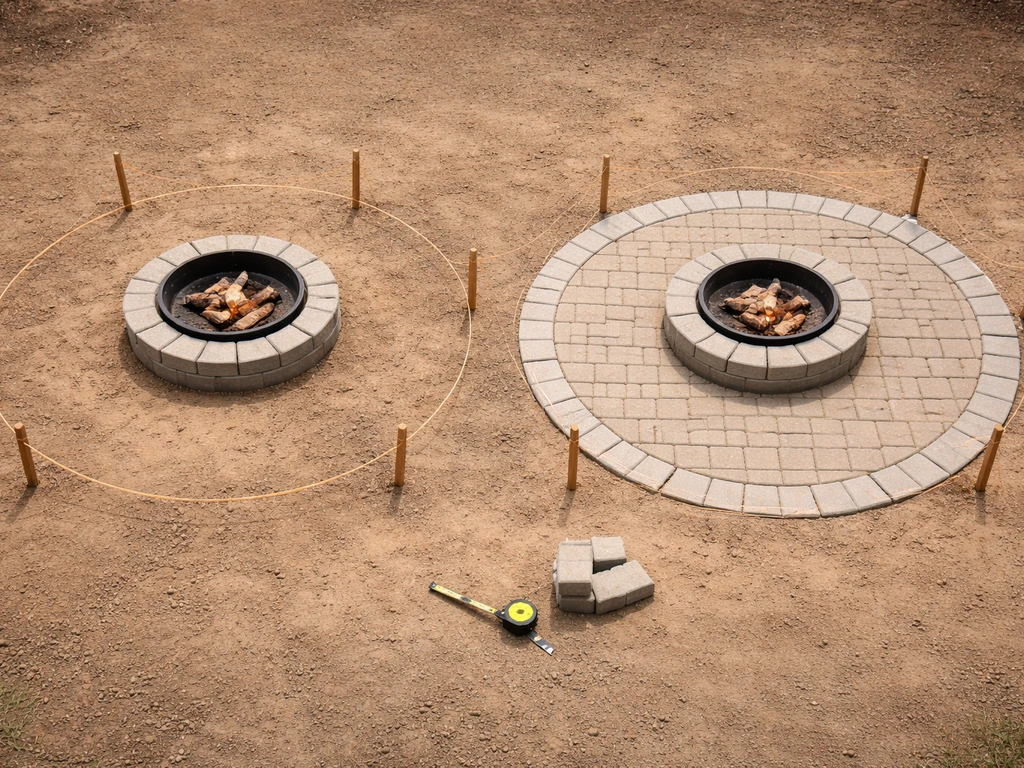
For most backyards, a circular seating area between 12 and 16 feet in diameter gives you enough room for 4 to 6 chairs around a fire pit without anyone feeling like they're sitting in the fire itself. The fire pit itself is typically 36 to 48 inches in outer diameter for a DIY stone or block build. Center the pit in your patio space, then mark out your seating ring. Make sure your layout accounts for traffic flow from the house to the seating area, and leave at least one clear 3-foot walkway around the perimeter so nobody has to step over someone to get in or out.
Think about the sun and wind patterns in your yard too. Positioning the fire pit on the downwind side of your primary sitting area keeps smoke from blowing into people's faces. And if you have a fence, a tree line, or a structure nearby, that's where clearances come in, which we'll cover next.
Permits, safety clearances, and fire-code basics
This is the section most DIYers skip, and it's the one that causes the most problems. Check with your local municipality before you build anything. Many jurisdictions require a permit for a permanent fire pit, and some ban wood-burning fire pits altogether in certain zones or during dry-season burn bans. The rules vary significantly by location.
As a practical baseline using real code guidance from multiple jurisdictions, here's what you should plan around. Wood-burning fire pits typically require 15 to 25 feet of clearance from any structure, combustible surface, vegetation, or property line. Gas fire pits are generally held to a slightly more lenient standard, often 10 to 15 feet from structures, because the fuel source is controlled.
Cities like Madison, WI and Fort Collins, CO require at least 15 feet from buildings and property lines for wood-burning fires. Big Bear, CA requires 25 feet of clearance in all directions from anything combustible for wood-burning pits. The International Fire Code's [Section 307 pegs open burning location at not within 50 feet](https://inglesidetx. gov/DocumentCenter/View/9367/International-Fire-Code-Section-307?
bidId=) of a structure in some jurisdictions, though many local amendments bring that down to 15 to 25 feet.
Beyond clearances, most codes also require that the fire pit be built on a stable, level surface (this directly ties into your foundation work), that the pit have a non-combustible interior such as steel, brick, or masonry, and that wood-burning pits include a spark arrestor or heavy-gauge wire screen. NFPA’s home fire safety educational message also notes that using a fire pit screen helps contain dangerous embers and sparks as a safety measure spark arrestor or heavy-gauge wire screen. Some areas require the pit to be placed in a depression or enclosure. Gas-fired pits are subject to their own inspection requirements for fuel lines and connectors.
- Call your local building or fire department before you start, not after
- Ask specifically about permanent vs. portable fire pits, since they're often regulated differently
- Check HOA rules if applicable, which can be stricter than municipal codes
- Find out whether a permit is required for the patio surface itself (often required for patios over a certain square footage)
- Ask about seasonal burn bans and whether wood-burning pits are allowed at all in your area
Fire pit types and what to build
For a true DIY build, you're essentially choosing between three approaches: a wood-burning block or stone ring, an in-ground or semi-in-ground pit, or a gas fire pit with a burner insert. Each has real trade-offs.
| Type | DIY Difficulty | Typical Cost (materials) | Clearance Required | Best For |
|---|---|---|---|---|
| Block/stone ring (wood) | Easy | $150–$400 | 15–25 ft from combustibles | Beginners, budget builds |
| In-ground pit (wood) | Moderate | $100–$300 | 15–25 ft from combustibles | Clean look, low profile |
| Integrated patio fire pit (wood) | Moderate–Hard | $400–$1,200 | 15–25 ft from combustibles | Permanent, polished result |
| Gas fire pit (propane or natural gas) | Moderate (plumbing adds complexity) | $300–$1,500+ | 10–15 ft from structures | Convenience, smoke-free |
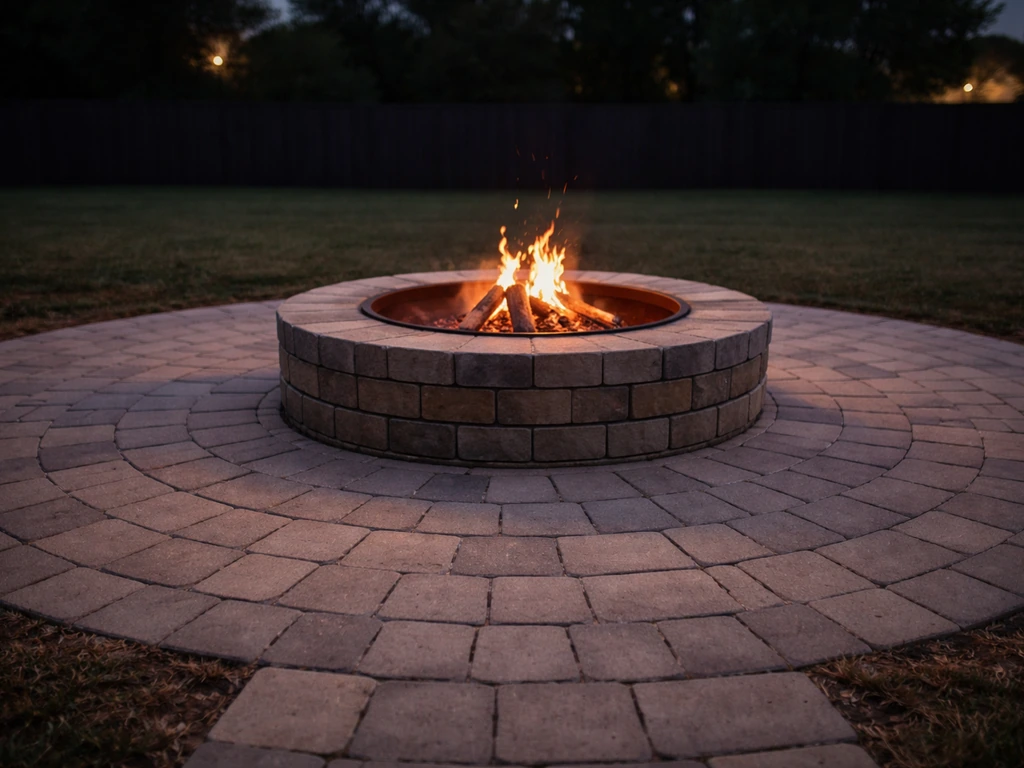
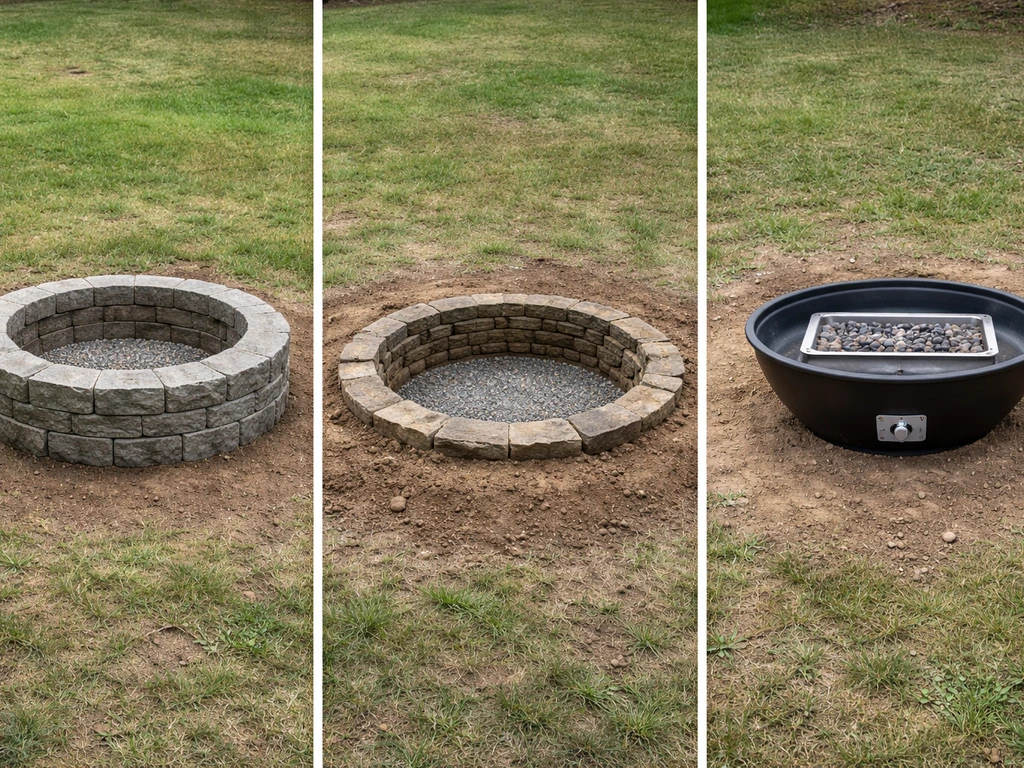
For most first-time builders, a stacked block or natural stone ring fire pit integrated into a paver patio is the sweet spot. It's forgiving, uses widely available materials, and looks great. The key is protecting the inside of that ring. Standard concrete pavers should never be exposed directly to open flame. You must line the interior with either a prefabricated steel fire ring/liner or fire bricks (refractory bricks) set with high-heat refractory mortar. The fire ring or firebrick layer acts as a thermal buffer that protects the outer decorative block from cracking due to heat cycling.
If you're leaning toward a gas fire pit, you'll follow most of the same patio-building steps, but instead of a fire ring you'll be installing a gas burner kit with a dedicated propane feed or a natural gas line run from the house. Gas lines require either a licensed plumber or a gas fitter in most states, so budget for that labor cost even if you're doing everything else yourself. The patio and enclosure portions are still fully DIY-friendly.
If you're interested in a more architectural look, a built-in fireplace or fire table setup is a natural extension of this project. If you want a bigger focal feature, you can extend these same patio-building steps into how to build a patio fireplace, but expect added masonry detail. If you want a patio fire table instead, you can use many of the same patio building and clearance basics, then focus on the burner and heat-safe enclosure details. Those builds follow similar principles but with more masonry complexity.
Site prep and base design: the part that makes or breaks everything
A patio that cracks, settles unevenly, or pools water almost always traces back to poor base prep. This is where you spend the most effort, and it's worth it. The paver surface is just the finishing layer. The real structure is underground.
Excavation and grading
Plan to excavate about 7 to 10 inches below your finished paver surface. That breaks down as 4 to 6 inches of compacted gravel base, 1 inch of bedding sand, and 2 to 3 inches of paver thickness. In cold climates or areas with poorly draining or disturbed soil, lean toward 6 inches of gravel or more. As you dig, slope the ground away from your house at about 1/8 inch per foot (roughly 1% grade). This keeps water from pooling under your patio or running toward the foundation.
Remove all sod and organic material from the entire patio footprint. Roots, grass, and decomposing soil are the main causes of long-term settlement. Once you're down to native soil, tamp it firmly with a plate compactor before you add anything on top.
Gravel base and bedding sand
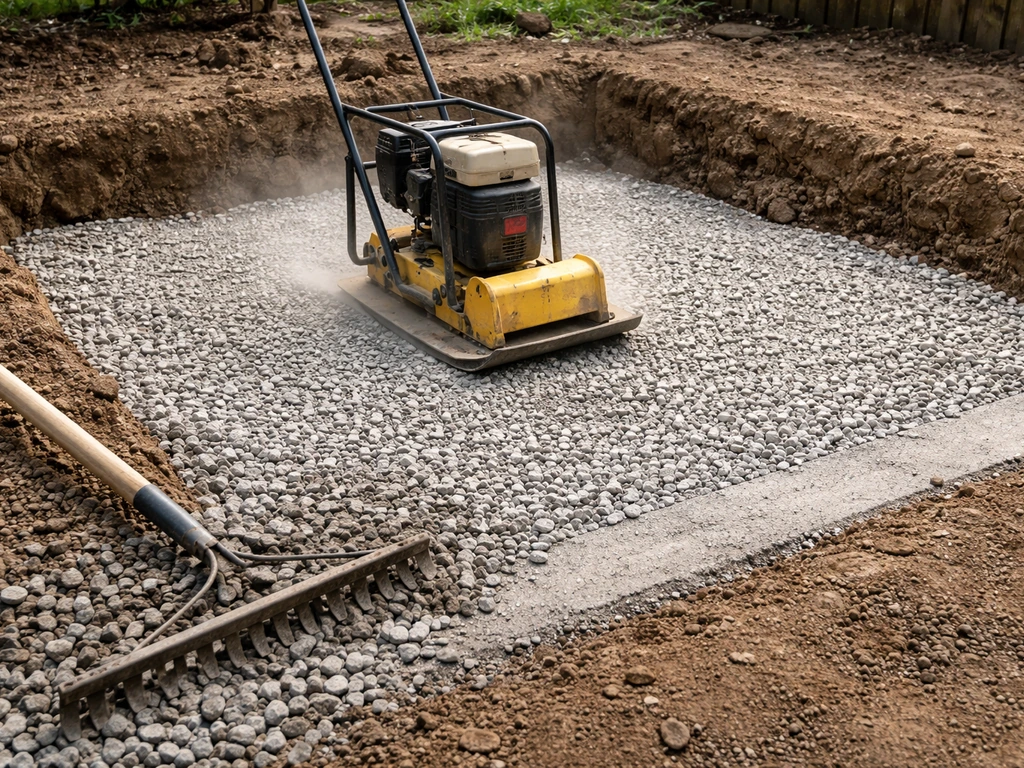
Fill your excavated area with 3/4-inch crushed stone (also called gravel base or road base). Add it in 2-inch lifts, compacting each lift with a plate compactor before adding the next. Rushing this step is how you get a patio that looks fine for a year and then starts sinking in spots. Your finished compacted gravel base should be 4 to 6 inches deep across the entire patio. Then add a 1-inch layer of coarse bedding sand, screeded smooth and level. Do not compact the sand layer after screeding. It stays loose so the pavers can be set and tapped into position.
Fire pit foundation
The fire pit itself needs extra attention in the base area. Where the fire pit will sit, add crushed gravel to achieve about a 5-inch thick base specifically for the pit footprint, compact it, and make sure it's level. This gives you a stable, non-combustible platform for the first course of blocks. If you're building the fire pit on top of an existing concrete or paver patio, mortar the first course of blocks directly to the surface with construction adhesive or mortar to prevent shifting. The inside of the pit area should be lined with a minimum of 1 inch of sand before placing any fire brick.
Materials, tools, and cost breakdown
Here's a realistic material and tool list for a mid-size DIY fire pit patio, roughly a 12-foot diameter circular patio with a 36-inch fire pit centered in it. Costs reflect mid-2026 pricing and will vary by region.
| Item | Quantity (approx.) | Estimated Cost |
|---|---|---|
| Concrete pavers (2–3 inch thickness) | 80–100 sq ft | $200–$500 |
| 3/4-inch crushed gravel base | 1.5–2 tons | $80–$160 |
| Coarse bedding sand | 0.5 ton | $30–$60 |
| Retaining/edging block (patio border) | 30–40 linear ft | $100–$200 |
| Fire pit block (decorative, exterior ring) | 30–50 blocks | $150–$350 |
| Prefabricated steel fire ring liner | 1 (36-inch diameter) | $50–$120 |
| Fire brick (refractory bricks) | 20–30 bricks | $60–$150 |
| Refractory/high-heat mortar | 1–2 bags (50 lb) | $30–$60 |
| Landscape fabric (weed barrier) | 1 roll | $20–$40 |
| Polymeric sand (paver joints) | 1–2 bags | $30–$60 |
| Construction adhesive or block adhesive | 2–3 tubes | $15–$30 |
| Plate compactor rental | 1 day | $80–$120 |
| Other tools (level, rubber mallet, chisel, tape measure, string line) | — | $30–$80 if buying |
Total material and tool cost for this project typically runs $850 to $1,900 depending on paver quality and whether you rent or already own tools. You can build a simpler gravel-patio version (skip the pavers, use compacted gravel as the surface) for under $400, which works well for casual setups and is even easier to drain. On the higher end, using natural flagstone or premium pavers can push the budget to $2,500 or more.
Step-by-step build plan
This sequence assumes you're building a circular paver patio with an integrated stacked-block fire pit. Adjust the dimensions to fit your yard and layout.
- Mark your layout: Use spray paint or stakes and string to mark the outer edge of the patio and the center point of the fire pit. Double-check your clearances from all structures, property lines, and combustible materials before digging anything.
- Excavate: Dig down 7 to 10 inches across the entire patio footprint. Remove all sod and organic material. Grade the soil to slope away from the house at approximately 1/8 inch per foot. Tamp the subgrade firmly.
- Lay landscape fabric: Roll out a single layer of weed-barrier landscape fabric over the entire excavated area. This prevents weed growth from below without blocking drainage.
- Add and compact gravel base: Pour in 3/4-inch crushed gravel in 2-inch lifts, compacting each lift thoroughly with a plate compactor. Build up to 4 to 6 inches of compacted gravel. Check level frequently across the whole area.
- Build up the fire pit base: In the fire pit footprint (the center area), continue adding compacted gravel until you reach approximately 5 inches of compacted depth in that zone, tighter than the rest. This is the fire pit platform.
- Screed the bedding sand: Spread a 1-inch layer of coarse sand over the gravel base across the entire patio area. Use a screed board and guide rails to pull the sand flat and level. Do not compact it after screeding.
- Set the patio pavers: Start laying pavers from the center or from a straight edge, depending on your pattern. Tap each paver level with a rubber mallet. Use a level and string lines constantly. Cut pavers as needed with a chisel and hammer or a wet saw for cleaner cuts.
- Install patio edging: Set your border blocks or metal/plastic paver restraints around the perimeter to lock the pavers in place. Without edging, pavers will slowly migrate outward.
- Build the fire pit exterior ring: Starting from the first course, stack your fire pit blocks in a circular pattern around the perimeter of the pit. Offset each course so joints don't align (like a brick pattern). Apply construction adhesive between courses. Check for level on every course.
- Install the fire ring liner or fire bricks: Set a prefabricated steel fire ring inside the block wall, or line the interior with fire bricks using refractory mortar. This thermal barrier protects the outer blocks from heat damage. Add a 1-inch sand base inside the pit and tamp it.
- Fill paver joints: Once all pavers are set and the patio surface is complete, spread polymeric sand over the surface and sweep it into the joints. Mist with water to activate the binding agent. This locks joints, prevents weeds, and resists erosion.
- Final level check and cleanup: Walk the whole patio, tapping down any high spots and checking for wobble. Re-tamp low areas by lifting the paver, adding sand, and resetting.
Troubleshooting common problems
- Pavers settling unevenly: Almost always means the gravel base wasn't compacted enough or there were soft spots in the subgrade. Pull up the affected pavers, add gravel or sand as needed, re-compact, and relay.
- Water pooling on the patio surface: You didn't slope it enough during base prep. Fix by carefully lifting the low area's pavers, adjusting the sand bed, and re-laying with the correct slope.
- Fire pit blocks cracking: The interior was exposed to direct flame without a liner. Remove the cracked blocks and retrofit with a steel fire ring or firebrick layer using refractory mortar.
- Paver joints washing out: You used regular sand instead of polymeric sand, or didn't wet it properly. Sweep out the old sand, refill with polymeric, and re-activate with water.
- Patio edge pavers shifting outward: Missing or inadequate edging restraint. Install metal or plastic paver edge restraints spiked into the gravel base every 12 inches.
Finishing touches: seating, edging, weatherproofing, and maintenance
Once the patio and fire pit are built, the finishing details make it feel intentional rather than like a construction site. For seating, plan for chairs placed 5 to 7 feet from the outer edge of the fire pit. Adirondack chairs, curved bench sections, or built-in stone benches all work well. If you go with built-in bench seating made from the same block system as your fire pit, keep the seat height around 17 to 18 inches and cap the tops with flat capstones that won't absorb heat dangerously.
Apply a penetrating paver sealer to your patio surface after the polymeric sand has fully cured (usually 72 hours after installation). Sealer protects against staining, freeze-thaw damage, and UV fading. Use a product rated for your specific paver material, whether that's concrete, natural stone, or brick. Reapply every 2 to 3 years or when water stops beading on the surface.
For the fire pit itself, clean out ash after every use and always wait until the ash is fully cold before removing it. A thin layer of ash left at the bottom actually helps insulate the base and improve the next fire, but too much restricts airflow and traps moisture. Once or twice a season, inspect the fire pit's interior liner for cracks in the firebrick or signs of spalling. Small cracks in refractory mortar joints can be repaired with fresh refractory mortar without having to tear down the whole structure.
Cover the fire pit with a weatherproof lid or cover when not in use. This keeps rain from saturating the base, prevents debris from accumulating in the pit, and slows wear on the interior surfaces. A fitted steel or aluminum cap costs $30 to $80 and can add years to the life of the pit.
Every spring, do a quick inspection of the entire patio. Look for pavers that have shifted or settled, edging that has pulled away, and mortar joints in the fire pit that need touching up. Catching small issues early means 30 minutes of work instead of a full rebuild. A well-built DIY fire pit patio should need nothing more than basic cleaning and the occasional joint sand top-off for the first several years.
FAQ
Can I build a do it yourself fire pit patio directly on top of existing concrete or pavers?
Yes, but you need to treat it like an overlay system. Use a stable leveling layer (often compactable base plus sand) so the new patio and fire pit do not lock into old low spots. For the fire pit, mortar or adhesive the first course to the existing surface to prevent shifting, then verify you still meet required clearances to structures and property lines.
What size should my do it yourself fire pit patio be if I want comfortable seating but more room to move?
Use your seating layout, not just the fire pit diameter. Keep chairs far enough back so people can step past comfortably, then maintain at least a 3-foot circulation walkway around the perimeter. If you expect more than 6 chairs, increase the overall patio diameter rather than crowding the ring inward.
How do I choose between wood-burning and gas for a DIY fire pit patio without surprises later?
If your priority is faster setup and less maintenance, gas usually wins, but it requires proper line work (often licensed). If you want the traditional flame and flexibility with fuels, wood-burning is possible but you must plan for spark control, stricter clearance compliance, and ash management after every use.
Do I need a fire pit lid or cover if the patio is covered by a pergola or roof?
A roof helps, but it does not fully stop rain and debris from getting into the fire pit. A weatherproof lid still prevents water from saturating the base and reduces grit buildup that can accelerate liner wear. Choose a cover that fits the pit opening tightly and can withstand heat exposure.
Polymeric sand is mentioned for sealing, but how can I prevent weeds or washout at the joints?
The key is installing with the correct base depth and keeping the surface level so water does not concentrate in any one joint. Only apply polymeric sand after the pavers are fully set and cured, then follow the manufacturer activation steps. If you notice joint gaps returning quickly, your base or drainage slope is likely off.
What is the best way to protect the fire pit area from cracking pavers around it?
Give the fire pit zone extra base and do not skip the non-combustible interior liner system. Use the thicker, compacted gravel base under the pit footprint, keep the first course firmly supported (adhesive or mortar if on an existing patio), and ensure the firebrick or liner fully protects the decorative blocks from heat cycling.
How much slope should a do it yourself fire pit patio have, and does it affect seating comfort?
A mild slope away from the house, about 1/8 inch per foot, is usually enough to prevent pooling under the patio. It can be subtle enough that seating feels level, especially with chairs that have wider bases. If your patio grade looks noticeable when you stand on it, increase base leveling precision during bedding sand screeding.
Can I install drainage around the patio, or will that interfere with the base work?
You can, and it often helps in wet or freeze-thaw areas, but it must tie into the overall excavation plan before you place the gravel base. Avoid cutting away base depth near the fire pit footprint. If you add a drain, keep it sloped and properly wrapped in landscape fabric so fine soil does not migrate into the base.
What should I do if the patio starts settling or rocking after the first season?
Stop using the affected area and identify whether movement is on the perimeter, around edging, or near the fire pit. Often the cause is insufficient compaction, displaced bedding sand, or organic material not fully removed. Small adjustments may be possible by lifting affected pavers and re-leveling with properly compacted gravel and fresh bedding sand, but severe base failure usually requires re-excavation.
Is it safe to burn pine or other resinous wood in a DIY wood-burning fire pit patio?
You can, but resinous woods create more creosote and residue. That means more frequent ash and liner inspection, and more attention to spark control and ventilation. If your area has burn restrictions, follow local rules, since residue buildup can also worsen odor and smoke issues.
How often should I inspect and repair the fire pit liner or firebrick in a DIY build?
Do a quick check in spring and after any unusually long or hot burn. Look for spalling, cracks in refractory mortar joints, and signs of liner shifting. Small mortar joint repairs can be made with refractory mortar without full teardown, but if firebrick pieces loosen, you may need to address the underlying support and base stability.