You can extend an existing patio by excavating the new footprint, building a matching base, and connecting the new surface to the old with a proper expansion joint, never by bonding the two slabs rigidly together. If you are wondering how to add a patio to your house, the extension connection is where good planning and correct joints pay off most patio extensions. The critical things to get right are matching the finished height of the existing surface, maintaining a slope of at least 1/8 inch per foot away from the house, and using the correct joint type at the seam so both sections can move independently without cracking or letting water in. For a practical look at how to add on to an existing patio, review the steps for planning the extension and making the connection seam so both sections can move independently without cracking or leaking water.
How to Extend a Patio: Step-by-Step DIY Guide

Planning the Extension: Goals, Layout, and Measurements
Before you touch a shovel, spend time figuring out exactly what you want and staking it out. Walk the space and ask yourself: do you need more room for furniture, a dining table, a grill station, or a fire pit area? That answer drives the size and shape. To make your patio bigger without creating drainage or cracking issues, plan the extension size and layout before you start work how to make patio bigger. A rough rule of thumb is to allow at least 36 inches of clearance around furniture on all sides, so if you're adding a 6-person dining set, budget a minimum 12x14-foot addition.
Once you know the purpose, measure and mark the new footprint with stakes and mason's string. Keep the shape simple if you can, rectangular sections are faster to build and easier to connect cleanly. If you're wrapping around a corner or adding an irregular shape, sketch it on graph paper first and note every dimension. You'll need those numbers when ordering materials and planning your excavation.
Check with your local building department about permit requirements. Many municipalities don't require permits for ground-level patio slabs under a certain size, but rules vary and it's worth a 10-minute call before you start. Also look at your property lines, setback requirements often apply even to hardscape.
- Stake the full perimeter of the new section with batter boards and mason's string before any digging
- Note the finished height of the existing patio at the connection point—you'll build to match it exactly
- Check for underground utilities before excavating—call 811 (in the US) at least a few days ahead
- Account for the slope in your layout: the far edge of the new section will sit lower than the house-side edge
- Sketch the joint location between old and new—this is where the expansion joint will go
Assessing the Existing Patio Before You Build
This step is where a lot of DIYers skip ahead and regret it. If the existing patio has base problems, those problems will telegraph right into your new section if the two are connected at the wrong height or the old surface is shifting. You need an honest look at what you're working with.
Check the surface and structure
Walk the existing patio and look for cracks, spalling (surface flaking), settled sections, and heaving. Minor hairline cracks are usually cosmetic. Deep spalling that penetrates into the slab, not just the surface layer, may require patching or could indicate that the slab is deteriorating from below. Extensive cracking along joints, or sections that have shifted vertically relative to each other, suggest base failure underneath. If you see widespread distress like that, replacement of the damaged section is a better move than extending off it.
Evaluate the base stability
Probe around the edges of the slab. If you can rock or wiggle edge pavers, or if a concrete slab rocks when you step on it, the base has moved. Dig a small test hole at the edge to see what's underneath, you want to find compacted gravel or crushed stone, not loose dirt or sand. A residential patio base should be 4 to 6 inches of compacted aggregate. If what's under there is thin or soft, plan to excavate deeper in the new section to get proper depth, and address the old base issue before connecting.
Confirm the slope and drainage
Lay a long level or a 10-foot straightedge on the existing surface and measure the fall away from the house. The minimum slope for a patio adjacent to the foundation is about 1/8 inch per running foot, QUIKRETE's concrete patio specs use this figure, and the Building America Solution Center recommends at least 1/4 inch per foot for anything within 10 feet of the house. If the current slab drains poorly or water pools near the foundation, fix the slope issue now. You can't correct a drainage problem in the old section by building a well-sloped extension, the water still has to go somewhere, and if the existing surface traps it, you'll make the situation worse.
Choosing Extension Materials That Match (or Intentionally Don't)
Your two main choices are extending in the same material as the existing patio or deliberately using a contrasting material for a design reason. Both are valid, but each has practical implications at the connection point.
| Material | Matches Concrete Patio | Matches Paver Patio | Connection Complexity | Cost Range (materials only) |
|---|---|---|---|---|
| Poured concrete | Easiest match if same mix/finish | Contrasting—intentional design | Expansion joint required; height matching critical | $4–$8 per sq ft |
| Concrete pavers | Works as contrast or border | Best match if same product line | Edge restraint + expansion joint zone | $5–$12 per sq ft |
| Natural stone pavers | Contrasting—intentional design | Can match if similar thickness | Edge restraint + transition strip | $10–$25 per sq ft |
| Poured concrete with exposed aggregate finish | Close match to existing if same aggregate | Contrasting | Expansion joint required | $5–$10 per sq ft |
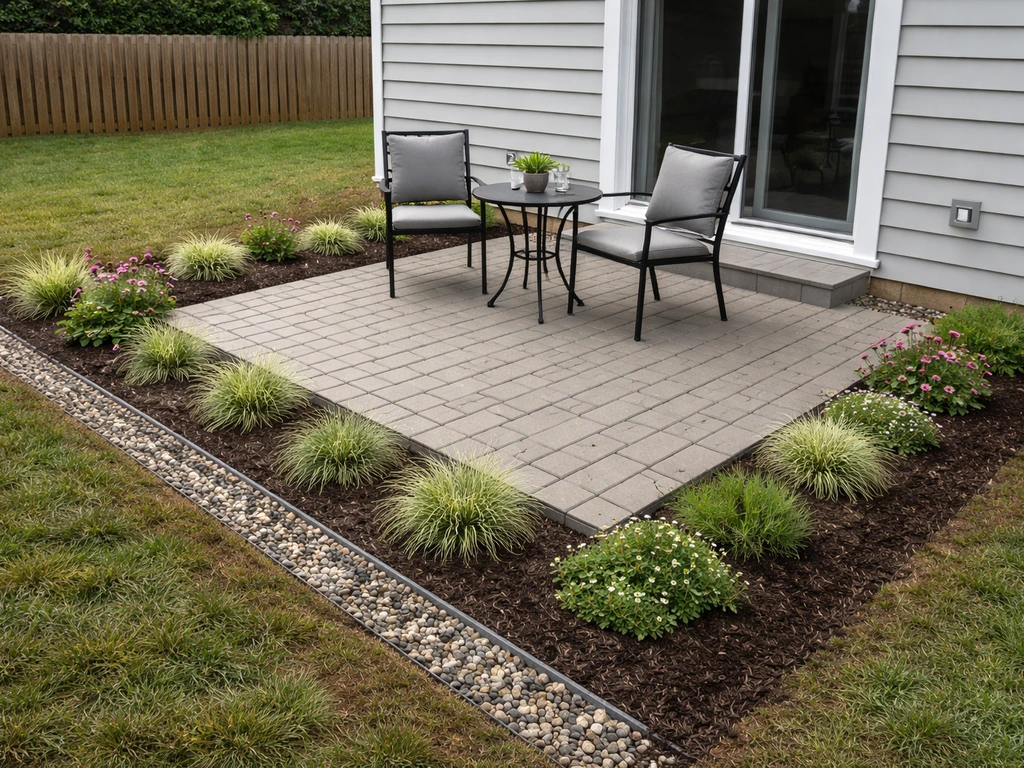
If you're extending a concrete patio with more concrete, try to match the slab thickness (typically 4 inches for residential), the aggregate mix, and the surface finish as closely as possible. Bring a photo of the existing surface to your concrete supplier. For pavers extending a paver patio, contact the original manufacturer if you still have records, concrete pavers fade over time, so new ones may look brighter than the old until they weather in. Using a complementary but intentionally different paver color as a border around the extension is a common design move that sidesteps the matching problem entirely.
Edging and coping options
Whatever material you choose, you'll need edge restraint or coping along the outer perimeter of the new section. For paver extensions, plastic or aluminum edge restraint spiked into the base keeps the pavers from shifting outward over time. ICPI guidelines show the edge restraint length should equal the base thickness, so for a 4-inch base, your edge restraint needs to be embedded at least 4 inches deep.
Western Hardscape Association’s installation basics also emphasizes that perimeter edge restraints for paver patios are essential to prevent horizontal creeping and loss of bedding sand edge restraint length should equal the base thickness. For concrete extensions, a formed edge is built into the pour. Decorative coping stones or bullnose pavers along the outer edge give a cleaner finished look and protect the slab edge from chipping.
Site Prep and Foundation Work
Good foundation work is where patio extensions succeed or fail. This is not the place to cut corners. A surface that looks perfect on day one can crack, shift, and separate within a single winter if the base isn't right.
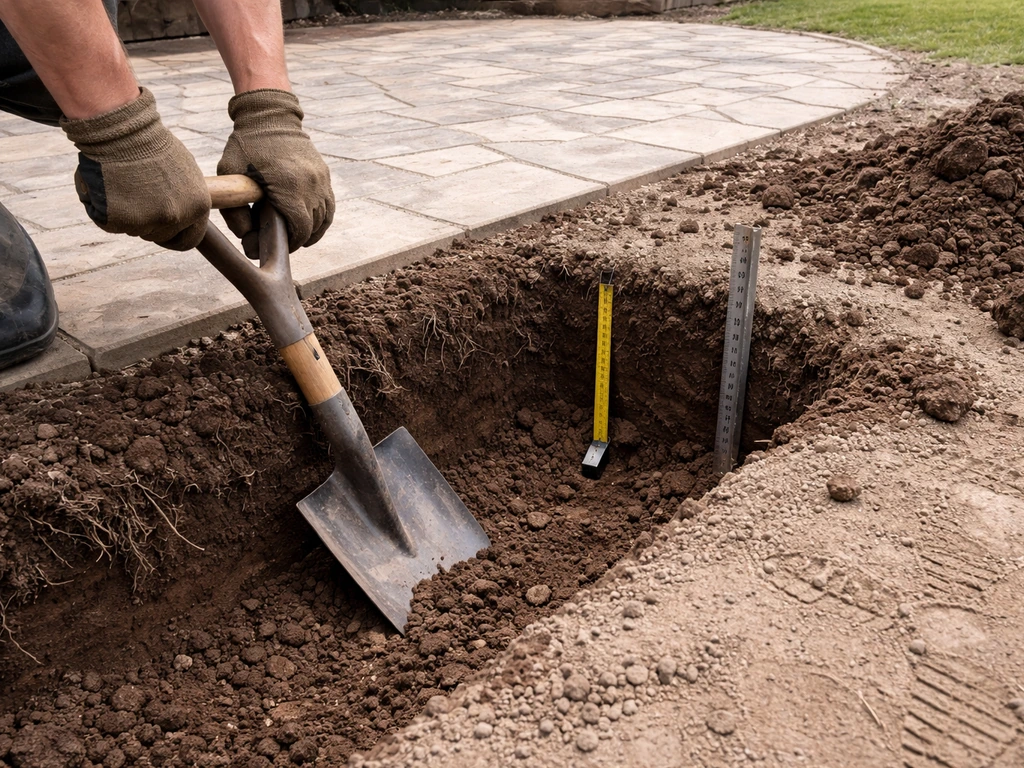
Excavation
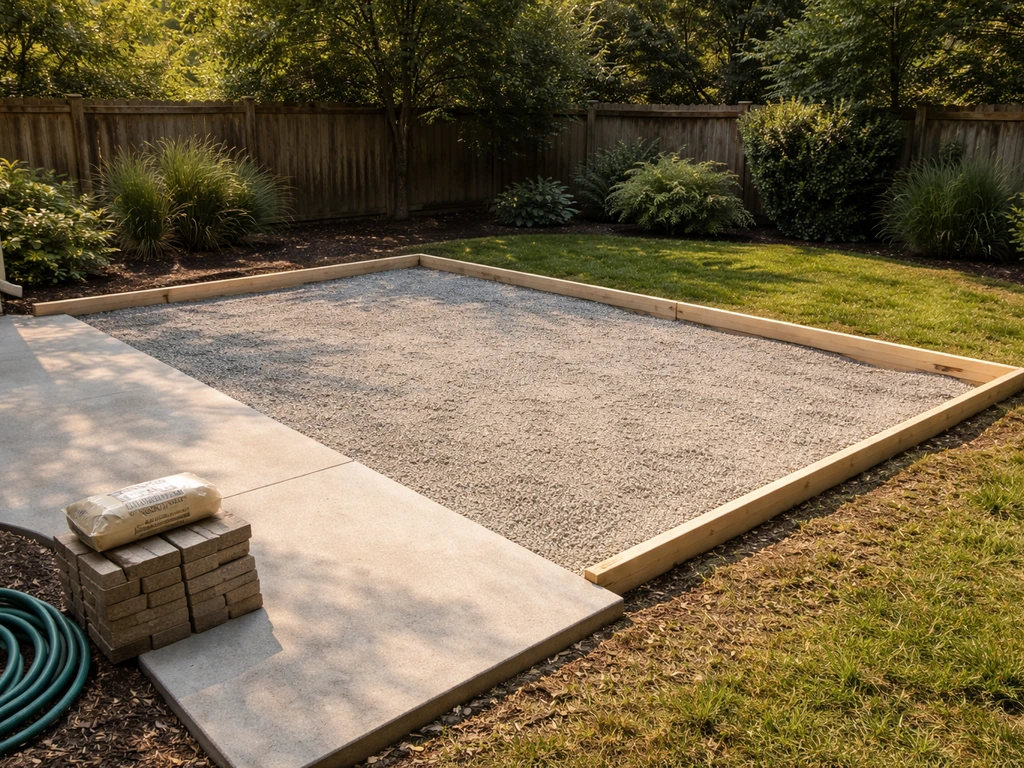
Excavate the new footprint to the depth required for your base plus surface material. For a 4-inch concrete slab on a 4-inch compacted gravel base, you're digging down 8 inches from the finished surface level. For pavers, the math is: base depth (4–6 inches compacted) + 1 inch of bedding sand + paver thickness (usually 2 3/8 inches for standard residential concrete pavers) = roughly 7.5 to 9.5 inches total. Always calculate from the desired finished height and dig to that total depth.
When you excavate alongside the existing slab or paver edge, be careful not to undermine the existing base. Dig straight down at the joint line rather than angling under. If the existing edge isn't supported all the way to the bottom, it can settle or crack once the new section is installed beside it.
Sub-base and compaction
Fill the excavated area with crushed stone or compacted gravel (often called road base or Class II base rock). Install it in 2-inch lifts, compacting each lift with a plate compactor before adding the next. You're targeting a minimum of 95% compaction relative to the Modified Proctor test, in practical terms, that means the surface shouldn't deflect under the plate compactor and you can't push a rod easily into the finished base. A 4-inch compacted base is the minimum for residential patios; 6 inches is better in areas with freeze-thaw cycles or soft native soil.
If you have soft or clay-heavy soil at the bottom of the excavation, consider laying a geotextile fabric before the gravel goes in, it keeps the soil and aggregate from mixing over time. Don't place geotextile on top of the bedding sand layer, only under the aggregate base.
Leveling and bedding
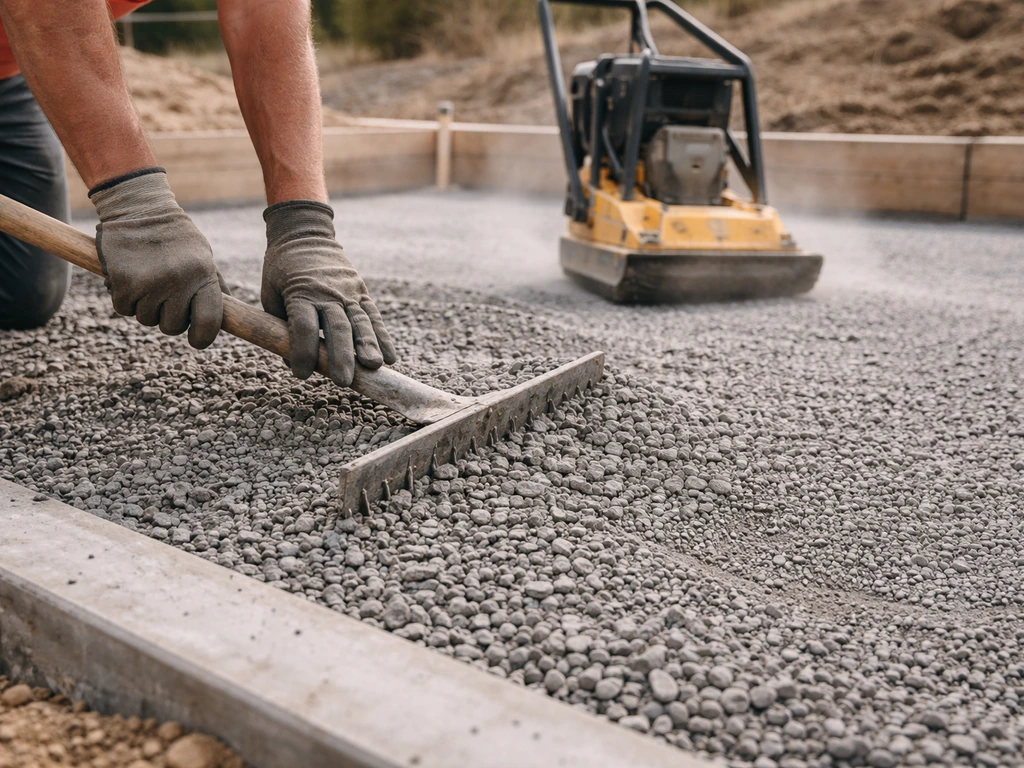
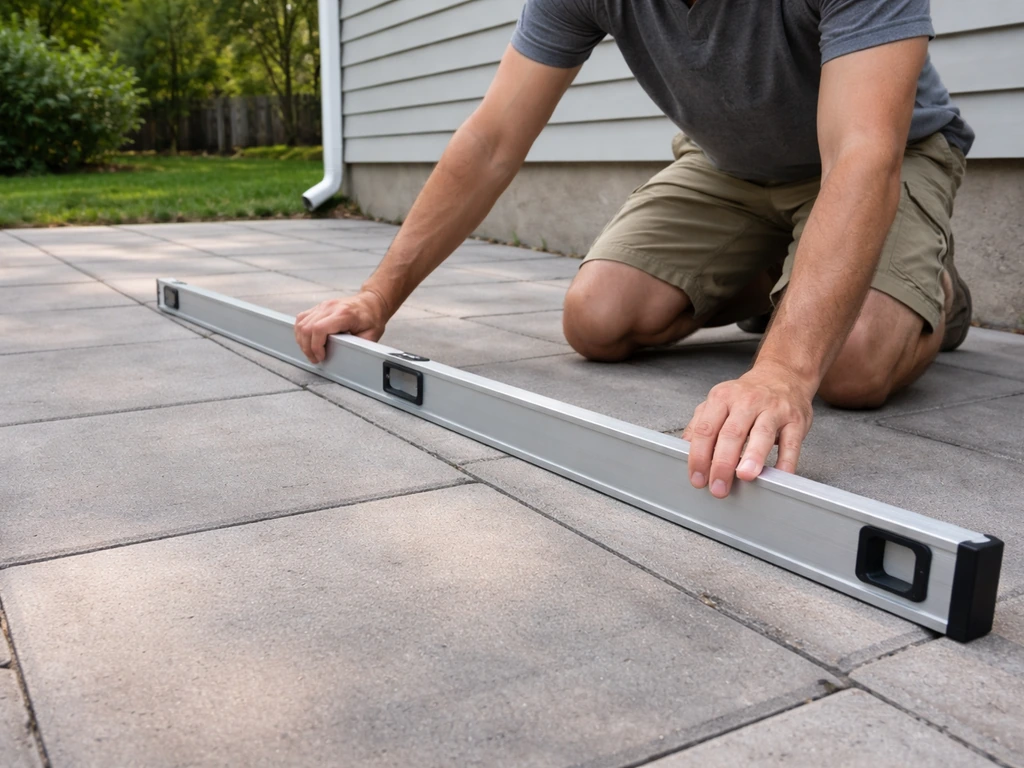
For concrete extensions, the compacted base is your final layer before forming and pouring. Check it with a straightedge, ACI 302.1R-style standards call for a maximum gap of 1/4 inch under a 10-foot straightedge for finished flatwork. For paver extensions, screed a 1-inch layer of clean, coarse bedding sand over the compacted base using pipes or rails as guides and a straight 2x4 dragged across them. The target is a uniform 1 inch of sand, not thicker, because an overly deep bedding layer causes pavers to settle unevenly. Set your screed pipes or rails at the correct slope so the bedding plane already incorporates the 1/8-inch-per-foot fall away from the house.
Connecting Old to New the Right Way
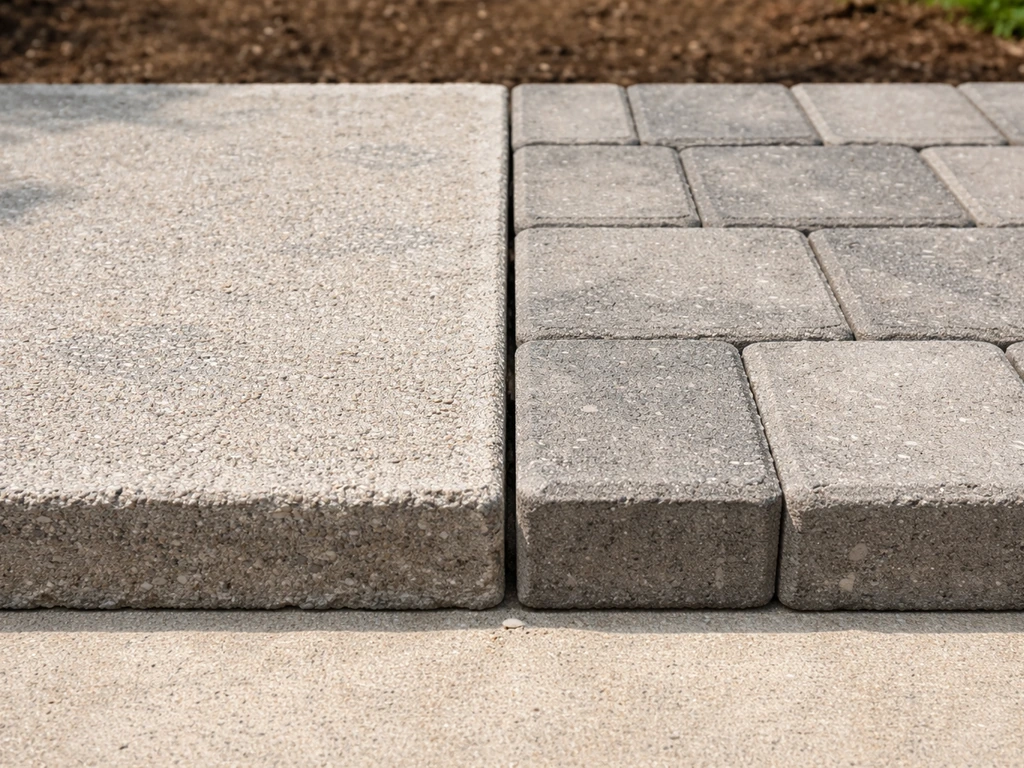
This is the most technically important part of the whole project. The old and new sections will move independently as temperatures change and the soil shifts seasonally. In a Reddit r/Concrete discussion on expansion joints, commenters frequently debate whether patios and pours need expansion joints to allow movement between sections blank" rel="noopener noreferrer">Expansion joint or no expansion joint?. If you try to bond them rigidly together, whether by pouring concrete against the old slab without a joint, or pinning pavers with adhesive at the seam, you're setting up for cracking and separation.
Expansion joints for concrete extensions
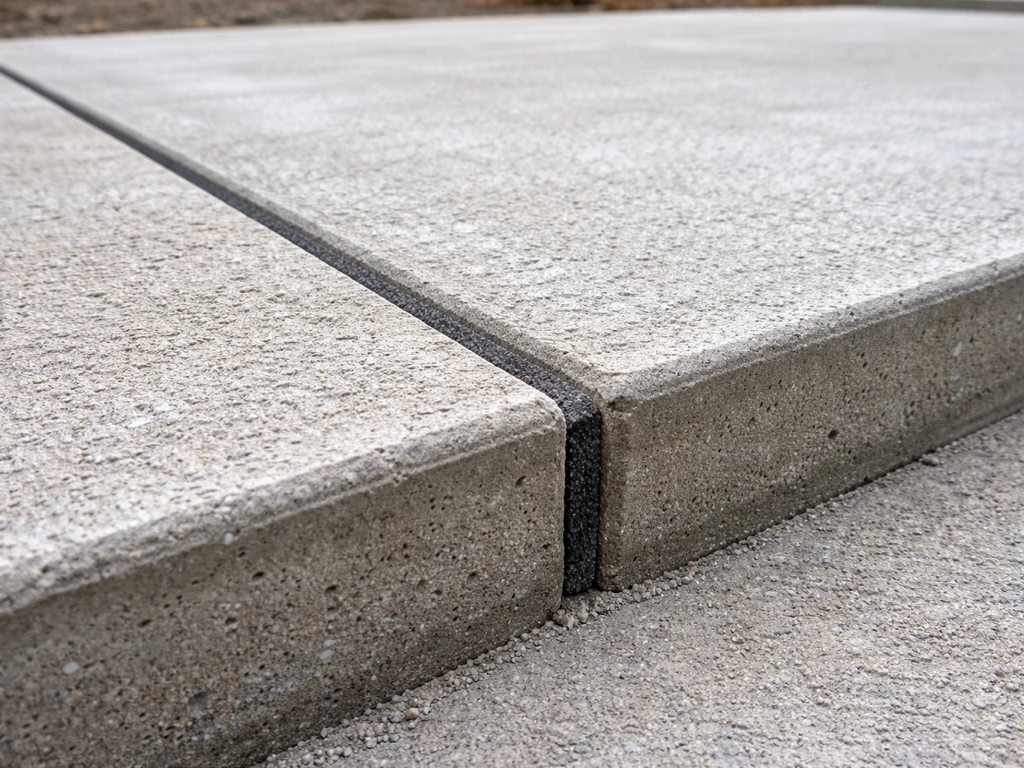
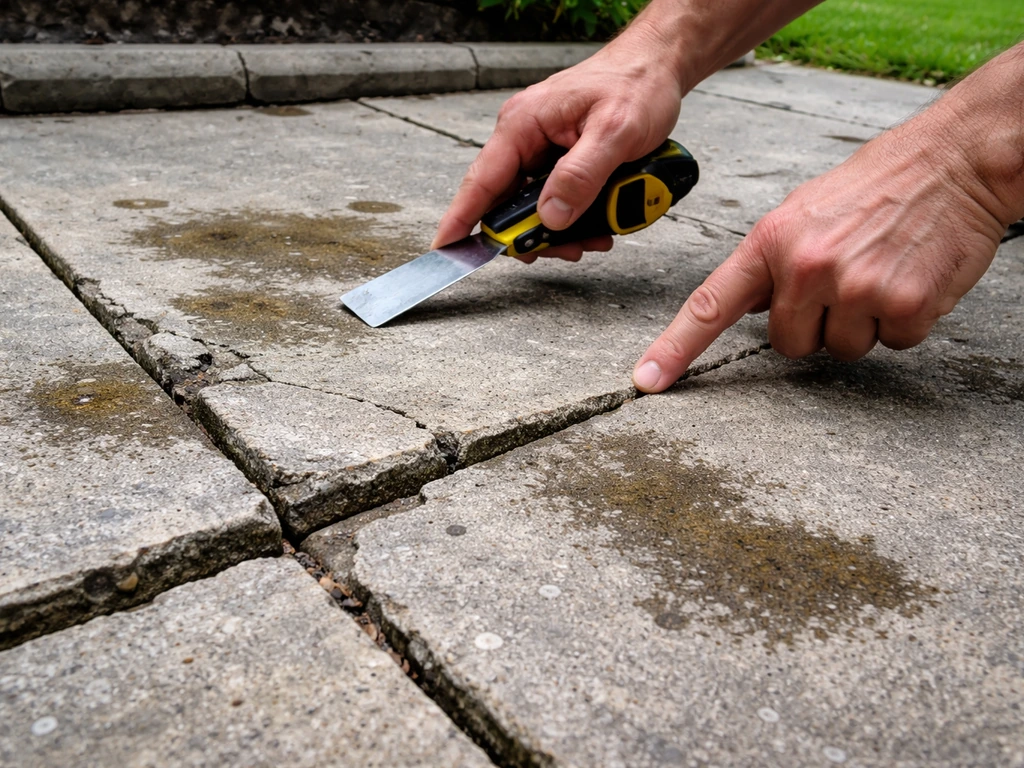
Where the new concrete slab meets the existing one, you need a full-depth isolation (expansion) joint: a gap filled with compressible material, typically 1/2-inch expansion joint foam backer, that runs the entire depth of the slab. This allows both sections to expand and contract without pushing against each other. SlabCalc's bonding guidance is explicit: never bond side-by-side slabs rigidly together; maintain at least a 1/2-inch expansion joint between old and new concrete. Press the foam backer strip against the edge of the existing slab before you pour, so the new concrete forms directly against it.
Also place isolation joints anywhere the new slab meets a wall, step, post, or column. Contraction (control) joints within the new slab itself should be spaced at roughly 2 to 3 times the slab thickness in feet, so for a 4-inch slab, cut control joints every 8 to 12 feet, and never more than 15 feet apart. Keep panel proportions close to square, a length-to-width ratio no greater than 1.5:1 reduces cracking risk. Control joints need to be at least 1/4 of the slab depth (1 inch deep for a 4-inch slab) to reliably induce cracking at the joint rather than randomly across the surface.
Connecting paver extensions
For paver-to-paver connections, the joint between old and new is less structurally complex than concrete, but you still need to think about height and edge support. Make sure the new pavers sit at the same finished height as the existing ones, if there's a lip at the seam, it's a trip hazard and looks bad. Extend the compacted base at least 6 inches beyond the edge restraint line to prevent the base from spreading outward and the edge pavers from settling or tilting. The edge restraint itself should be secured with 10-inch spikes driven through the restraint into the base at roughly 12-inch intervals.
Managing height transitions
Getting the finished heights to match is mostly a math problem, work backward from the existing surface height, account for all your layers (base + bedding + surface material), and adjust your excavation depth accordingly. Use the existing slab edge or a paver as your benchmark and run a mason's string line out across the new footprint with a line level to set the grade. If the new section will be slightly lower or higher due to unavoidable conditions, a small beveled transition strip or a deliberate step down (with proper edging) is a cleaner solution than a barely-there lip.
Step-by-Step Build Workflow
Here's how to run the project from start to finish. If you're extending a small patio or working with a different scenario like a raised patio, some steps will vary, but this sequence covers the core DIY process for most ground-level extensions. If you are working with a raised patio, the basics are similar, but you need extra attention to framing, support, and making the height transition waterproof. Once you’ve planned the extension layout and materials, you can move into the actual backyard patio extension steps for excavating and building the new section.
- Stake out and string the new footprint; confirm finished height benchmark at the existing edge
- Call 811 for utility location; check permit requirements with your local building department
- Excavate to required depth (base + bedding + surface thickness), keeping edges clean and vertical
- Install geotextile fabric at the bottom of the excavation if soil is soft or clay-heavy
- Add compacted gravel base in 2-inch lifts, compacting each layer with a plate compactor
- Check base with a 10-foot straightedge—maximum gap should be no more than 1/4 inch
- For concrete: set forms at correct finished height and slope; press isolation joint foam backer against the existing slab edge; dampen the base before pouring; screed with a 2x4 in a sawing motion; cut or tool control joints within 6–12 hours of pour
- For pavers: set screed pipes at correct slope; spread and screed 1 inch of coarse bedding sand; lay pavers in pattern starting from a fixed corner; cut edge pavers with an angle grinder or wet saw; install edge restraint along outer perimeter, spiking every 12 inches
- Check alignment every few rows with a string line; adjust bedding sand under any low pavers before they're locked in
- For concrete: keep slab moist for at least 7 days of curing; avoid heavy foot traffic for 24–48 hours and vehicle traffic for at least 28 days
- Fill paver joints with polymeric sand, sweeping it in and activating with a light misting of water
- Final drainage check: pour a bucket of water at the house-side edge and confirm it flows toward the outer edge
Troubleshooting checkpoints
- If water pools at the connection seam after rain, the slope of the new section may be inadequate—recheck grade before the base is locked in
- If edge pavers rock or tilt within the first season, the base wasn't extended far enough beyond the edge restraint or wasn't fully compacted
- If the new concrete slab cracks near the old-to-new joint, the expansion joint material may have been omitted or was too thin—repair with a flexible polyurethane joint sealant
- If pavers are sinking in one area, dig them up, add bedding sand, and re-compact that spot before re-laying
- If the finished height doesn't match the existing surface, you caught it too late to excavate deeper—a beveled aluminum transition strip can bridge a gap up to about 3/4 inch
Finishing, Sealing, and Keeping It Looking Good
Edging and cut pieces
Clean cuts at the outer edge make the whole project look professional. For pavers, a wet saw or angle grinder with a diamond blade gives the cleanest cut. Mark each cut piece individually rather than measuring in bulk, the outer edge of your excavation is rarely perfectly straight, and small variations add up. For concrete, the formed edge creates a clean finish automatically, but you may want to add a bevel tool to round the outer edge slightly and prevent chipping.
Sealing
Sealing is optional but worthwhile, especially for concrete. A penetrating concrete sealer applied to new concrete (after at least 28 days of cure) helps resist staining, reduces moisture absorption, and extends the life of the surface. For pavers, a sealer can enhance color and help lock in polymeric joint sand. Reapply every 2 to 3 years, or when water stops beading on the surface. Don't seal across the expansion joint, that gap needs to remain flexible, filled with a backer rod and topped with a flexible polyurethane or silicone joint sealant that can compress and stretch with seasonal movement.
Weed control
Weeds come up through paver joints, around the edges, and through any gaps in the base. Polymeric sand in paver joints is your first line of defense, it hardens and resists weed germination better than regular jointing sand. Lay a strip of non-woven geotextile along the outer perimeter before backfilling against the edge restraint to slow weed encroachment from the sides. If weeds appear anyway, a targeted application of a non-selective herbicide at the edge followed by re-sanding the joints usually handles it. For concrete, check the expansion joint annually and reseal any joint where the filler has shrunk or cracked, open joints invite weeds and water infiltration.
Long-term maintenance
Every spring, check the drainage slope with a level, freeze-thaw cycles and soil settling can cause subtle shifts over time. Inspect the expansion joint between old and new sections: if the joint sealant has cracked or separated, clean out the old material and reseal it. For pavers, re-sand joints every few years and re-compact edge areas if they start to shift. Concrete surfaces benefit from a quick power wash and a fresh coat of sealer every 2 to 3 years. Catch small problems early, a 30-minute annual inspection is a lot cheaper than re-doing a section that's been quietly undermined by water for two years.
FAQ
Do I always need a permit to extend a patio?
Not always, especially right next to the foundation. Many places allow small, ground-level patios without a permit, but adding square footage, changing drainage, or building near property lines often triggers a review. Call your building department with your planned dimensions and the distance from the house, so you do not discover the issue after the excavation.
Can I extend over cracks and spalling on my existing patio?
If the existing slab is damaged but still mostly stable, you may be able to patch and extend, but you must first confirm the base is sound. Hairline surface cracks alone are usually fine, but if you see vertical offset at the seam, widespread joint cracking, or areas that rock when stepped on, the extension connection will likely telegraph the failure and you may need partial replacement before you add onto it.
What should I use to connect the new patio to the old one so it does not crack?
At the connection seam, you should avoid adhesives or rigid fasteners that tie the two sections together. Instead, use a full-depth expansion (isolation) joint for concrete-to-concrete and a properly supported height-matched paver transition for pavers. If you are unsure, treat any flexible caulk as temporary, because it does not provide the movement capacity that prevents slab-to-slab cracking.
Can I apply concrete sealant across the expansion joint?
No, you should not seal over the expansion joint gap. The joint must remain compressible at full slab depth, with a backer rod and a flexible top sealant designed to stretch and compress. Sealing it rigidly can trap water and movement, which accelerates cracking around the joint edges.
What if my extension ends up a little higher or lower than the existing patio?
If the match is slightly off, create a controlled transition rather than a sharp lip. A thin “caulk-like” fill is not reliable, it can wash out and become a trip hazard. Use edging and, for concrete, consider a beveled transition strip; for pavers, rebuild the first course so the surface elevation is consistent across the seam.
Why do pavers around the edge settle or dip after installation?
For pavers, the most common cause of settlement is bedding sand that is too thick or inconsistent, or base that was not compacted in lifts. If you compact the base properly and screed only about 1 inch of clean bedding sand, you reduce uneven drops. Also confirm your edge restraint is embedded deeply enough, otherwise the perimeter can spread and pull the patio out of level.
My current patio has puddles, can I fix it by sloping only the new extension?
If your patio drains poorly now, you generally need to re-solve the grading and moisture path, not just make the new section slope. Water from the extension will still flow to the lowest points, which may be near the foundation. Re-check the fall away from the house across the whole combined area before you pour or set pavers.
How much movement should I expect at the seam in winter or summer?
Yes, plan for seasonal movement. Leave the expansion/isolation joint gap between old and new concrete at full depth, and do not fill it with rigid grout or mortar. For paver extensions, keep the seam supported, height-matched, and free to move as a unit, then maintain joint sand so the paver bedding stays stable.
How do I make sure the slope is correct under pavers or concrete?
Recreate a consistent slope on the bedding plane, then lock it in with correct slope for the sand screed. If you cut the base level incorrectly, you can end up with a surface that looks fine during installation but holds water after the patio settles. Use a level and measure grade both before and after compaction, not just once.
What joint sealant type should I use for concrete patio isolation joints?
For joints, use flexible, purpose-made materials. Flexible polyurethane or silicone joint sealant is appropriate for the top of an isolation joint over compressible backer, while rigid patching compound can fail when the slab moves. Also keep the joint clean, remove old loose filler, and reseal if the sealant has shrunk or separated.
How can I avoid messy cuts or chipping at the outer edge?
You should plan to align cuts at the outer edge so the seam remains where it belongs, not pushed around during installation. Measure and mark each cut piece individually because excavation lines rarely stay perfectly straight. For concrete, a clean formed edge or a light bevel on the top edge reduces chipping, especially where shoes, moving furniture, or mowing wheels contact the patio edge.
Is sealing necessary, and when should I seal the extension?
A sealer is optional, but it is different for concrete and pavers. Concrete sealer should be applied after curing for at least 28 days and typically every 2 to 3 years depending on sun exposure and traffic, while paver sealing is often about color enhancement and helping joint sand performance. Do not seal the expansion joint itself, and watch for newly sealed surfaces becoming slippery after rain.