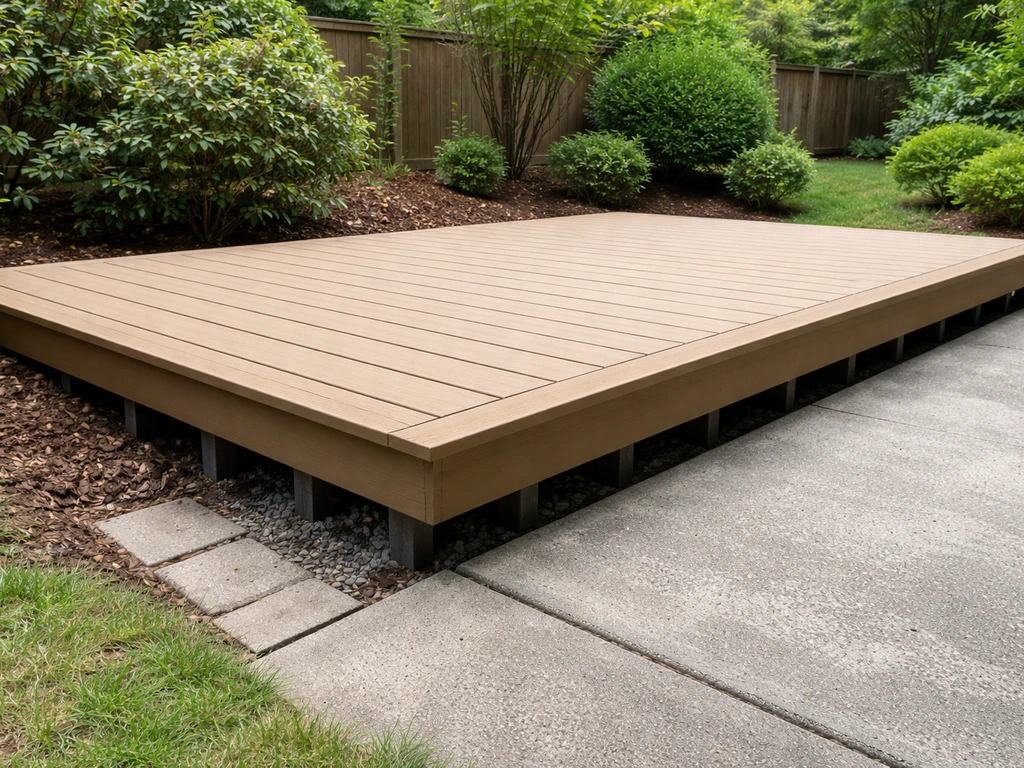
Building a patio deck is one of the most rewarding DIY projects you can tackle as a homeowner. The basic process is this: decide on your structure type, lay out your footprint, prep the ground with compacted gravel and proper drainage, frame with pressure-treated lumber, fasten your decking boards, and finish with sealing or staining. A simple ground-level or low patio deck can be built in a weekend for as little as $500 to $800 in materials if you keep the design modest. Whether you're building fresh on bare ground, layering new decking over an existing concrete patio, or creating a patio space underneath an elevated deck, the fundamentals are the same, good prep, solid framing, and quality fasteners.
How to Make a Patio Deck: Step-by-Step DIY Guide

Nolan Carver
4 May 2026
First, decide exactly what you're building
Before you buy a single board, you need to get clear on which scenario fits your situation. There are three common setups people mean when they search for a patio deck, and they each involve different prep and structural decisions.
- Deck built on bare ground (new construction): You're starting from scratch on a dirt or grass area. This is the most common DIY situation and gives you full control over drainage, layout, and height.
- Deck built over an existing concrete or paver patio: Your patio slab is already there and you want to add a wood or composite deck surface on top. The slab becomes your base, which simplifies some steps but adds others.
- Patio built under an elevated deck: You have (or are building) a raised deck and want to use the shaded space underneath as a patio — either with pavers, gravel, concrete, or even a dry-under drainage system.
If you're building on bare ground, this guide covers your full process start to finish. If you're adding decking over an existing patio or building out the under-deck space, jump ahead to the dedicated section on those two setups after reading through the framing and materials sections, a lot of the knowledge overlaps. It's also worth thinking about height early: a low or ground-level patio deck (within a few inches of grade) needs no guardrails and is far simpler to build than a raised deck. If your finished deck surface will be 30 inches or more above grade at any point, local codes will require guardrails at 36 inches minimum height, plus additional structural considerations.
Plan your layout and take your measurements
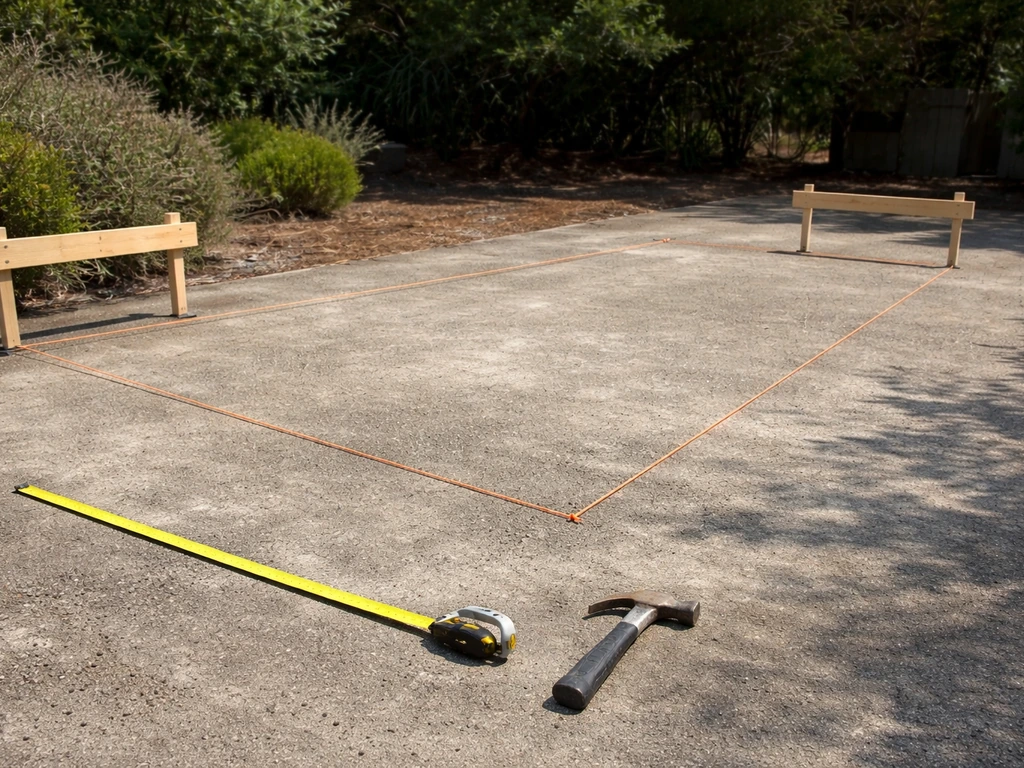
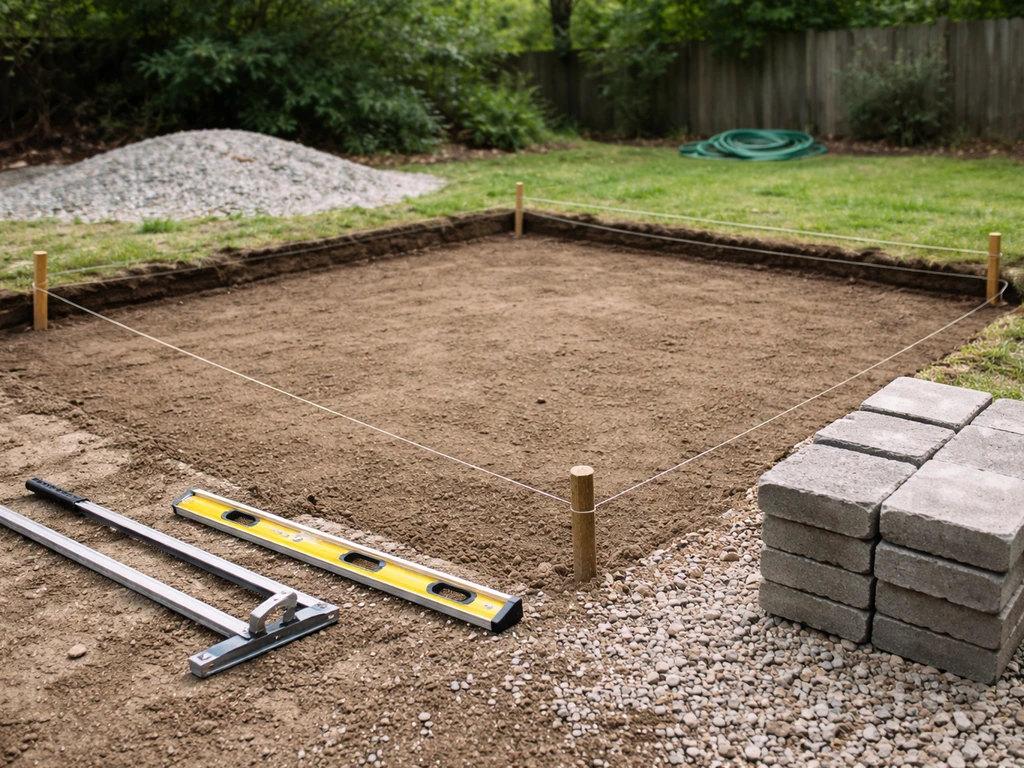
Start by staking out your deck's footprint on the ground using batter boards and string lines. For a simple rectangular back patio deck, this is straightforward: drive stakes a few feet past each corner, run string between them, and use the 3-4-5 triangle method to confirm your corners are square. Measure 3 feet along one string, 4 feet along the perpendicular string, and the diagonal between those two points should be exactly 5 feet. If it's not, adjust until it is. This is the same method used to square a patio deck layout and it works every time.
For small patio decks (think 10x10 to 12x16 feet), keep it simple. Bigger decks require more footings, more lumber, and more time. A 10x12-foot deck is a very achievable first project and gives you real usable outdoor space. Measure twice, then mark your exact footing locations on the ground, typically spaced no more than 8 feet apart center-to-center, though 6-foot spacing is stronger and safer for heavier composite materials. Sketch your layout on paper with actual measurements before you dig anything.
Small and low patio deck layout tips
For a small or low patio deck, fewer footings are fine. A simple 10x10 platform can work with as few as four corner footings plus one center support, depending on your joist span. In areas subject to ground freezing, support footings are typically placed below the local frost depth, which is set by the local jurisdiction depending on your joist span. Joists spaced 16 inches on center is the standard, and it's the spacing you'll find recommended in most municipal deck guides. Keep your decking boards running perpendicular to the joists. If the deck is very low to the ground (6 inches or less of clearance), plan your ventilation gaps carefully, you want air moving under there to reduce moisture buildup and wood rot.
Prep the ground: base, drainage, and slope
This is the step most beginners underestimate, and skipping it is what causes decks to shift, sag, and rot within a few years. Good ground prep takes a few hours but adds years to your deck's life.
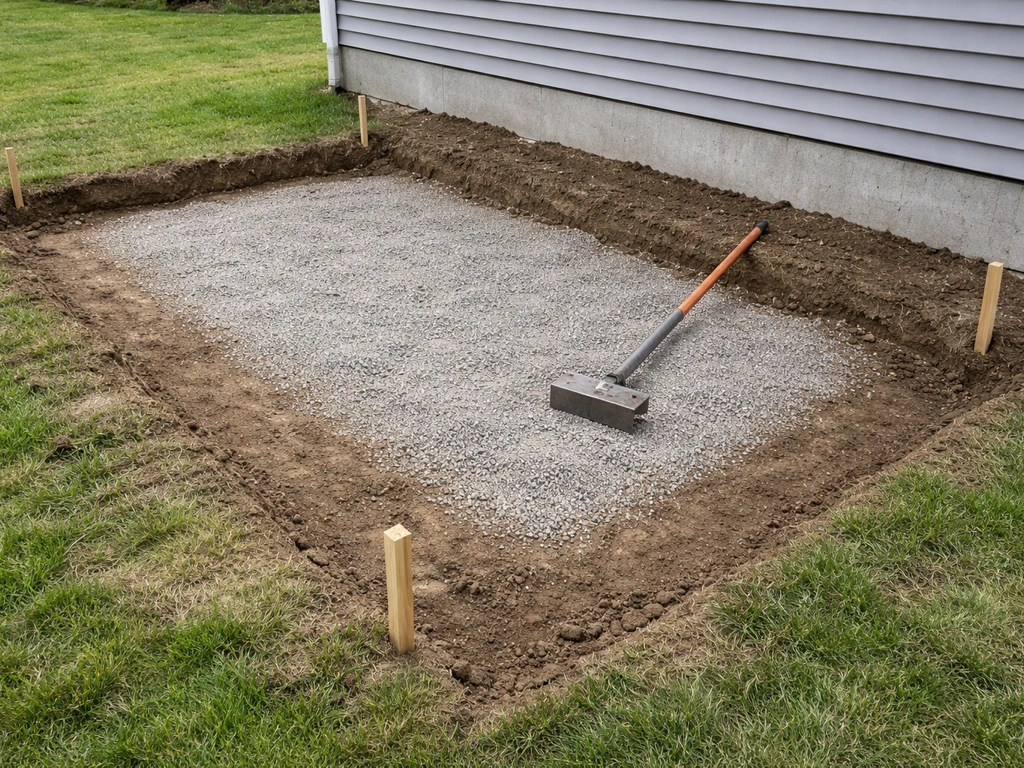
- Remove all grass, sod, and organic material from the deck footprint. Organic material breaks down and causes settling. Dig down 4 to 6 inches if needed.
- Add 4 inches of compacted gravel (crushed stone works well) across the entire footprint. This creates a drainage layer so water doesn't pond under your deck.
- Dig your footing holes at each marked location. In cold climates, these must go below the local frost line — check your local building department for the depth in your area. In mild climates, 12 to 18 inches is often enough, but verify locally.
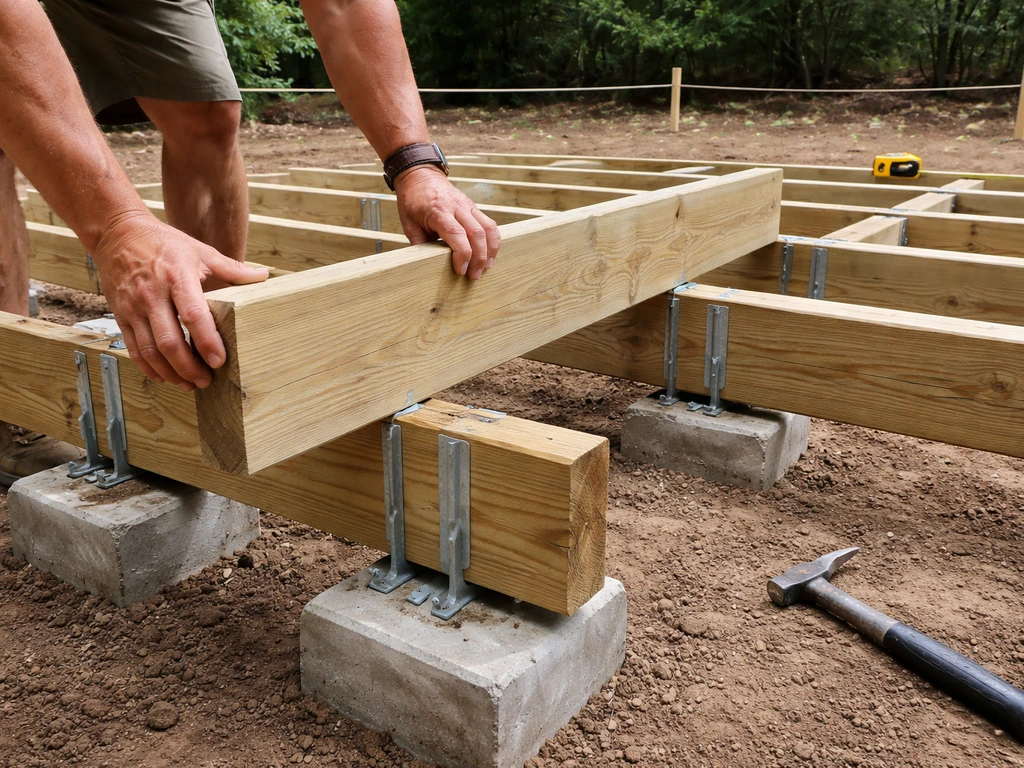
- Set concrete tube forms (Sonotubes) in each hole, pour concrete, and set post anchors or post bases while the concrete is still wet. Keep the tubes plumb. Let concrete cure for at least 48 hours before loading.
- Add gravel backfill around each pier after setting to further aid drainage and keep water from pooling around your posts.
- Slope the ground slightly away from your house (about 1/8 inch per foot) so that any water that gets under the deck drains outward, not toward your foundation.
If you're building a fully freestanding deck (not attached to your house), you also need to think about ventilation. Leave at least 6 inches of clearance between the bottom of your framing and the ground, and don't enclose the sides completely, air needs to circulate underneath to dry things out after rain. blank" rel="noopener noreferrer">A ledger-attached deck (one bolted to your house framing) involves additional code requirements under IRC Section R507.9, including specific fastener types and patterns. If you're going that route, pull a permit and check with your local building department, it's worth it.
Materials and tools: what you actually need
Here's an honest breakdown of what goes into a basic patio deck build and what your budget-friendly options are. Pressure-treated lumber is the standard for ground contact and framing. For decking boards, you have more choices.
| Material/Component | Standard Option | Budget-Friendly Option | Notes |
|---|---|---|---|
| Decking boards | 5/4x6 pressure-treated pine | Recycled composite or treated pine on sale | 1.25" thick, 5.5" wide boards at 16" o.c. span |
| Joists | 2x8 or 2x10 pressure-treated | 2x6 for very short spans (under 6 ft) | Size depends on joist span; check span tables |
| Beams | Double 2x10 or 4x8 pressure-treated | Doubled 2x8 for lighter loads | Carry joist loads to posts/footings |
| Posts | 4x4 or 6x6 pressure-treated | 4x4 adequate for low decks | 6x6 for decks over 8 ft high |
| Footings | Concrete tube forms + poured concrete | Pre-cast concrete deck blocks for flat, frost-free areas | Tube forms are stronger and frost-safe |
| Fasteners | Stainless steel or hot-dipped galvanized screws | Coated deck screws (cheaper but adequate) | Avoid plain steel — it rusts fast |
| Decking alternative | Cedar or redwood (rot-resistant) | Composite decking (higher upfront, lower maintenance) | Composite lasts longer in wet climates |
| Joist hangers/hardware | Triple-zinc or stainless joist hangers | Standard galvanized joist hangers | Never skip hangers — they're load-critical |
Tools you'll need
- Circular saw (a miter saw is a bonus but not required)
- Drill/driver with deck screw bits
- Speed square and framing square
- String line and batter boards
- Tape measure (25-foot minimum)
- Post hole digger or rented power auger
- Level (4-foot level is ideal)
- Wheelbarrow and shovel for gravel and concrete
- Safety glasses and hearing protection
You don't need a $300 miter saw to build a solid patio deck. A quality circular saw handles every cut you'll make. Rent a power auger for footing holes if you have more than four footings, digging by hand gets old fast. Total material costs for a 10x12 foot basic pressure-treated deck run roughly $600 to $1,200 depending on your region and lumber prices. Composite decking boards will add $300 to $600 to that estimate but drastically cut long-term maintenance costs.
How to build a patio deck: step by step
This sequence is designed for a beginner building a freestanding, ground-level or low patio deck. For a full walkthrough, follow this guide on how to install patio decking from layout and framing to board spacing, fastening, and finishing. Once you understand the basics of a patio deck build, you can follow the step-by-step plan for wood framing, decking boards, and finishing touches how to build a patio deck. If you're building a raised deck or attaching to a house, the core steps are the same but you'll add ledger installation and possibly stair framing. If you want the specifics for how to build a raised patio deck, focus on ledger installation, guardrails, and stair or step framing as you follow the same core workflow.
- Step 1 — Check local permits: Many municipalities require a permit for decks over a certain size (often 200 sq ft) or height. Call or visit your local building department before you start. It takes maybe 30 minutes and saves major headaches later.
- Step 2 — Lay out the footprint: Use batter boards and string to mark your corners. Confirm square with the 3-4-5 method. Mark all footing locations with spray paint on the ground.
- Step 3 — Dig and pour footings: Dig footing holes to the required depth, set tube forms so they extend 2 to 4 inches above grade, pour concrete, and set your post anchors while wet. Keep everything plumb. Let cure 48 hours minimum.
- Step 4 — Set posts: If using post-anchor hardware, drop your pressure-treated posts into the anchors and secure. For a low deck, your 'posts' may be very short stubs or you may set beam hardware directly on the piers.
- Step 5 — Install beams: Lay your beams (doubled 2x10 or 4x8) across the tops of the posts. Use structural screws or through-bolts to connect beams to posts. Check that beams are level in both directions.
- Step 6 — Hang joists: Install rim joists (the outer frame) first, then hang interior joists at 16 inches on center using joist hangers. Every joist gets a hanger — this is non-negotiable for structural integrity.
- Step 7 — Add blocking: Install blocking (short 2x pieces between joists) at the midpoint of long joist spans to prevent twisting. This is especially important for spans over 8 feet.
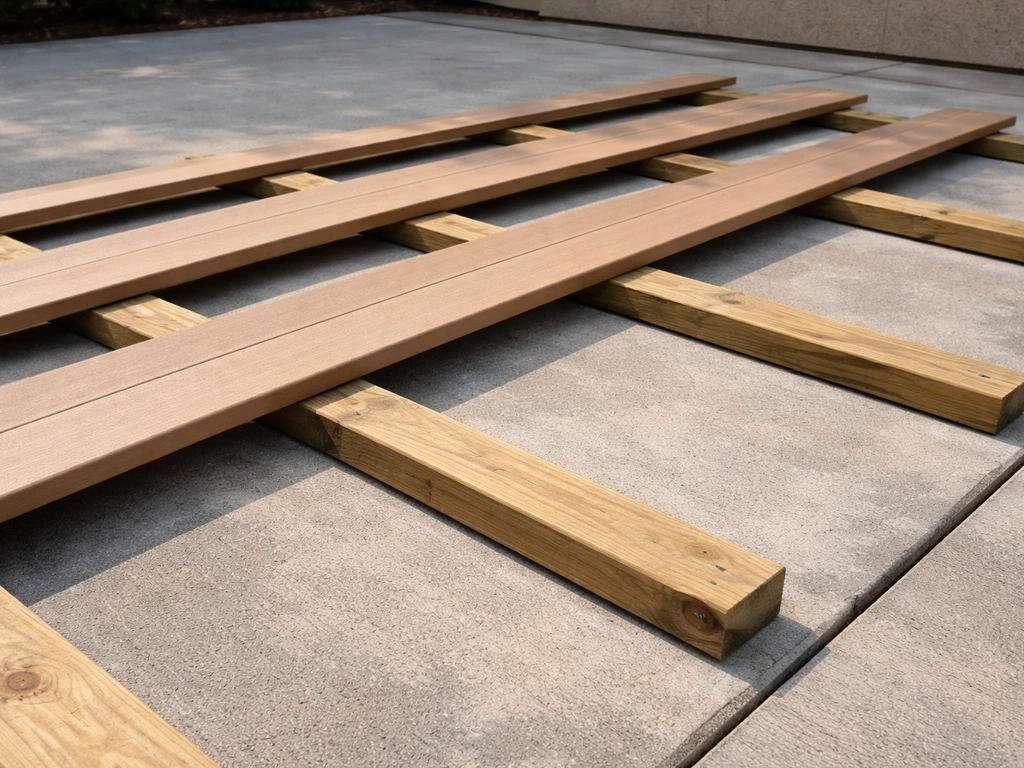
- Step 8 — Lay decking boards: Start at one edge and work across. Leave a 1/8-inch gap between boards for drainage and wood expansion. Pre-drill near board ends to prevent splitting. Drive two screws per board per joist — that's your pattern.
- Step 9 — Cut edges flush: Once all boards are down, snap a chalk line and trim the ends flush with a circular saw for a clean, professional edge.
- Step 10 — Install guardrails if needed: If any part of your deck is 30 inches or more above grade, guardrails are required. Minimum height is 36 inches above the deck surface. Use 4x4 rail posts bolted through the rim joist, not just screwed in.
- Step 11 — Seal or stain: Apply a quality deck sealer or penetrating stain within the first few weeks of completing the build, before the wood weathers and grays.
Building decking over an existing patio, and building a patio under a deck
These two situations come up constantly, and they both deserve a clear explanation because they're a bit different from starting from scratch.
Adding decking over a concrete patio
If you already have a concrete patio slab and want to put a wood or composite deck surface on top, the slab does the heavy lifting as your foundation. You don't need footings. Instead, you install pressure-treated sleepers (typically 2x4 or 2x6 lumber) directly on the slab, fastened with concrete screws, and then nail or screw your decking boards to those sleepers. Space sleepers at 16 inches on center just like joists. The key issue here is drainage: you need the slab to slope slightly away from the house (at least 1/8 inch per foot), and you need to allow water to escape from under the decking. If the slab is dead flat or slopes toward the house, correct that first with a concrete grinding or resurfacing product, or plan drainage channels. Shimming sleepers to create a slight pitch also helps. This approach keeps the deck very low to the ground, which is actually a big advantage, no guardrail requirements, easy to step on and off, and simple to build.
One common mistake with decking-over-concrete builds: using untreated lumber for sleepers. Even pressure-treated wood in direct contact with a moist concrete slab can degrade faster than you'd like. Use lumber rated for ground contact (labeled UC4A or UC4B), and consider adding a foam sill seal or moisture barrier tape between the sleeper and the slab to reduce direct moisture transfer. If you're going to build decking over a patio, take this one shortcut off the table, it's a cheap fix that adds years of life.
Creating a patio under a raised deck
If you have a raised deck (or are building one) and want to use the space underneath as a usable patio, you're dealing with two main challenges: keeping the space dry and making it look intentional. For keeping it dry, a under-deck drainage system installed on the underside of the deck joists channels water off to the sides before it drips down. These systems run $8 to $15 per square foot installed and make the under-deck space genuinely usable even during rain. Without a drainage system, the space is shaded but not dry. For the patio surface itself, crushed gravel is the cheapest option (and great for drainage), followed by concrete pavers laid on compacted gravel, and then poured concrete as the most finished option. Install landscape fabric before your gravel layer to suppress weeds. Make sure the grade under the deck slopes away from your house foundation at a minimum of 1/8 inch per foot, water sitting against a foundation is the last thing you want. The patio surface you choose under the deck is its own project, and many of the same principles covered in concrete and paver patio construction apply directly here.
Finishing, safety checks, and keeping it in good shape
Once your deck is framed and boarded, don't just walk away. The finishing touches are what separate a deck that looks great for 15 years from one that's a maintenance headache in five.
Sealing and surface protection
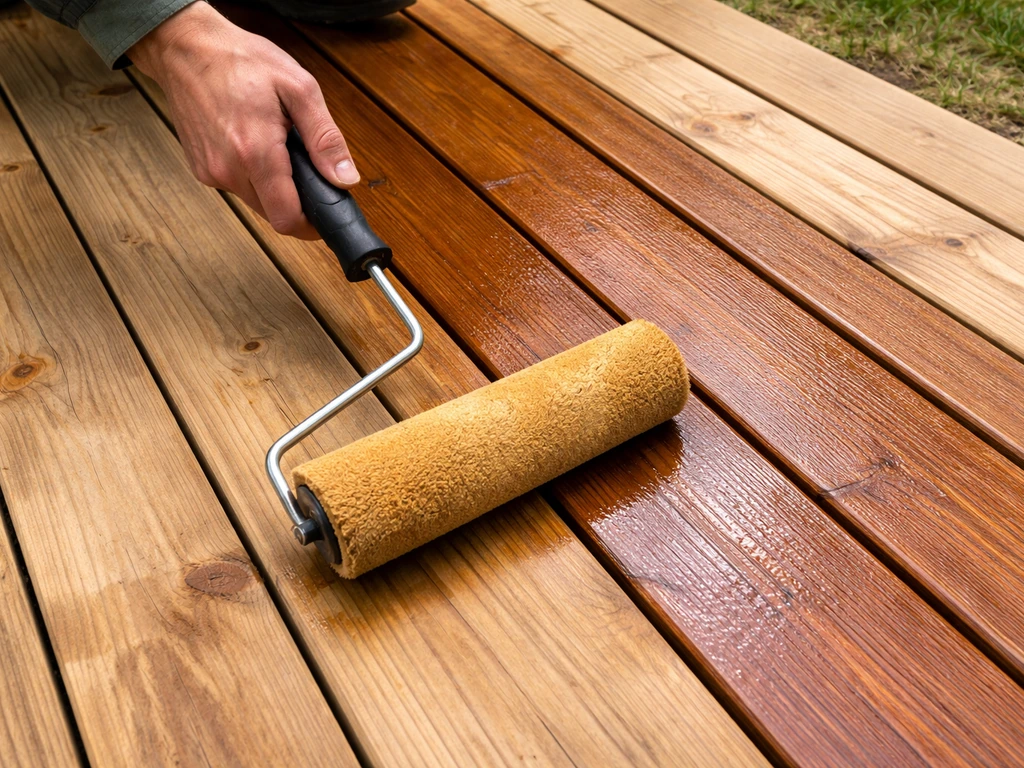
For pressure-treated pine decking, wait 2 to 4 weeks after construction for the wood to dry slightly, then apply a penetrating oil-based deck stain or sealer. Solid color stains offer the most UV protection. Semi-transparent stains let the wood grain show and look more natural. Clear sealers protect against water but not UV, so the wood will gray over time, that's a look some people like. Reapply every 1 to 2 years for pressure-treated pine, or every 2 to 3 years for cedar or composite. Composite decking generally just needs an occasional wash with soap and water, no staining required, which is a big reason many DIYers choose it despite the higher upfront cost.
Fastener and structural checks
Every year in spring, walk the deck and look for these things: any screws that have backed out (drive them back in or replace), joist hanger corrosion, soft spots in decking boards (probe with a screwdriver, if it sinks in easily, that board is rotting), and any wobble in railings or posts. Guardrail posts should feel completely solid when you push on them firmly. If they move, the through-bolts may have loosened or the rim joist connection needs reinforcement. This annual check takes 20 minutes and will catch problems before they become expensive repairs.
Quick safety checklist before you use the deck
- All decking boards are fully fastened — no boards with only one screw per joist
- Guardrails (if required) are at least 36 inches above the deck surface and feel rock solid
- No gaps between deck boards wider than 4 inches (balusters must prevent a 4-inch sphere from passing through)
- Stairs have a consistent rise (typically 7 to 7.75 inches) and run (minimum 10 inches) — uneven stairs are a trip hazard
- No standing water under or on the deck after rain — if pooling, address the drainage immediately
- All cut ends of pressure-treated lumber are sealed with end-cut preservative to prevent moisture intrusion
Building your own patio deck is completely doable, even if you've never swung a framing hammer before. The mistakes most people make, skipping ground prep, using the wrong fasteners, ignoring drainage, are all avoidable with a little planning. Start with a modest footprint, use quality pressure-treated lumber for all structural components, and don't rush the footing and framing stages. Get those right and everything else is just carpentry. If you want to go deeper on any part of this, there's a lot more to explore on wood deck construction specifics, the design and layout process, how to install decking materials over different bases, and what it takes to rebuild or repair an aging deck. If you want deeper guidance, the wood deck construction specifics section also walks through the design and layout process for how to design a patio deck, including how to handle different bases and common build considerations. If you are wondering how to rebuild a patio deck, focus first on checking the structure, replacing any rotted boards, and correcting drainage before you re-surface rebuild or repair.
FAQ
Can I put a patio deck on top of an existing concrete slab without footings?
Yes, as long as the base is truly supportive and level. For concrete patio slabs, check for low spots and slope, then use the sleeper approach with properly rated ground-contact lumber, sealed and fastened to the slab. If you have water that pools on the slab, fix drainage first, otherwise the deck boards and sleepers will stay damp.
What lumber and fasteners should I use so my patio deck does not rot early?
Choose materials based on what parts contact moisture. Pressure-treated framing is standard, but decking-over-concrete sleepers should be labeled for ground contact (commonly UC4A or UC4B) and you should avoid untreated lumber. For fasteners, use corrosion-resistant deck screws or hardware rated for pressure-treated wood, not generic indoor screws.
How do I know if my patio deck needs guardrails?
Don’t rely on the “within a few inches of grade” rule of thumb. If your finished deck surface is 30 inches or higher above grade at any point, guardrails are typically required, and local code details can add more constraints. Measure the finished walking surface height, not framing height, and confirm with your local building department.
How do I decide the correct joist spacing and decking board direction?
Spacing and layout matter more than people expect. Standard joist spacing is often 16 inches on center for typical decks, but decking direction should stay consistent relative to the joists, and board ends should land over framing, not in midspan. If you use wider boards or composite, verify span ratings so you do not overshoot what your joists can support.
What ventilation rules apply to a low, freestanding patio deck?
For low decks, ventilation is critical, even if you use gravel under the framing. Keep clearance under the framing, avoid fully enclosing the perimeter, and maintain an unobstructed airflow path from one side to the other. If you add insulation or landscape edging that blocks airflow, moisture will accumulate and you may see rot faster.
Do composite patio decks require different spacing or fastening than pressure-treated wood?
If you use composite decking, watch for the manufacturer’s required fastening method (clips versus screws), and confirm which board orientation it recommends for drainage. Composite still needs correct structure, especially proper joist spacing and end support, and it can expand and contract, so leave the recommended gaps at borders and around posts.
How should I handle deck board seams and board end support?
Yes, and the most common failure is using the wrong board end support. If you need to run boards longer than the available straight lengths, plan seams so they land on joists and keep the pattern consistent across rows. Also check that any “hidden” ends are still fastened securely, not just resting on unsupported air.
What causes patio decks to shift or sag, and how can I prevent it?
If you are building on bare ground, compacted gravel is a start, but you still need a stable footing plan. Mark footing points accurately, dig to consistent depth, and ensure the ground is firm before you frame. A deck that shifts usually comes from inconsistent base compaction or footings placed too far apart for the joist span and material weight.
When should I stain or seal a newly built patio deck, and which finish lasts longest?
If the deck surface is meant to be wet-resistant, your finishing schedule matters. Wait for pressure-treated wood to dry before staining or sealing, and choose a penetrating oil-based stain or sealer for better water resistance. For solid color options, you get stronger UV protection than clear sealers, which protect against water but do not stop UV graying.
What maintenance checks should I do every year to catch problems early?
Annual checks should include more than visible boards. Look for backed-out fasteners, signs of corrosion at hanger points, and soft spots in decking, probe those areas with a screwdriver. Also inspect where posts meet framing for movement, if rail posts shift under firm pressure, you may need to retighten through-bolts or reinforce the connection.