Building a patio yourself is completely doable, and the basics are the same whether you're laying pavers or pouring a concrete slab: get your layout right, prep a solid base with proper drainage slope, and take your time with each layer before moving to the next. Skip the base prep or rush the compaction, and you'll be relaying the whole thing in three years. Do it right once, and you'll have an outdoor space that lasts decades.
Tips for Building a Patio: DIY Plan, Base, and Steps

Nolan Carver
24 Jun 2026

Plan your layout and purpose first
Before you buy a single paver or bag of gravel, spend real time thinking about how you'll actually use the space. A patio for a dining table and six chairs needs at least 12 by 16 feet (192 square feet) to feel comfortable. A simple seating area with a couple of chairs and a fire pit can work in as little as 10 by 10. Measure the furniture you plan to use, set it up on your lawn, and walk around it. That's your minimum footprint.
Think about traffic flow too. Where do people walk from the house to the yard? You don't want your patio blocking that path or forcing awkward detours. Ideally, your main patio door lines up with a clear edge or corner of the patio so movement feels natural. Also consider sun and shade: a south or west-facing patio can be brutal in summer afternoons, which might push you toward a pergola or umbrella plan from the start.
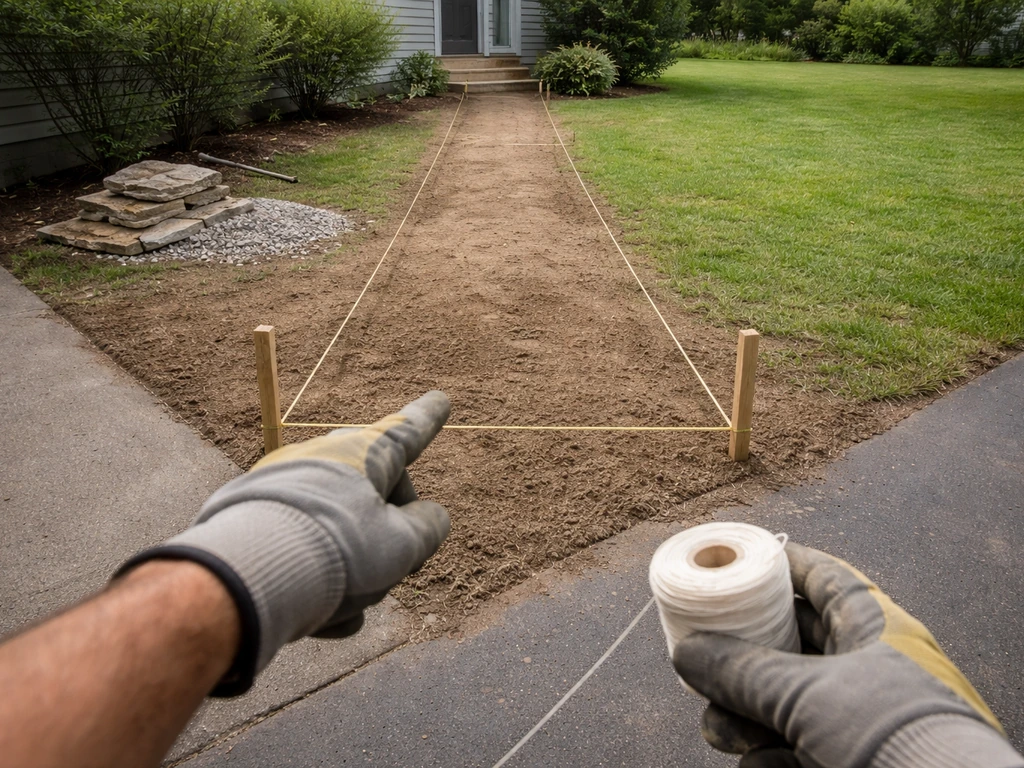
Sketch your layout on graph paper using a scale of 1 inch equals 1 foot. Mark the house foundation line, any existing doors or windows, and utilities (call 811 before you dig anything). Square and rectangular patios are much easier to build as a beginner because you're working with 90-degree corners and straight lines. L-shapes and curves add complexity fast, especially with pavers. If this is your first build, keep it simple.
Choosing the right patio material
The three materials most homeowners choose between are concrete pavers, poured concrete slabs, and natural stone. Each has real tradeoffs in cost, difficulty, and longevity. Here's an honest comparison:
| Material | Cost (installed DIY) | Difficulty | Durability | Repairability | Best For |
|---|---|---|---|---|---|
| Concrete Pavers | $8–$20/sq ft | Moderate | Very high | Easy (replace individual units) | Most DIYers, flexible design |
| Poured Concrete Slab | $5–$12/sq ft | Harder (requires forms, mixing/ordering) | High with proper joints | Hard (patch or resurface) | Flat, low-maintenance surfaces |
| Natural Stone (flagstone) | $15–$30/sq ft | Moderate–Hard | Very high | Moderate | Irregular, natural aesthetic |
| Gravel/Decomposed Granite | $2–$5/sq ft | Easy | Moderate | Very easy | Budget builds, casual use |
| Porcelain Pavers | $12–$25/sq ft | Moderate | Excellent | Moderate | Modern design, low maintenance |
For most DIYers, concrete pavers are the best starting point. They're forgiving: if you make a mistake or a paver cracks, you pull it up and fix it. They come in consistent sizes that make layout math straightforward, and they're available at every home improvement store. Poured concrete gives you a seamless look and a lower material cost, but it requires more skill to get right (mixing, finishing, and cutting control joints before the slab cracks on its own).
NRMCA also notes that isolation or expansion joints and control (contraction) joints help manage slab movement and influence joint spacing based on slab thickness, guiding where cracking occurs isolation/expansion joints and control (contraction) joints.
Natural stone looks incredible but the irregular shapes make installation slower and harder to level precisely.
Site prep: the part most people rush (don't)
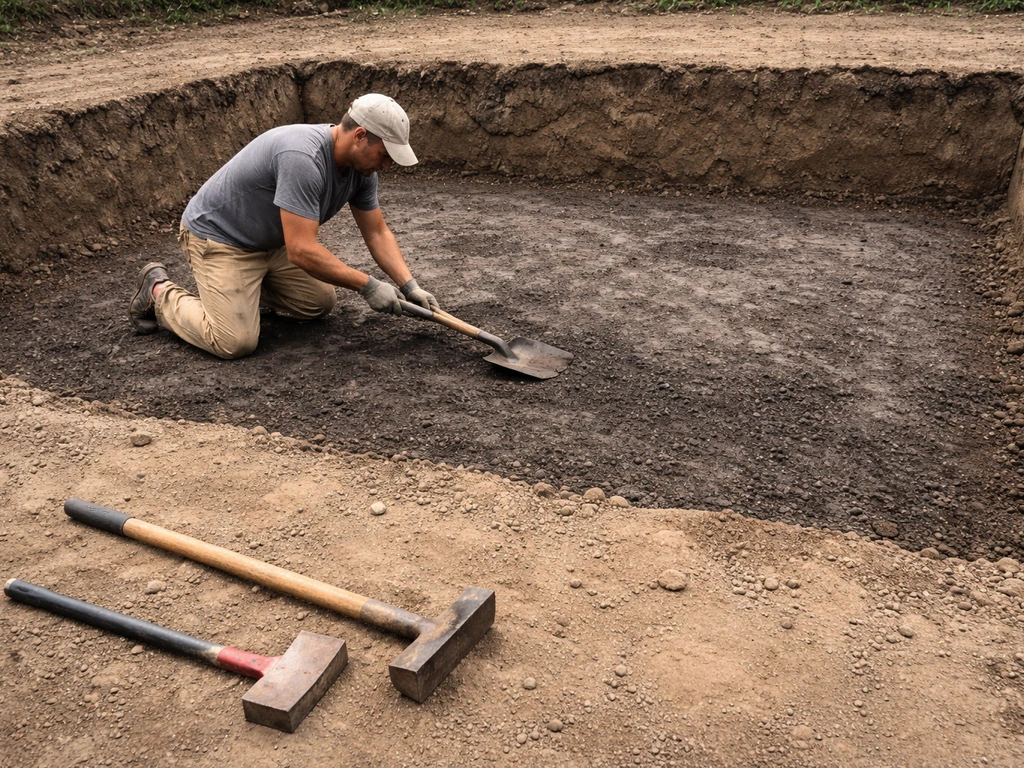
Good site prep is 80% of a durable patio. The two things that destroy patios over time are poor drainage and inadequate base compaction. To get the best way to build a patio, focus first on proper grading and drainage so water never pools near the house. Both are completely preventable if you do the groundwork correctly.
Grading and drainage slope
Your finished patio surface needs to slope away from the house at a minimum of 1/8 inch per foot, and ideally 1/4 inch per foot. Over a 10-foot-wide patio, that's a drop of 1.25 to 2.5 inches from the house edge to the outer edge. This keeps rainwater from pooling against your foundation. Use a 4-foot level with a tape measure or a line level and string lines to establish this slope across the entire excavated area before you lay a single stone.
Excavation depth
For a paver patio, you typically need to excavate 7 to 9 inches deep. If you're also planning how to build a patio base, treat drainage slope and compacted gravel as non-negotiables before you add bedding sand or pour concrete. That gives you room for 4 to 6 inches of compacted gravel base, 1 inch of bedding sand, and the paver thickness itself (usually 2.375 inches for standard pavers). For a poured concrete slab, dig down 8 to 10 inches to allow for 4 inches of compacted gravel and a 4-inch slab. Mark your excavation depth with stakes and string lines so you're digging consistently across the whole area.
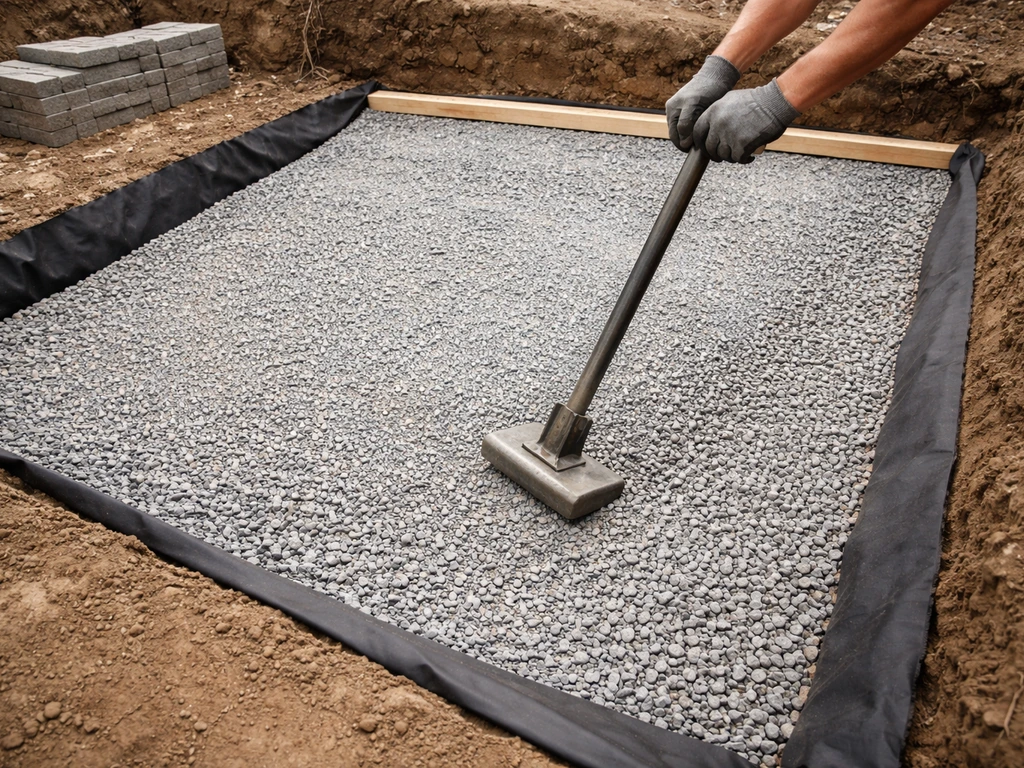
Building your base
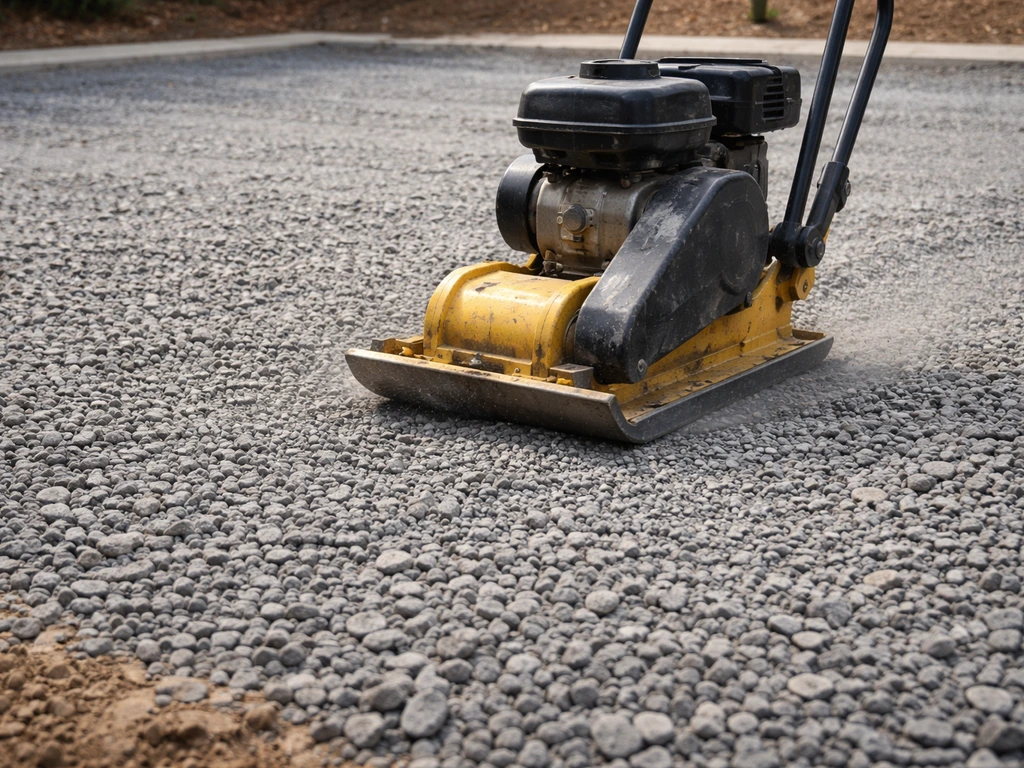
After excavating, add your crushed stone base in 2-inch lifts and compact each lift with a plate compactor before adding the next one. Don't dump all 6 inches in and compact once, that won't give you uniform density. Use 3/4-inch clean crushed stone (also called #57 stone or road base gravel depending on your region). After full compaction, check for any low spots by dragging a 2x4 screed board across the surface. Fill hollows, re-compact, and check again. This step directly determines whether your patio stays level for ten years or develops humps and dips within two.
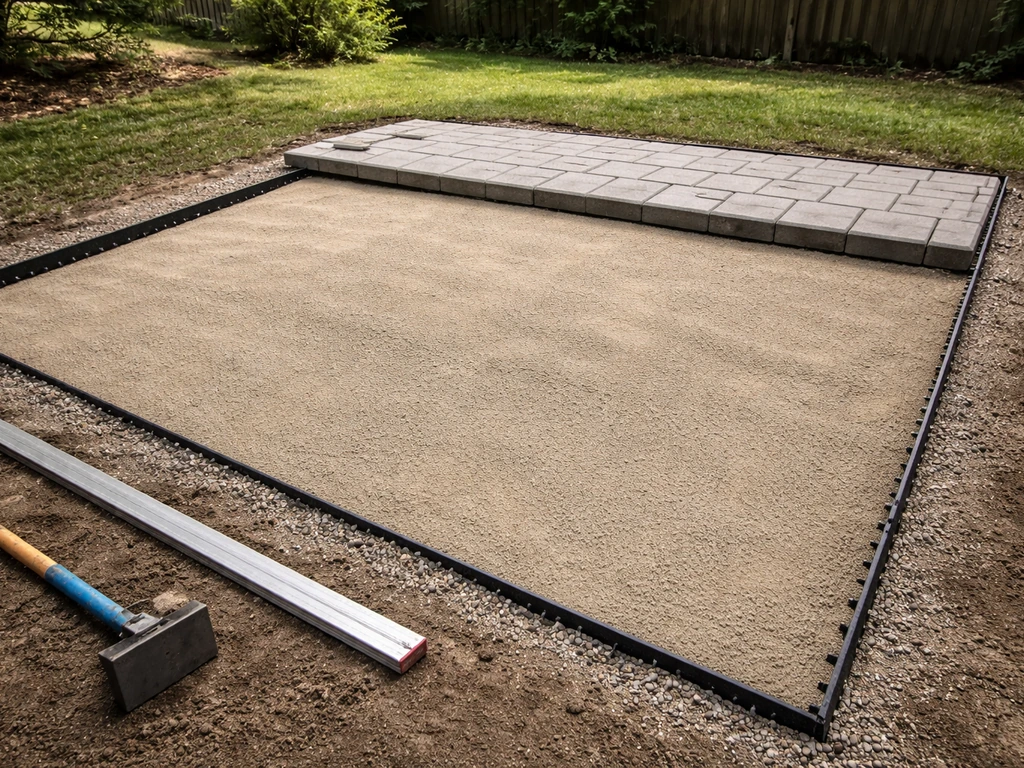
For paver installations, add a 1-inch layer of coarse concrete sand (not mason sand, not play sand) over the compacted base. Screed it flat and at your target slope, then do not walk on it before laying pavers. Footprints in screeded sand are surprisingly hard to remove perfectly, and they'll show up as high spots later.
Building steps for paver and slab patios
Laying a paver patio
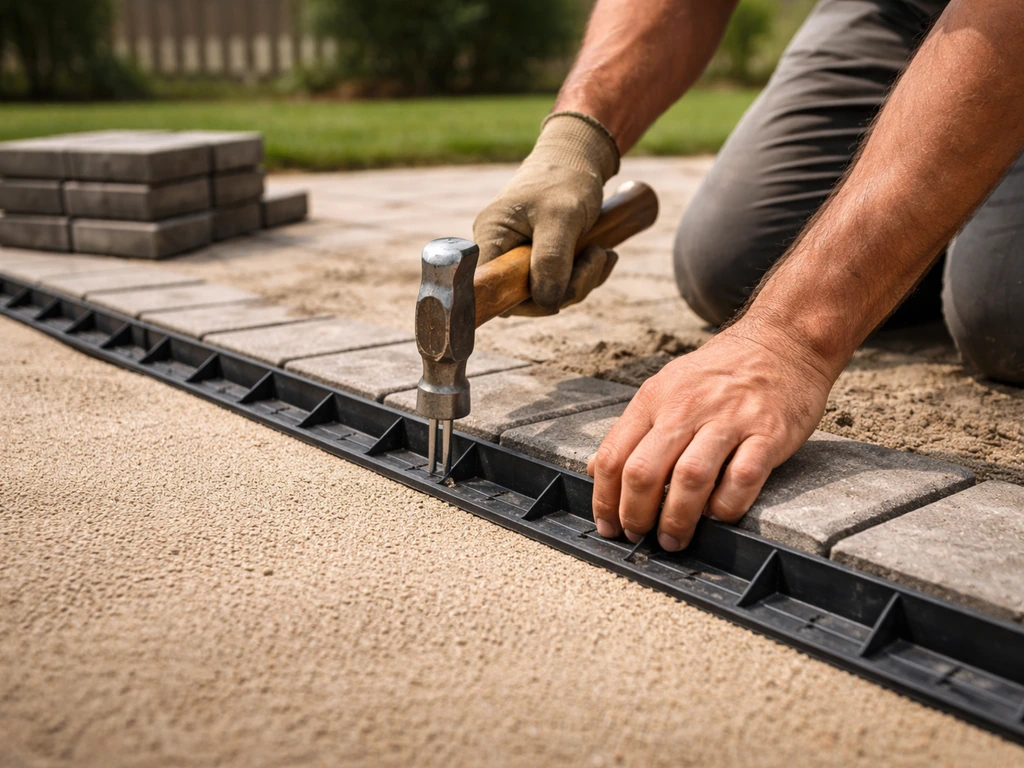
- Set your edging restraints first. Install plastic or aluminum paver edge restraints along your outer perimeter and spike them into the base every 12 inches. These hold your pattern tight and prevent edge pavers from migrating outward over time. This step gets skipped constantly by beginners and it's one of the top reasons paver patios loosen up.
- Start from a straight edge, usually the house side or a fixed straight line. Lay pavers from that reference point outward so cuts end up at the outer edges where they're less visible.
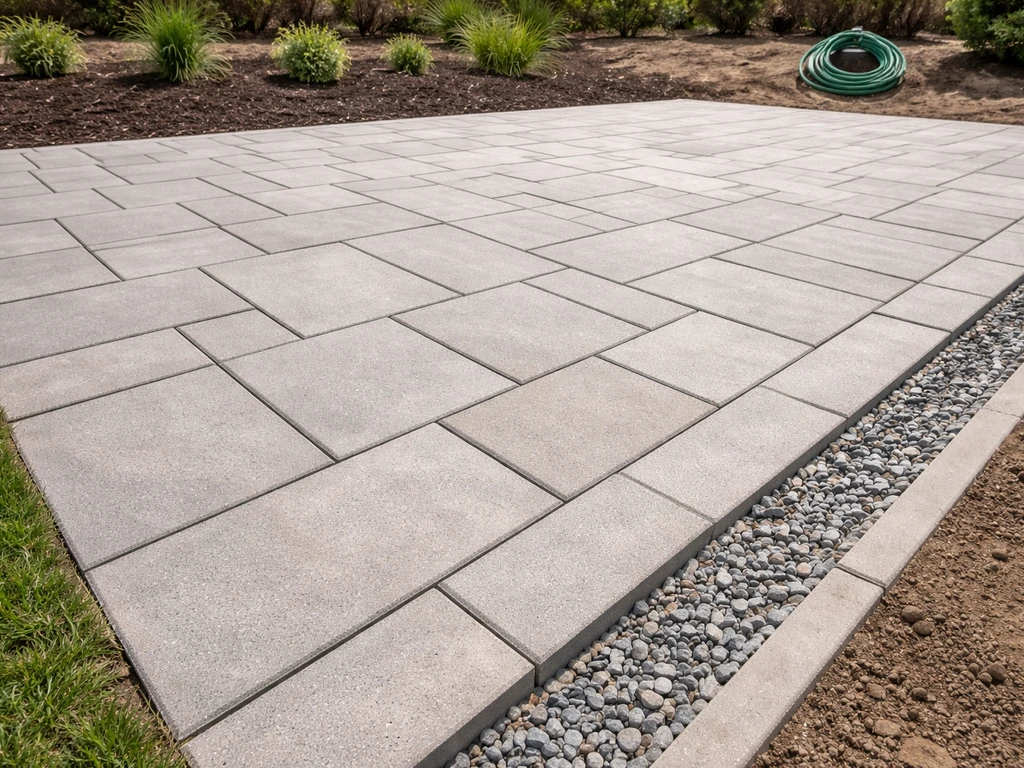
- Choose your pattern. Running bond (like brick) and 90-degree herringbone are the two strongest and most popular patterns. Herringbone locks pavers together better under traffic. Avoid diagonal herringbone on a first project because it creates a lot of angle cuts.
- Use two kneeling boards (scrap plywood pieces) to distribute your weight as you work across the sand bed. Kneel on the already-laid pavers, not the screeded sand.
- Check your slope and level every few pavers with a 4-foot level. Tap high pavers down with a rubber mallet. If a paver is low, lift it and add a small amount of sand beneath it.
- After all full pavers are laid, mark and cut border pavers using a diamond blade circular saw or angle grinder. Wear a respirator rated for silica dust (more on this below) and cut wet or use vacuum shroud dust controls.
- Spread polymeric jointing sand over the entire surface and sweep it into joints with a push broom. Make at least two passes in different directions. Compact with the plate compactor (put a rubber mat under the compactor plate to avoid scuffing the pavers). Sweep and compact again until joints are full. Polymeric sand hardens slightly when wetted and significantly reduces weed growth and ant infiltration versus plain joint sand.
- Mist the surface with water to activate polymeric sand, following the manufacturer's instructions for timing and quantity.
Pouring a concrete slab
Concrete slab work is harder for beginners because timing matters: once the truck arrives or you start mixing, you're working against the clock. That said, small slabs under 200 square feet can be mixed on-site with a rented mixer. Anything larger, order ready-mix concrete and make sure you have enough help (at least two other people) and tools ready before the truck backs in.
- Build your forms from 2x4 lumber set to your finished slab height. Stake them every 2 to 3 feet. Check and double-check level and slope before you pour — once the concrete is in, the forms are your guide.
- For slabs 4 inches thick, use a 4,000 PSI mix. Order or mix about 10% more than your calculated volume to account for waste.
- Pour, then screed the surface with a straight 2x4 pulled across the tops of the forms. Work in sections and screed twice in different directions.
- Float the surface with a bull float to close the surface and remove screeding marks. Don't over-finish a slab that will be exposed outdoors — a slightly rough surface gives better traction.
- Cut control joints before the slab fully hardens. For a 4-inch slab, cut joints every 8 to 12 feet (the ACI general rule ties joint spacing to roughly 24 to 36 times slab thickness, with practical spacing typically capping at 10 to 15 feet for residential slabs). Isolation joints at the house foundation and any other fixed structures are also critical — they allow independent movement and prevent random cracking along the slab-to-foundation interface.
- Cure the concrete for at least 7 days by keeping it moist. Cover with plastic sheeting or use a curing compound. Rushing this step causes surface cracking and reduces long-term strength.
Tools, safety, and workflow
Tools you'll actually need
- Plate compactor (rent this, don't skip it — hand tampers are not sufficient for a base you're trusting to stay flat for 10+ years)
- 4-foot level and line level with string and stakes
- Rubber mallet
- Dead blow hammer
- Screed board (a straight 2x4 works fine)
- Push broom and hand broom
- Circular saw with diamond blade, or angle grinder with diamond wheel, for cutting pavers or stone
- Wheelbarrow and square-nose shovel
- Tape measure and chalk line
- For concrete: bull float, hand float, and edging tool
Safety: silica dust is serious
Cutting concrete, pavers, or stone creates respirable crystalline silica dust, which causes serious and permanent lung disease over time. OSHA's construction standard (29 CFR 1926.1153) specifically regulates silica exposure and requires engineering controls like wet cutting or vacuum dust collection. For a DIY build, the practical takeaway is: always cut pavers wet (most angle grinders and circular saws can run with a small stream of water at the blade), or use a vacuum shroud dust collection attachment. At minimum, wear an N95 respirator rated for silica. Don't rely on a paper dust mask. Cut outdoors with the wind at your back so dust blows away from you.
Realistic DIY timeline
| Phase | Task | Time Estimate (200 sq ft patio) |
|---|---|---|
| Weekend 1 | Layout, marking, and excavation | 1 full day |
| Weekend 1 | Gravel base delivery, spreading, and compaction | Half to full day |
| Weekend 2 | Sand bed and screeding (pavers) or form building (slab) | Half day |
| Weekend 2 | Paver laying or concrete pour | Full day |
| Weekend 3 | Cuts, edge restraints, jointing sand, cleanup | Half day |
Don't try to excavate and lay pavers in the same day. Tired workers make mistakes, and mistakes in a patio base are expensive to fix. Give yourself a weekend for each major phase and you'll enjoy the process instead of rushing through it.
Budget breakdown, permits, and mistakes to avoid
What a DIY patio actually costs
For a 200-square-foot paver patio, here's a realistic breakdown for a mid-range build in most parts of the US in 2026:
| Item | Estimated Cost |
|---|---|
| Concrete pavers (mid-grade, ~$1.50–$2.50/paver) | $400–$700 |
| Crushed stone base (6 inches, ~3.5 tons) | $120–$200 delivered |
| Coarse bedding sand (1 inch, ~1 ton) | $40–$80 |
| Polymeric jointing sand | $50–$80 |
| Plastic edge restraints and spikes | $40–$70 |
| Plate compactor rental (2 days) | $80–$120 |
| Diamond blade for cutting | $25–$50 |
| Miscellaneous (string, stakes, tools) | $30–$60 |
| Total estimate | $785–$1,360 |
Add a 10 to 15% contingency to your budget for waste, broken pavers, and unexpected subgrade issues. If you hit soft spots during excavation (old tree roots, buried debris, or poorly drained clay soil), you may need to dig deeper and add more base material. That's not a disaster, it's normal, just budget for it.
Do you need a permit?
Many municipalities don't require permits for at-grade patio slabs under a certain size (often 200 to 400 square feet), but rules vary significantly. If your patio attaches to the house, includes a structure (like a pergola), involves significant grading changes, or is larger than your local threshold, you almost certainly need a permit. Call your local building department or check their website before starting. Getting caught without a required permit can mean fines or being forced to tear out finished work. It's a 10-minute phone call that can save you a lot of grief.
The mistakes that ruin patios
- Skipping or under-compacting the base: This is the number one cause of paver settlement and slab cracking. Rent the plate compactor. Compact in 2-inch lifts. Check level after each pass.
- Wrong drainage slope: Sloping toward the house instead of away is a foundation nightmare. Check your slope with a level at every stage of prep, not just at the end.
- No edge restraints: Without them, pavers slowly migrate outward and joints widen. Even if it looks fine at first, it'll spread within a season or two of freeze-thaw cycles.
- Using the wrong sand for bedding: Mason sand and play sand are too fine and will wash out or shift under load. Use coarse concrete sand or manufactured stone dust for the bedding layer.
- Forgetting to call 811 before digging: Underground utilities (gas, electric, water, cable) are buried throughout most yards. A single shovel hit in the wrong spot can be dangerous and expensive.
- No control or isolation joints in concrete slabs: Concrete moves. If you don't give it a place to crack, it'll crack wherever it wants. Cut control joints at appropriate intervals and isolate the slab from the foundation with a compressible joint filler.
- Laying pavers on top of existing concrete: If you're paving over an old slab, the existing concrete must be structurally sound and slope correctly. Building up on a cracked, heaving slab just buries the problem.
- Underestimating material quantities: Always add 5 to 10% overage to your paver order for cuts and breakage. Running short mid-project and ordering a second batch risks dye lot variations that are visible in the finished surface.
Your next steps to get started today
Here's the exact order of operations to move from idea to build. This sequence keeps you from buying materials before you know your final dimensions and from doing work you'll have to redo.
- Measure your space and finalize dimensions. Use stakes and string to mark the exact footprint. Walk around it, set out furniture, confirm it feels right.
- Check local permit requirements and call 811 to have utilities marked.
- Calculate your material quantities: multiply length by width to get square footage, then use that to calculate gravel, sand, and paver quantities (most paver retailers have online calculators).
- Order crushed stone base material first — it usually has the longest lead time for delivery.
- Rent or borrow a plate compactor for the weekend you plan to do excavation and base work.
- Excavate to the correct depth, establish your slope, and build the base in compacted 2-inch lifts.
- Screed your sand bed, lay pavers from the straightest reference edge, and check level constantly.
- Cut, edge, and finish with polymeric sand.
- If you're pouring concrete instead, frame your forms on a compacted gravel base, pour, screed, float, cut control joints, and cure for a minimum of 7 days before use.
If you want to go deeper on any single phase, the site has step-by-step guides on how to build a patio base specifically, how to construct a patio from scratch, and approaches for building a nice patio on a tighter budget. Each one expands on the details touched here. But for most readers, the single most useful thing you can do right now is go outside, stake out your dimensions, and get a feel for the real scale of the space you're planning. Use these steps to learn how to build patios from scratch, including base prep, drainage, and installation. Everything else flows from that.
FAQ
How do I confirm my patio slope is correct before laying any pavers or pouring concrete?
After you set your slope using strings or a level, verify it in at least three cross-sections (front-to-back and both sides). Measure the height change from the house edge to the outer edge at multiple points, because a “looks right” slope can hide low spots at corners.
Do I need geotextile fabric under the gravel base, or will crushed stone alone be enough?
Crushed stone compacts best when it stays separated from surrounding soil. In many climates and soil types, adding geotextile under the base helps prevent fines from migrating into the gravel, which reduces long-term settling. If your soil is sandy and well-draining, the need can be less, but for clay or soft subgrade it often helps.
What should I do if I hit soft spots or poor-draining soil during excavation?
Treat it as a subgrade stabilization issue, not just a materials problem. Remove the soft material until you reach firm soil, then rebuild the base to the required depth, compacting in lifts. If soft areas keep returning, consider consulting a local pro or adding additional base depth, because patching on top usually leads to repeating dips.
How thick should my bedding sand layer be, and can I adjust it to fix uneven base areas?
For pavers, the bedding sand is typically about 1 inch, and it should be screeded to that target thickness. Don’t use extra sand to “level” a bad base, because paver movement and uneven settling usually show up later. Fix the base first, then place the bedding to the right thickness.
Can I install pavers over an existing patio, concrete slab, or old base?
Generally, no. Old slabs and deteriorating bases can leave you with uneven support, drainage problems, and potential movement. If you want to reuse something, you still need to confirm level, soundness, and correct drainage path. In most cases the durable approach is to remove failed materials and rebuild the base properly.
What’s the easiest way to handle patio edges and prevent pavers from shifting over time?
Use solid edge restraints (metal or concrete edging) that are pinned and set at the correct heights, then compact up to them. Flexible edging without proper restraint can let pavers creep outward, especially on sloped yards. Also plan for an expansion gap at the house side if your patio is connected.
How should I deal with joints between pavers (sand vs polymeric sand), and when does it matter?
If you choose sand, keep in mind it can wash out over time in heavy rain, especially if drainage isn’t perfect. Polymer sanding (often called polymeric joint sand) can lock joints more tightly, but it requires careful application and usually specific watering conditions to activate. If your area gets freeze-thaw cycles, follow the product instructions closely to avoid joint cracking.
Is it safe to cut pavers and stone indoors or under a garage, since that reduces wind and mess?
It’s usually a bad tradeoff. Even with dust control, cutting can create hazardous silica dust that accumulates in enclosed spaces. If you must do it near a structure, prioritize wet cutting and vacuum shrouds, and ensure ventilation. Cutting outdoors with dust blowing away from you is safer and more manageable.
How do I prevent the patio from pooling water when there’s a slope in my yard already?
Don’t assume the yard slope automatically fixes patio drainage. You still need the patio surface to slope away from the house at the required rate, and you need a path for runoff away from foundation areas. Walk the site during a normal rain (or simulate with a hose) to spot where water naturally flows, then design your patio edge drainage accordingly.
What’s the best way to lay out an accurate patio shape if I’m doing a simple rectangle but not starting perfectly square?
Square the layout before excavating. A practical method is to set two perpendicular strings using a 3-4-5 measurement triangle (3 feet, 4 feet, 5 feet) to confirm right angles. If you skip this, small corner errors compound into larger misfits that can force ugly edge cuts or uneven joint widths.
How many extra pavers or concrete slab materials should I plan for beyond the square footage estimate?
A 10 to 15 percent contingency is a good default, but add more if you expect lots of cuts (tight borders, diagonal layouts, or curves). Also account for breakage during transport and matching thicknesses and batch colors if you mix multiple deliveries for the same pattern.
Do I need expansion joints or any gap near the house or between structures?
Yes, especially where the patio meets the house or rigid elements. Plan for a small gap so the patio can move slightly with temperature changes without pushing against the foundation. If you’re tying into an existing wall or adding a pergola or steps, treat that junction as a movement-risk area and follow local details or product guidance.
How long should I wait before using the patio after installation, especially with concrete or polymeric sand?
For concrete slabs, waiting depends on curing conditions and the specific mix and thickness, but don’t treat “it looks dry” as cured. For pavers with polymeric joint sand, timing matters because activation typically requires controlled moisture and then allows joints to set. If you want to be safe, plan around weather and give extra time before heavy foot traffic or moving furniture onto freshly laid materials.
What’s the most common DIY mistake that ruins patio durability fastest?
Skipping compaction or rushing the base layers. Even if the surface looks fine at first, a weak or uneven base leads to rocking pavers, dips, and water pooling. If you only focus on one thing, prioritize correct drainage slope and consistent, lift-by-lift compaction checks.