You can absolutely build a durable, attractive patio yourself. The key is following the right sequence: pick a design that fits your yard, calculate your materials honestly, dig and prep a solid base, lay your surface, and lock everything in with proper edging and jointing. Most DIY patio failures come from skipping base prep or ignoring drainage, not from poor laying technique. Get those two things right and the rest is straightforward. If you're looking for easy do it yourself patio ideas, focus on a simple layout, solid base prep, and a surface material that matches your skill level.
Do It Yourself Patio Guide: Design, Build, and Troubleshoot

Nolan Carver
28 Apr 2026
Choosing the right DIY patio design for your yard
Before you buy a single bag of gravel, spend time figuring out what design actually makes sense for your space. A lot of people jump straight to a style they saw online without checking whether it works with their yard's shape, grade, or how they actually use the space. Start with function: How many people need to sit there? Do you want a dining area, a lounge space, a fire pit zone, or all three? That determines size before anything else.
For most backyards, a simple rectangular or square patio is the easiest to build and the most material-efficient. L-shapes, curves, and tapered sections are doable, but they require more careful layout work and produce more material waste. If you're a first-timer, a clean rectangle will teach you everything you need to know, and you can always add a curved garden border around it later for visual interest.
Think about what you're placing on the patio. If you want a fire pit, plan its location from the start. A good rule of thumb is to keep the fire pit and its surrounding clearance to no more than about one-third of your total patio area so you still have room for furniture and comfortable circulation. You'll also want to account for safety clearances around any fire feature, which we'll touch on more in the finishing section.
Raised patios are another option worth considering if your yard has a significant slope. Instead of fighting a grade, you build up with a retaining-wall-style perimeter and fill to a level surface. It's more work and more materials, but the result is often cleaner than trying to cut deep into a hillside. That said, a raised patio involves structural considerations that go beyond a basic flat-ground build, so if that's your direction, treat it as a more advanced project.
Once you have a general shape and size in mind, sketch it out on paper with rough dimensions. Mark your house wall, any doors or windows that open onto the space, existing trees or obstacles, and the direction water currently flows off your yard. That sketch becomes your planning document for everything that follows.
Materials and tools: what to use and how to decide
The three most common DIY patio surfaces are concrete pavers, poured concrete slabs, and natural flagstone. Each has a real tradeoff, and the right choice depends on your budget, skill level, and how much you want to deal with maintenance down the road.
| Material | Typical Cost (installed DIY) | Skill Level | Durability | Repairability | Best For |
|---|---|---|---|---|---|
| Concrete pavers | $8–$20 per sq ft in materials | Beginner–Intermediate | Very high | Easy (swap individual pavers) | Most DIYers; forgiving and flexible |
| Poured concrete slab | $4–$8 per sq ft in materials | Intermediate–Advanced | High (with proper jointing) | Difficult (patch or replace section) | Smooth, low-maintenance surface |
| Natural flagstone | $10–$25+ per sq ft in materials | Intermediate | High | Moderate (re-set individual stones) | Irregular, natural aesthetic |
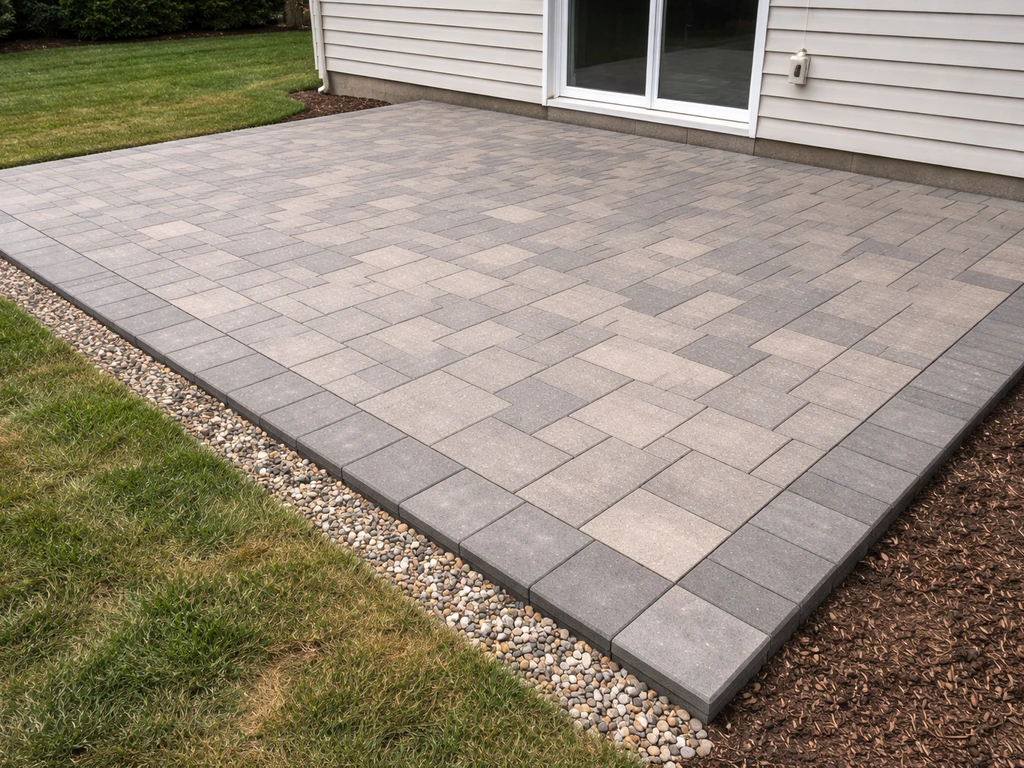
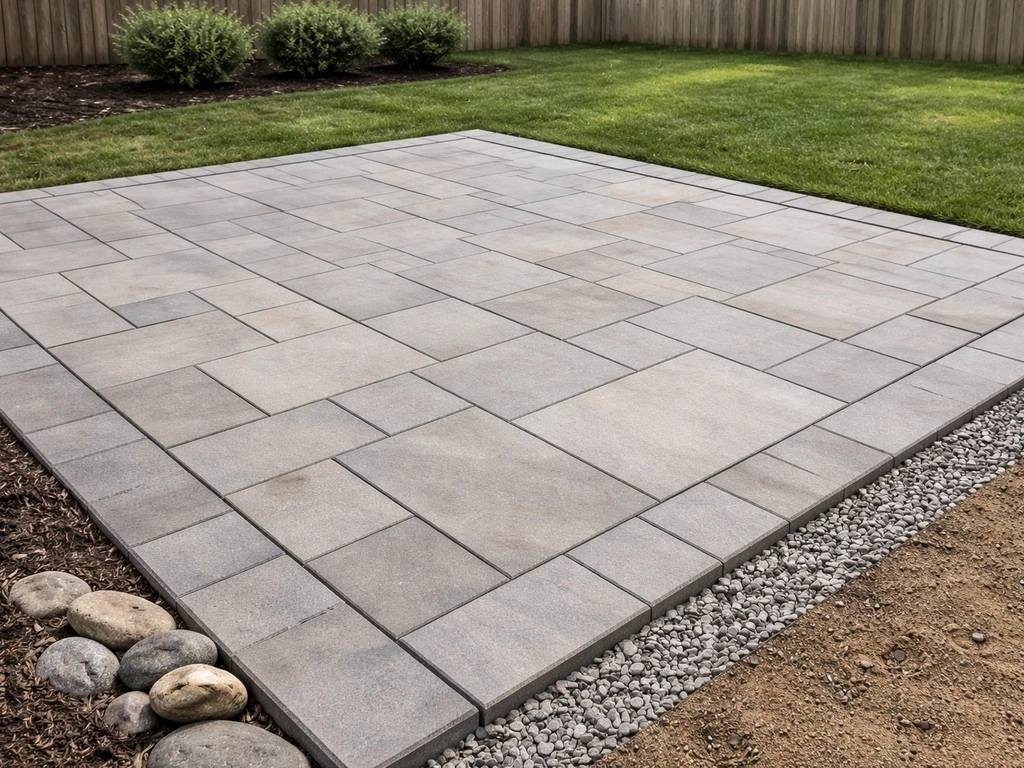
For most first-time DIY patio builders, concrete pavers are the best starting point. They're forgiving because you can pull and reset individual pieces if something goes wrong. They don't crack the way a concrete slab can, and they come in a huge range of styles and colors. Poured concrete is cheaper per square foot on materials but requires form-building, mixing or ordering ready-mix, and knowledge of control joint spacing to prevent random cracking. A 4-inch slab typically needs control joints roughly every 10 feet or so in each direction. Flagstone is beautiful but fitting irregular pieces takes patience and a good eye.
Base and bedding materials
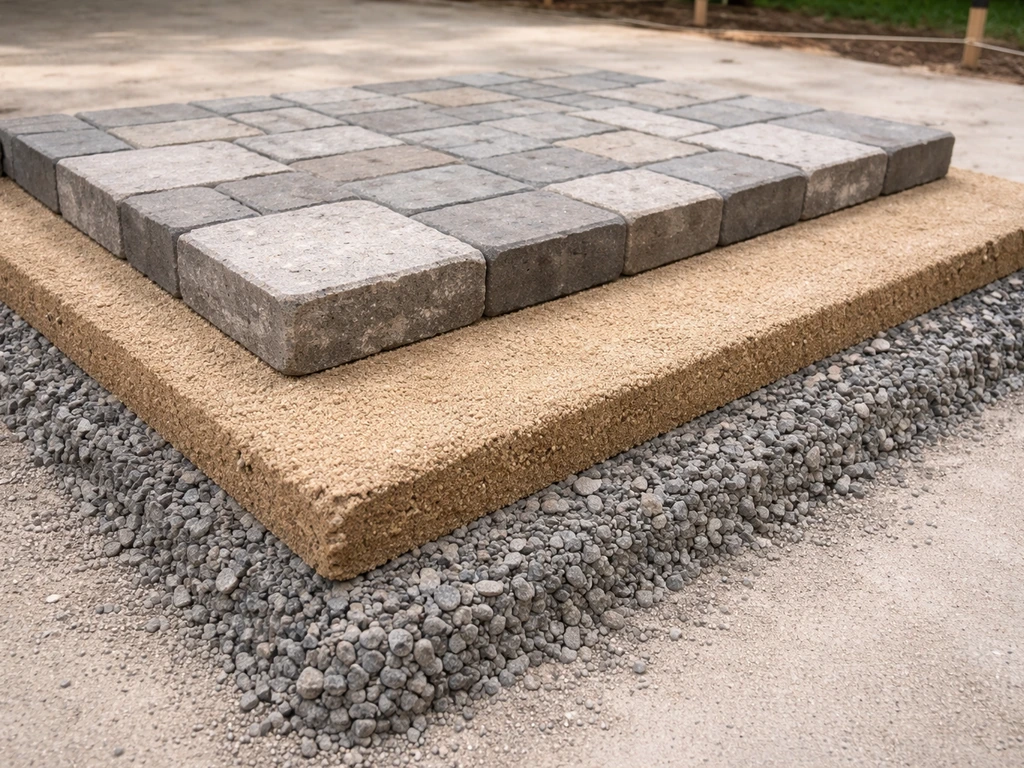
Regardless of your surface choice, the base is what keeps everything from sinking or shifting. For a standard pedestrian patio, plan on 4 to 6 inches of compacted gravel (crushed stone, not round river rock) as your base layer, plus 1 inch of coarse bedding sand directly under pavers or flagstone. In clay-heavy soils, bump that gravel base up to 6 to 8 inches and add a layer of geotextile fabric between the native soil and your gravel.
The geotextile acts as a filter: it stops soil particles from migrating up into your base material over time, which is one of the main reasons patios sink and get uneven. The [ICPI (Interlocking Concrete Pavement Institute) specifically recommends geotextile under pavers in all clay-soil applications. ](https://www. angeluspavingstones.
com/wp-content/uploads/2022/01/AngelusCoverSheet-TechSpec22. pdf) Even in sandy or loamy soil, geotextile can extend the life of your base and is worth the modest extra cost.
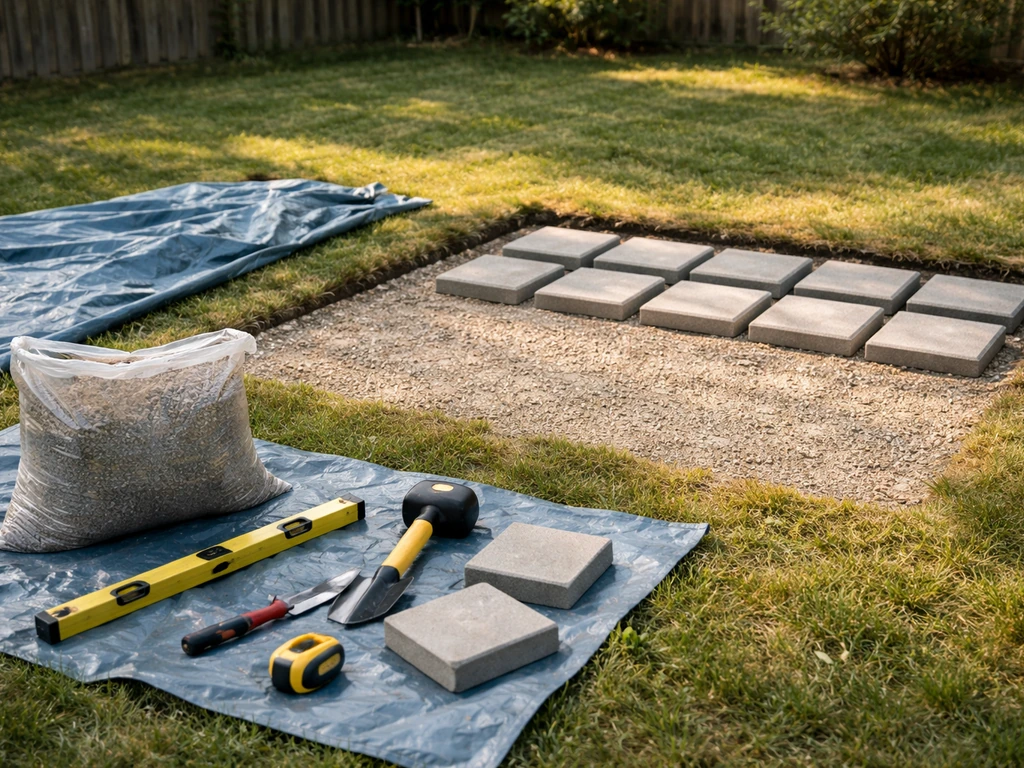
Tools you'll actually need
- Tape measure, stakes, and string line (for layout)
- Line level or laser level (to check slope across the area)
- Plate compactor (rent one, don't skip it)
- Hand tamper (for edges the plate compactor can't reach)
- Rubber mallet (for setting pavers or flagstone)
- Shovel, garden rake, and a screed board (a straight 2x4 works fine)
- Wheelbarrow
- Circular saw with a diamond blade or a paver splitter (for cuts)
- Broom and leaf blower (for jointing sand)
- Safety glasses and work gloves
The plate compactor is the one tool most beginners try to skip. Don't. Hand-tamping a 4-inch gravel base by hand is slow, inconsistent, and will lead to settling later. Renting a compactor for a weekend typically costs $60–$120 and is one of the best investments you'll make on this project.
Planning and measuring: layout, elevations, and drainage
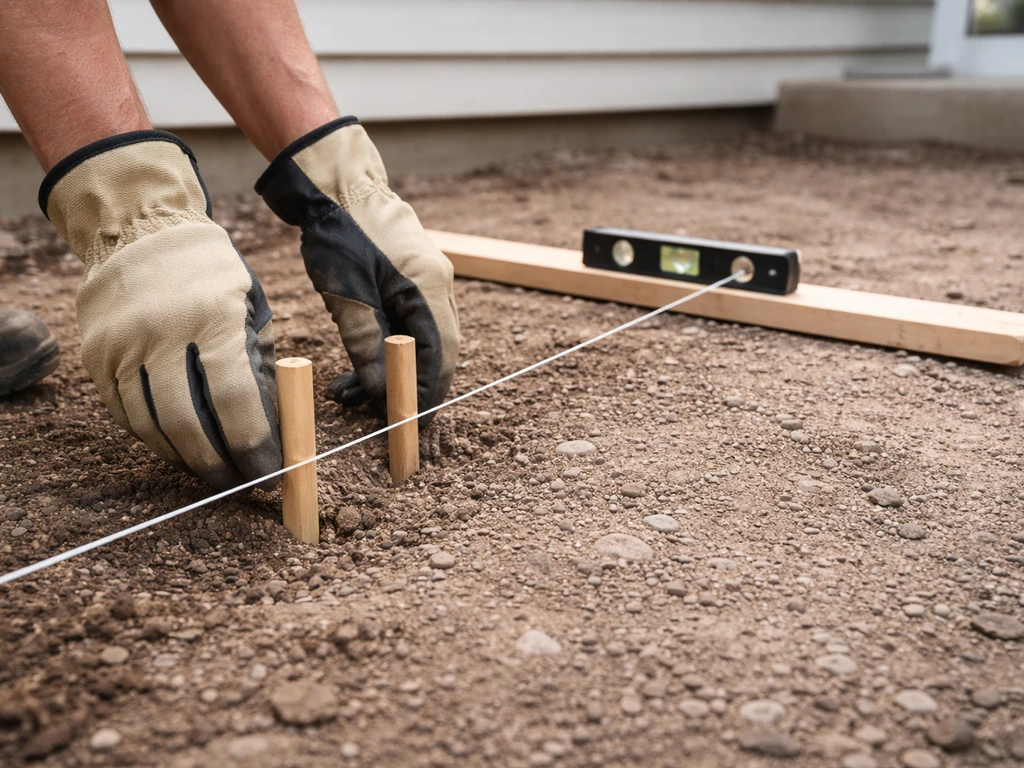
Accurate layout is what separates a patio that looks professionally built from one that clearly doesn't. Take your time here before you dig anything.
Setting your slope
Every patio needs a slight slope away from your house to prevent water from pooling against the foundation. The standard is about 1/8 inch of drop per foot of run, which over a 10-foot-wide patio means the far edge is roughly 1.25 inches lower than the edge near the house. That sounds like nothing, but it's enough to move water. More than 1/4 inch per foot starts to feel noticeably tilted when you're sitting on furniture. Mark your intended finished height at the house wall first, then use a string line and line level to establish the slope across the entire patio area.
Calculating excavation depth
Your excavation depth needs to account for every layer in your stack. For a paver patio, that typically works out to: gravel base (4–6 in) + sand bedding (1 in) + paver thickness (roughly 2.375 in for a standard 60mm paver). Add those up and subtract about 1/4 inch because the finished surface should sit slightly above grade to stay clear of lawn and mulch. So for a standard build, you're digging roughly 7 to 9 inches below your intended finished surface level. Measure from your string line, not from the existing ground, since the ground itself may be uneven.
Handling irregular shapes and obstacles
If your patio isn't a simple rectangle, plan around drains, downspouts, and fixed obstacles before you start laying anything. For curves, use a garden hose to sketch the shape on the ground and take measurements at multiple points to define it. L-shapes and angled cuts need to be treated as separate rectangles during material calculations so you don't underestimate quantities. Mark everything with spray paint or stakes and string before digging.
Site prep and base construction: excavation, subbase, and compaction

This is the most physical part of the project and the most important. A well-built base will hold your patio solid for 20+ years. A poorly built one will have you resetting pavers within a few seasons.
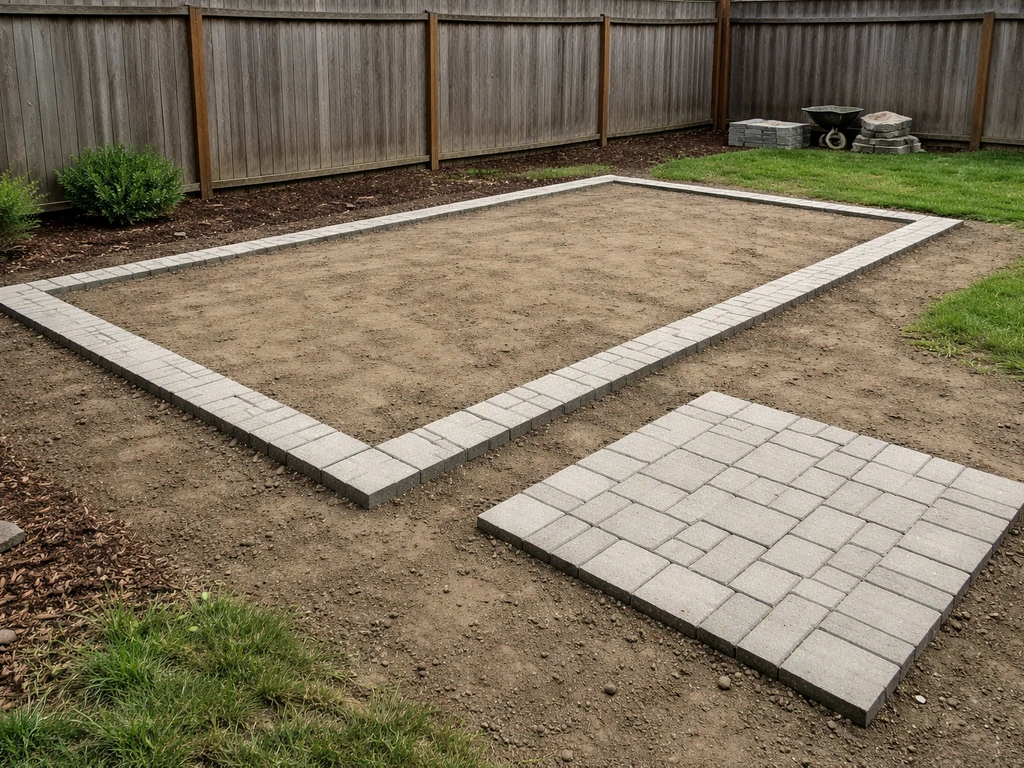
- Mark your patio perimeter with stakes and string, extending a few inches beyond your finished patio edge on all sides to give yourself working room.
- Strip all grass and organic material from the area. Organic material compresses and rots over time, which causes settling.
- Excavate to your calculated depth, keeping the bottom relatively flat. Use your string lines as a consistent depth reference.
- If you're in clay soil, lay geotextile fabric across the entire excavated area, lapping it up the sides a few inches. Overlap seams by at least 12 inches.
- Add your crushed gravel base in two lifts: pour about 2–3 inches, compact thoroughly with the plate compactor, then add the remaining 2–3 inches and compact again. Compact in overlapping passes. For a 6-inch base in clay soil, do three lifts of 2 inches each.
- Check for level and slope across the compacted base with your string line before moving on. The base should mirror the slope you want in your finished surface.
- Install edge restraints around the perimeter now, before adding sand. Plastic paver edging, aluminum edging, or a poured concrete border all work. Drive spikes every 12 inches into undisturbed soil, not into your base.
- Spread 1 inch of coarse bedding sand over the compacted base. Screed it flat using your 2x4 across screed rails (use 1-inch diameter pipes or conduit as guides, then pull them out and fill the channels after screeding).
Don't add more than 1 inch of sand. More sand does not mean more cushion or forgiveness. Thick sand beds compress unevenly and become one of the most common causes of sunken pavers down the road.
Building the patio surface: step-by-step installation
Once your base is prepped and sand is screeded, you're ready for the satisfying part. If you want a complete walkthrough, follow this guide on how to DIY a patio from design to base prep and installation. The actual installation process varies slightly by material, so here's how to approach each.
Laying concrete pavers
- Start from a corner or a straight edge (usually the house wall side). Work outward and across, never stepping on the screeded sand bed.
- Set each paver by placing it tight against the last, then tapping it down gently with a rubber mallet. Don't slide pavers into place, as that drags sand and creates ridges.
- Keep joints consistent (typically 1/16 to 3/16 inch). Plastic spacers or just careful eyeballing both work.
- Check your surface with a level every few rows to catch any drift before it compounds.
- Cut border pavers to fit using a circular saw with a diamond blade or a rented paver splitter. Splitters are faster and cleaner for straight cuts.
- Once all pavers are set, run the plate compactor over the entire surface (put a rubber mat or a piece of carpet under the plate to protect the paver faces). This seats everything firmly and evenly into the sand bed.
- Sweep polymeric sand into all the joints. Go over the surface multiple times in different directions until every joint is filled to just below the paver surface. Blow off any excess from paver tops.
- Lightly mist the surface with water to activate the polymeric sand binders, following the manufacturer's instructions. Let it cure fully before heavy use.
Pouring a concrete slab
For poured concrete, you'll build wood forms around your excavated and base-prepped area, then pour either ready-mix concrete (ordered by the yard for larger slabs) or mix bags on-site for small patios. A typical patio slab is 4 inches thick. As you screed and float the surface, plan your control joints immediately: score them about 1/4 of the slab depth (roughly 1 inch deep) at intervals of about 10 feet or less in each direction for a 4-inch slab.
These joints give the concrete a place to crack in a controlled, straight line instead of randomly across your surface. Cure the slab slowly by keeping it moist with burlap and a hose or a curing compound for at least 7 days.
Setting natural flagstone
Flagstone can be set the same way as pavers (on a sand bed with tight joints) or set with larger gaps filled with gravel, ground cover plants, or polymeric sand. Lay out all your stones dry first and do a 'puzzle fitting' pass before you commit to placement. Aim for consistent joint widths and try to keep the largest stones toward the center of the patio where foot traffic is heaviest. Cut pieces to fit corners and edges with an angle grinder or a cold chisel and hammer for rough cuts.
Finishing, edges, and common troubleshooting
The finishing work is what makes a DIY patio look polished and hold up long-term. Skipping these steps is where a lot of otherwise solid builds fall apart over the first year or two.
Edge restraints: don't skip them
Edge restraints are required along the entire perimeter of any paver or flagstone installation and anywhere two different surface materials meet. Without them, the lateral pressure from foot traffic and freeze-thaw cycles pushes the outermost pavers outward over time, and once that starts, the whole field begins to open up and settle unevenly. Your options include plastic paver edging (widely available and easy to install), aluminum edging (more rigid, better for curves), steel edging (the most durable, best for high-traffic edges), or a poured or dry-stacked concrete border. Whatever you use, anchor it into undisturbed soil below the base, not into the gravel itself.
Adding a fire pit
If you're incorporating a fire pit into the patio, position it so the fire pit and its clearance zone (the area you'd leave clear for safety around it) takes up no more than about a third of the total patio area. Make sure you understand the clearance requirements for the specific fire feature you're installing, as recommended clearances vary based on the heat output and whether surrounding materials are combustible or non-combustible. Generally, you want several feet of non-combustible paver surface surrounding the pit before any wood decking, furniture, or plantings.
Troubleshooting the problems that actually happen
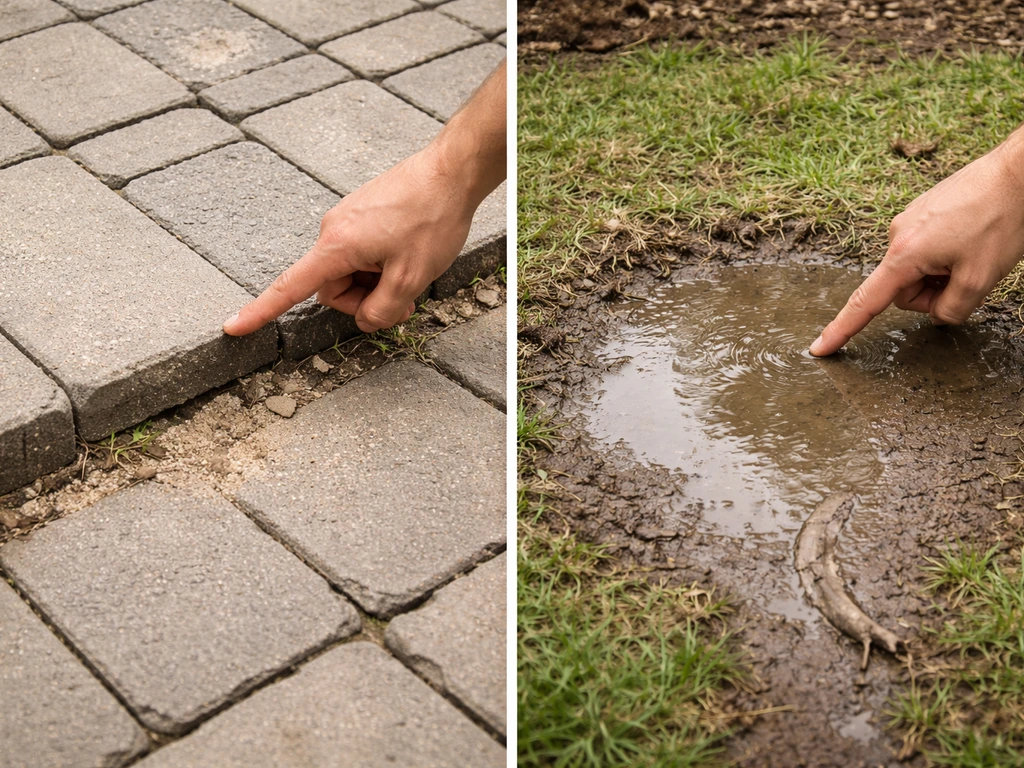
Uneven settling almost always traces back to one of three things: base not compacted thoroughly enough, bedding sand too thick (more than 1 inch), or organic material left in the subgrade. If you have a section that's sinking, pull those pavers up, excavate the problem area, fix the base, and relay. It's annoying but not difficult, which is one of the great advantages of pavers over poured concrete.
Water pooling on the surface means either your slope is off or you have a low spot in the base. Check your slope first with a level: you should have consistent fall away from the house. If the slope is right but water still ponds, find the low spot, pull the pavers in that zone, add a little sand, re-screed, and relay. For water pooling near the house foundation, consider adding a linear drain or redirecting a downspout extension to carry water past the patio edge entirely.
Polymeric sand washing out of joints usually means it was applied to a wet surface or didn't get fully activated. Let the patio dry completely, blow out the damaged joints with a leaf blower, re-apply fresh polymeric sand, compact lightly, and mist properly per the product instructions. The sand height in the joints should end up just slightly below the paver surface, not flush with the top.
Edge restraint failure (bent, popped-out, or shifted edging) usually means the spikes went into base gravel instead of undisturbed soil underneath it, or the wrong product was used for a curve. Re-drive spikes into solid ground below the base material, and for tight curves, use flexible aluminum or plastic edging rated for curves rather than forcing a straight product.
Where to go from here
Once you've got the fundamentals down from this guide, you can start layering in the details that make a patio truly your own. If you want fresh do it yourself backyard patio ideas for your layout, start by choosing a design that matches how you plan to use the space. If budget is a primary constraint, there are smart material swaps and phased approaches worth exploring.
You can use the same budget-focused approach for a do it yourself patio on a budget by prioritizing affordable materials and planning the build sequence carefully. If you want a specific look with less complexity, there are streamlined patio ideas designed specifically for easier execution. And if you're ready to commit to a full how-to walkthrough of the build process itself, a step-by-step construction guide will take you through each phase in even more depth.
The foundation you've built with this guide, understanding base prep, drainage, and material choices, is what every successful patio project is built on.
FAQ
How do I calculate material quantities if my patio includes a slope and edging?
Plan for a patio to be slightly wider and deeper than your final layout so you have room for edging, joint space, and an accurate slope transition. As a quick rule, add about 2 to 3 inches to each outside edge of your drawn patio dimensions (then confirm with your exact paver format and edging thickness) so you do not end up short once excavation lines and restraint sit correctly.
What should I remove from the excavation before adding gravel and sand?
Avoid setting pavers directly over weeds, grass roots, or leftover topsoil. Remove all organic material down to firm subgrade, then verify it is not soft or muddy when walked on. If you have to backfill any low spots with soil, compact it separately (and consider geotextile again) because that soil often becomes the weak point later.
Can I connect a DIY patio to an existing concrete slab or to my house foundation?
Yes, but only if you make the connection carefully. You typically need a compressible gap between the patio surface and the house foundation, especially if you are using pavers, and you must maintain drainage that carries water away from the building. If you are tying into an existing slab, use a joint or transition strip so freeze-thaw movement does not crack the slab or push pavers.
Is river rock acceptable for the gravel base of a do it yourself patio?
Do not use river rock, because rounded stones do not lock together well, and the base can shift. If you already purchased round stone, you can often re-crush or return it, but if you must proceed, you would need to increase thickness and be extra strict about compaction, which usually costs more than replacing it.
How can I confirm my patio slope is correct before I start full installation?
If you are unsure, measure and mark the slope first, then install a few “test areas.” Lay 3 to 5 rows of pavers or a small flagstone test section, check drainage after watering with a hose, and verify the surface height near the house matches your target. This catches slope errors before you commit across the full patio area.
What are common mistakes with the sand bed when building a do it yourself patio?
For most paver patios, keep the sand bed thin and uniform, no more than about 1 inch, then screed it so you can set pavers flush without pressing into thicker sand. Also avoid wetting the sand heavily, you want it just workable, because overly wet sand tends to squeeze out during setting and can create uneven faces.
How do I choose the right edging for curves and high-traffic areas?
Use edging that matches your traffic and the radius of your curves. For pavers, rigid straight edging can work for gentle bends, but for tight curves you need edging designed for curves, then ensure it is anchored into undisturbed material below the base. A mismatch there often causes edges to pop outward after the first freeze-thaw season.
Why does polymeric sand wash out, and what is the correct way to fix it?
For polymeric sand, do a full dry-down and activate it exactly per the product. If joints fail, it is usually because the patio was still too wet when sand was applied, or because you washed too much sand out while compacting. The fix is to remove loose sand, let the patio dry, then reinstall and mist lightly in the amounts the instructions specify.
How do I avoid polymeric sand staining or improper joint height?
Do not lay polymeric sand on top of a dusty, unsettled base. After you compact pavers, sweep joints clean thoroughly, then check that the joints are slightly below the top of the pavers, not flush. If you pack too much sand into joints, it can be pushed out during activation and create a mess on the surface.
What should I do if my patio surface is level but water still pools?
Check drainage by observing where water runs during a controlled hose test, but also look at subgrade conditions. If the slope is right and you still pond, the issue is usually a low spot or uneven base thickness. Fixing it typically requires lifting that zone, adjusting base and sand, then relaying, instead of adding more sand on top.
What additional planning is needed when adding a fire pit to a do it yourself patio?
For fire features, do not only plan for the pit location, plan for airflow and housekeeping. Keep a clear perimeter with non-combustible paver surface around the pit, and avoid placing the closest furniture edge where heat can make it uncomfortable. Also confirm your specific unit’s clearance requirements, because heat output and whether the pit uses wood, gas, or pellets can change the safe distances.
Are there extra considerations for a do it yourself patio in freeze-thaw climates?
If your patio will be used in winter climates, prioritize joints and restraints. Ensure proper slope, keep sand thickness within the recommended range, and avoid leaving organic debris under pavers. Those are the factors that most strongly reduce freeze-thaw heaving and joint opening.
What is the fastest way to diagnose why a section of pavers is sinking?
A good checklist is: base is compacted and uniformly thick, no more than 1 inch bedding sand, edges restrained continuously and anchored below the base, correct slope, and joints filled appropriately. If pavers sink in one area, you almost always need to lift and rebuild that section because topping up sand usually just delays the problem.