The easiest DIY patio you can build today is a gravel or decomposed granite patio for a small flat yard, or a dry-laid concrete paver patio if you want something more solid. Both require no mixing concrete, no special licenses, and tools you likely already own. A 10x10 ft gravel patio can be done in a weekend for under $200 in materials. A paver patio of the same size runs $350–$700 in materials but lasts decades and looks polished. The right choice depends on your yard's slope, your budget, and how much time you want to put in.
Easy DIY Patio Ideas: Step-by-Step Build Guide for Beginners

Nolan Carver
28 Apr 2026

Easy patio ideas by yard type and budget
Before you pick an idea, think about two things: what your yard is actually like (flat, sloped, shady, wet) and how much you want to spend. Here are the five easiest DIY patio styles, ranked from lowest to highest effort and cost.
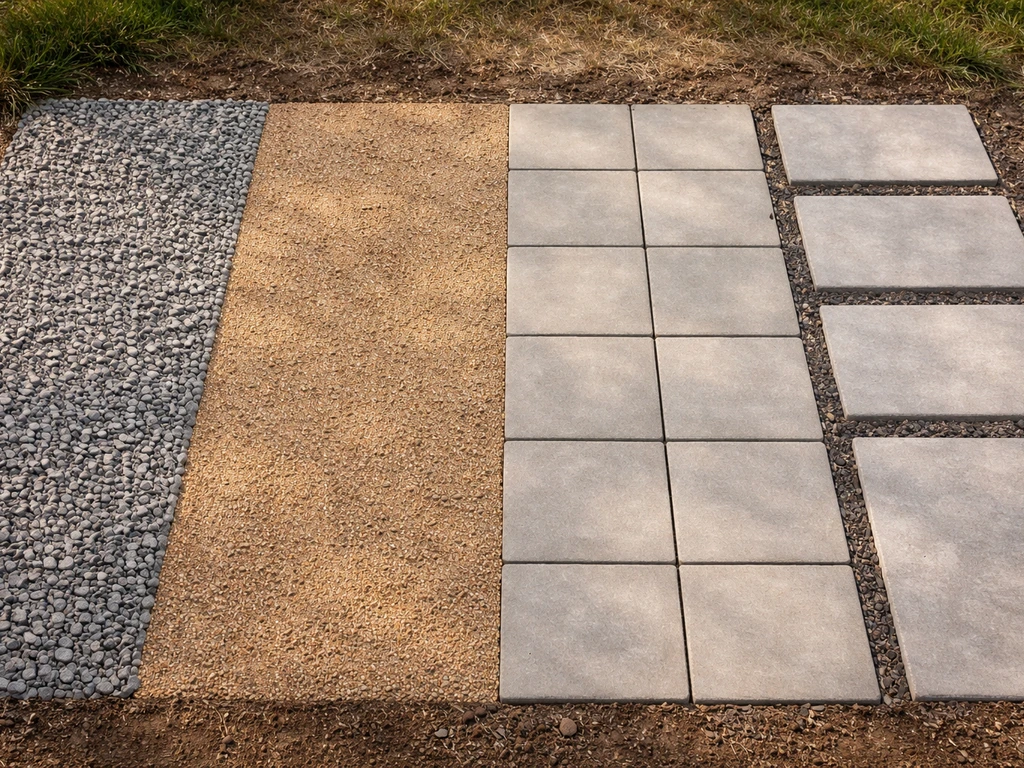
- Gravel patio: Dig down 4–6 in., lay landscape fabric, pour crushed gravel or pea gravel, add edging. Zero cutting, zero leveling precision. Best for flat to gently sloped yards. Budget: $1–$3/sq ft in materials.
- Decomposed granite (DG) patio: Similar to gravel but compacts into a firm, almost solid surface. Great for dry climates. Stabilized DG (mixed with a binder) holds even better. Budget: $2–$5/sq ft in materials.
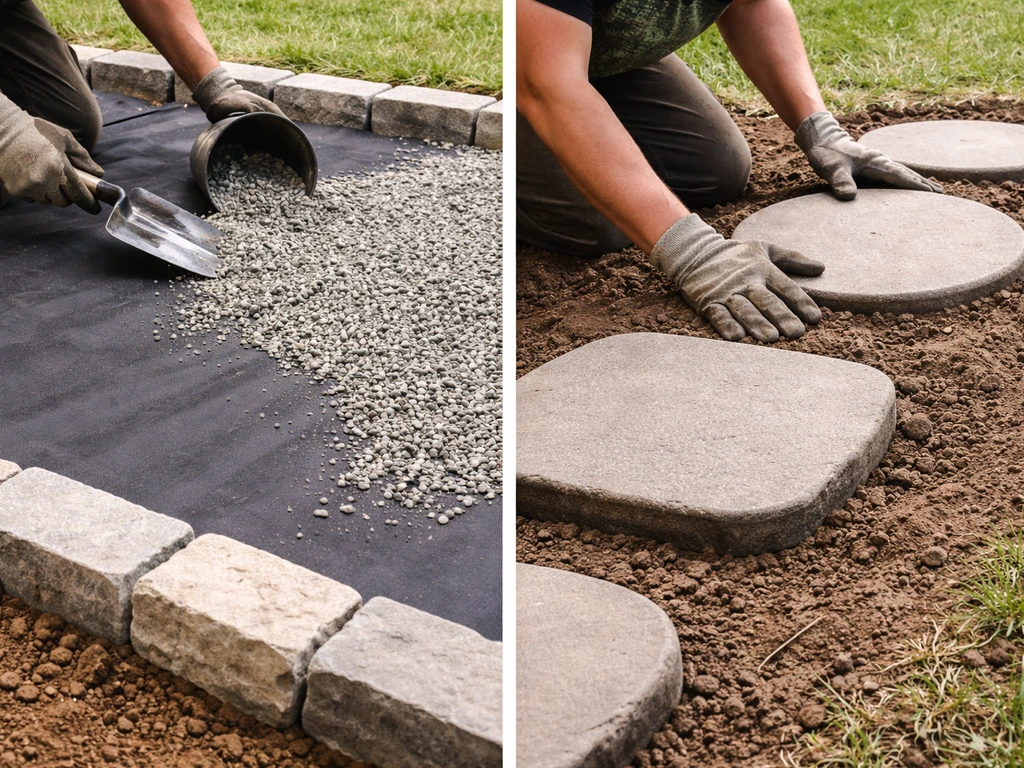
- Stepping-stone patio: Individual flagstones or large pavers set directly in sand or soil, spaced a few inches apart. No base compaction needed across the full area—just under each stone. Perfect for awkward shapes and beginner skill levels. Budget: $3–$8/sq ft.
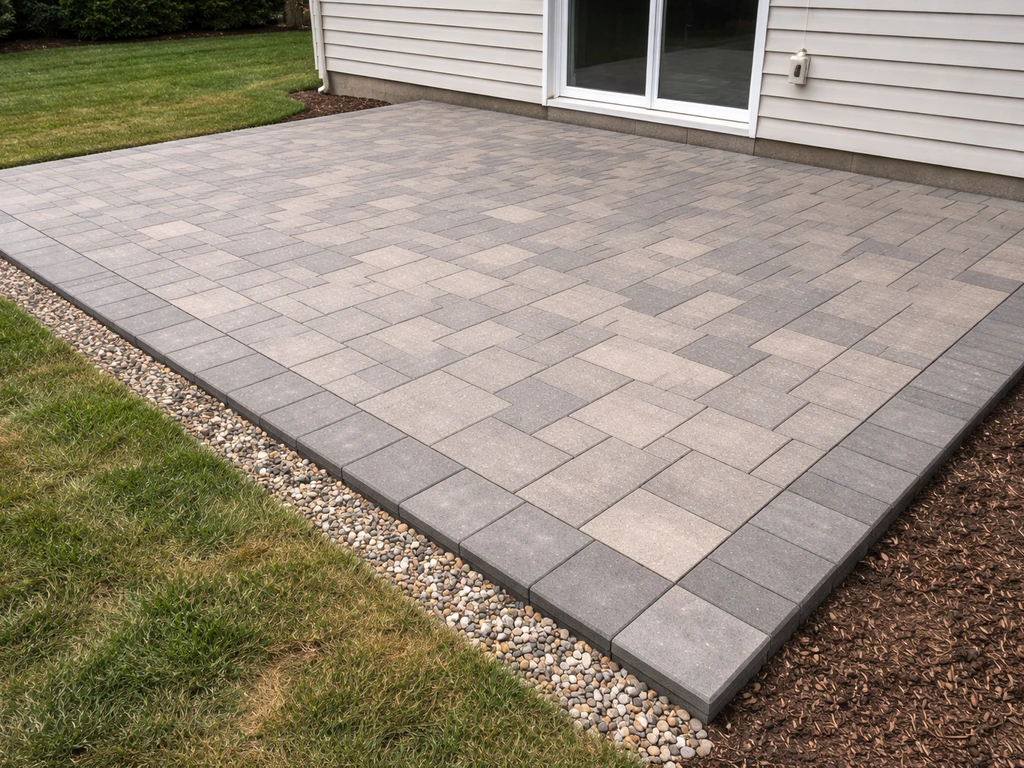
- Dry-laid concrete paver patio: Pavers on a compacted gravel base and 1-in. sand bed. The gold standard for a solid DIY patio you can do yourself. Looks clean, handles foot traffic and furniture well. Budget: $7–$15/sq ft in materials.
- Outdoor tile on pedestals: Porcelain or stone tile on adjustable plastic pedestals. No mortar, great for slopes because pedestals level the surface and water drains underneath. Higher material cost but very forgiving to install. Budget: $10–$20/sq ft.
If your yard has a serious slope or you get heavy rain, lean toward pavers on a proper base, a pedestal tile system, or DG (which drains well by nature). If it's flat and you just want a quick weekend project, gravel or stepping stones are your fastest path. If you're after a patio that adds real home value and you have a free weekend plus moderate motivation, the paver patio is worth the extra work.
Pick the right patio material
Here's a side-by-side comparison of the four main easy-DIY patio materials so you can decide quickly.
| Material | Difficulty | Avg. DIY Cost (materials only) | Drainage | Durability | Best For |
|---|---|---|---|---|---|
| Crushed gravel | Very easy | $1–$3/sq ft | Excellent | Low (shifts over time) | Quick budget patios, irregular shapes |
| Decomposed granite | Easy | $2–$5/sq ft | Very good | Moderate (stabilized DG lasts longer) | Dry climates, naturalistic look |
| Concrete pavers | Moderate | $7–$15/sq ft | Good (with slope) | High (20+ years) | Permanent patios, furniture use |
| Outdoor tile (pedestal) | Easy–Moderate | $10–$20/sq ft | Excellent (drains below) | High (freeze-thaw resistant) | Slopes, rooftop-style patios, modern look |
My honest recommendation: if this is your first patio and you want something that looks finished and holds up, go with concrete pavers on a compacted base. If you just want outdoor space fast and cheap, do gravel with good edging. Decomposed granite is underrated for DIYers who want a gravel-style patio that doesn't shift underfoot as much. Pedestal tile is the move if you have a tough slope to deal with or want a modern aesthetic.
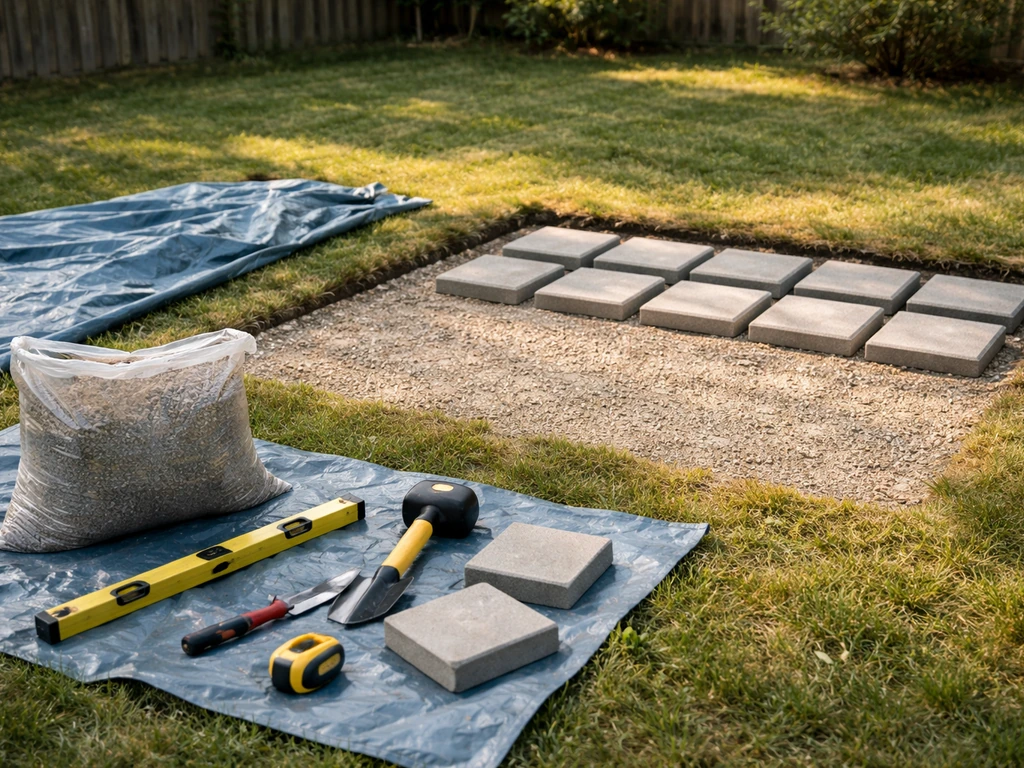
Tools, materials, and supplies checklist
The list below covers a basic concrete paver patio, which is the most tool-intensive easy option. For gravel or DG, you can skip the plate compactor rental and paver cutter. For stepping stones, you can skip the compactor and the screed pipes.
Tools
- Tape measure and marking paint or chalk line
- Mason's line and line level (or a 4-ft spirit level)
- Shovel and flat spade
- Wheelbarrow
- Hand tamper (for small areas) or rented plate compactor (for anything over 50 sq ft)
- Screed pipes (1-in. diameter conduit works great) and a straight 2x4 board for screeding sand
- Rubber mallet
- Paver saw or angle grinder with a diamond blade (for cutting pavers to fit edges)
- Push broom
- Garden hose with spray nozzle
Materials (for a 10x10 ft concrete paver patio, adjust quantities to your size)
- Concrete pavers: roughly 100 sq ft plus 5–10% extra for cuts and breakage
- Crushed stone or road base aggregate: about 1.5 tons for a 4-in. base over 100 sq ft
- Coarse bedding sand (not play sand): about 0.5 ton for a 1-in. screed layer
- Polymeric sand: 1–2 bags for joint filling (hardens after watering, resists weeds and washout better than plain joint sand)
- Landscape fabric or geotextile (optional but recommended): enough to cover the excavated area
- Plastic or aluminum paver edging with landscape spikes
- Stakes and mason's line
For gravel or DG patios, swap in
- Crushed gravel or pea gravel (gravel patio): 2–3 in. of gravel over landscape fabric, roughly 1 ton per 100 sq ft at 3-in. depth
- Decomposed granite (DG patio): 2–4 in. compacted DG, about 1–1.5 tons per 100 sq ft; stabilized DG if you want a firmer surface
- Metal or composite edging (critical for both gravel and DG to keep material contained)
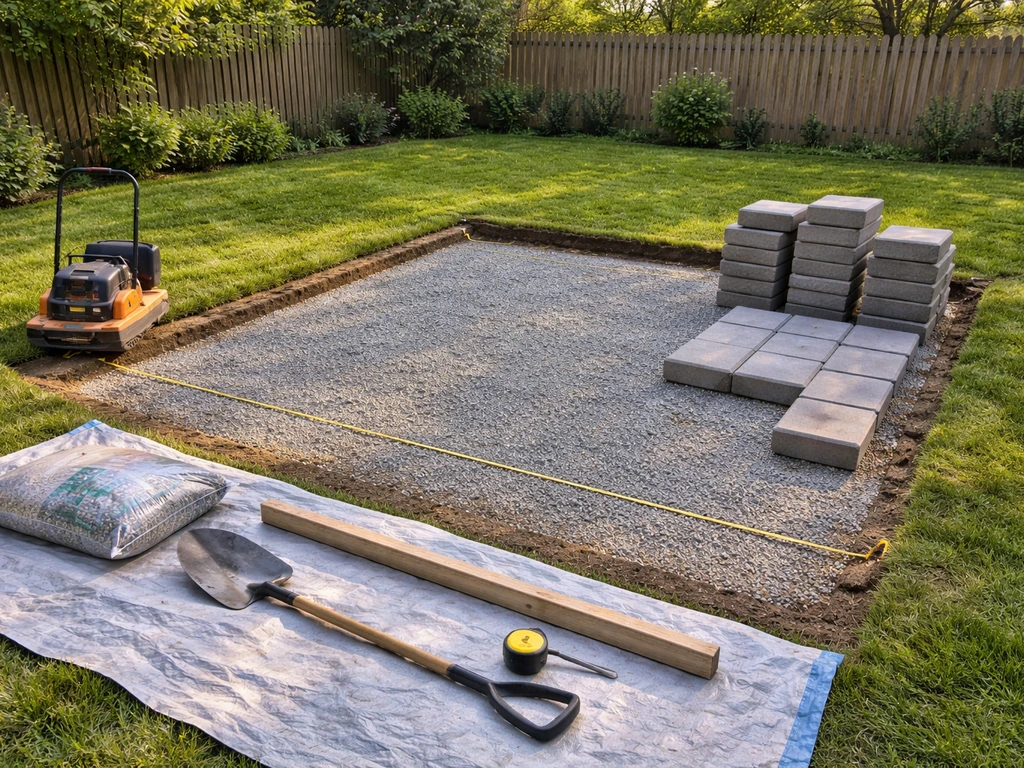
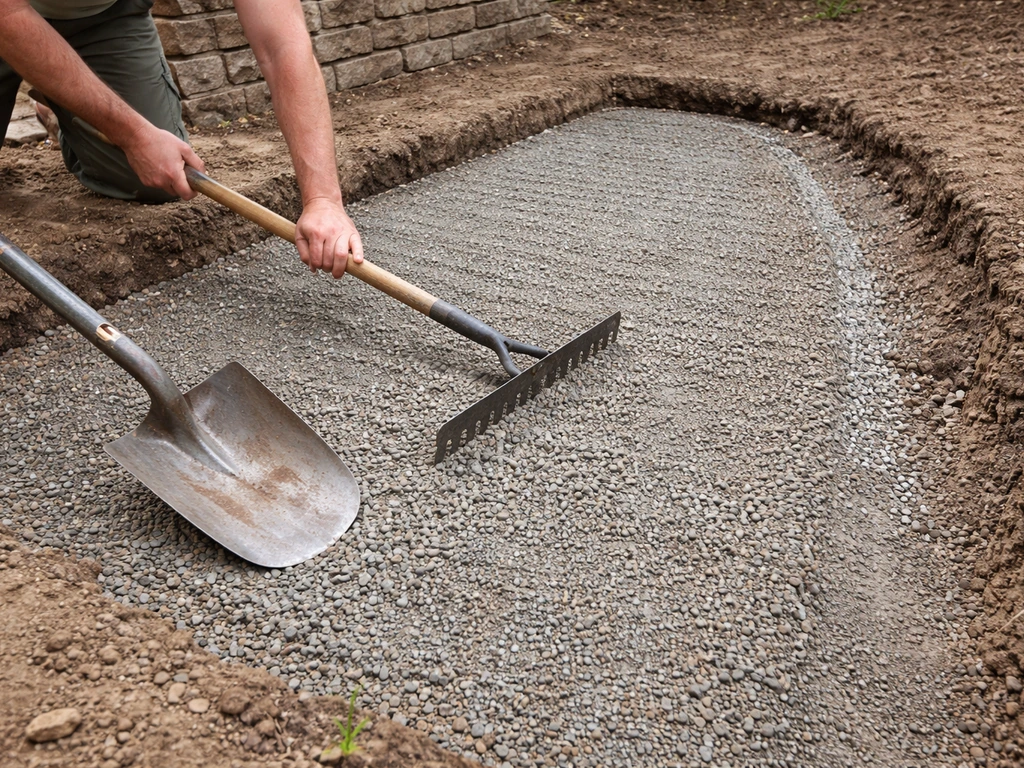
Step-by-step site prep and base building
This is where most DIY patios fail or succeed. A bad base means uneven pavers, pooling water, and wobbling stones six months later. Spend the time here and the rest of the project goes smoothly. Ohio811 says its one-call service is free and cites Ohio Revised Code chapters as the basis for call-before-you-dig requirements.
- Call 811 (or your country's equivalent utility locating service) before you dig. It's free and it keeps you from hitting a buried line.
- Clear the area: remove sod, plants, and roots. Roots will cause heaving later if left in place.
- Excavate to depth: for a paver patio, dig down about 7–9 in. total (4–6 in. for gravel base + 1 in. for bedding sand + the paver thickness, usually 2–2.5 in.). For gravel-only patios, 4–6 in. is enough. For stepping stones, dig just deep enough to accommodate the stone thickness plus 1.5–2 in. of sand beneath each stone.
- Grade the subgrade: use a level and stakes to confirm your slope. You want the ground to slope away from the house at about 1/8 to 1/4 in. per foot. This is your drainage slope and it should be established in the subgrade, not corrected with sand later.
- Compact the subgrade: run a plate compactor over the excavated soil until it's firm. Don't skip this. Loose soil under the base is the single most common cause of sinking pavers.
- Lay geotextile fabric (optional but recommended): landscape fabric over the compacted subgrade keeps subgrade soil fines from migrating up into your gravel base over time, which helps the base stay firm.
- Spread and compact the gravel base: add crushed stone in layers no more than 3–4 in. thick, compacting each layer before adding the next. For a paver patio, you're aiming for 4–6 in. total compacted depth. The compacted base surface should be within 3/8 in. of flat over any 10-ft span.
- For gravel or DG patios: after the crushed stone sub-base is compacted, spread your gravel or DG on top in 2–3 in. layers and compact. Stabilized DG should be dampened slightly before final compaction so it binds properly.
One thing to be firm on: you cannot fix base problems by adding extra bedding sand. If the base is low in spots, fix it with more compacted base material. Sand is only there to give your pavers a precise, consistent 1-in. bed to sit in, not to fill in dips.
Layout, measuring, and leveling basics
Good layout means your patio looks intentional and comes out the right size. Here's how to do it without expensive equipment.
- Measure and mark the patio perimeter with marking paint or stakes and mason's line. Check for square by measuring diagonally from corner to corner in both directions: if the two diagonal measurements match, your layout is square.
- Set a slope in your layout: your finished patio surface needs to drain away from the house. Aim for 1/8 to 1/4 in. of drop per linear foot running away from any structure. Use a line level on your mason's line to set this slope before you excavate.
- Plan your paver pattern before you start: doing a dry layout on your driveway takes 20 minutes and tells you exactly how many cuts you'll need and where border pieces go.
- For circular or freeform patios: use a garden hose to define the shape on the ground, then trace it with marking paint. Calculate the approximate square footage using length x width for rectangles (add 10% for curves and waste).
- Install edging before laying pavers: plastic or aluminum paver edging spiked into the ground every 12 in. defines your perimeter and keeps pavers from spreading outward over time. Set it at the finished paver height.
For drainage, here's a simple test before you build: after a rain, watch where water flows in the area you're planning to patio. If it already drains away from the house naturally, you're in good shape. If it pools, you have a grading problem that the patio itself needs to address with a deliberate slope built into the base. The National Patio Construction Authority notes that a commonly referenced minimum slope standard for residential patios is 1/8 inch per foot away from the foundation, citing IRC Section R401.3 and ICPI technical guidance minimum slope standard of 1/8 inch per foot away from the foundation.
Simple install walkthroughs for each patio type
Gravel patio
- Excavate 4–6 in., grade for slope, compact subgrade.
- Lay landscape fabric over the full area, overlapping seams by 6 in.
- Install edging around the perimeter and stake firmly.
- Fill with gravel in 2–3 in. layers, compacting each layer.
- Rake to level and you're done. Total time: 4–8 hours for a 10x12 ft area.
Decomposed granite patio
- Excavate 4–6 in., grade for slope away from house, compact subgrade.
- Add 2–3 in. of crushed gravel sub-base, compact it.
- Install edging (this is critical for DG—it will spread without containment).
- Spread DG in 2-in. layers; lightly moisten stabilized DG before compacting.
- Compact each layer firmly with a plate compactor.
- After final compaction, add a thin top-dressing layer of DG and compact again for a smooth finish.
- Allow to cure for 24–48 hours before heavy use. Total time: 6–10 hours for a 10x12 ft area.
Stepping-stone patio
- Lay out your stones in the desired pattern on the existing ground surface first to check spacing and coverage.
- Trace around each stone with a spade, then lift the stone aside.
- Dig each individual hole about 1.5–2 in. deeper than the stone's thickness.
- Add 1.5–2 in. of coarse sand or crushed gravel in the hole.
- Set the stone and check with a level, adjusting sand beneath until the stone is stable and sits just slightly above grade.
- Fill gaps between stones with polymeric sand, gravel, mulch, or ground cover plants.
- Total time: 3–6 hours for a 10x10 area depending on stone count.
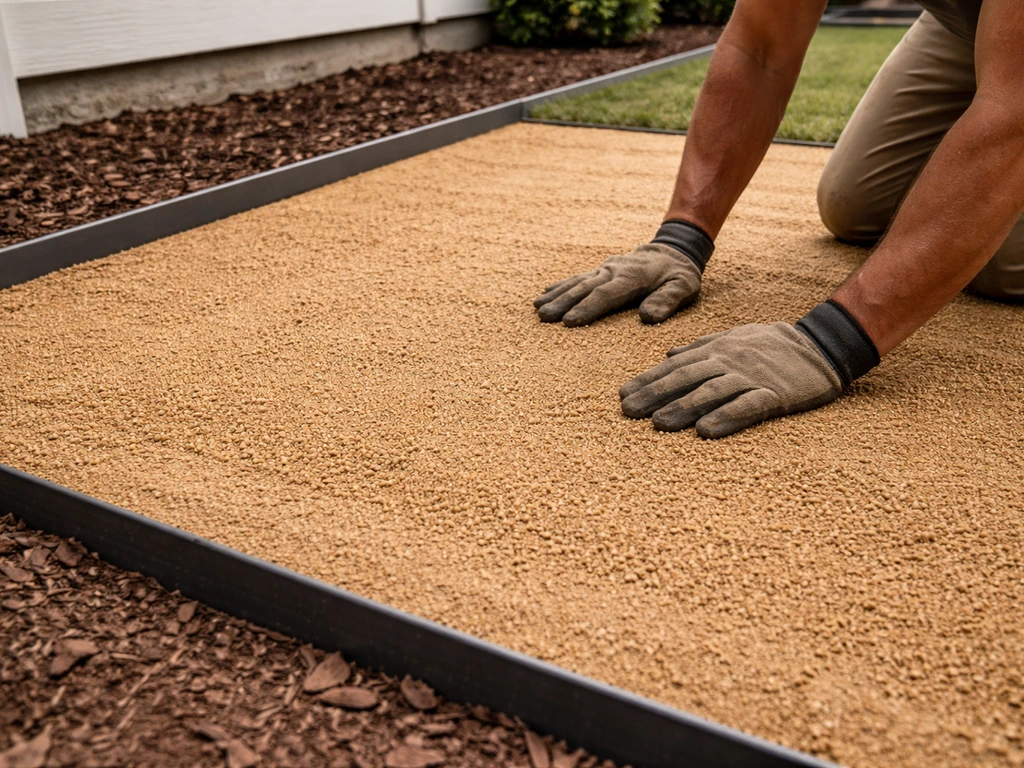
Concrete paver patio
- Complete full site prep and base building as described above (4–6 in. compacted gravel base).
- Set screed pipes (1-in. diameter conduit) parallel on the compacted base, spacing them about 6 ft apart. Set them at the correct elevation so that when you screed sand over them, you'll get exactly 1 in. of bedding sand.
- Spread coarse bedding sand between the pipes and drag a straight 2x4 over the pipes to screed the sand flat and level. Remove pipes carefully and fill the grooves with sand, gently patting flat.
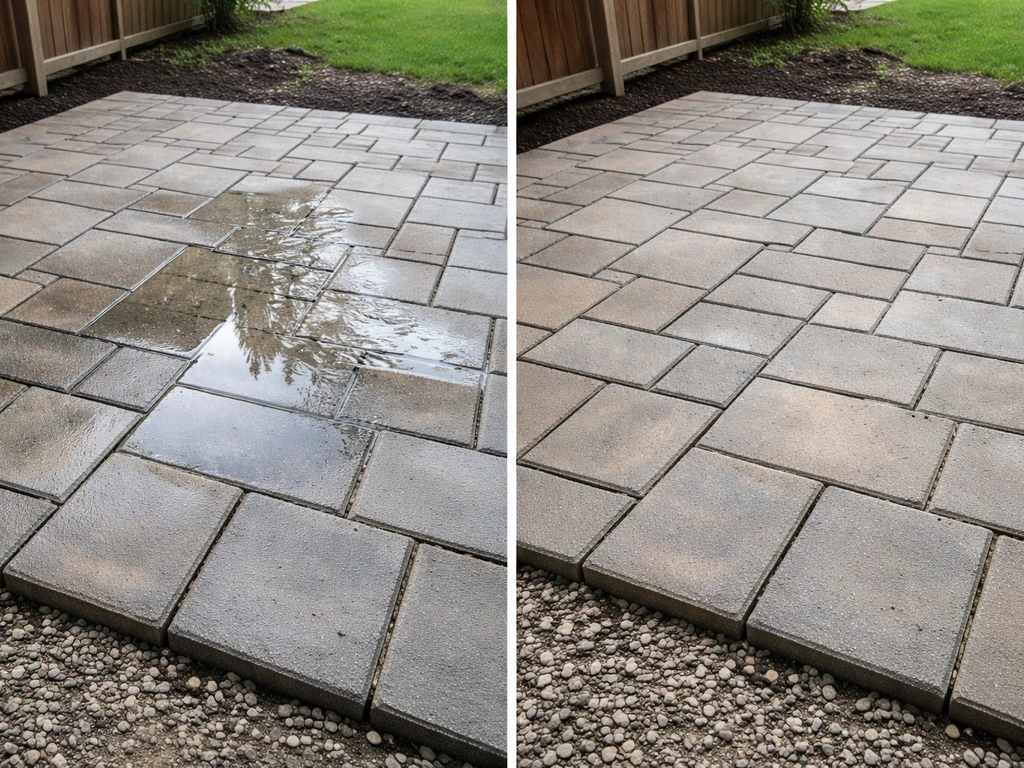
- Start laying pavers from a corner (usually starting at the house or a fixed straight edge). Set each paver with a firm downward press, not a slide. Use a rubber mallet to tap them flush.
- Check level frequently with a 4-ft level or straightedge. Pavers may be set 1/8 to 1/4 in. above your intended final elevation to account for minor settling over time.
- When the field pavers are done, cut border/edge pieces to fit using a paver saw or angle grinder with a diamond blade.
- Once all pavers are placed, run the plate compactor over the entire surface to seat them firmly into the sand.
- Spread polymeric sand over the surface, sweep it into the joints with a push broom. Blow off excess with a leaf blower, then activate by misting with a garden hose until the surface is damp but not flooded.
- Stay off the patio for 24 hours while the polymeric sand cures. Total time: 1–2 full days for a 10x12 ft area.
Pedestal tile patio
- Prep the surface: this can be an existing concrete slab, a compacted base, or even a roof deck.
- Set adjustable pedestals at your layout grid points. Adjust each pedestal's height so the tops are all level—pedestals self-compensate for slope, which is the whole point.
- Drop tiles or large-format pavers onto the pedestals. Most pedestal systems are designed so the tile weight holds everything in place without adhesive.
- Water drains freely in the space beneath the tiles, so no slope is required at the tile surface level.
- Total time: 4–8 hours for a 10x12 ft area, often less if surface prep is already done.
Common DIY mistakes and how to troubleshoot
Every patio builder makes some of these mistakes on their first project. Here's what to watch for and how to fix it before or after it happens.
| Mistake | Why It Happens | How to Fix It |
|---|---|---|
| Water pooling on the patio | Not enough slope built into the base (need 1/8–1/4 in. per foot minimum) | Reset affected pavers, re-grade the sand/base beneath them to restore slope |
| Pavers sinking or becoming uneven | Base wasn't compacted properly, or sub-base was too shallow | Pull up affected pavers, add and compact more base material, re-screed sand, reset pavers |
| Pavers spreading outward (gaps opening up) | No edging installed, or edging wasn't staked deeply enough | Install or re-stake perimeter edging; fill joints with polymeric sand |
| Gravel or DG migrating out of patio area | Edging too short or not installed; no edging on low side of slope | Add taller edging and stake every 12 in.; use L-shaped edging on sloped edges |
| Weeds growing through paver joints | Used regular joint sand instead of polymeric sand, or skipped landscape fabric | Remove weeds, re-fill joints with polymeric sand and activate with water |
| Uneven stepping stones that rock underfoot | Sand bed too thin or inconsistent; stones not seated firmly | Lift stone, add or remove sand until stone sits flat and stable, re-set |
| Bedding sand washing out under pavers | No edging, poor drainage slope, or heavy rain event eroding base | Improve perimeter edging, re-check drainage slope, refill joints with polymeric sand |
The single biggest mistake I see is people skipping or rushing the base compaction step because it's the least glamorous part of the job. If you have access to a plate compactor, use it. If your area is too small to justify renting one, a hand tamper will work but takes more effort and passes. Either way, the base has to be firm before a single paver goes down.
Project planning: cost, time, and next steps
Realistic cost estimates
| Patio Type | Approx. DIY Material Cost (10x12 ft) | Time to Complete | Skill Level |
|---|---|---|---|
| Gravel | $150–$300 | 4–8 hours | Beginner |
| Decomposed granite | $200–$450 | 6–10 hours | Beginner |
| Stepping stones | $300–$700 | 3–6 hours | Beginner |
| Concrete pavers | $840–$1,800 | 1–2 full days | Beginner–Moderate |
| Pedestal tile | $1,200–$2,400 | 4–8 hours (surface prep separate) | Beginner–Moderate |
These are materials-only estimates. Add $50–$100 for tool rentals (plate compactor, paver saw) if you don't own them. Local material prices vary quite a bit: decomposed granite runs roughly $40–$100 per cubic yard for natural DG and $100–$225 per yard for stabilized DG. Concrete pavers in a basic pattern typically run $7–$15 per square foot in materials, depending on the paver style and thickness.
How to sequence the project
- Measure your space and decide on the patio footprint. Sketch it out on paper with rough dimensions.
- Choose your patio type based on your yard conditions and budget (use the comparison table above).
- Calculate quantities: multiply your square footage by the base and material depths to get cubic footage, then convert to tons or yards for ordering. Most gravel suppliers have calculators on their websites.
- Order materials and schedule a plate compactor rental for the same day you plan to lay base.
- Call 811 at least 3 business days before digging.
- Day 1: Excavate, compact subgrade, install base, compact base.
- Day 2 (or same day for smaller patios): Install edging, screed sand (for pavers), lay surface material, compact final surface, fill joints.
- Day 3: Final cure for polymeric sand if used; add any finishing touches like border stones, lighting, or furniture.
Easy upgrades to make your patio feel finished
- Border stones: a single row of a contrasting paver color or larger cap stone around the perimeter makes the patio look designed, not just laid.
- Low-voltage landscape lighting: stake lights around the perimeter or between pavers add huge ambiance for very little cost or effort.
- A fire-pit zone: designate a circular area at one end of the patio with a ring of larger pavers or a gravel-filled circle—this creates a natural gathering spot and is easy to prep during initial install.
- Polymeric sand over regular joint sand: if you used regular sand at first, sweeping in polymeric sand later is a simple upgrade that reduces weeds and joint washout significantly.
Once you've nailed the basics covered here, you'll naturally start looking at more involved projects. Many homeowners use a simple paver or gravel patio as a starting point before tackling things like a full do-it-yourself backyard patio with multiple zones, a budget-conscious approach to expanding the footprint, or even exploring how to DIY a patio on more challenging terrain.
If you want to expand beyond a basic surface, this guide also covers how to diy a patio on more challenging terrain. Start with the project that matches your current skill level and yard conditions, build it well, and you'll have both the confidence and a solid reference point for whatever comes next.
If you want more do it yourself backyard patio ideas for layout and materials, use this as your baseline and then compare options like pavers versus gravel. If you want help planning your do it yourself patio on a budget, focus on choosing an easy material and building a firm base first.
FAQ
How thick should the base and bedding be for easy do it yourself patio ideas?
Most homeowners are happiest with a 1 to 1.5 inch thick leveling layer above the compacted base, then a separate 1 inch paver or paver-bed layer (sand or similar) only where the design calls for it. If you add extra bedding sand to “make up” low spots, it can wash out or compact unevenly over time, leading to rocking pavers and dips.
What edging works best to keep gravel or DG from spreading?
For gravel or decomposed granite, prioritize true edging (metal, concrete, or timber rated for outdoor use) and set it so it locks the material in place. For pavers, use edging that can be pinned or staked and keep it tight to the paver face so the joints do not widen as traffic and freeze-thaw happen.
Can I lay pavers directly on dirt to keep easy do it yourself patio ideas truly simple?
A concrete paver patio typically needs a compacted base beneath the bedding, you do not want to lay pavers directly on soil. For small flat yards, you can often start with a straightforward compacted base and then add the specified bedding layer, but if you see any subgrade softness, you should over-excavate and replace with a properly graded base material before you move on.
What should I do if my yard stays wet after rain, even after I build the patio?
If your soil is wet or you notice pumping water after rain, stop and address drainage first with grading or a dedicated draining strategy (for example, adjusting the base slope and ensuring water has a clear path away from the house). If you still want pavers, you may need a more engineered base and separation layer to prevent fine soil from mixing into the base over time.
How much slope do I need for drainage on an easy DIY patio?
In most climates, you should plan for at least a slight fall away from the house, typically around 1/4 inch per foot of patio run. Use a string line or level to verify the slope while building the base, not after the pavers are already down.
What should I use to fill paver joints, and how do I prevent weeds?
Many DIYers get the joint material wrong. With pavers, the joint filler should be appropriate for outdoor exposure and installed in a way that compacts or settles into the gaps, then rechecked after the first rain or freeze-thaw. Do not use filler that’s too fine or prone to washing out, it will create weeds and shifting.
Are stepping stones stable enough for daily walking, or do easy do it yourself patio ideas fall apart?
If you want stepping stones or gravel and you get heavy foot traffic, increase stability by compacting the base more aggressively and using a consistent spacing plan tied to your stride. For stepping stones, ensure the top surface lands at a comfortable height above surrounding grade so you do not create trip hazards or standing water.
How do I handle transitions at doors, steps, or existing concrete?
If the patio will connect to a door, consider a threshold detail so the patio surface does not sit higher than the doorway sill or create a water barrier. Leave a small expansion gap where the patio meets walls or fixed features, then cap or seal appropriately so water does not migrate into cracks.
Can I reuse old pavers or gravel to lower the cost of easy do it yourself patio ideas?
You can often reuse existing pavers only if they’re flat, not warped, and you can remove all old sand and debris so the base is still correct. For gravel or DG, reuse is less predictable because fines and organics can clog drainage, so it’s better to use clean material and refresh edging and base where needed.