You can build a solid, good-looking patio yourself for $3 to $8 per square foot in materials, depending on what surface you choose. That compares to $10 to $30 per square foot for a professionally installed paver patio in 2026. The real secret is picking the right material for your yard conditions, doing the base prep correctly the first time, and knowing which tools to rent instead of buy. If you are looking for do it yourself backyard patio ideas, start with the same material and base-prep priorities this guide emphasizes. If you are looking for do it yourself backyard patio ideas, start with the same material and base-prep priorities this guide emphasizes how to diy a patio. That compares to $10 to $30 per square foot for a professionally installed paver patio in 2026 easy do it yourself patio ideas. This guide walks you through every step, from setting a realistic budget to troubleshooting problems that show up a season later.
Do It Yourself Patio on a Budget: Step-by-Step Guide

Budget planning and realistic cost ranges
Start by separating your budget into three buckets: materials, equipment rentals, and hidden prep costs. Most first-timers budget for materials and forget the rest, then get surprised when excavation or drainage eats up a third of their money. If you are looking for do it yourself backyard patio ideas, use this checklist to plan your budget, layout, and materials before you start digging.
For a typical 200 square foot patio, here is a rough breakdown of what to expect at the DIY level in 2026. These are material-only costs, not installed prices.
| Surface Type | Material Cost (per sq ft) | 200 sq ft Estimate | Skill Level |
|---|---|---|---|
| Gravel/crushed stone | $1–$3 | $200–$600 | Beginner |
| Concrete pavers | $3–$6 | $600–$1,200 | Beginner–Intermediate |
| Natural stone pavers | $5–$10 | $1,000–$2,000 | Intermediate |
| Poured concrete (DIY mix) | $3–$5 | $600–$1,000 | Intermediate–Advanced |
| Flagstone | $4–$8 | $800–$1,600 | Intermediate |
On top of materials, add these line items before you finalize your number: base gravel or crushed stone (about $0.50–$1.00 per square foot for a 4-inch sub-base), sand bedding layer ($0.30–$0.60 per square foot), edging ($1–$3 per linear foot for plastic or metal), and polymeric sand for joints ($25–$40 per bag, one bag covers roughly 50–75 square feet). Equipment rental is typically $40–$100 per day for a vibratory plate compactor, which you absolutely need for anything beyond a gravel path. Rent it for one day and plan to complete compaction in that window.
Hidden costs that catch people off guard include disposal fees if you are hauling out excavated soil (sometimes $50–$200 depending on volume and your local dump), extra base material if you discover soft or clay-heavy soil, and concrete or mortar for edging anchors. Budget a 10–15% contingency on top of your material total. If you come in under, great. If not, you are covered.
Choose the right DIY patio design and materials
The best budget patio design is a simple rectangle or square. Curves and angles look great but they cost more because you end up cutting pavers, generating waste, and spending more time on layout. A rectangle keeps cuts to the perimeter only, and most of those can be done with a rented wet saw or a simple chisel-and-hammer split for natural stone.
For most first-time DIYers in typical yard conditions, concrete pavers are the best choice. They are dimensionally consistent, which makes leveling easier, they are durable through freeze-thaw cycles, and they come in a huge range of styles that look far more expensive than they are. A standard 4x8 inch or 12x12 inch concrete paver is the most forgiving option for beginners because mistakes are fixable: you pull the paver up, re-level, reset.
Gravel is the cheapest option and works great as a low-key patio surface, especially under furniture or as a secondary seating area. It drains perfectly, requires almost no base work, and you can install it in a weekend. The downside is it migrates under foot traffic and is not ideal as a primary patio if you want to pull chairs up to a table every day. If you go gravel, use a 3/4-inch crushed stone (not pea gravel, which rolls underfoot) and lock it in with solid edging.
Poured concrete is durable and can be budget-friendly if you mix it yourself for smaller areas, but it is unforgiving if you get the grade wrong or the slab cracks. It also requires forming, curing time, and more physical effort. Save poured concrete for when you have done at least one paver project and understand how to read a slope and work a level across a large surface.
If you want a more elevated look without a big price jump, consider a running bond or herringbone pattern with standard 4x8 concrete pavers. Both patterns are structurally stronger than a basic stacked pattern and look noticeably more polished, with no extra material cost.
Site assessment: layout, permits, base conditions, and slope/drainage
Walk your yard before you buy a single bag of anything. This is where a lot of DIY patio projects go sideways, because the planning gets rushed in favor of getting started.
Measure and mark your layout
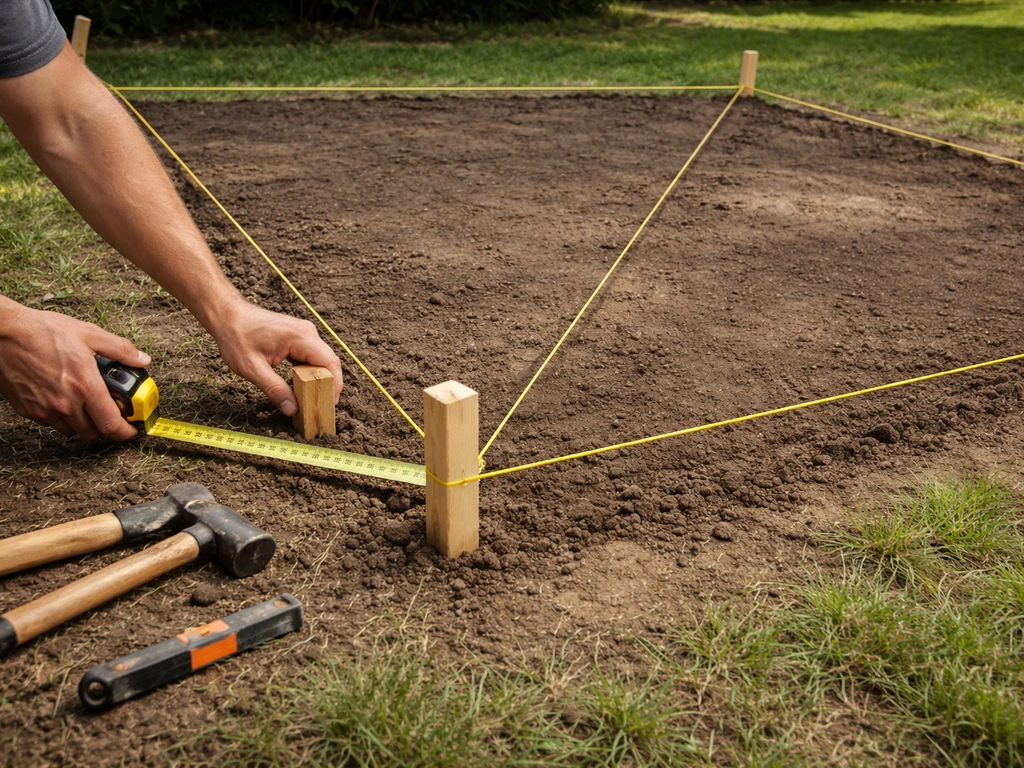
Use stakes and mason's line to mark the perimeter of your patio. Spray paint works too. Measure diagonals to confirm square: if both diagonals are equal, your rectangle is square. A 10x20 foot patio has a diagonal of about 22.4 feet. Get within a quarter inch and you are fine. Mark your layout 6 inches beyond your final patio edge on all sides so you have room to set edging and work.
Check permits and HOA rules
Most jurisdictions do not require a permit for a ground-level patio under a certain square footage, often 200 square feet, but this varies widely. Call or check online with your local building department before you dig. If you are in an HOA, check your CC&Rs because some associations require approval for any hardscape addition, or they restrict materials and colors. Getting caught after the fact is a much bigger headache than a 15-minute phone call upfront.
Read your ground conditions
Dig a small test hole about 12 inches deep in the center of your planned patio area. If you hit dense, sandy, or loamy soil that holds its shape when you squeeze a handful, you are in good shape. If the soil is clay-heavy (sticky, slow to drain, holds a fingerprint), plan for extra base depth or consider adding a layer of road base gravel below your standard crushed stone sub-base. Clay soil is the number one cause of paver settling and heaving.
Address slope and drainage before anything else
Your patio needs to slope away from any structure by at least 1/4 inch per foot (about a 2% grade). Measure the existing ground slope with a long level and a tape measure. If water currently pools near your house foundation or in your yard, you need to address it before installing a patio, because a flat hard surface will concentrate that water and make it worse. For mild drainage issues, a properly sloped patio that directs water to a gravel trench or your yard's natural drainage path is often enough. For serious ponding, install a perforated pipe drain along the low edge of your patio before you lay the base.
Tools and supplies checklist for a DIY patio
Here is what you will need, split between what to buy and what to rent. Buying cheap versions of tools you will only use once is false economy. Rent the heavy equipment, buy the hand tools.
Tools to rent
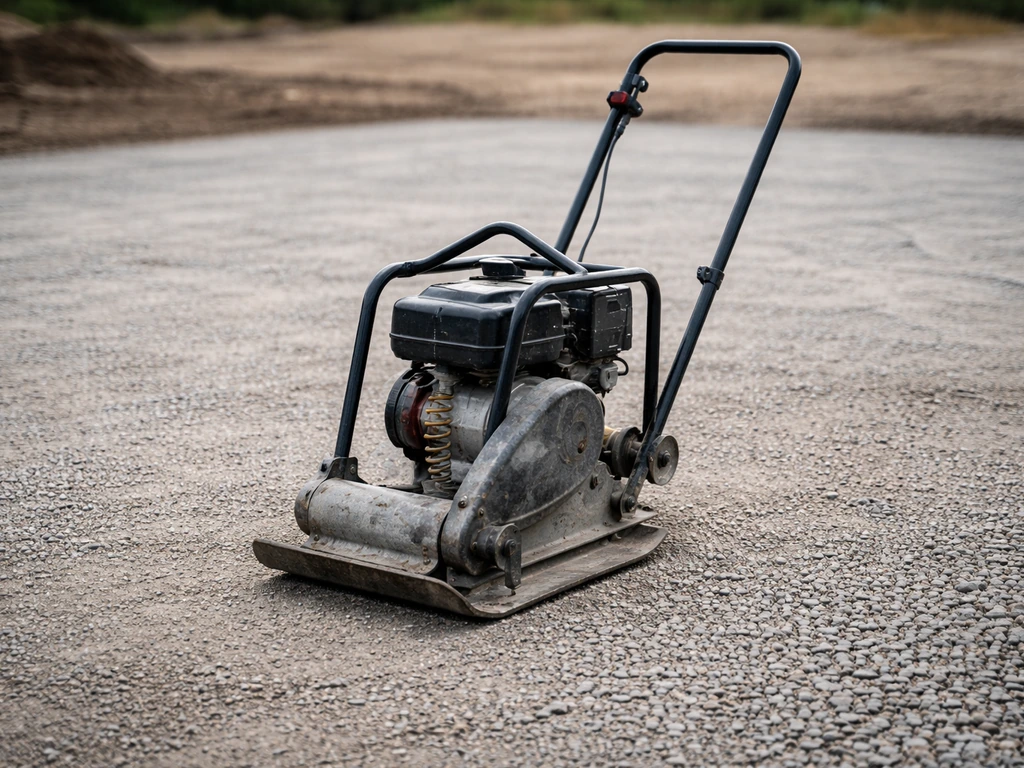
- Vibratory plate compactor ($40–$100/day): essential for compacting sub-base and base layers, do not skip this
- Wet saw or masonry saw (if cutting pavers to fit): $50–$80/day, or use a rented angle grinder with a diamond blade for smaller jobs
- Sod cutter if removing a large grassy area: $80–$120/day, saves hours of hand digging
- Tamper (hand tamper) if your area is small: usually cheap enough to buy ($25–$35)
Tools to buy
- Tape measure (25 ft minimum)
- 4-foot level and a long straightedge or screed board (an 8-foot 2x4 works)
- Line level or water level for establishing grade across the full patio
- Stakes and mason's line
- Rubber mallet
- Square-edge shovel and a flat spade
- Wheelbarrow
- Rake and flat tamper
- Broom (for sweeping sand into joints)
- Safety glasses, work gloves, knee pads
Materials checklist
- Patio surface material (pavers, flagstone, gravel — calculated for your square footage plus 10% overage)
- Crushed stone or road base for sub-base, 4 inches compacted depth minimum (6 inches in cold climates or clay soil)
- Coarse concrete sand for bedding layer (1 inch depth)
- Polymeric sand for joints
- Landscape fabric (optional: use under gravel patios, not under pavers — it can cause leveling problems)
- Edging material (plastic paver edging or aluminum landscape edging with spikes)
- Edging spikes (10-inch galvanized spikes, one per 12 inches of edging)
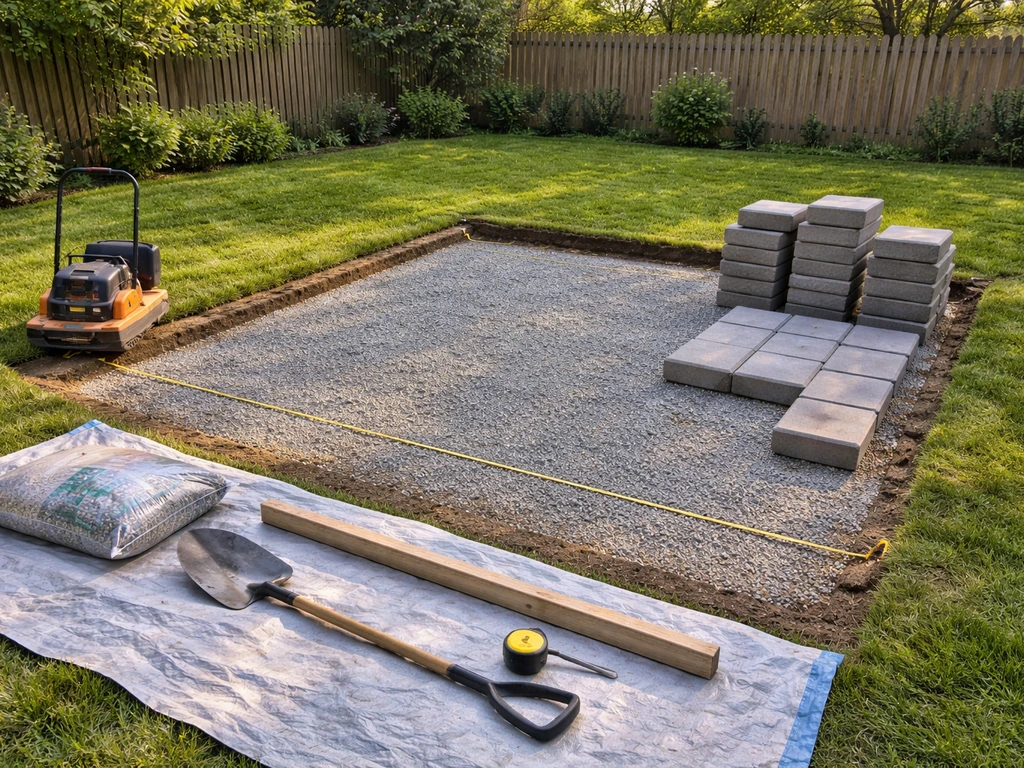
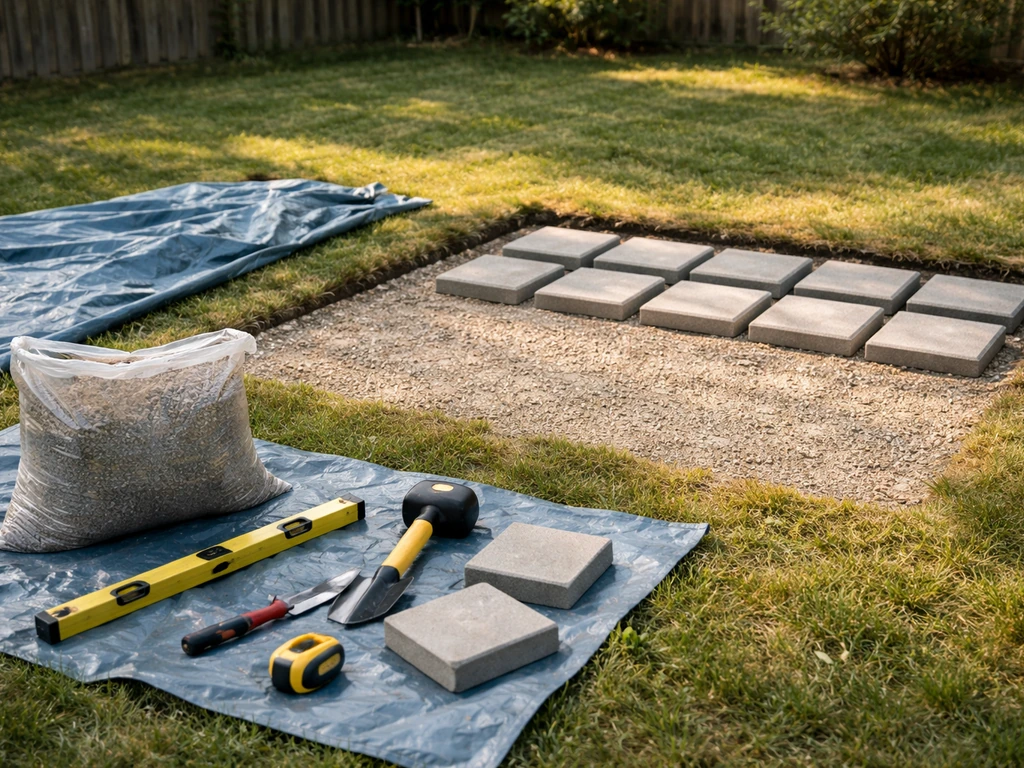
Step-by-step construction: base, edging, leveling, and surface install
Take your time on the base. A rushed base is the only reason most DIY patios fail. Everything on top is only as good as what is underneath it. A contractor-style installation guide also emphasizes uniform bedding depth near the edges and proper vibrating or tapping of pavers into the sand bed as part of the correct installation steps bedding/screed depth and compacting the sand bed before setting pavers.
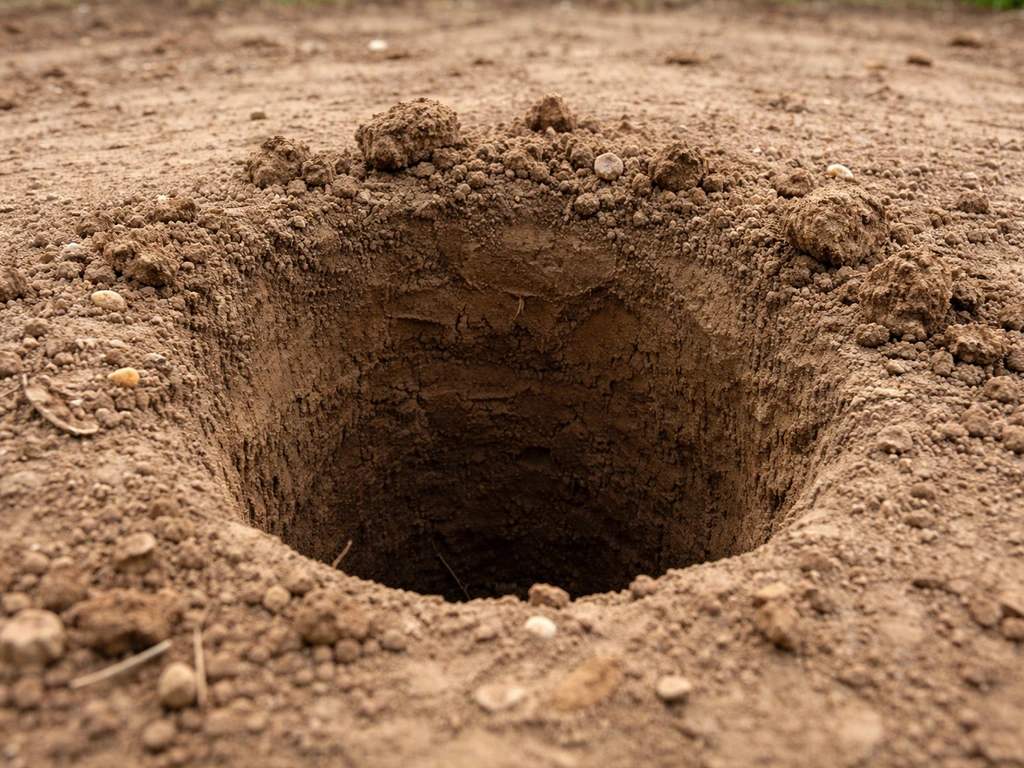
- Call 811 before you dig. In the US, 811 is the free utility-locating service. They will mark buried lines within a few days. This is not optional.
- Excavate to depth. Remove sod and soil to a depth of about 7–8 inches below your finished patio surface. That allows for 4 inches of compacted sub-base gravel, 1 inch of sand bedding, and roughly 2–2.5 inches of paver thickness. In northern climates with hard freezes, go to 6 inches of sub-base, so excavate 9–10 inches total. Keep your grade sloping away from any structures as you dig.
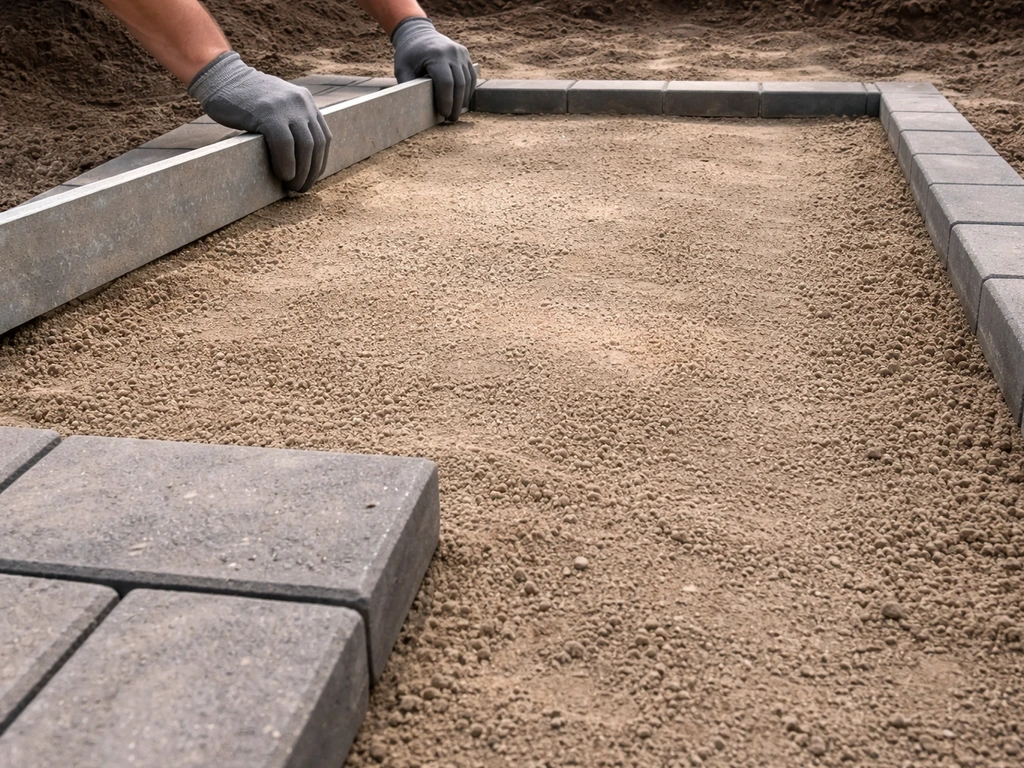
- Install edging before your base. Set your paver edging along the perimeter of the excavated area and stake it firmly into the ground. This gives you a contained box to fill and compact inside of, and it holds your final grade line.
- Add and compact sub-base. Bring in your crushed stone (3/4-inch minus gravel or Class II road base). Add it in 2-inch lifts, compacting each lift with the plate compactor before adding the next. Do not dump all 4 inches in at once and compact it. Make 2–3 passes with the compactor on each lift, overlapping slightly. This is what prevents settling.
- Add the sand bedding layer. Spread 1 inch of coarse concrete sand (not play sand, not polymeric sand — coarse concrete sand) over the compacted base. Use two lengths of 1-inch diameter conduit pipe as screed rails to drag your screed board across and create a perfectly flat, 1-inch deep sand surface. Pull the pipes out after screeding and fill the channels with sand, smoothed by hand.
- Lay your pavers. Start from a corner (typically the corner closest to the house) and work outward. Set each paver firmly into the sand with a slight press down — do not slide them once placed. Use a rubber mallet to tap them flush. Check every few rows with your 4-foot level. Keep joint spacing consistent (1/8 to 1/4 inch for concrete pavers with polymeric sand).
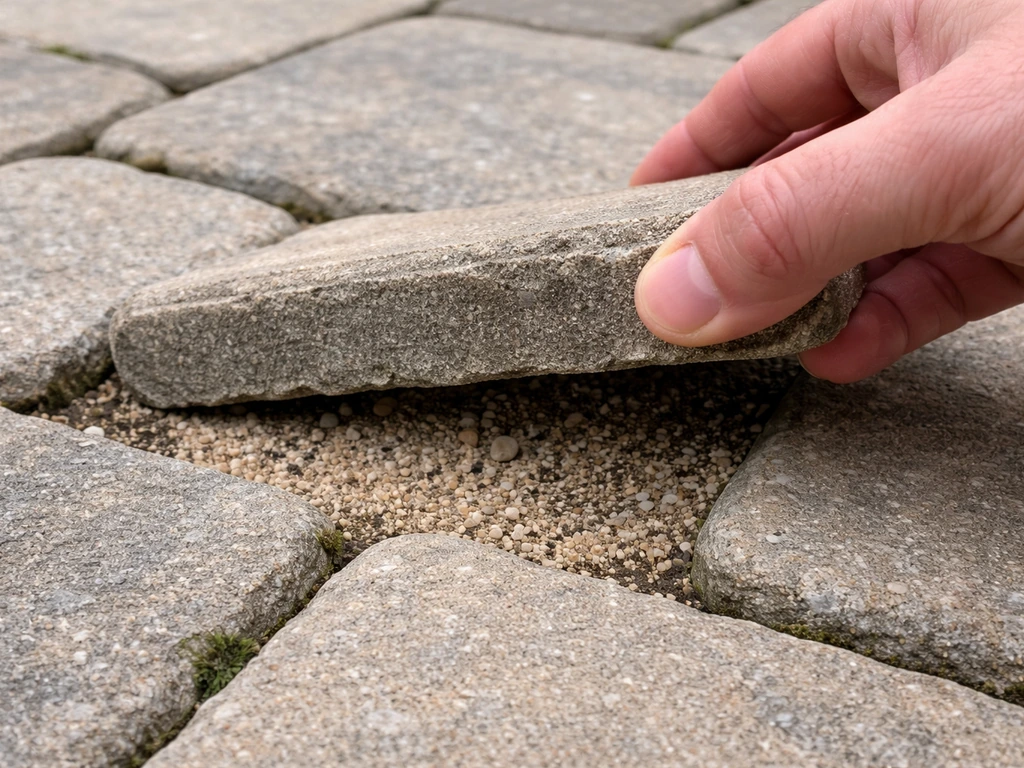
- Cut edge pieces. Measure and mark any pavers that need trimming for the perimeter. A rented wet saw gives the cleanest cut. For rough-edged flagstone, a cold chisel and hammer work fine and give a natural look.
- Compact the finished surface. Run the plate compactor over the entire paver surface once all pavers are set. Place a piece of plywood or a rubber pad between the compactor and the pavers to protect the surface. This seats everything firmly into the sand.
- Sweep in polymeric sand. Pour polymeric sand over the surface and sweep it into the joints with a push broom. Make multiple passes until joints are filled to within 1/8 inch of the top. Blow off excess dust with a leaf blower (this is important — leftover haze cures on the surface). Mist the surface with water to activate the polymer binder. Let it cure 24–48 hours before heavy use.
Finishes, upgrades, and how to save money without cutting corners
Saving money on a patio comes down to knowing where corners matter and where they do not. The base is not negotiable. But there are real places to cut costs without sacrificing the finished result.
Smart ways to cut material costs
- Buy pavers in bulk from a masonry supply yard instead of a big-box store. You will often pay 20–40% less per unit, especially on larger orders.
- Use the existing ground slope to your advantage. If your yard already slopes away from the house at roughly the right grade, you are saving yourself the excavation and fill math that comes with creating a slope from scratch.
- Choose a thicker paver (2.375 inches or 60mm) over a thinner one. It costs slightly more per unit but it is more resistant to cracking and you avoid replacement costs later. This is not a corner you want to cut.
- Use standard brick-pattern pavers instead of tumbled or textured premium pavers. The difference in durability is minimal but the price difference can be $1–$2 per square foot.
- Skip the sealant on year one. Concrete pavers do not need to be sealed immediately. Wait a full year, let the polymeric sand cure through one freeze-thaw cycle, and seal then if you want to. Sealant on a fresh install often traps moisture.
Affordable upgrades that look expensive
- Solar path lights along the patio edge: $20–$60 for a set of 8, zero wiring required, and they add significant nighttime ambiance
- A simple border course in a contrasting paver color or a slightly larger paver size: creates a defined edge that looks custom without extra skill
- Potted plants or raised planter boxes built from leftover lumber: adds greenery and softens the hardscape look for almost nothing
- An outdoor rug on part of the patio surface: defines a seating zone and makes the space feel intentionally designed
- String lights hung from a simple post-and-hook setup at the corners: a $40 investment that transforms an outdoor space at night
The upgrades that are not worth the budget on a first patio build are built-in fire pits (they require their own foundation and drainage consideration), permanent overhead structures, and in-ground lighting that requires trenching. Save those for a future project once you know the space works for you.
Maintenance and common DIY troubleshooting
A well-built patio is low maintenance, but not zero maintenance. Here is what to expect in the first few years and how to fix the problems that show up most often.
Settling and uneven pavers
Some settling in the first 6–12 months is normal, especially in areas with heavy foot traffic. If you see a paver that is noticeably low or rocking, pull it up (a flathead screwdriver slid into the joint gives you enough leverage), add a small amount of coarse sand underneath, tamp it flat, and reset the paver. Do this promptly because a low paver catches water and accelerates the problem. If a whole section is settling, that usually points to insufficient sub-base compaction in that area. Pull the pavers, add more base material, compact thoroughly, re-screed the sand, and relay.
Weeds in the joints
Polymeric sand is your best defense, but even good polymeric sand joints can get weed seeds blown in over time. Pull weeds by hand as soon as you see them (before roots establish) or hit them with a targeted weed killer. Do not use bleach, which can stain pavers. If joint sand has eroded significantly, sweep in fresh polymeric sand, compact it lightly by hand, and re-wet. This is a 30-minute job once a year.
Water pooling on the surface
If water sits on your patio after rain, you either have insufficient slope or a low spot. Check the grade with a level. A correctly built patio should show water sheeting off within a few minutes of rain stopping. For a minor low spot, pulling and resetting a few pavers with added sand underneath often solves it. For a drainage problem at the edge of the patio (water pooling against the house), you may need to extend a downspout further away or install a small channel drain at the low side of the patio.
Heaving in cold climates
In areas with hard freezes, frost heave is the main enemy. Water in the base expands when it freezes and pushes pavers up. The fix is prevention: a deep enough base (6 inches of compacted gravel minimum) that drains well so water does not sit in the base layer to freeze. For example, FigureCalc’s patio cross-section calculator works through layer thicknesses and shows that with 4 inches of compacted base, 1 inch of bedding sand, and standard paver thickness, the total excavation depth comes out to roughly 7 to 7.375 inches depending on the paver thickness FigureCalc’s layer-thickness excavation example for 4 inches of compacted base plus 1 inch of bedding sand. If you used only 4 inches of base and you are in a cold climate, heaving is a likely outcome. Relay affected sections in spring with added base depth.
Edging failure
Paver edging that pops out or bows is almost always caused by spikes that are too short, spaced too far apart, or driven into soft soil. Use 10-inch galvanized spikes every 12 inches. If edging has already failed, pull it back, compact the soil behind it firmly, and re-spike it. In very soft soil, backfill behind the edging with compacted gravel before re-spiking to give it something solid to anchor into.
Annual maintenance in about an hour
- Inspect for settled or rocking pavers each spring and reset as needed
- Check joint sand and top up with polymeric sand where erosion has occurred
- Pull any weeds before they root deeply
- Clear leaves and debris from the surface and edges to prevent staining and moisture retention
- Check edging stakes and re-drive any that have worked loose
- Consider applying a paver sealer every 3–5 years to protect color and reduce staining
Building a DIY patio on a budget is genuinely doable for most homeowners, and the payoff is real: outdoor living space you built yourself, at a fraction of contractor prices. The approach described here works for everything from a simple 100-square-foot seating pad to a larger entertaining area. Once you have done it once, the next project, whether it is adding a fire pit area, extending the patio, or tackling a raised design, gets much easier because you understand what is underneath and why it matters.
FAQ
What’s the cheapest “do it yourself patio on a budget” option that still won’t turn into a mess in a year?
Gravel can be the lowest-cost, but it is only stable as long as you use 3/4-inch crushed stone and solid edging. If you want a primary patio that stays level longer, concrete pavers are usually the best budget balance because you can re-level individual stones if something shifts.
Do I really need polymeric sand, or can I skip it to save money?
You can skip it, but joint sand is what prevents pavers from migrating. Regular sand washes out more easily and weeds fill joints faster. If budget is tight, buy polymeric sand for the main traffic area first, and use regular sand only in the least-used perimeter until you can top it off.
How do I know whether my base depth is enough before I start digging?
Do a second soil check a day or two before you excavate, not just one test hole. If you find clay pockets across the site, plan extra sub-base in those low areas or consider a deeper base with additional road base gravel below your standard crushed stone layer to reduce settling and heaving.
What’s the biggest beginner mistake when planning a patio layout?
Trying to fit a complex shape to existing landscaping. Layout simplicity saves money because cuts and waste add up quickly. Stick to a rectangle or square, and plan your layout so you can end up cutting only along the perimeter, not in multiple interior runs.
Should I buy or rent a wet saw for cutting pavers or natural stone?
Renting is usually cheaper unless you expect to cut a large volume. For a budget patio with mostly perimeter cuts, you can often handle concrete pavers with the right scoring technique plus a grinder, but natural stone typically needs a wet saw for clean edges and fewer breakages.
How much extra material should I order to avoid running short mid-project?
Order at least 10% extra pavers for simple rectangles, and 15% to 20% if you have any diagonal edges, lots of curves, or you expect to waste pieces during learning. Also account for joint sand, edging, and spikes, because under-ordering those creates delays.
What should I use for edging if I want the patio to stay put long-term?
Go with plastic or metal edging that is anchored by correctly sized galvanized spikes. A common failure is using short spikes or too few anchors, especially on the corners. Use about 10-inch spikes spaced close enough that the edging cannot lift when stepped on or pushed with a shovel.
Can I build a DIY patio budget-style over existing concrete or pavers?
Usually no if the existing surface is not stable and level. Any movement or poor slope transfers into the new install. If you do not want to remove everything, consider whether you can achieve the required 1/4 inch per foot drainage and a stable base, otherwise removal plus proper base prep is the safer budget long-term choice.
How do I handle drainage if my yard already pools near my house?
Do not install a flat patio over an existing drainage problem. Confirm your grade and ensure water can shed away from the foundation. For more serious ponding, plan a solution like extending a downspout farther out or adding a small channel drain along the low edge before you lay the base.
Is a permit always required for a patio under 200 square feet?
Not always, but assumptions are risky because rules vary by location and sometimes by patio height or proximity to property lines. Before you dig, call your local building department or check online, and also confirm HOA approval and material restrictions if applicable.
What’s the best way to fix pavers that rock or settle without redoing the whole patio?
Identify whether it is one stone or a whole area. For a rocking unit, lift it, add a small amount of coarse sand, tamp level, then reset. For a section that is consistently low, that usually indicates insufficient compaction, so remove pavers in that zone, add and compact base material, re-screed sand, and relay.
How do I prevent weeds in the joints when I have polymeric sand?
Polymeric sand helps, but it is not a permanent barrier. Pull weeds as soon as they appear before roots establish, and avoid broad staining chemicals like bleach. If joints erode, sweep fresh polymeric sand in, compact lightly, and re-wet according to the product instructions.
What should I do if water remains after rain?
First check whether the patio has the needed slope away from buildings, then look for a low spot. A minor low spot is often solved by lifting a few pavers, adding sand, and resetting. If water pools at an edge, you may need to address the drainage pathway, such as improving downspout discharge distance or adding a small drain channel.
What’s the best budget strategy for freeze-thaw areas to reduce frost heave?
Prioritize base thickness and drainage so water does not sit in the sub-base and freeze. In cold climates, 6 inches of properly compacted gravel minimum is a common target, and 4 inches is often insufficient. If heaving happens, relay in spring with added base depth rather than trying to patch individual stones.