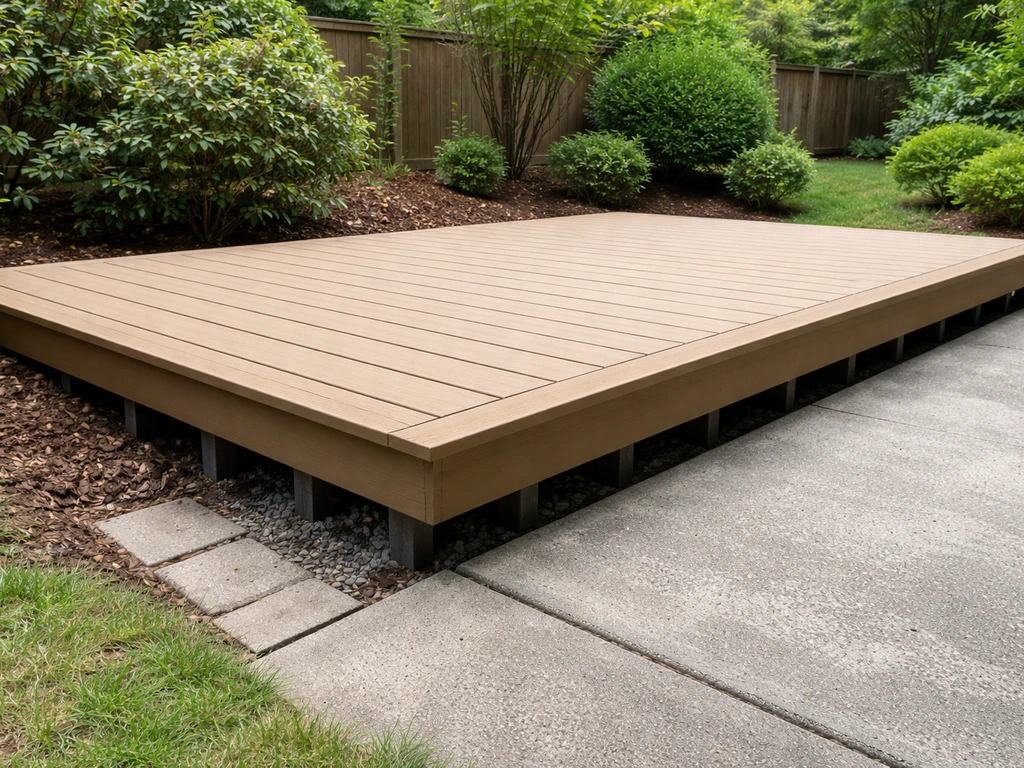
You can build a simple wood patio deck yourself in a weekend or two. The basic sequence is this: plan your layout, prep the ground and set footings, frame with pressure-treated lumber, install your decking boards with consistent spacing, then seal and maintain. Next, follow our step-by-step guide to make a patio deck by planning the layout, building the frame, and installing the decking boards. It sounds like a lot, but broken into stages it's very manageable for a first-time builder. A 12 ft x 12 ft ground-level deck is the sweet spot for beginners: simple rectangle, easy math, and you'll finish it feeling confident rather than overwhelmed.
How to Build a Patio Deck With Wood Step by Step

Nolan Carver
17 Jun 2026

Plan your deck before you buy a single board
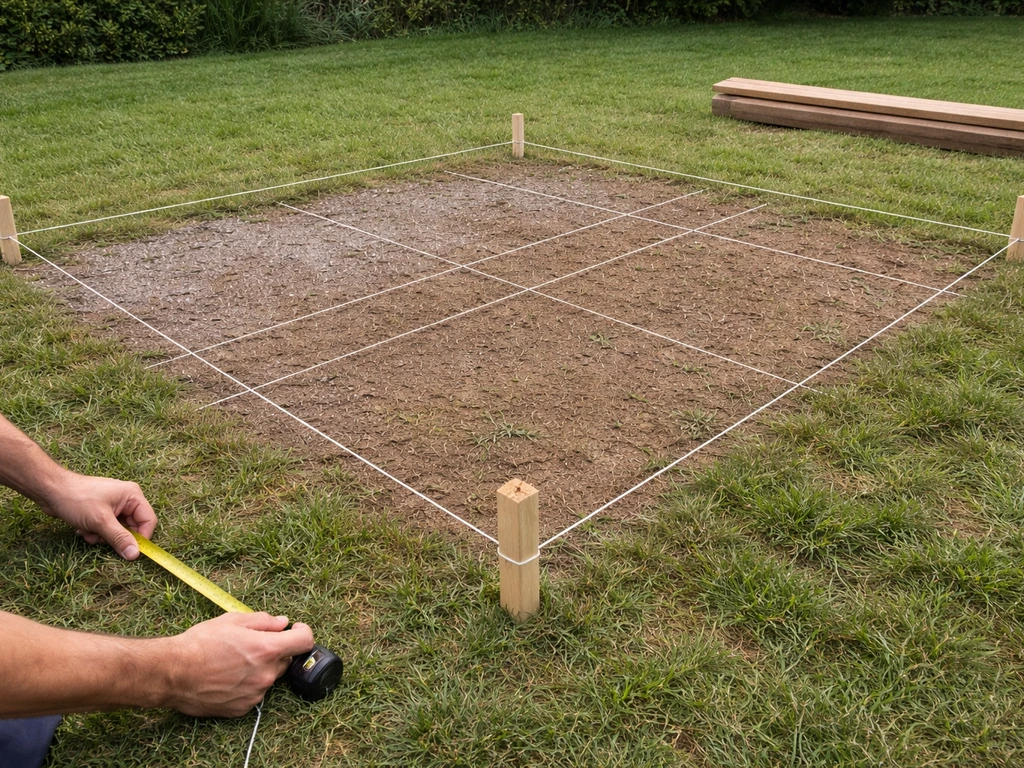
Start with size and placement. A 12 x 12 ft rectangle is the classic beginner deck for good reason: it keeps your joist grid manageable, board lengths predictable, and the layout math straightforward. Once you have your size and placement dialed in, you can follow the next steps to install patio decking safely and get a level, durable result. Sketch it on paper first. Note where your house door lands, which direction you want the boards to run, and whether there's any slope to deal with. The direction your decking boards run is more than a style choice; your joists run perpendicular to the boards, so that decision locks in your framing direction early.
Aim for a ground-level or low-profile deck if you're new to this. Keeping the deck close to existing grade gives you a continuous, patio-like feel without the added complexity of tall posts, guard rails, or stair codes. That said, even a low deck needs proper footings and framing, so don't skip those steps just because you're not building something elevated.
Check your local permit requirements before you start. Many municipalities require a permit for any deck attached to a house, and some require one for freestanding decks above a certain size too. The AWC DCA-6 guide (Prescriptive Residential Wood Deck Construction Guide, based on the 2015 IRC) is widely used by inspectors and is freely available online. Download it and keep it handy; it has span tables and connection details you'll actually need.
- Decide on size early: 12 x 12 ft or 10 x 16 ft are both beginner-friendly rectangles
- Sketch the layout with door location, board direction, and slope noted
- Confirm the deck will sit away from any buried utilities (call 811 before digging)
- Check local permit requirements and frost depth rules for your area
- Decide if the deck will be freestanding or ledger-attached to the house
If you're thinking about design beyond the basics, designing around your yard's natural features and traffic patterns will make the finished deck feel intentional rather than dropped in. That design thinking is worth spending real time on before the build starts.
What materials and tools you actually need
Pressure-treated lumber is the go-to for structural framing on a wood deck. For anything in ground contact (posts, footings, any wood touching soil), use UC4B rated pressure-treated lumber. For joists and above-ground framing, UC4A or UC3B is typically appropriate depending on your span tables and local code, but UC4B is never a wrong choice if you want to be conservative. What matters most is not buying standard dimensional lumber from the shelving aisle and hoping it holds up outdoors. It won't.
For the decking surface itself (the boards you walk on), you have a few solid choices. Pressure-treated pine is the most affordable and widely available. Cedar and redwood look great and resist rot naturally but cost more. Composite decking (like Trex) skips a lot of maintenance but adds cost upfront and installs a bit differently than wood. For a beginner first build focused on wood, stick with pressure-treated pine for framing and either pressure-treated or cedar for the decking surface.
| Material | Best Use | Rot Resistance | Relative Cost | Maintenance |
|---|---|---|---|---|
| Pressure-treated pine | Framing + decking surface | High (treated) | Low | Stain/seal every 2-3 years |
| Cedar | Decking surface | High (natural) | Medium | Seal every 1-2 years |
| Redwood | Decking surface | High (natural) | High | Seal every 1-2 years |
| Composite (Trex, etc.) | Decking surface only | Very high | High upfront | Minimal (clean regularly) |
Your hardware matters as much as your lumber. Modern pressure-treated wood (ACQ/CA treated) is more corrosive to metal than older CCA-treated lumber, so you cannot use standard galvanized joist hangers and expect them to last. Use joist hangers, post bases, and connectors that are explicitly rated for use with ACQ/CA treated lumber. Simpson Strong-Tie and USP make hardware with the right coatings. Check the label before you buy; it will say whether it's approved for use with treated lumber.
Tools you'll need for the build

- Circular saw (a miter saw is a nice upgrade for clean cuts)
- Drill/driver with bits and a dedicated impact driver for driving deck screws
- Speed square and framing square
- Tape measure (25 ft minimum)
- String line and line level (or laser level)
- Post hole digger or rented power auger for footings
- Level (4 ft level is ideal for framing)
- Chalk line
- Safety glasses, hearing protection, and work gloves
- Concrete mix for footings (bags or ready-mix depending on scope)
A practical materials list for a 12 x 12 ft deck
- Concrete tube forms and concrete mix (quantity depends on footing depth and diameter)
- Post bases rated for treated lumber (one per footing)
- 4x4 or 6x6 posts (UC4B, cut to height needed)
- 2x8 or 2x10 pressure-treated lumber for rim joists and interior joists (16" o.c. layout = roughly 10 joists for a 12 ft span)
- Joist hangers rated for treated lumber (plus hanger nails or structural screws)
- 5/4x6 or 2x6 pressure-treated or cedar decking boards for the surface
- Structural deck screws or hidden fasteners (stainless or coated for treated lumber)
- Gravel/crushed stone for footing drainage
- Weed barrier fabric (optional but helpful)
Site prep, drainage, and footings
This is the stage most beginners rush and most experienced builders take seriously. Your footings are the foundation of everything. Get them wrong and no amount of great framing will fix a deck that moves, sags, or heaves over winter.
Start by clearing the site. Remove sod, roots, and any organic material from the area where your deck will sit. Organic material under a deck compresses over time and shifts your footings. Once cleared, rough-grade the area so water drains away from the house, not toward it. A 1- to 2-inch drop per 10 feet of run is a practical target. If your yard has significant slope, plan your footing heights to compensate for it now rather than fighting it later in framing.
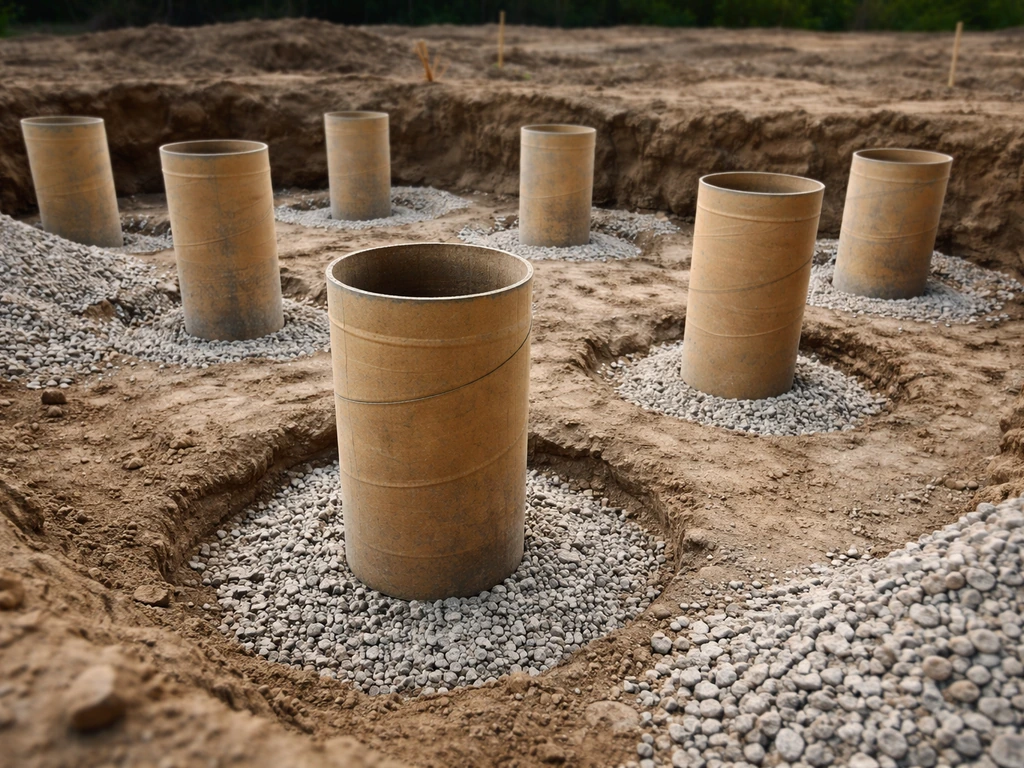
Dig your footings below the frost line. This is non-negotiable in any climate that freezes. When water in the ground freezes, it expands and pushes everything above it upward. A footing above the frost line will heave seasonally and crack your framing connections. Frost depth varies by location: some areas require 12 inches, others require 36 inches or more. One local example from the Post Falls residential deck guide specifies a minimum of 24 inches. Your local building department will tell you the exact requirement for your area, and this is one detail worth getting exactly right.
For a typical ground-level DIY deck, cylindrical concrete footings poured in tube forms (Sonotube or similar) work well. Dig the hole, drop in the tube, pour concrete, and set your post base while the concrete is still wet. Wait at least 24 to 48 hours before loading any weight on fresh footings. Add 4 to 6 inches of compacted gravel at the bottom of each hole before pouring to improve drainage and reduce freeze-thaw movement. Don't skip that gravel step.
Deck blocks (precast concrete piers) are sometimes sold as a no-dig solution and they can work for very small, freestanding, low-load platforms on stable, level ground. But they're not appropriate as a substitute for proper frost-depth footings in most climates, and many local codes won't accept them for a permanent deck structure. If your area freezes, pour real footings.
After footings are set, spread a 2- to 4-inch layer of compacted gravel under the deck footprint. This limits weed growth, improves drainage, and keeps the area under your deck from becoming a mud zone. Lay weed barrier fabric over the gravel if you want to reduce future maintenance, but make sure it doesn't trap standing water. The goal is drainage, not a lined pond.
Framing the deck structure
Once your footings are cured and your post bases are set, you're ready to frame. Framing is the skeleton of your deck: the beams, the rim joists that form the outer rectangle, and the interior joists that support the decking boards. Get this stage square and level and everything else gets easier.
Squaring the frame
Set your four corner posts (or beam supports) and build your outer rim joist rectangle first. Before you go any further, check the frame for square using two methods. First, the 3-4-5 triangle rule: measure 3 feet along one side and 4 feet along the adjacent side, then the diagonal between those two points should be exactly 5 feet if the corner is a true 90 degrees.
Second, measure the diagonals of the entire frame corner to corner in both directions. If both diagonals are equal, your frame is square. If they're not, push one corner gently until they match, then lock it in place. String lines along the perimeter help you keep everything consistent as you add interior framing.
Installing joists
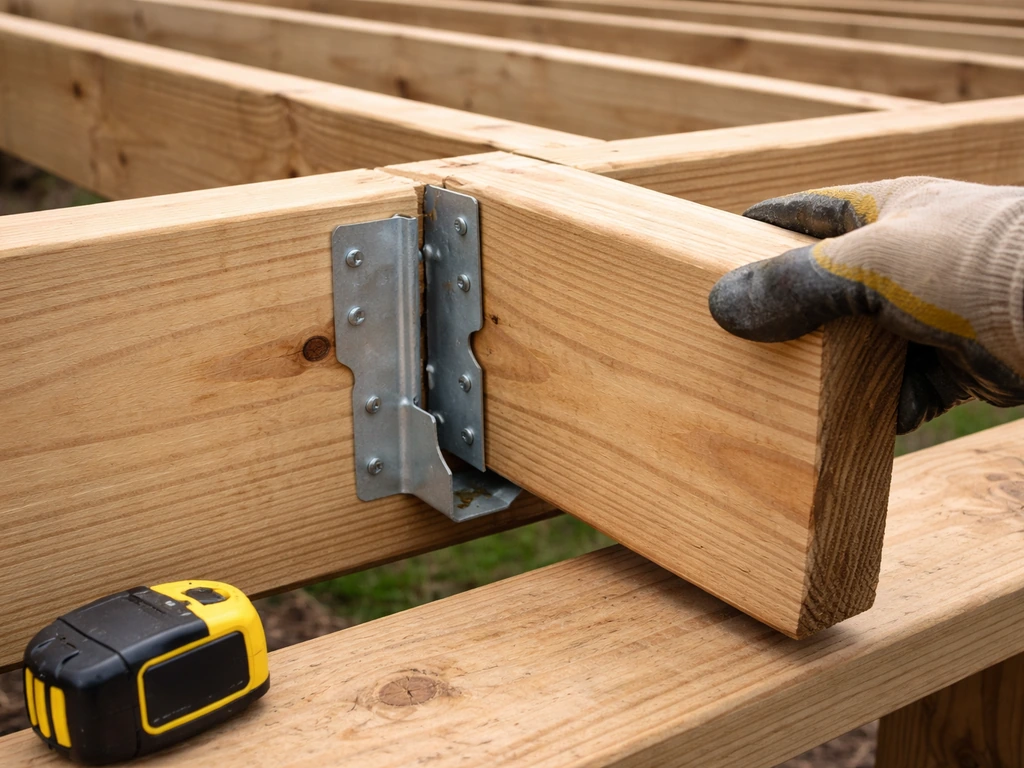
Standard residential deck framing calls for joists at 16 inches on center. That means measuring from the outside face of one joist to the outside face of the next is always 16 inches. This spacing works with standard 8-foot and 12-foot decking boards and keeps the deck surface solid underfoot. Mark your joist layout on both rim joists with a pencil and speed square before installing anything: a simple X on the correct side of each mark tells you exactly where each joist face lands.
Hang each interior joist using joist hangers rated for treated lumber. Position the hanger, nail it to the rim joist with the correct hanger nails (not just any nail from your bin), then drop the joist into place and fasten through the pre-punched holes in the hanger. Every hole in that hanger should have a fastener. Missing fasteners in joist hangers are one of the most common structural deficiencies found in deck inspections and one of the easiest to avoid.
Check that all joists are level across the frame as you go. A 4-foot level across the top of the joists will catch any high or low spots before you start laying decking boards. A slightly high joist can be planed down; a low one needs a shim or replacement. Don't assume everything will be perfect off the shelf: pressure-treated lumber often has a slight bow or crown. Always install joists crown-side up so the weight of the deck and foot traffic pushes the crown flat over time.
Installing decking boards the right way
Start your first board along one edge of the deck and work toward the opposite end. Leave a small overhang at the perimeter edges: 1/4 inch minimum is common guidance, and up to 1 inch overhang looks clean and protects the rim joist from direct rain exposure. Snap a chalk line along the starting edge to keep that first board perfectly straight. If your first board isn't straight, every board after it compounds the error.
Space your boards consistently. For pressure-treated pine or cedar, a 1/8-inch gap between boards is the standard recommendation. This gap allows water to drain through, air to circulate, and the wood to shrink and expand without buckling. A good trick: use a 1/8-inch spacer (a scrap of composite material or a large nail works) between each board as you fasten them. Don't rely on eyeballing it.
Fasten each board to every joist it crosses. Use structural deck screws or coated screws rated for use with treated lumber. Stainless steel screws are the premium choice for cedar. Drive two fasteners per board per joist, set back from the board edge about 3/4 inch to avoid splitting. Pre-drilling near board ends prevents splits, especially in dry or aged boards. Keep your fastener pattern consistent: same offset, same angle, every time. Inconsistent fastening is one of those beginner tells that shows up clearly once the deck is finished and you're looking across the surface in raking light.
Plan your last board before you start. Measure the remaining distance after laying several boards, do the math, and figure out whether your last board will land as a full-width piece or need to be ripped down. Ripping a narrow sliver as your last board looks awkward. If that's where you're headed, adjust your spacing slightly across all the boards (you have more flexibility than you think) to land on a better-looking final course.
Leveling, safety, and fixing common problems
Once framing and decking are done, do a full walk-through inspection before you call it finished. Walk every inch of the deck surface. Any bounce, flex, or wobble tells you something structural needs attention. Sagging, sway, and unevenness often come from support or attachment issues, so beginner troubleshooting should include inspecting beneath the deck and the connectors and hardware first. A solid deck should feel firm and dead-quiet underfoot.
Common problems and how to fix them
- Wobbly deck: Usually caused by under-spaced joists, posts that aren't properly secured to footings, or missing/loose hardware connections. Check your joist hanger fasteners first, then look at how posts are attached to their post bases.
- Sagging frame: Often a sign that a joist span is too long for the lumber size, or a footing has shifted. Refer to the span tables in AWC DCA-6 to verify your joist size is correct for the span, and inspect footings for movement.
- Uneven decking surface: Usually crown-up installation gone wrong, or a joist that was installed low. Add blocking between joists at midspan to stiffen the frame, or sister a new joist alongside a problem one.
- Boards splitting during fastening: You're not pre-drilling near ends, or driving screws too close to the edge. Pre-drill and move your fasteners at least 3/4 inch from the edge.
- Boards cupping or warping: Often a sign of moisture imbalance (one side wet, one side dry). Ensure airflow under the deck is adequate and that water doesn't pool on the surface.
- Loose boards after time: Check whether fasteners have backed out (re-drive or replace), whether the board itself has split (replace the board), or whether the underlying joist has moved (structural fix needed first).
Level checks matter most at the framing stage, but re-check the surface after boards are installed too. A string line stretched tight across the deck from corner to corner will show any high or low spots clearly. Small inconsistencies in a finished surface are normal. A difference of more than 3/8 inch over 10 feet is worth correcting, especially near door thresholds where a trip hazard can develop.
Safety check before your first use: confirm every joist hanger has all its fastener holes filled, that posts are solidly connected to post bases (not just sitting on top), that there are no protruding screw heads or nail points on the walking surface, and that the deck doesn't rock when you push on a corner. These checks take 20 minutes and can catch problems that would otherwise show up as expensive failures down the road.
Finishing, sealing, and keeping your deck looking good
Freshly pressure-treated lumber is often too wet to accept a stain or sealer right away. The mill treatment process saturates the wood with preservative chemicals and water, and applying a finish before the wood dries out means the finish can't properly penetrate. A simple test: sprinkle a few drops of water on the surface. If the water beads up, the wood is still too wet. If it absorbs quickly, the wood is ready for finishing. This can take a few weeks to a few months depending on conditions.
When the wood is ready, clean it first before applying any finish. Use an oxygenated cleaner or a deck-specific cleaner, not straight bleach. Bleach can damage wood fibers and some treated lumber formulations react poorly with chlorine-based products. Scrub the surface, rinse thoroughly, and let it dry completely before applying stain or sealer.
Choose a penetrating stain/sealer over a film-forming paint for a wood deck. Penetrating finishes soak into the wood fibers rather than forming a surface film, which means they don't peel when the wood moves and they're much easier to reapply. A semi-transparent or solid color penetrating stain gives you UV protection, water resistance, and color in one product. Apply according to the manufacturer's instructions and plan to reapply every 2 to 3 years for pressure-treated pine (a little more often for cedar).
Annual maintenance routine
- Inspect all hardware connections each spring: look for corrosion, missing fasteners, and any structural movement
- Check decking boards for splits, raised fasteners, or cupping and address immediately
- Clean the surface with an appropriate deck cleaner to remove dirt, mold, and algae
- Allow the surface to dry fully before applying any finish product
- Reapply stain or sealer whenever the water-bead test shows the finish is no longer repelling moisture
- Clear debris from between deck boards to prevent moisture trapping and rot
- Check that drainage under the deck is still working: no standing water pooling around footings
A well-built wood patio deck with basic annual maintenance can easily last 20 to 30 years. If you're aiming for how to build a raised patio deck, the same maintenance habits help keep the framing and decking performing long term wood patio deck. The maintenance isn't complicated; it's just consistent. Catch problems early (a split board, a loose fastener, a soft spot) and fixing them is a 20-minute job. Ignore them and you're looking at partial deck replacement. Treat the deck like any other part of your house: a little attention every year saves a lot of money over time.
If you're planning to expand the project later, whether that means rebuilding an older structure, adding a raised platform section, or squaring up a more complex layout, the skills you build on this first ground-level deck transfer directly. Start simple, build it right, and the next project will go faster and cleaner than you expect.
FAQ
Do I need to add stairs or guard rails for a ground-level patio deck?
Even for low decks, check local code triggers. Some areas require guard rails if there is any drop from the deck surface (including around openings or along sides) and stairs can have specific riser and tread limits. If your deck is truly ground-level with minimal height, you may avoid guard rails, but you still need safe transitions where people step on and off.
What if my backyard slope makes a “perfectly level” 12x12 deck impossible?
You usually have two options: step the deck in height (creating a stepped footprint) or use a low-profile deck with properly varied footing heights so the framing stays level. Avoid trying to “shim everything” above the joists, large shims can fail over time. Plan footing heights during layout so the frame can be assembled level from the start.
How do I choose the right joist span, spacing, and board direction for my deck size?
Use your decking board direction as a framing decision, since joists run perpendicular to the boards. Then confirm joist span based on your local conditions, wood grade, and the actual support layout (beam locations and distance between rim joists). Don’t assume 16 inches on center alone is enough, the joist length and load must also match your span tables.
Can I build the deck directly on compacted gravel or pavers instead of frost-depth footings?
In freezing climates, gravel-only or surface blocks are usually not a substitute for proper footings. Deck blocks can work only for very small, low-load, stable platforms on level ground, but many codes reject them for permanent structures and they can shift over freeze-thaw cycles.
What is the right way to deal with drainage under the deck?
Clear organics, keep a gravel layer under the deck footprint, and grade the ground so water runs away from the house. If you add weed barrier, make sure water cannot pond on top of it. A deck that traps moisture under the surface increases rot risk and can accelerate hardware corrosion.
Should I leave extra space around the house or near doors?
Yes. Leave clearance so the deck does not bind against siding, trim, or door thresholds as wood moves with moisture changes. Pay extra attention to transitions at door openings, if the deck settles even slightly, the gap can become a trip hazard, so plan for safe, adjustable details there.
How do I avoid splitting when screwing down pressure-treated decking boards?
Pre-drill near board ends and keep fasteners at the recommended offset from the board edge. Also use the correct screws for treated lumber, using the wrong coatings can cause faster corrosion and premature loosening. Consistent hole placement matters, random “close enough” drilling often shows up as cracks.
Do I need to use joist hanger nails, and can I mix fastener brands?
Use the nails or screws specified for the joist hanger system. Mixing fasteners or using whatever is in your bin can reduce the connection strength. Check that every hanger hole is filled, missing fasteners are a common inspection issue and they are hard to correct after the decking goes on.
What should I do if the wood looks wet and my finish plan is soon?
Wait until the wood is dry enough to accept finish, if water beads on the surface, it is not ready. Finishing too early can lead to uneven penetration and premature failure. Plan for weather conditions, finishing schedules often shift by a few weeks, especially in humid regions.
Is a penetrating stain enough, or do I need a sealer or paint for protection?
A penetrating stain or sealer generally provides better long-term performance than film coatings on deck wood because it moves with the grain. Choose semi-transparent or solid options for UV protection. Film products can peel or fail when the wood expands and contracts, and they also require more frequent recoat discipline.
How often should I inspect and maintain a wood patio deck after it’s finished?
Do a quick seasonal check at least once or twice a year. Look for loose fasteners, soft spots, raised or split boards, and any wobble at corners. Catching small issues early can prevent deck sagging that may require structural repairs, not just board replacement.
What are common deck builder mistakes that are easiest to prevent early?
The biggest preventable issues are skipped or shallow footings, incorrect framing square, incomplete hanger fastener coverage, and inconsistent board spacing or start-board alignment. Also avoid using untreated or non-rated lumber for ground contact areas, and don’t plan the board layout before you decide the joist direction.