You can build a square patio yourself over a single weekend for a small project, or across two to three weekends for a larger one. The core process is the same regardless of material: size and square the layout, excavate and compact a solid base, install edging, lay your surface, and slope everything at least 1/4 inch per foot away from the house so water drains properly. This guide walks you through every stage, from picking your dimensions to the final sweep of polymeric sand, with real measurements and no shortcuts that come back to haunt you.
How to Build a Square Patio: DIY Plan, Layout & Step-by-Step

Nolan Carver
13 Jul 2026
Who this guide is for
This article is written for homeowners who want to build a square patio without hiring a contractor. You do not need prior construction experience. If you can swing a hammer, read a tape measure, and rent a plate compactor for a Saturday, you have the skills to complete this project. Beginners will find every term explained the first time it appears. Experienced DIYers can use the section headings to jump straight to the parts they need, whether that is the material comparison table, the drainage detail, or the step-by-step construction workflow.
Decide on patio size and layout first
Before you buy a single bag of material, settle on a size that actually works for the way you live. If you need a refresher on measuring and calculating area, see our guide on how to work out patio size for step-by-step examples and templates. A good rule of thumb is to allow roughly 25 square feet per person for comfortable seating. A four-person bistro set fits on a 10 ft x 10 ft patio. A six-to-eight person dining setup with room to pull chairs back needs at least a 16 ft x 16 ft footprint. If you want to add a fire pit or grill station later, build those clearances into the plan now rather than squeezing them in afterward.
Check your municipality's setback requirements before you finalize placement. Most residential codes require a patio to sit at least 5 feet from a side property line, though this varies. Patios attached to or immediately adjacent to the house also sometimes require a permit, especially if they are raised more than 8 to 12 inches or if they include a structure like a pergola. A quick call to your local building department takes ten minutes and can save you from tearing out finished work.
For layout, a square patio positioned parallel to the back of the house almost always looks cleaner than one set at an angle. Leave at least 3 feet of clearance between the patio edge and any fence, planting bed, or structure so you can mow, maintain plantings, and access the space without bumping furniture. Deciding on size and siting also directly feeds into your area calculation, your material order, and your excavation plan, so get this locked down before anything else.
How to calculate your patio area
The math here is simple. For any square patio, the area equals the side length multiplied by itself: Area = side x side, or side squared. A 10 ft x 10 ft patio is 100 sq ft. A 12 ft x 12 ft patio is 144 sq ft. A 16 ft x 16 ft patio is 256 sq ft. You use this area number to calculate how many pavers, how much gravel, and how much concrete you need. For step-by-step examples and a calculator for different shapes, see our guide on how to calculate patio area.
Worked example: concrete slab
For a 12 ft x 12 ft concrete patio at the standard 4-inch (0.333 ft) thickness: volume = 12 x 12 x 0.333 = 48 cubic feet. Divide by 27 to convert to cubic yards: 48 / 27 = 1.78 cubic yards. If you are using 80 lb bags of ready-mix (each yields about 0.60 cu ft), you need 48 / 0.60 = 80 bags. Add a 10 percent waste buffer and order 88 bags. For anything approaching 2 cubic yards or more, it is more cost-effective and far less exhausting to order ready-mix concrete delivered by truck.
Worked example: pavers
Divide your patio area (in square feet) by the coverage per paver to get your unit count, then add waste. For a standard running-bond layout with no diagonal cuts, add 5 percent. For diagonal or herringbone patterns, add 10 to 15 percent because you will cut significantly more units at the edges. Always confirm coverage numbers with your specific manufacturer since paver dimensions vary between brands and product lines.
How to measure for a square patio
Accurate measurement at the layout stage prevents wasted cuts, off-center patterns, and edges that do not line up with the house. For a quick visual checklist and step-by-step tips on how to layout a square patio, see the dedicated layout guide. For step-by-step instructions on how to measure for a patio, see the “How to measure for a square patio” section. For a square patio you need a 25-foot or 100-foot tape measure, a ball of mason's line (string), wooden stakes, and a line level or laser level. A 4-foot carpenter's level is useful but a laser level is much faster for checking grade across a larger area.
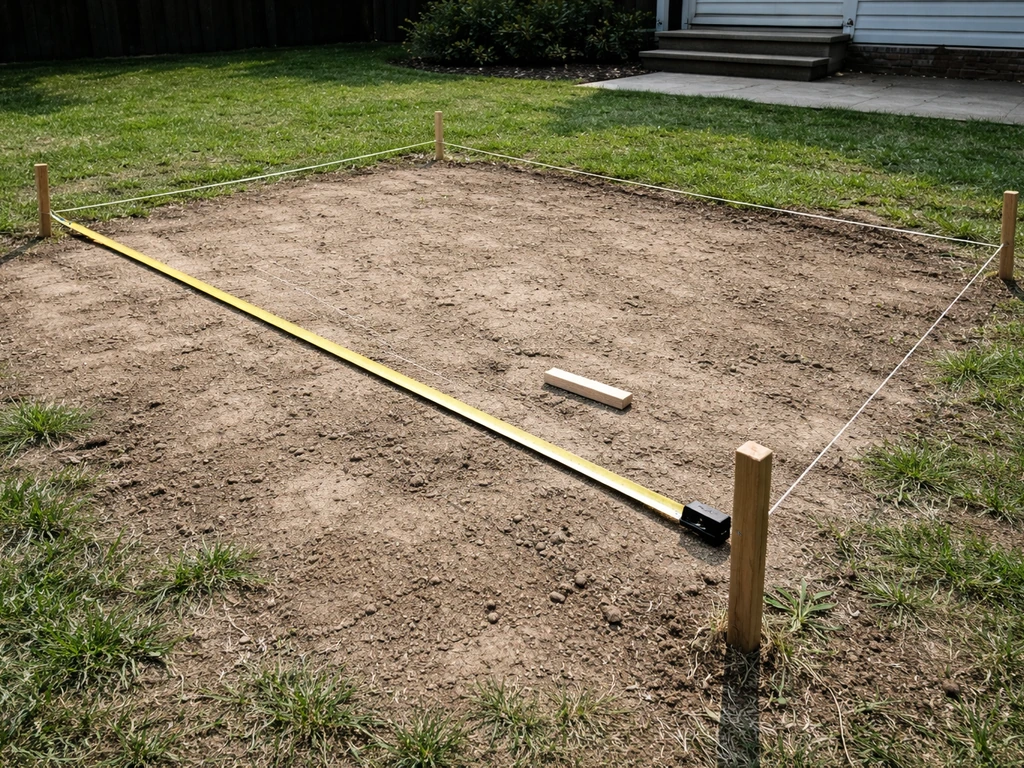
Start by measuring the two walls or reference points you are working off. Even on a house that looks perfectly square, individual walls are often out of plumb or not exactly perpendicular to each other, so always measure from one consistent control point rather than trusting that two walls are parallel. Mark your desired outer corners with stakes, run string lines between them, and check that the string is taut before measuring. A sagging string line introduces error in a project where a 1/2-inch mistake at one corner multiplies across the whole surface.
For elevation, set a reference grade at the point where the patio meets the house. From there, every measurement drops 1/4 inch per foot of distance away from the house. On a 12-foot patio, the far edge should be 3 inches (12 x 0.25) lower than the house edge. Use a line level or laser to confirm this slope before excavation, not after.
How to square a patio
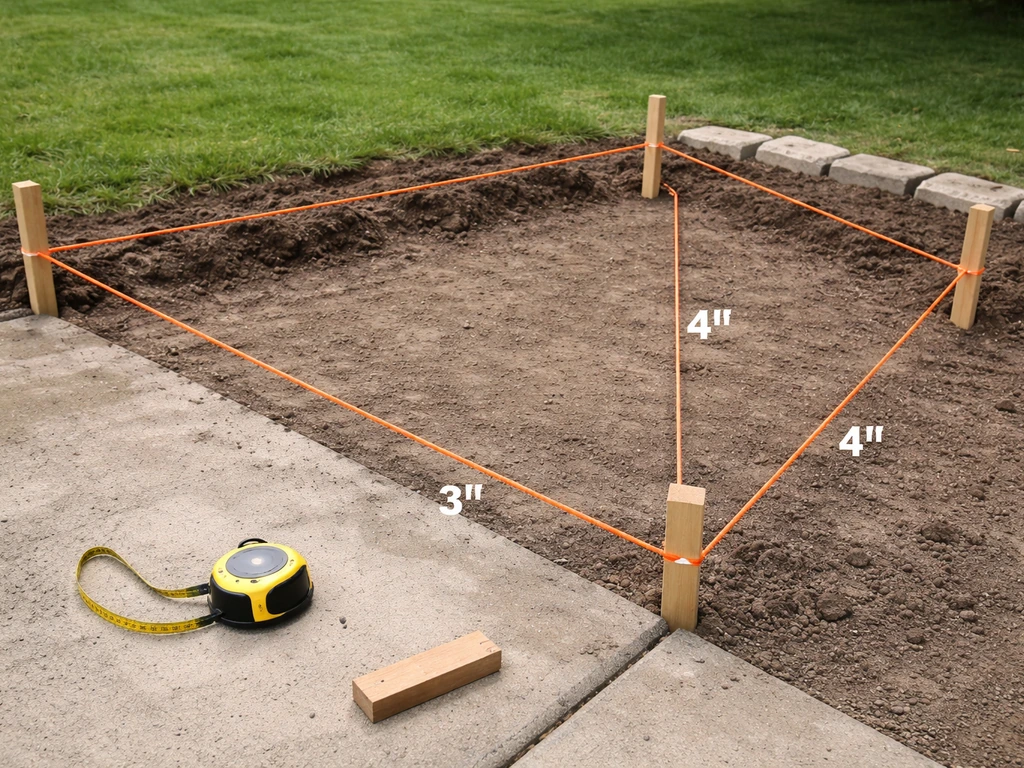
A patio that is not square looks wrong immediately, and it makes every row of pavers harder to cut as you work toward the edges. There are two reliable methods for establishing true 90-degree corners: the 3-4-5 triangle method and the equal-diagonals method. Use both together for maximum accuracy. For a complete, step-by-step walkthrough on how to square a patio, see the dedicated guide.
The 3-4-5 triangle method
This method uses the Pythagorean theorem. On any true right triangle, if one leg is 3 units and the other leg is 4 units, the hypotenuse (diagonal) will be exactly 5 units. To use it on a patio layout: set one string line along what will be the house-facing edge of the patio. From the corner where the two adjacent edges meet, measure 3 feet along one string and mark it. Measure 4 feet along the perpendicular string (your side edge) and mark it. The diagonal between those two marks must measure exactly 5 feet. Adjust the side string until the diagonal hits 5 feet on the nose. For better accuracy on larger patios, scale up to a 6-8-10 or 9-12-15 triangle. The larger your reference triangle, the smaller the angular error in your layout.
The equal-diagonals method
Once all four corners are staked, measure corner to corner diagonally in both directions. On a perfect square, both diagonals are identical. If one diagonal is longer than the other, move the longer-diagonal corners inward slightly until both diagonals match. This method catches cumulative error that the 3-4-5 check might miss if you applied it only at one corner.
Batter boards: why and how to use them
Stakes that get kicked during excavation ruin your layout. Batter boards solve this by moving your reference points outside the dig zone. Build simple L-shaped frames from 2x4 lumber set about 2 feet beyond each corner. Level the crosspieces, then run string lines that intersect exactly over each intended corner. When you need to excavate, drop the strings; when you need to check layout, rehang them on the same notches. This is the same technique used for house foundations and it works just as well for a patio.
How to square a patio off a house
When the patio butts up against the house, the house wall becomes your primary reference line. Here is the exact sequence I use. For a step-by-step layout tuned to patios against a building, see how to square a patio off a house.
- Pick two control points on the house wall that represent the intended inside corners of the patio. Measure the desired patio width between them along the wall and mark with chalk or a pencil.
- Drive stakes at those two points (or set batter boards just beyond them) and run a string line tight along the house, representing the house-side edge of the patio.
- From each control point, run a perpendicular string line out into the yard to represent the two side edges of the patio. At this point they are only approximately perpendicular.
- Apply the 3-4-5 method at each corner where a side string meets the house string: measure 3 feet along the house string and 4 feet along the side string; adjust the side string until the diagonal between those two marks is exactly 5 feet (or use a 9-12-15 multiple for greater precision).
- Set the far corner by measuring the patio length along each side string, then drive stakes where those measurements land.
- Run a final string line connecting the two far corner stakes to form the fourth side.
- Verify by measuring both diagonals (corner to corner). They must be equal. If they are not, adjust the far corners until the diagonals match.
- Transfer corner points to the ground using a plumb bob and mark with spray paint or stakes.
One common mistake is using a door threshold or a corner trim board as the reference rather than the actual foundation or house sheathing face. Trim can be off-level, warped, or installed at a slight angle. Use the foundation wall itself, or at minimum a consistent point on the house framing, as your control. Also plan your expansion gap: a concrete patio that is poured tight against the foundation will crack. Leave a 1/2-inch to 1-inch isolation joint filled with foam backer rod or a premade expansion joint strip.
Site evaluation: what to look for before you dig
Call 811 (the national Dig Safe line in the United States) at least three business days before any digging. This is free, it is required by law in most states, and it marks buried utilities so you do not cut a gas or electrical line. Do this before you do anything else on site.
Walk the area after rain and note where water pools or drains slowly. Standing water after 24 hours indicates clay-heavy or compaction-hardened soil with poor drainage, which means you will need to work harder on your base and drainage layer. Push a screwdriver into the soil several times across the patio footprint. If it goes in easily to 6 inches, you have decent soil. If it stops at 2 to 3 inches, you may have very hard clay or compacted fill, and you will need to loosen and re-compact rather than just digging to depth.
Note the existing grade. Most yards slope slightly away from the house, which is ideal. If your yard slopes toward the house, you will either need to build up the patio on a raised base or install a drainage channel at the patio's inner edge to intercept water before it reaches the foundation. Also note tree roots, large rocks, or old concrete that may complicate excavation. Removing a large root that runs under the patio footprint is much easier before you build than after.
Drainage and slope solutions
Every solid-surface patio needs positive drainage. The standard minimum is 1/4 inch of drop per foot of run, away from the house. This equals about a 2 percent slope. On a 12-foot patio, the outer edge should be 3 inches lower than the house-side edge. This slope is subtle enough that you will not notice it while sitting but steep enough to move water off the surface during rain.
When the slope cannot run away from the house due to an adjacent fence, grade change, or neighbor's property, route the water laterally to one or both sides. A channel drain (linear trench drain) installed at the low point of the patio and tied into a downspout or yard drain handles this well. For patios in low spots where water migrates from the surrounding yard, a French drain installed around the perimeter redirects subsurface water before it saturates the base and causes settling. Run gutter downspouts away from the patio footprint entirely; a downspout extension of 4 to 6 feet is cheap and prevents a significant portion of drainage problems before they start.
Permeable paver systems and gravel patios have a built-in drainage advantage because water infiltrates through the joints and base rather than running off. If your site has persistent wet spots, a permeable base system is worth the slightly higher installation effort.
Materials: which surface is right for your project
The four main options for a DIY square patio are poured concrete, concrete pavers, natural flagstone, and compacted gravel. Each has a genuine sweet spot in terms of budget, skill level, and long-term maintenance. Here is an honest comparison.
| Material | Cost (installed DIY) | Skill Level | Durability | Drainage | Best For |
|---|---|---|---|---|---|
| Poured Concrete | $6–$12/sq ft | Intermediate–Advanced | Very high (30+ yrs) | Poor (needs slope/joints) | Permanent, low-maintenance slab |
| Concrete Pavers | $8–$18/sq ft | Beginner–Intermediate | High (25–30 yrs) | Good (joints allow infiltration) | Clean look, easy repairs, DIY-friendly |
| Natural Flagstone | $10–$25/sq ft | Intermediate | High (30+ yrs) | Good (open joints) | Rustic/natural aesthetic, irregular shapes |
| Compacted Gravel | $2–$5/sq ft | Beginner | Moderate (needs top-up) | Excellent | Budget-friendly, casual, permeable |
| Raised Pedestal System | $15–$35/sq ft | Intermediate–Advanced | High (material-dependent) | Excellent | Rooftop, deck, uneven ground |
For most first-time DIYers, concrete pavers hit the best balance of affordability, forgiving installation (you can pull and relay individual units), and finished appearance. Poured concrete delivers the cleanest look and lowest long-term maintenance but has a very tight window between placement and finishing, which is stressful for solo builders. Flagstone is beautiful and durable but requires more cutting and fitting. Gravel is the fastest and cheapest but needs periodic regrading and is not ideal for furniture that sinks or tips on loose surfaces.
Budget-friendly options and realistic cost estimates
Costs vary by region, material availability, and site conditions, but here is a realistic range for a 12 ft x 12 ft (144 sq ft) square patio in 2026.
| Budget Tier | Material Choice | Estimated DIY Material Cost | Notes |
|---|---|---|---|
| Low ($2–$5/sq ft) | Compacted gravel with edging | $300–$720 | Rent plate compactor, buy landscape fabric and steel edging |
| Mid ($8–$14/sq ft) | Concrete pavers on compacted base | $1,150–$2,000 | Includes base gravel, bedding sand, pavers, polymeric sand, edging |
| High ($12–$20/sq ft) | Poured concrete slab (ready-mix) | $1,700–$2,900 | Includes rebar/mesh, forms, ready-mix concrete, sealer; may need pump truck |
Labor is the biggest cost if you hire out, typically $15 to $25 per square foot for contractor-installed pavers or concrete in most U.S. markets. Doing it yourself on a 144 sq ft patio can realistically save $2,000 to $3,500. Renting equipment (plate compactor, laser level, concrete saw) runs $150 to $400 for a weekend and is almost always worth it versus buying tools you will use once. Buy your sand, gravel, and pavers locally from a landscape supply yard rather than a home center when possible: you will get better pricing on bulk quantities and can often have material delivered and dumped on site.
Tools and materials checklist
- Tape measure (25 ft minimum, 100 ft preferred for layout)
- Mason's line (string line) and line level
- Wooden stakes and batter-board lumber (2x4s)
- Spray paint or chalk for marking ground
- Shovel (flat spade for cutting edges, round point for moving soil)
- Wheelbarrow
- Plate compactor (rent)
- Hand tamper (for tight spots near edges)
- Laser level or transit level (rent or borrow)
- 4-foot carpenter's level and straightedge
- Rubber mallet
- Paver or masonry saw with diamond blade (rent)
- Screed board (a straight 2x4 works fine)
- Broom and push broom
- Garden hose with spray head
- Safety glasses, work gloves, knee pads
- Geotextile landscape fabric
- Compacted aggregate base (crusher run or ASTM D2940-graded material)
- Coarse concrete sand or bedding sand (for paver installations)
- Pavers, flagstone, concrete mix, or gravel (your chosen surface)
- Plastic or steel edge restraints with spikes
- Polymeric jointing sand (for pavers)
- Concrete control joint cutter (for concrete slabs)
- Optional: rebar or wire mesh (for concrete slabs)
Step-by-step construction: the full workflow
Here is the big-picture sequence. Each stage is expanded in its own section below. Do not skip steps or reverse their order, because each one depends on the previous being done correctly. The most common DIY mistake is jumping straight to laying surface material before confirming the base is adequately compacted and sloped.
- Mark the layout and confirm squareness
- Evaluate site, call 811, and plan drainage
- Excavate to the required depth
- Install geotextile and compact the subgrade
- Install and compact the aggregate base in lifts
- Set edge restraints
- Screed the bedding layer (sand-set systems) or form and pour concrete
- Lay the surface material
- Compact, joint, and finish
- Connect drainage details
- Seal and cure (if applicable)
Site prep and excavation
Once your layout is marked with spray paint on the ground, strip any sod or vegetation inside the footprint. Remove it entirely, including roots; do not bury organic material under the base because it will decompose and cause settling. Set your excavation depth based on your chosen surface system. A typical paver patio requires removing 8 to 10 inches of soil: 4 inches of compacted aggregate base plus 1 inch of bedding sand plus the paver thickness (usually 2.375 to 3.125 inches). A concrete slab needs 4 inches of base plus 4 inches of slab, so an 8-inch excavation. Add 1 to 2 inches to your total depth to account for the finished patio surface sitting slightly proud of the surrounding grade, which prevents edge wash-in.
If you hit large rocks or roots, remove them and fill the void with compacted base material, not topsoil. Old concrete can often be broken up with a sledgehammer and removed in chunks. Protect adjacent structures (fences, footings, utility lines) by hand-digging within 12 inches of them rather than using a powered excavator. Box the excavated area cleanly so the walls are vertical, not sloped inward, which helps keep edge restraints solid.
Foundation and sub-base construction
Lay geotextile landscape fabric directly on the prepared subgrade before any aggregate goes in. This fabric separates the aggregate base from the underlying soil, preventing fine particles from migrating upward and weakening the base over time. Overlap seams by at least 12 inches and fold the fabric up the sides of the excavation.
Use graded aggregate base material (commonly called crusher run or road base, ideally meeting ASTM D2940 gradation) rather than pea gravel or drain rock for the structural base. Pea gravel does not compact properly and will shift. Spread the aggregate in layers (lifts) no deeper than 3 to 4 inches before compacting each one. Run the plate compactor in overlapping passes across the entire surface, then make a second pass perpendicular to the first. For a residential pedestrian patio, the target is at least 95 percent of standard Proctor density (ASTM D698). In practical terms: the base should feel rock-solid underfoot, show no movement under the compactor on the second pass, and leave only faint tire marks when you walk across it. For well-drained soils and pedestrian use, 4 inches of compacted base is typically sufficient. ICPI Tech Spec 4, Structural Design of Interlocking Concrete Pavements (base depth & compaction guidance) recommends a 4 in. compacted aggregate base for residential pedestrian pavements, increasing to 6–8 in. or more for vehicular loads, and specifies compacting base and subgrade in 2–4 in. lifts with density verification by field testing blank" rel="noopener noreferrer">ICPI Tech Spec 4 — Structural Design of Interlocking Concrete Pavements (base depth & compaction guidance). On clay-heavy or wet soils, increase to 6 inches.
After the base is compacted and sloped correctly (confirming your 1/4 inch per foot fall with a level and measuring tape), the base is ready for either the bedding sand layer (paver systems) or concrete forms.
Edging, restraints, and retaining-wall basics for raised patios
Edge restraints are not optional on a paver patio. Without them, the outer rows of pavers creep outward over time, opening up wide joints, and the whole surface gradually unravels. Install plastic or steel paver edging along all exposed patio edges before you place any surface material. Spike it through the geotextile into the compacted subgrade every 12 inches. On curves, use segmented flexible edging. Where the patio meets the house, a soldier course of pavers set in a slight concrete bed is more durable than plastic edging.
If your patio is raised more than 6 to 8 inches above the surrounding grade, you need a retaining wall or built-up edge to hold the base material in place. Segmental retaining wall blocks (like Allan Block or Versa-Lok) are DIY-friendly and stack without mortar for walls under about 3 feet in height. Always install drainage behind retaining walls: a 12-inch wide column of clean 3/4-inch gravel behind the wall, with a perforated drain pipe at the base tied to daylight, prevents hydrostatic pressure from pushing the wall over. Walls above 4 feet typically require an engineering permit in most jurisdictions.
Surfacing: installation steps by material
Concrete pavers (sand-set)
Spread a 1-inch layer of coarse concrete sand (not masonry sand or playground sand, which are too fine) over the compacted base. Screed it flat using a straight 2x4 dragged across two screed rails set at the correct elevation. Do not compact the sand before laying pavers. Start laying pavers from a corner or a straight edge, maintaining your chosen pattern. Use spacers or rely on the built-in lugs most concrete pavers have to keep joint spacing consistent. Cut perimeter pieces last using a paver saw. Once all pavers are in place, compact the whole surface with a plate compactor fitted with a rubber foot pad, then sweep polymeric sand diagonally across the surface, compact again, and repeat until joints are full. Mist the surface with water to activate the polymeric binder and allow to cure per the manufacturer's schedule (usually 24 hours).
Poured concrete slab
Build 2x4 or 2x6 forms around the perimeter of the patio, staked and leveled to your final slab height. Add wire mesh or rebar (at minimum, 6x6 W1.4xW1.4 welded wire mesh) on 3/4-inch chairs to keep it centered in the slab thickness. For a 4-inch residential pedestrian slab, ready-mix concrete at a 3,000 to 4,000 psi mix design is standard. Pour, screed, and float the surface, then run a bull float or hand float to close the surface. Cut control joints to a depth of at least 1 inch (one-quarter of the slab thickness) at maximum 8 to 10-foot intervals to control where cracking occurs. Cure with a curing compound or by keeping the surface moist for at least 7 days. Do not apply sealer until the concrete has cured for at least 28 days.
Natural flagstone
Flagstone can be set dry on a compacted sand and gravel base (with grass or ground cover in the joints) or mortared onto a concrete base for a more permanent installation. For dry-set flagstone, use the same base preparation as for concrete pavers. Lay out the stones dry first to check fit and spacing before committing. Flag thickness matters: use stones at least 1.5 inches thick to prevent cracking under foot traffic. Fill joints with polymeric sand or fine gravel for the dry-set approach, or with mortar for a mortared installation.
Compacted gravel
A gravel patio is the fastest to install. After excavating 4 to 6 inches, lay geotextile fabric, install steel or plastic edging, then fill and compact 3 to 4 inches of crusher run or pea gravel in lifts. Top with a 1 to 2-inch layer of smaller decorative gravel (decomposed granite or pea gravel). Gravel needs periodic raking and a small top-up every two to three years as stones migrate or sink.
Compacting, jointing, and finishing
For paver systems, the final compaction pass is critical. Run the plate compactor across the entire paved area in at least two perpendicular directions. This seats the pavers firmly into the bedding sand and begins to work the jointing sand into the joints. Sweep additional polymeric sand across the surface, compact again, and sweep once more until joints are filled within 1/4 inch of the top of the paver. Avoid sweeping polymeric sand on a wet surface or when rain is imminent within 24 hours, as it will set prematurely on top rather than curing correctly in the joints.
For concrete slabs, the finishing sequence is: screed to level, bull float to close the surface, edge with an edger tool along the forms, cut or groove control joints, then broom-finish for texture and slip resistance. A broom finish (dragging a stiff broom across the surface while the concrete is still workable) provides grip and hides minor surface imperfections. For decorative applications, exposed aggregate, stamping, or staining are done at specific stages of the pour, which adds complexity.
Drainage details for the finished patio
Confirm the 1/4-inch-per-foot slope is present on your finished surface before declaring the job done. Lay a 4-foot level across the patio in multiple directions and hold a tape measure under the uphill end: it should read about 1/4 inch per foot of level length, or just over 1/16 inch of gap per foot. If you have a downspout that empties near the patio, extend it at least 6 feet beyond the patio perimeter with a solid-wall extension pipe. Where the patio slope must drain toward a fence or wall, install a channel drain at the low end and connect it to a solid-wall pipe that daylights at least 10 feet from the house or into a dry well. Check that channel drain grates are flush with the patio surface so they do not create a trip hazard.
Common troubleshooting and fixes
| Problem | Likely Cause | Fix |
|---|---|---|
| Pavers sinking in one area | Insufficient base compaction or organic material in subgrade | Pull pavers, remove and recompact base, relay pavers |
| Pavers heaving in winter | Frost movement in poorly drained base or clay subgrade | Improve drainage, increase base depth, use crushed stone not sand |
| Concrete cracking beyond control joints | Control joints too far apart, slab too thin, or poor curing | Fill cracks with polyurethane caulk; accept as cosmetic if not structural |
| Water pooling on surface | Inadequate slope or low spot in surface | Re-slope by grinding high spots (concrete) or pulling and resetting pavers |
| Water draining toward house | Insufficient outward slope or site grading issue | Install channel drain at house edge; regrade surrounding soil; extend downspouts |
| Joint sand washing out | Wrong sand type or not enough compaction passes | Sweep in fresh polymeric sand, compact, and mist to reset |
| Edge pavers shifting outward | Edge restraint not staked frequently enough or into soft soil | Pull edges back, restake with longer spikes into compacted base |
| Gravel patio rutting | Insufficient base depth or no fabric separator | Add fabric layer, top-dress with fresh gravel, compact |
Finishing and decoration ideas for a square patio
A square footprint is one of the most versatile layouts for outdoor furniture. For detailed styling tips and layout ideas, see our guide on how to decorate a square patio. Center a 48-inch round dining table on a 12 x 12 patio and you have enough room for four chairs and comfortable circulation. On a 16 x 16 patio, you can anchor a conversation set of four to six chairs around a coffee table on one half, and place a grill or serving cart on the other half, with room to move between them.
A built-in fire pit or fire table works best when set on its own pad or at the corner of the patio rather than the center, which keeps the center open and allows seating to wrap around three sides. If you are adding a wood-burning fire pit, check local codes for setback distances from the house and combustible structures (typically 10 feet minimum). Gas fire tables are simpler to permit and run off a standard propane tank or an in-ground gas line.
Lighting transforms a patio from a daytime-only space. String lights anchored between posts or along an overhead pergola structure are the fastest and most cost-effective option. In-ground or post cap lights at the patio edge define the space at night without creating glare. For a square patio, four corner posts with lights create a natural perimeter that draws the eye inward to the seating area.
Plantings along the perimeter soften the hard edges of a square patio. Raised planters at two corners frame the space and add color without taking up floor area. For low-maintenance greenery, ornamental grasses, lavender, and boxwood work well near pavers because they tolerate heat and drought. Leave a 6-inch clearance between dense plantings and the patio edge so you can clean and maintain the joint sand without overgrowth filling the gaps.
Maintenance and seasonal care
A well-built paver patio needs very little maintenance. Sweep it free of debris and rinse with a garden hose seasonally. Every two to three years, check the joints and top up with fresh polymeric sand if any have eroded. Avoid using metal shovels or aggressive salt products in winter; a plastic shovel and calcium chloride (rather than rock salt) are gentler on paver surfaces and joint material. Re-compact problem areas in spring if frost heave has lifted a section, then reset individual pavers as needed. This is the main advantage of pavers over concrete: a 12-inch patch repair takes twenty minutes, not a full slab replacement.
Concrete patios benefit from a penetrating sealer applied every two to three years. Clean the surface first, let it dry completely, and apply sealer per the manufacturer's instructions. Sealer reduces water absorption, which reduces freeze-thaw damage in cold climates. For flagstone, sealing natural stone is optional but helps prevent staining in high-use areas. Gravel patios just need an annual rake and a small bag of fresh stone added to any low spots.
How long will this project take?
Here is a realistic time estimate for a solo DIYer building a 12 x 12 paver patio with no prior experience. These estimates assume material is already delivered on site.
| Stage | Estimated Time (Solo DIYer) | Notes |
|---|---|---|
| Layout and squaring | 2–3 hours | Batter boards, string lines, spray marking |
| Excavation (by hand) | 4–6 hours | 12x12 ft at 8–10 in depth = roughly 4 cubic yards of soil to move |
| Geotextile and base install + compaction | 3–4 hours | Two to three lifts of aggregate with compactor passes |
| Edge restraint installation | 1 hour | |
| Screeding bedding sand | 1–2 hours | |
| Laying pavers + cutting edges | 4–8 hours | Depends on pattern complexity |
| Final compaction and jointing | 1–2 hours | Including polymeric sand misting |
| Cleanup and site work | 1–2 hours | |
| Total | 17–28 hours | Typically 2 full weekends for a beginner; 1 weekend for an experienced DIYer |
Stage the work by doing the layout and utility marking in the days before your main build weekend. Order and have all materials delivered the day before you plan to dig. The excavation and base compaction are the physically hardest stages. If you are working alone, plan for those to take a full day on their own. Trying to compact base, set sand, and lay pavers in the same day almost always results in rushing the compaction step, which is the most important step in the whole project.
Quick-reference layout guide and measurement template
Use this reference during layout to catch errors before you start digging. Print it out and take it to the job site.
| Patio Size | Area (sq ft) | Diagonal (ft, in) | 3-4-5 Scale to Use | Far Edge Drop (1/4 in/ft) |
|---|---|---|---|---|
| 8 x 8 ft | 64 sq ft | 11 ft 3.4 in | 3-4-5 ft (standard) | 2 in |
| 10 x 10 ft | 100 sq ft | 14 ft 1.4 in | 6-8-10 ft (doubled) | 2.5 in |
| 12 x 12 ft | 144 sq ft | 16 ft 11.3 in | 9-12-15 ft (tripled) | 3 in |
| 14 x 14 ft | 196 sq ft | 19 ft 9.6 in | 9-12-15 ft (tripled) | 3.5 in |
| 16 x 16 ft | 256 sq ft | 22 ft 7.3 in | 9-12-15 ft (tripled) | 4 in |
| 20 x 20 ft | 400 sq ft | 28 ft 3.4 in | 12-16-20 ft (quadrupled) | 5 in |
The diagonal measurement is the single most useful squareness check. Measure corner to corner in both directions. If both diagonals match the value in the table above (within 1/4 inch), your patio is perfectly square. If they do not match each other, adjust corners until they do, even if neither matches the table value exactly. Equal diagonals mean square corners regardless of the specific measurement.
A few final reminders that come from building a lot of these: the base is the project. Every hour you spend compacting properly saves you two hours of resetting pavers five years from now. The slope is non-negotiable. And squaring the layout before you ever touch a shovel is what separates a patio that looks professionally built from one that looks like a weekend project. Take your time on those first three steps and the rest falls into place.
FAQ
How do I choose the right size for a square patio and calculate area?
Decide how you will use the patio (dining, lounge, fire pit, grill) and measure available space. Area for a square patio = side length × side length (Area = side²). Examples: 10 ft × 10 ft = 100 ft²; 12 ft × 12 ft = 144 ft²; 16 ft × 16 ft = 256 ft². Use the area to estimate quantities of paving, base, and slab volume (volume = area × thickness).
How do I calculate concrete volume and number of bags or yards needed?
Volume (cubic feet) = length (ft) × width (ft) × thickness (ft). Convert to cubic yards by dividing by 27. An 80 lb bag of premix yields ≈0.60 ft³ (~0.022 yd³). Example: 12×12 patio at 4 in (0.333 ft) → 12×12×0.333 = 48 cu ft = 1.78 cu yd; 48 ÷ 0.60 ≈ 80 80‑lb bags; add 5–10% waste (order ≈88 bags) or order 2 yd³ ready‑mix. For pours > ~1 yd³, ready‑mix is usually easier and often cheaper per yd³.
What are good patio thickness guidelines for different materials?
Concrete slab for pedestrian patios: 4 in. is standard. Increase to 5–6 in. and use reinforcement (mesh/rebar) for heavy loads. Segmental concrete pavers usually require a compacted aggregate base (see base depth below) and nominal bedding sand layer; paver thickness depends on paver type (e.g., 2 3/8" to 3 1/8" for pedestrian pavers). Raised pedestal or decking systems follow manufacturer span/load charts.
How deep and what kind of base do I need under pavers or slabs?
For pedestrian patios on well‑drained soils a compacted aggregate base of about 4 in. (compacted) over prepared subgrade is commonly recommended. For poor subgrade or occasional vehicle loading increase base depth to 6–8 in. Compact base and subgrade in 2–4 in. lifts to target density (industry often specifies ≥95% of standard Proctor for aggregate bases). Use graded aggregate per ASTM D2940 (crusher‑run or 3/4" minus) and consider geotextile over very soft soils.
How do I square and lay out a square patio accurately?
Set two batter boards outside the footprint and run tight string lines to indicate two adjacent sides. Use the 3‑4‑5 (or scaled multiples) Pythagorean method to create a right angle: e.g., measure 3 ft on one string, 4 ft on the other, and adjust until the diagonal between those points is 5 ft. Once right angle is set, measure opposite sides and diagonals — equal diagonals indicate a true square. Transfer marks to stakes or forms.
How do I square off a patio when it's against a house?
Establish a baseline parallel to the house (use house face as a reference). Place batter boards and run a string parallel to the house at the desired setback. From two points on that baseline, use the 3‑4‑5 triangle to set a perpendicular string out from the house, then measure equal distances along both strings to set the other two corners. Always leave a small gap or flashing/expansion joint where the patio meets the house to allow for movement and water flashing.