Building a patio extension means digging out a new area next to your existing patio, building a proper compacted base, and connecting the two surfaces so they move together instead of cracking apart. Done right, your extension blends in seamlessly with the original, drains correctly, and stays level for years. Done wrong, you end up with a gap, a trip hazard, or a puddle every time it rains. This guide walks you through every step, from reading your existing patio to finishing the joint, so you can get it right the first time.
How to Build an Extended Patio Step by Step DIY Guide

Nolan Carver
4 Jul 2026
Know what you're extending and choose the right matching build
Before you pick up a shovel, figure out exactly what your existing patio is made of and how it was built. The material drives almost every decision that follows: the base depth, the jointing method, whether you need an expansion gap, and how hard it will be to match the finish. If you are asking how to build a patio extension that looks seamless and stays stable, start by matching the existing materials and building method.
The three most common patio types you'll be extending are poured concrete slabs, concrete or natural stone pavers set on a sand-and-gravel base, and mortared slabs or flagstone. Each one has a different strategy for the new section.
| Existing Patio Type | Best Extension Match | Joint Approach | Relative DIY Difficulty |
|---|---|---|---|
| Poured concrete slab | New poured concrete slab | Isolation/expansion joint with foam backer | Moderate |
| Concrete pavers on sand base | Matching pavers on compacted gravel + bedding sand | Shared edge restraint, no gap needed | Beginner-friendly |
| Natural stone pavers on sand | Matching stone on same base system | Shared edge restraint or small sand-filled gap | Beginner-friendly |
| Mortared flagstone or tile | Mortared extension on concrete sub-slab | Caulked expansion joint between slabs | Moderate to hard |
| Gravel or decomposed granite | Same gravel type, same depth | Just match grade and blend material | Easy |
If your existing patio is concrete and you want to add pavers to the extension, that works fine visually, but you need a deliberate transition edge between the two materials. If you are looking for the full step-by-step, this guide on how to add on to existing patio covers planning, prep, and tying the new section in correctly. A lot of homeowners go this route because pavers are forgiving on uneven ground and easier for a solo DIYer to install. If you're extending a small patio or working with a raised patio that has a retaining edge, the approach gets more specific, those situations involve extra steps around edging and height management that go beyond what a standard ground-level extension requires.
One quick check before you go any further: call 811 (in the US) at least three business days before you dig. That number connects you to your local utility-locating service and they'll mark underground gas, water, and electrical lines for free. It takes five minutes to set up and can save you from a genuinely dangerous situation.
Do you need a permit?
Many jurisdictions require a permit for patio additions, especially if the extension is attached to the house or exceeds a certain square footage. Portland, Oregon, for example, requires building permits for residential additions and specifies what must be included in the application. Your local rules will differ, but a quick call to your city's building department will tell you in under ten minutes whether you need one. Don't skip this step, an unpermitted addition can create problems when you sell.
Measure, mark layout, and plan the connection to the existing patio
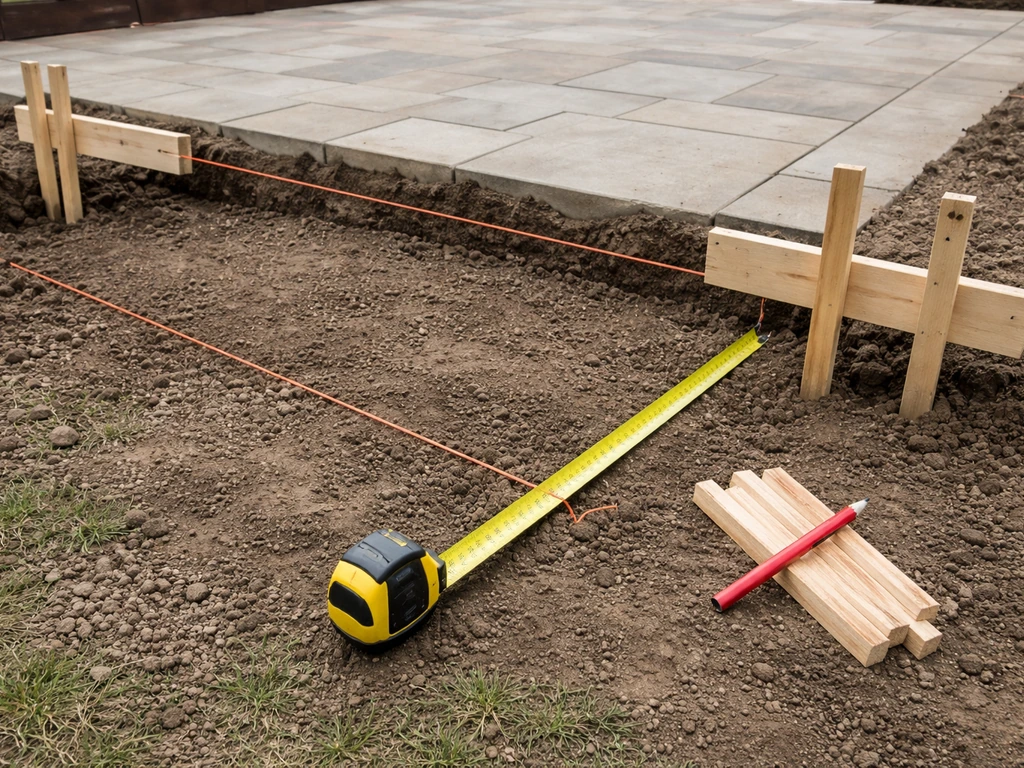
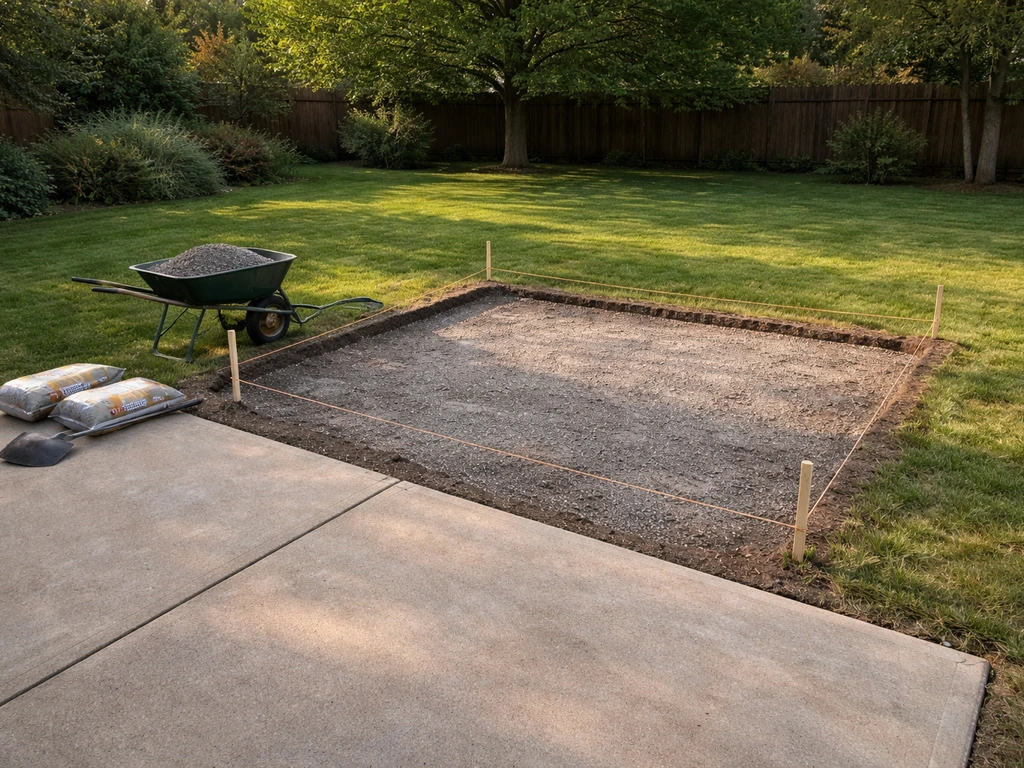
Start at the existing patio edge and work outward. Measure the total footprint you want for the extension and use batterboards and mason's line to mark the perimeter. To make patio bigger, focus on measuring your full footprint and planning how the extension will connect to the existing edge Measure the total footprint you want for the extension. Square it up using the 3-4-5 triangle method: measure 3 feet along one line from a corner, 4 feet along the perpendicular line, and adjust until the diagonal between those two points is exactly 5 feet. That gives you a perfectly square corner every time.
Note the finished surface height of the existing patio at the edge where the two sections will meet. Write that number down. Your extension's finished surface needs to match this height exactly, not within half an inch, not close enough. A height difference creates a trip hazard and looks unfinished. The way you hit that target is by working backward from that height when you plan your base depth.
For a paver extension, the math looks like this: finished surface height minus paver thickness (usually 2.375 in for standard pavers) minus bedding sand layer (1 in) equals the top of your compacted gravel base. For a concrete extension, finished height minus slab thickness (typically 4 in for a residential patio) equals the top of your compacted sub-base. Write those numbers on your layout sketch before you dig a single inch.
Site prep: excavation, base layers, compaction, and weed control
Good site prep is the difference between a patio that lasts twenty years and one that starts heaving and shifting in three. This is the step most DIYers rush, and it's where most failures begin.
Excavation depth
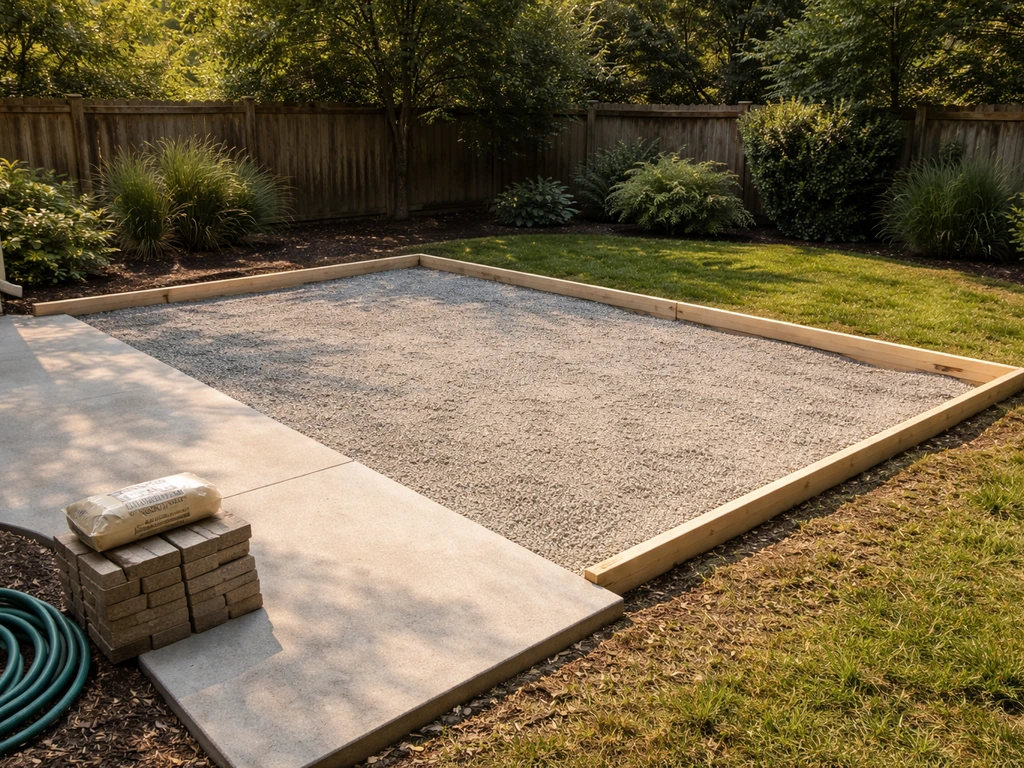
For a paver patio, plan to excavate about 7 to 9 inches below your finished surface grade: roughly 4 to 6 inches of compacted gravel base plus 1 inch of bedding sand plus the paver thickness. In freeze-thaw climates, go to the deeper end of that range or add more base. For a 4-inch concrete slab, you need at least 4 inches of compacted base below the slab, so excavate about 8 inches below finished grade. Dig out the entire extension footprint plus about 6 inches beyond your layout lines on each side to give yourself room to work and install edge restraints.
Remove all organic material, roots, and soft soil. If you hit soft or spongy spots after excavating, those areas need to be dug out deeper and filled with compacted gravel. Leaving soft spots under the base is a guaranteed recipe for settling.
Geotextile fabric and base compaction
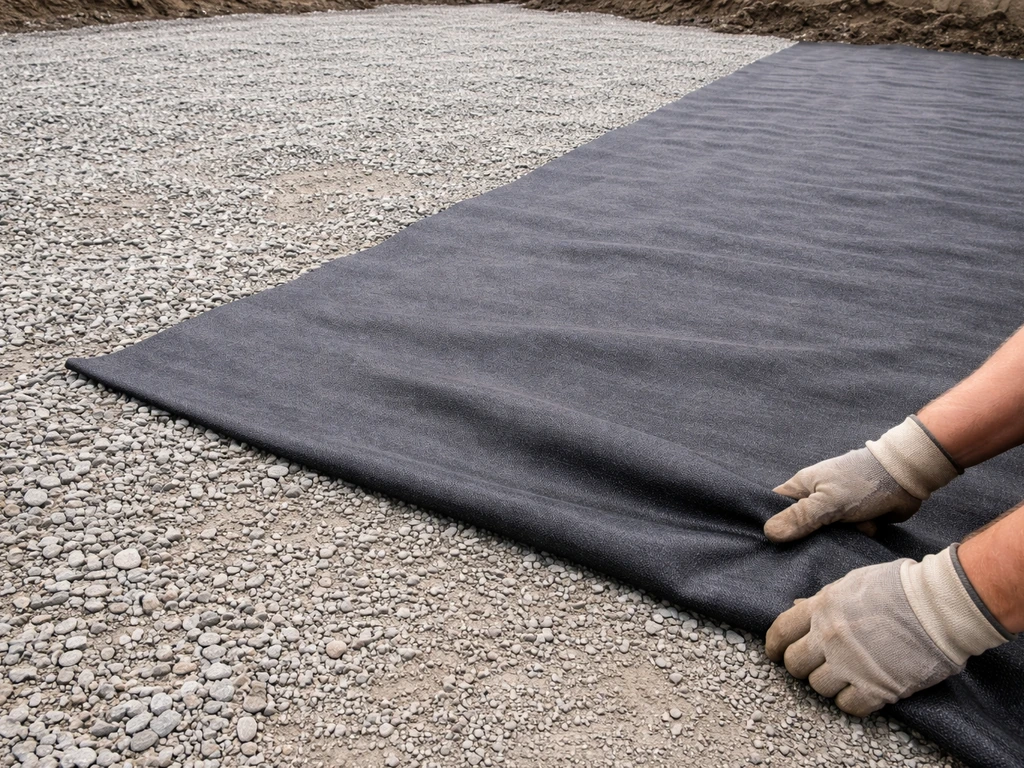
Lay a geotextile fabric (not cheap landscape fabric from the garden center, actual geotextile, which is heavier and woven or nonwoven specifically for drainage and separation) over the compacted subgrade before adding your base material. blank" rel="noopener noreferrer">Geotextile prevents fine soil particles from migrating up into your gravel base over time, which is what causes base contamination and eventual settling. Overlap seams by at least 12 inches.
Add your crushed-stone base (3/4-inch compactible gravel or road base is typical) in lifts no deeper than 4 to 6 inches at a time, and compact each lift with a plate compactor before adding the next one. Renting a plate compactor for a day runs about $60 to $90 in most areas and is completely worth it, hand tamping is not sufficient for a base that needs to support years of foot traffic and weather cycles. After compaction, check your base depth against your numbers from the layout phase and adjust as needed.
Drainage and slope: preventing standing water on the extension
Standing water on a patio is annoying at best and damaging at worst, it accelerates freeze-thaw cracking, promotes mold and moss, and can direct water toward your foundation. Getting the slope right is non-negotiable.
The standard rule for patios attached to or near the house is to slope the surface away from the foundation at a minimum of 1/4 inch per foot (about 2%). Some sources suggest that slope should be maintained for at least 10 feet out from the foundation wall. For pavers specifically, a commonly used DIY target is 1/8 inch per foot (roughly 1 inch per 8 feet), though the 1/4-inch-per-foot standard is safer and what most building codes reference.
Build the slope into your base, not just the surface. If you try to create slope only by adjusting the surface material at the end, you'll get inconsistent results. Set your screed rails or concrete forms so the entire base system tilts away from the house at the correct pitch. A 4-foot level with a small shim under one end lets you check your slope as you go. For a 4-foot level and a 1/4-inch-per-foot slope, the bubble should be off-center by roughly 1 inch at that length.
If your yard already slopes toward the house, a common problem in older neighborhoods, you may need to plan a channel drain or redirect the extension's runoff path to a planted area or a dry creek bed. Don't just hope it works out; check where the water goes during a heavy rain before you build.
Build the extension base and set the surface (concrete vs pavers)
Once your base is compacted, sloped correctly, and at the right height, you're ready to build the surface. If you want a smooth extension that looks like the rest of your patio, start with a solid base and the right drainage slope. Here's how each main option plays out.
Pouring a concrete slab extension
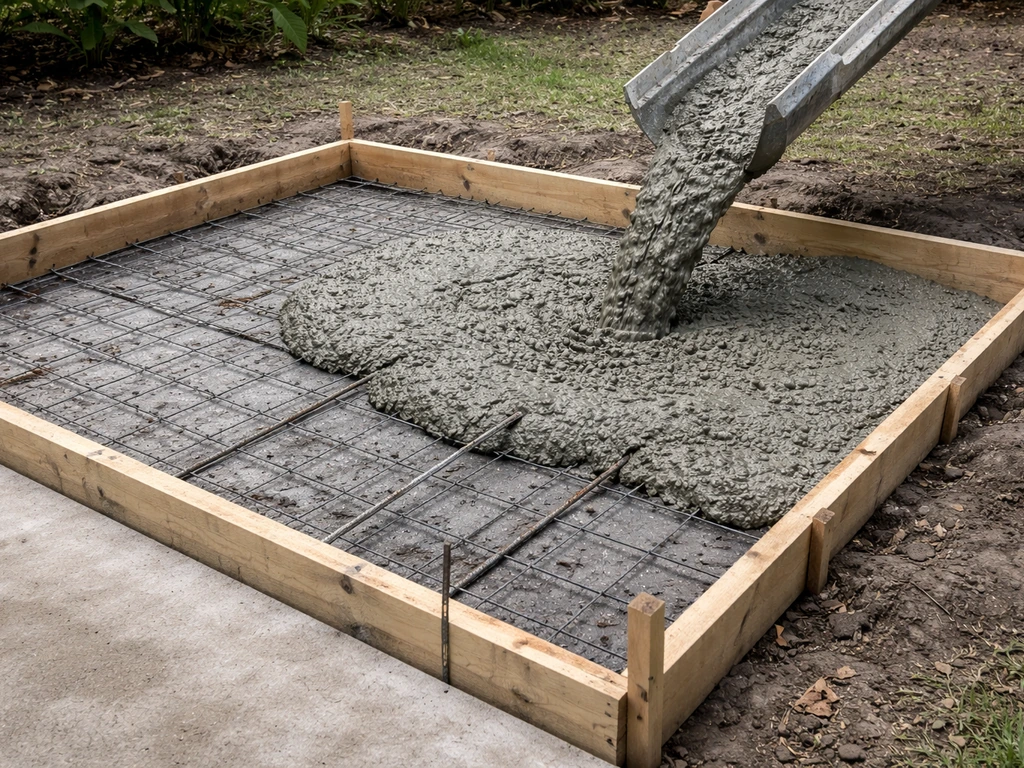
Set your forms so the top edge is at your target finished height. For a 4-inch residential slab, use 2x4 lumber set on edge. Add wire mesh or rebar (1/2-inch rebar on 18-inch centers is a solid standard for a patio) on chairs to hold it at mid-slab depth. Order or mix concrete to a 3,000 PSI mix minimum. Pour, screed to the form tops, and finish with a float and broom texture for traction. Control joints (the shallow cuts that guide where cracks form) should be cut to a depth of at least 1/4 of the slab thickness, so 1 inch deep for a 4-inch slab. For wet-saw cutting, the window is typically 4 to 12 hours after placement depending on temperature and humidity; early-entry dry-cut saws can go sooner. Space control joints no more than 2 to 3 times the slab thickness in feet (so about 8 to 12 feet apart for a 4-inch slab).
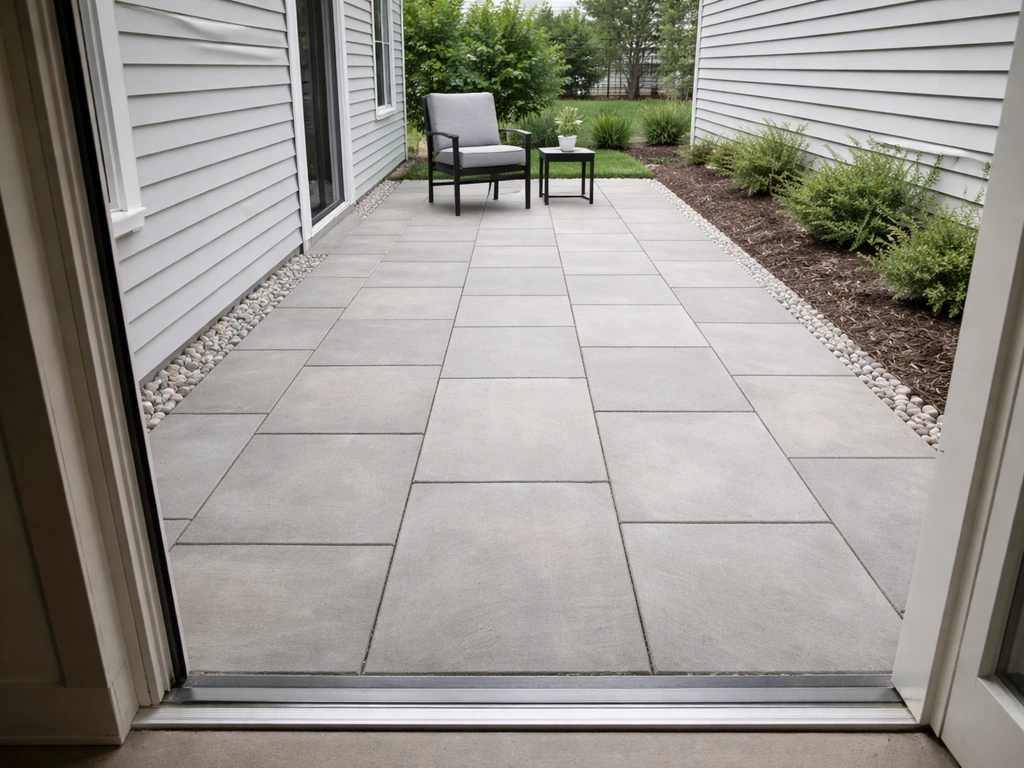
Installing pavers on a sand-and-gravel base
After your compacted gravel base, add a 1-inch layer of coarse bedding sand (not play sand, coarse concrete sand or chip stone). Screed it level using two parallel pipes as guides, then pull them out and fill the gaps. Do not compact the bedding sand before laying pavers. Set pavers by hand, working from one corner, maintaining consistent joint spacing (usually 1/16 to 3/16 inch for interlocking pavers). Use a rubber mallet and a straight edge or string line to keep rows aligned. Once all pavers are set, compact them with a plate compactor (put a rubber pad on the plate to avoid scuffing). Then sweep polymeric sand into the joints, compact again, and activate the sand with a gentle water mist. Follow the product instructions carefully, over-watering with polymeric sand like Sakrete PermaSand causes the polymer binder to float to the surface and form a haze or film.
Install edge restraints (plastic or aluminum paver edging spiked into the base) around the entire perimeter before setting pavers. Mutual Materials’ paver installation instructions also call for using edge restraint and include bedding sand screeding guidance, such as about a 1 inch bedding sand depth, to set and level pavers edge restraint and about a 1 inch bedding sand depth. This is what holds everything in place over time. Skipping it means your extension will creep outward within a couple of seasons.
Concrete vs. pavers: which is better for an extension?
| Factor | Poured Concrete | Pavers |
|---|---|---|
| DIY skill level needed | Moderate (forms, finishing) | Beginner to moderate |
| Typical material cost (10x10 ft) | $150–$300 | $200–$500 |
| Time to usable surface | 3–7 days cure time | Same day (after compaction) |
| Repairability | Hard—patches are visible | Easy—swap individual pavers |
| Drainage flexibility | Needs built-in slope and cuts | Naturally permeable joints |
| Freeze-thaw durability | Good with proper jointing | Excellent—flexes with movement |
| Matches existing concrete patio | Best match (same material) | Visible transition, acceptable |
For most DIYers extending a paver patio, the answer is more pavers, same material, same base system, easier to match height. For extending a concrete slab, pouring new concrete gives the cleanest look, but pavers are a legitimate option if you use a solid transition edge between the two.
How to tie in the joint/edge to avoid cracking or settlement gaps
The joint between old and new is the most technically important part of this whole project. Get it wrong and you'll have a crack, a gap, or a height difference within a year or two. Get it right and the extension looks and behaves like it was always there.
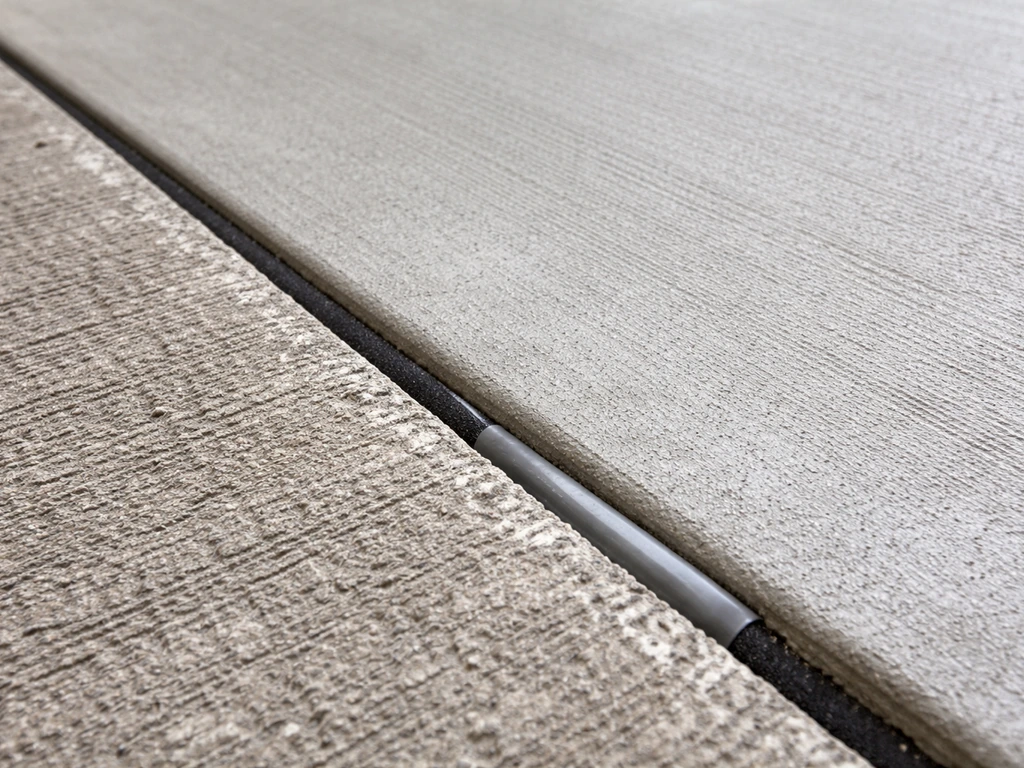
Concrete-to-concrete joints
Never pour new concrete directly against old concrete without an isolation joint between them. Old and new slabs expand, contract, and settle at different rates, especially in the first year or two after the new pour. Without a joint, one slab will crack the other. Use a foam expansion joint material (like Sakrete's foam-based concrete expansion joint product) pressed firmly against the face of the existing slab before pouring the new one. This compressible foam absorbs movement so both slabs can shift independently without breaking each other.
If you want better load transfer across that joint (meaning the two slabs share weight more evenly so one doesn't settle lower than the other), you can add dowel bars. Drill into the face of the existing slab with a hammer drill, epoxy in smooth steel dowel bars at mid-slab height on 12-to-18-inch centers, leaving half the dowel sticking out into the new pour. Dowels allow horizontal movement while resisting vertical differential settlement. This is especially worth doing if your new section is large or if you're in freeze-thaw country.
Paver-to-paver joints
When extending an existing paver patio, the connection is simpler. Remove the edge restraint from the existing patio edge where the two sections will meet. Build your new base right up to meet the existing base, making sure both base surfaces are at the same height. Then set the new pavers running right into and matching the pattern of the existing ones. Install a single edge restraint along any new exposed perimeter edges. The joint between old and new pavers just becomes another paver joint, fill it with polymeric sand like everything else.
Concrete-to-paver transitions
If you're adding a paver extension to a concrete patio, use a metal or aluminum transition edge strip anchored to the concrete edge. This gives the pavers a firm edge to butt against, prevents the bedding sand from washing out under the concrete, and creates a clean visual line between the two materials. Make sure the top of the paver surface matches the top of the concrete to within 1/4 inch, closer is better.
Finishing, cleanup, and a DIY troubleshooting checklist
Once the surface is set and joints are filled, clean up excess sand, remove any layout strings and batterboards, and backfill the edges outside your edge restraints with topsoil. Grade the surrounding soil away from the patio so it doesn't hold water against your edge restraints or under your surface.
For concrete, keep the slab moist for at least 7 days by covering it with plastic sheeting or using a curing compound. Don't let it dry out fast, slow curing produces a stronger slab. Keep foot traffic off for 24 to 48 hours minimum and heavy furniture off for at least 7 days.
For pavers, do a final check of surface flatness with a 6-foot straightedge. Any paver more than 1/8 inch higher than its neighbor (called lippage) needs to be reset, pull the paver, adjust the sand, and re-seat it. That 1/8-inch threshold is the standard for a professional-quality finish and it matters for both safety and appearance.
Troubleshooting checklist before you call it done
- Finished surface height matches existing patio edge within 1/4 inch (ideally flush)
- Surface slopes away from the house at minimum 1/4 inch per foot across the entire extension
- No paver lippage greater than 1/8 inch across any joint
- Polymeric sand fully cured and set in joints (no loose or dusty sand visible on surface)
- All perimeter edges have edge restraints fully spiked into the base
- No soft or spongy spots underfoot anywhere on the extension
- Expansion/isolation joint installed between new and old concrete (if concrete extension)
- Utility lines confirmed clear before excavation (811 call made and flags accounted for)
- Drainage path confirmed—water runs away from house and doesn't pool at the joint
- Geotextile fabric installed under base (not landscape fabric)
- Control joints cut at correct depth and spacing (concrete only)
- Permit obtained if required by local jurisdiction
- Surrounding soil backfilled and graded away from patio perimeter
Most problems that show up in the first year, a gap at the joint, a low spot that holds water, a row of pavers that shifted outward, trace back to one of the items on that list. If something looks off after your first rainstorm, check drainage first, then check your edge restraints, then check the joint. Those three things cover 90% of what goes wrong on DIY patio extensions. A solid method for extending a raised patio is to plan the base, match the finished height, and detail the joint so the new section settles correctly.
Building an extension is genuinely doable as a solo or two-person weekend project for small to medium footprints (under 200 square feet). Larger extensions, raised sections, or projects on sloped lots add complexity, especially around retaining edges, drainage routing, and base depth in areas with significant grade change. If your situation involves any of those factors, it's worth spending extra time in the planning phase before you start moving dirt. But for a standard ground-level extension that matches what you already have, the process here covers everything you need to get started today. If you want a complete, step-by-step overview, see this guide on how to extend backyard patio.
FAQ
Can I extend a concrete patio with pavers without making a messy joint?
Yes, but plan for a proper isolation or transition strategy. If your existing patio is concrete and you add pavers, use a metal or aluminum transition strip anchored to the concrete edge so the paver bedding sand cannot wash out. Also confirm the top elevations match closely, within about 1/4 inch, because even small height steps show up fast at the joint and create tripping risk.
Do I always need a permit to extend an existing patio?
Expect restrictions. Many areas treat patio additions attached to a structure, over a certain size, or that alter drainage as permit-worthy. Before you apply, ask the building department whether they require an expansion joint detail, a drainage plan, and proof of compacted base depth, not just the surface finish.
If I’m pouring a small concrete extension, do I still need control joints?
Yes, control joints are important even on extensions if you pour a new concrete slab. Cut them early enough for your conditions, and space them so you are not creating large uninterrupted slab panels. A common mistake is too few joints, which increases random cracking risk.
How much water should I use to activate polymeric sand, and what happens if I overdo it?
Generally, no. Polymeric sand should be kept dry before activation. After sweeping it into joints, mist lightly per the product instructions, and avoid oversaturation. Over-watering can cause binder haze or joint failure that you will only notice after a rain.
My patio extension developed a gap or low spot after a few months, what should I check first?
If you see settlement or a gap at the perimeter joint, it is usually base depth, compaction, or edge restraint related. Re-check that you used an actual geotextile layer (not garden fabric), built the base in lifts and compacted each lift, and installed edge restraints continuously around the section. Correcting this later often requires removing surface material, resetting pavers, and sometimes redoing base in affected areas.
What kind of fabric should I use under a paver patio extension, and does overlap matter?
For pavers, use geotextile that is intended for separation and drainage, heavier than typical landscape fabric. Also overlap seams by at least about 12 inches so base fines cannot migrate upward through any seam.
How do I ensure the patio drains correctly if the yard slopes toward the house?
If the extension is near the house, build the drainage slope into the base system and do not rely on surface leveling after the fact. A practical way to catch problems is to measure slope with a level as you set base forms, then verify that runoff moves away from the foundation at roughly the 1/4 inch per foot target.
What’s the biggest height mistake people make when matching an existing patio?
Plan the base so the extension finishes at the exact height of the existing patio at the meeting point. A common error is aiming for “close enough” and then compensating with extra bedding sand or grout, which can compress later. If you are using pavers, remember the math includes paver thickness plus bedding sand plus base depth, not just the surface height.
Do I need to reroute runoff for a patio extension, and how can I tell?
If your extension changes the path of runoff, assume you may need a redirected discharge location. One decision aid is to do a hose test or watch a heavy rain before building, then choose where water will go, such as a planted area, swale, or dry creek bed, rather than letting it pond at the slab edge.
I live in a freeze-thaw climate, should I excavate deeper for an extended paver patio?
Yes, but load issues can show up quickly. The deeper the freeze-thaw cycle or the softer the soil, the more you should bias toward the deeper base range and ensure thorough compaction. Also consider using the deeper end of excavation depth guidance in colder climates instead of the shallowest option.
Why can my new concrete slab crack the old one if I do it “flush”?
For concrete-to-concrete joints, do not skip the isolation joint concept. Use a compressible foam expansion joint material between old and new to allow movement without cracking, and for larger pours or freeze-thaw areas consider epoxy-set dowel bars for better load sharing.
How do I fix paver height issues (lippage) before I finish the joints?
Lippage is usually corrected immediately, not “later.” A good rule of thumb for resetting is to pull and re-set any paver that creates a height difference greater than about 1/8 inch relative to neighbors, then re-screed the sand under it. Waiting causes wobble, faster joint washout, and trip hazards.
What’s the difference between connecting paver-to-paver versus paver-to-concrete at the joint?
It depends on your existing material and the transition location. If you are matching pavers to pavers, you can treat the meeting area as just another paver joint once the base heights align and you keep restraints in place. If you are mixing concrete and pavers, you usually need a transition edge strip anchored to the concrete to keep the bedding sand from eroding under the new surface.