Building a grill patio means combining two projects that each have their own requirements: a solid, properly drained hardscape surface and a safe, code-compliant space for an open flame. Do both right, and you get an outdoor cooking area that lasts decades. If you want to go beyond a grill, the same planning basics apply to how to build an outdoor patio kitchen, including layout, clearances, and weatherproof finishes outdoor cooking area. Skip either, and you end up with a cracked slab, a flooded patio, or a setup that fails a permit inspection. This guide walks you through the entire process from reading your yard to finishing the surface, with real measurements, material options, and the safety details that catch most DIYers off guard.
How to Make a Grill Patio: DIY Build Steps and Tips

Nolan Carver
3 Jul 2026
Planning and site assessment for a grill patio
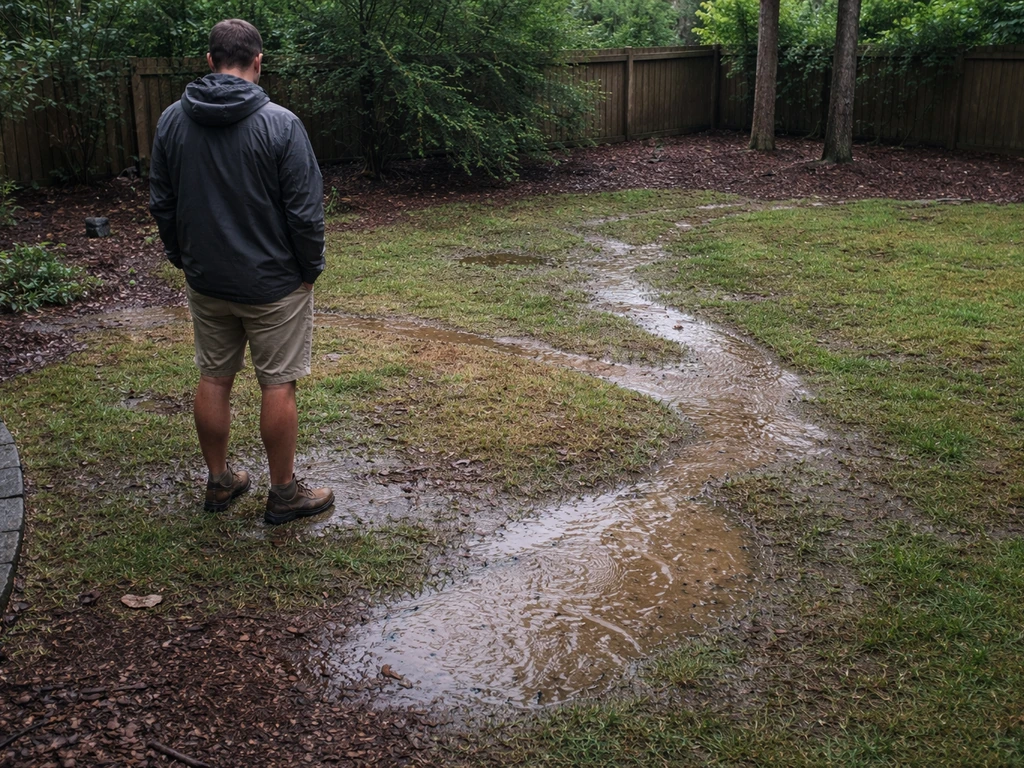
Before you buy a single bag of gravel, spend an afternoon reading your yard. Walk the area you have in mind after a rain and watch where water flows. A grill patio needs a minimum 1% slope (about 1/8 inch per foot) away from any structure, and 2% is better for areas that get heavy rain. If your site naturally drains toward the house, you will need to regrade before you do anything else. That is the single most common problem I see on DIY builds: people skip grading and spend years fighting pooled water.
Check your utility lines before you dig. Call 811 (the national dig-safe hotline in the US) at least three business days before breaking ground. Gas lines, buried irrigation, and electrical conduits all run through typical backyards, and hitting one is a serious safety and financial problem. Also confirm whether your project requires a permit. Most municipalities require permits for permanent structures, gas line connections, and electrical work. A patio slab alone often falls below the permit threshold, but add a built-in grill with a gas line and an outdoor outlet and you almost certainly need to pull permits. Call your local building department and ask directly.
Assess your soil. Clay-heavy soil expands and contracts with moisture and is a poor base without proper preparation. Sandy or loamy soil drains faster but can shift. Either way, you will need a compacted aggregate base, and if you are pouring a concrete slab, you may need footings depending on your jurisdiction's frost depth requirements. The IRC requires conventional footings to be at least 12 inches wide and 6 inches deep, and they must extend below the local frost line. In frost-free zones, this matters less; in Minnesota or Maine, it matters enormously. Check your local frost depth before you plan your base.
- Mark the boundaries of your planned patio with spray paint or stakes and string before assessing slope
- Note where the nearest gas shutoff and electrical panel are located
- Measure how far the patio edge will sit from the house foundation, fence lines, and any overhead structure
- Check for tree roots that could heave a slab over time
- Photograph the area and sketch a rough layout to scale on paper before committing to dimensions
Choosing the grill location, layout, and clearances
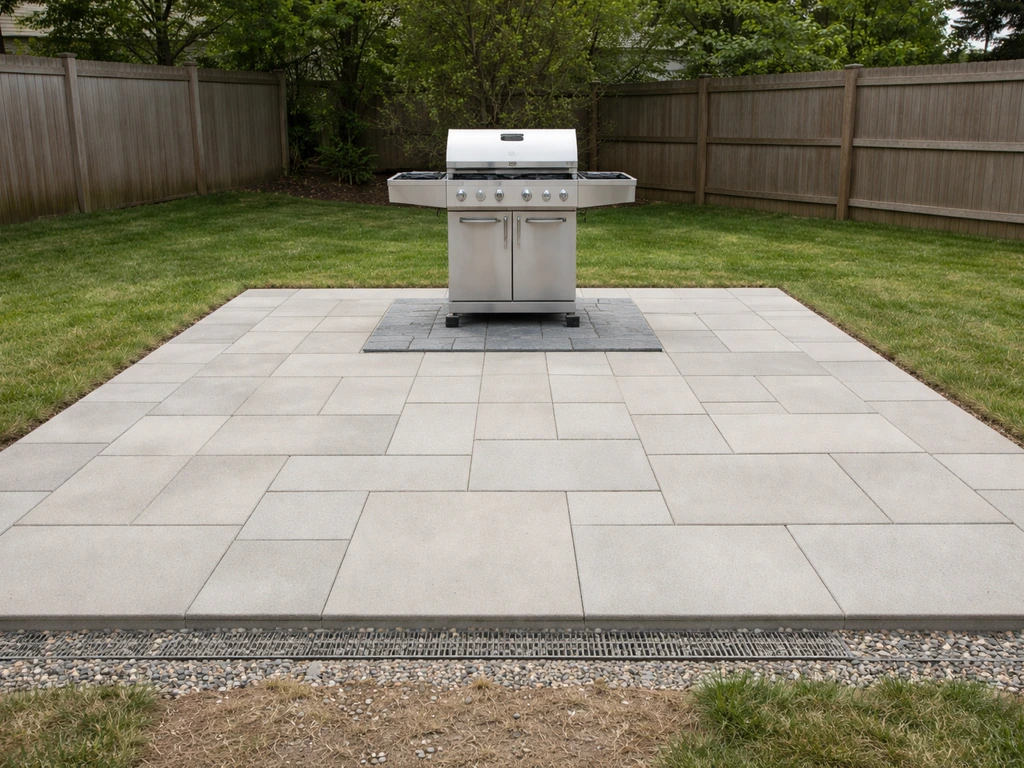
Where you put the grill on the patio matters more than almost any other decision. The non-negotiable rule: keep the grill away from combustible materials. The International Fuel Gas Code specifies a minimum 30-inch vertical clearance from the cooking surface to any combustible material overhead. If you are building a pergola over your patio, the grill needs to sit outside or well clear of any covered section, or the overhead structure needs to be entirely noncombustible. Weber's built-in grill installation guides reinforce this and explicitly warn against installing a built-in unit in an enclosed space, garage, breezeway, or under combustible overhead construction.
For built-in grills, follow the manufacturer's manual for clearance dimensions exactly. Do not rely on generic rules of thumb. As an example, a Weber SB38 S built-in installation guide calls for a minimum 24 inches (610 mm) from the grill cutout edge to any combustible construction, and a minimum 27 inches (686 mm) of lid clearance above. Your model may differ. Download your specific manual before you finalize the enclosure design and build it from noncombustible materials: concrete block, brick, or metal stud framing with cement board are all good choices. Never use wood framing directly adjacent to a built-in grill.
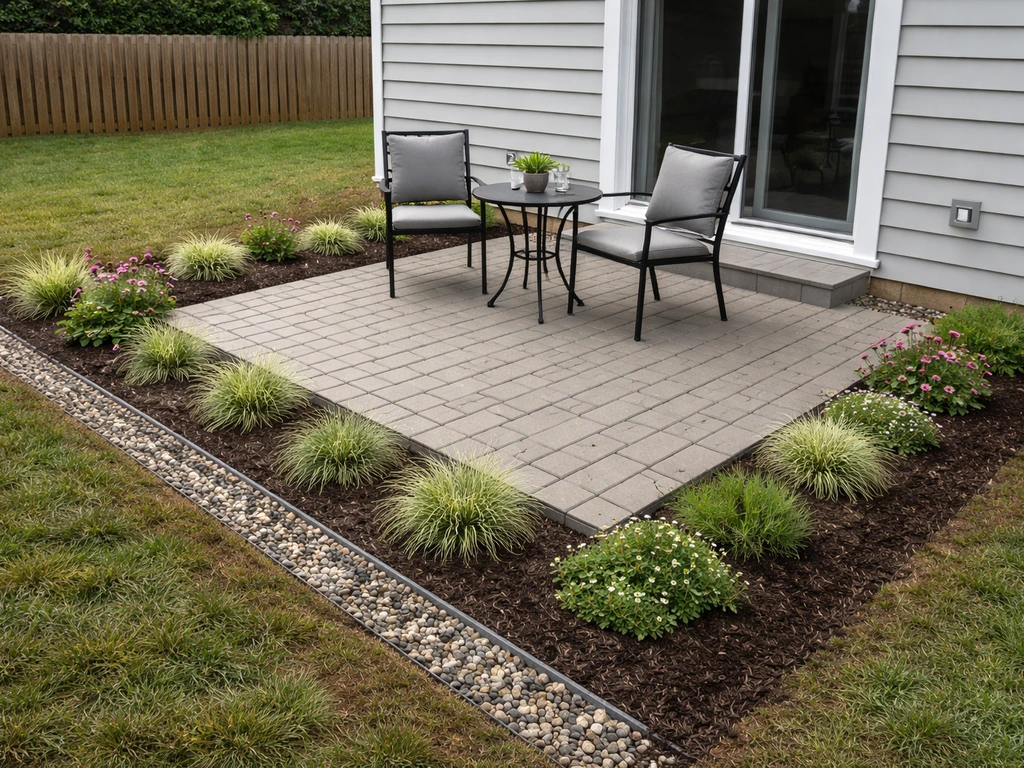
For layout, think about traffic flow and smoke direction. Position the grill so the cook faces into the patio rather than away from guests. The dominant wind direction in your yard will push smoke somewhere, and you want to know where before you build. Leave at least 3 feet of clear workspace on both sides of the grill for prep and plating. If you plan to add a patio bar or an outdoor kitchen island nearby, factor that into your overall footprint now rather than trying to shoehorn it in later. A connected outdoor kitchen setup changes your gas and electrical rough-in planning significantly.
| Clearance type | Minimum requirement | Source |
|---|---|---|
| Vertical clearance above cooking surface to combustible material | 30 inches (760 mm) | IFGC 2021 |
| Horizontal clearance from cutout edge to combustible construction (example model) | 24 inches (610 mm) | Weber SB38 S installation guide |
| Minimum lid clearance above grill (example model) | 27 inches (686 mm) | Weber SB38 S installation guide |
| General clearance to combustibles (fuel-burning appliances) | Per listed appliance and IFC requirements | IFC 2021 |
Always verify the clearances in your specific appliance's manual and confirm requirements with your local AHJ (Authority Having Jurisdiction). The numbers above are examples, not universal rules.
Materials, framing, and base prep for a grill patio
Your two main surface choices near the grill are concrete and concrete pavers. Both work well. The decision mostly comes down to budget, aesthetics, and how much you want to DIY. Poured concrete is typically less expensive per square foot for large areas but requires forming and finishing skill. Concrete pavers cost more upfront but are easier to adjust, replace, and install yourself. Either way, the base preparation process is essentially the same and is where most projects succeed or fail.
| Surface material | Approximate cost (materials only) | DIY difficulty | Heat resistance near grill | Repairability |
|---|---|---|---|---|
| Poured concrete slab | $6–$10 per sq ft | Moderate to hard | Good with sealer | Difficult (full section replacement) |
| Concrete pavers | $8–$15 per sq ft | Moderate | Excellent | Easy (individual paver replacement) |
| Natural stone (bluestone, flagstone) | $12–$25 per sq ft | Moderate | Excellent | Moderate |
| Brick pavers | $8–$14 per sq ft | Moderate | Excellent | Easy |
| Porcelain tile (outdoor rated) | $10–$20 per sq ft | Hard | Excellent | Moderate |
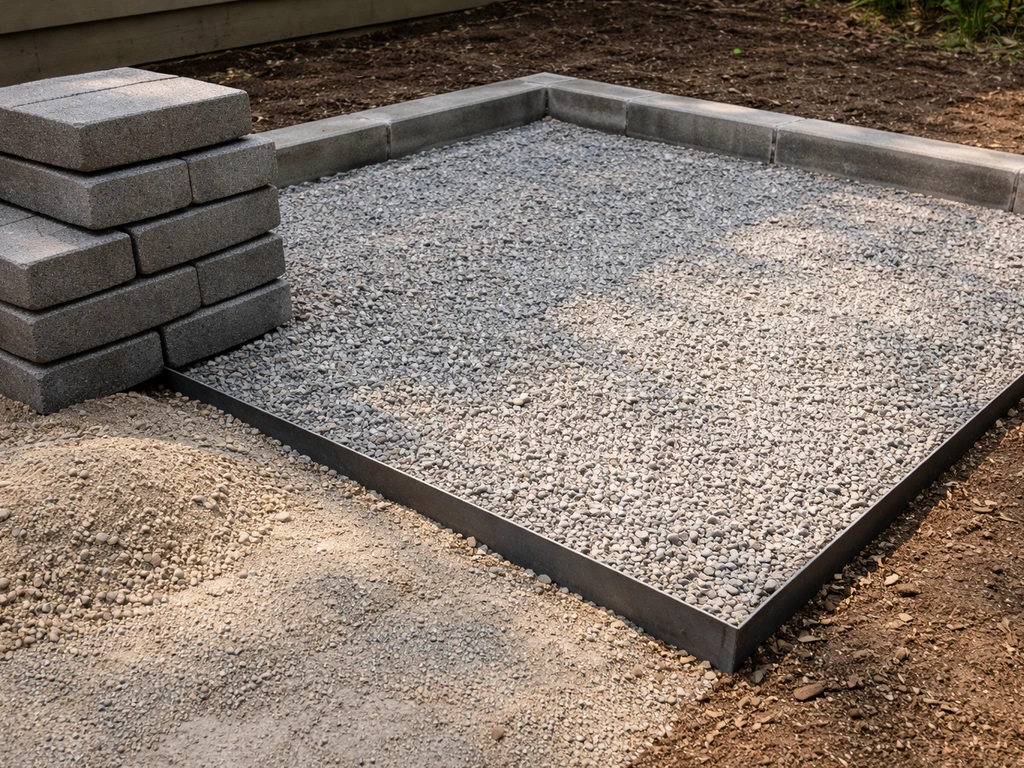
For the base, plan on a minimum 4-inch layer of compacted crushed aggregate (typically compacted gravel or crusher run) under pavers, and 4 to 6 inches under a concrete slab. The key word is compacted. The target is 95% of AASHTO T99 density for granular subbases. In practice, that means compacting in layers no thicker than 4 inches at a time using a plate compactor, not a hand tamper. A common DIY mistake is compacting in one thick lift and assuming it is done. It is not. I have seen Reddit threads where people estimated 30% compaction by eyeballing volume loss and thought that was fine. It is not fine. Rent a plate compactor, work in lifts, and take your time on the base.
If you are pouring a concrete slab, lay a vapor retarder over the compacted base before placing concrete. ACI guidance specifies a minimum of 6-mil polyethylene, with 10-mil being a more practical and durable choice for outdoor slabs. Overlap seams by at least 12 inches and tape them. This step is often skipped on outdoor flatwork but it matters for slab moisture performance over time, especially in climates with seasonal ground moisture changes.
For the grill enclosure itself, use concrete masonry units (CMUs), brick, or a metal stud frame sheathed with cement board. Do not use wood framing or composite materials anywhere within the required clearance zones. For the countertop surface adjacent to the grill, use granite, concrete board topped with tile, or stainless steel. These are noncombustible and will not warp or delaminate from grill heat.
Building step-by-step: patio construction with a grill feature
- Mark the full patio footprint with stakes and string lines. Use the 3-4-5 triangle method to confirm square corners (measure 3 feet on one line, 4 feet on the perpendicular, and the diagonal should be exactly 5 feet).
- Excavate to the correct depth: 8 to 10 inches for a paver patio (accounting for 4 inches of aggregate base, 1 inch of bedding sand, and the paver thickness), or 10 to 12 inches for a 4-inch concrete slab with 6-inch aggregate base. Add extra depth at the grill enclosure footprint if you need a thicker base or footings.
- Grade the excavated area away from the house at 1/8 to 1/4 inch per foot. Check your slope with a long level and tape measure at multiple points. This is the step people rush and regret.
- Install footing forms if your project requires footings (check local frost depth requirements). For a standalone slab patio with no attached structure, footings may not be required; for a built-in enclosure tied to a structure, check with your building department.
- Spread and compact your aggregate base in 4-inch lifts using a plate compactor. Make at least two passes in perpendicular directions per lift. Add water lightly to crusher run if it is very dry to aid compaction.
- For concrete slabs: place your vapor retarder (minimum 6-mil poly, 10-mil preferred), set your rebar or wire mesh reinforcement at mid-slab depth, build your forms to the correct height and slope, and pour concrete. A standard outdoor patio mix is 3,000 to 4,000 PSI. Finish the surface with a broom finish for traction.
- For paver patios: spread 1 to 1.5 inches of coarse bedding sand (consistent with ICPI guidance) over the compacted base, screed it level using pipes as guides, then lay pavers in your chosen pattern starting from a straight edge or corner. Do not disturb the screeded sand as you work.
- Install edge restraints on all exposed paver edges before filling joints. Plastic or aluminum paver edge restraints spiked into the base prevent lateral creep over time. This step is non-negotiable for long-term stability.
- Sweep polymeric sand into all paver joints, compact lightly with a plate compactor, sweep again, and activate with a fine water mist per the manufacturer's instructions. Incorrect water application is the number one cause of polymeric sand failure and haze.
- Build the grill enclosure using your chosen noncombustible framing system, confirming all clearances from the grill manual. Rough in gas and electrical before closing up the enclosure. Have a licensed plumber or gas fitter handle the gas line connection if you are not experienced with gas work.
For the gas supply, Weber's installation guides stress coordinating gas supply, valving, and shutoff requirements with the typical gas supply installation guidelines for your area. That means a dedicated shutoff valve accessible within a few feet of the grill, correctly sized gas line based on BTU demand and run length, and a pressure test before first use. If you are connecting to natural gas, your jurisdiction will almost certainly require a licensed contractor for the final tie-in regardless of how much you DIY the rest of the project.
Electrical for the grill patio is similarly specific. Any outdoor receptacle must have GFCI protection under NEC 210.8, and the enclosure must be weatherproof-rated for outdoor/wet locations per IRC requirements. Run conduit rather than direct-burial romex for added protection and future flexibility. If you are not comfortable with electrical rough-in, this is the right place to hire a licensed electrician. The GFCI outlet itself is simple; the panel work and conduit routing require more experience.
Finishing details: surface, drainage, and weather protection
Once the surface is in and the grill is installed, the finishing work determines how the patio holds up over the next 20 years. For a concrete slab, seal it with a penetrating concrete sealer appropriate for exterior freeze-thaw conditions. Penetrating sealers work by reducing water ingress into the concrete, which is what causes freeze-thaw spalling and scaling. Apply the sealer after the concrete has cured for at least 28 days, and reapply every 2 to 3 years in cold climates. For pavers, a sealer is optional but it enhances color and helps the polymeric sand joints resist weed intrusion.
Drainage deserves a second look after the patio is finished. Walk it after the first rain. Look for any low spots where water pools, particularly near the grill enclosure where standing water accelerates material deterioration. Small corrections can be made by adding or adjusting sand under individual pavers. On a concrete slab, you are stuck with what you poured, so getting the slope right during construction is critical. If you have a large patio area that is difficult to slope uniformly, consider adding a channel drain at the low end to collect and redirect surface water.
For the grill enclosure specifically, protect the countertop material and any exposed concrete board or mortar joints with an appropriate masonry sealer. Stainless steel components are naturally weather-resistant but benefit from a wipe-down with stainless steel protectant before winter. Cover the grill with a manufacturer-approved cover when not in use, especially during the off-season, to protect the burners and ignition components from moisture and debris.
If your patio connects to a bar setup or extends into a full outdoor kitchen, think about how drainage interacts with a sink or ice bin drain. If you are building a patio bar and grill together, plan the countertop, gas and electrical access, and drainage paths as one coordinated system bar setup. Those produce a lot of water and need to be tied into a proper drain line, not just routed onto the patio surface. That is a more advanced project with its own plumbing considerations, but worth planning for now if expansion is in your future.
Safety, code considerations, and common DIY mistakes
Most DIY grill patio problems fall into a handful of repeating categories. Knowing them in advance is more useful than any single tip.
- Skipping permits: Adding a built-in gas grill, running a new gas line, or installing electrical almost always requires permits. An unpermitted gas connection is a safety hazard and a problem when you sell the house. Pull the permits.
- Ignoring manufacturer clearances: Using generic spacing rules instead of reading the actual installation manual for your specific grill model is a fire risk and a code violation. Download the manual for your exact model before you design the enclosure.
- Using combustible materials in the enclosure: Wood-framed grill enclosures are a genuine fire hazard. Use CMU, brick, or metal stud with cement board. No exceptions near the grill itself.
- Poor base compaction: Under-compacted bases cause settling, cracked slabs, and uneven pavers within the first year or two. Compact in 4-inch lifts, rent a plate compactor, and do not skip lifts to save time.
- Wrong slope or no slope: Water pooling on or near the grill enclosure degrades materials quickly and creates slip hazards. Verify your slope at 1/8 to 1/4 inch per foot during base prep, not after the surface is down.
- DIY gas connections without the right experience: Gas leaks near an open-flame grill are extremely dangerous. If you are not experienced with gas piping and pressure testing, hire a licensed professional for the gas connection and have it inspected.
- Skipping edge restraints on pavers: Pavers without edge restraints spread outward over time, especially in areas with temperature cycling. Install restraints on every exposed edge before you fill joints.
- Applying polymeric sand incorrectly: Too much water dissolves the binder and leaves a white haze on pavers. Too little water means the joints never harden. Read the specific product data sheet and follow it exactly.
On the code side, the most important thing you can do before breaking ground is have a single conversation with your local building department. Bring your rough sketch, describe the project, and ask what permits are required and what inspections they will want to see. This 20-minute conversation can save weeks of rework. Most inspectors are genuinely helpful at the planning stage. The time they become adversarial is when they find unpermitted work after the fact.
If you are building a smaller standalone slab just for a freestanding grill rather than a full built-in setup, the project simplifies considerably. You still need proper base prep and slope, but you skip the enclosure framing, gas rough-in complexity, and most of the clearance math. That kind of compact grill pad is a great first build that teaches you the base prep fundamentals before tackling a more complex BBQ patio or outdoor kitchen project. If you want the full experience, a complete BBQ patio project builds on the same base prep fundamentals and adds the grill enclosure, utilities, and drainage details. Start there if the full project feels overwhelming, and build up from a solid foundation, literally.
FAQ
Can I build a grill patio without pouring concrete or setting pavers?
Yes, you can use a compacted crushed-gravel “pad” for a freestanding grill, but it is usually not a good long-term solution for built-in grills. For any enclosure countertop, you still need a stable, noncombustible base and proper drainage, and many areas treat an engineered gravel pad as a surface that still may need inspection if utilities or permanent structures are involved.
What if my yard cannot be regraded to achieve the slope you recommend?
You have options besides changing the whole yard. Consider lowering the patio area and building up the base on high points, or add a discrete channel drain or collection area at the low end. The key is to avoid water standing near the grill enclosure, since that accelerates countertop and mortar joint deterioration.
How do I handle the grill pad if I want to move the grill later?
Plan separation between the base and utilities. For a movable grill, use a standalone pad with no built-in enclosure and place gas or electrical connection points so they can be capped if you relocate. For a built-in grill, relocating usually means rebuilding the enclosure and gas/electrical terminations, so make sure the layout is final before rough-in.
Is a covered pergola acceptable if it is only partially covered?
It can be, but you still must maintain the clearance rules from the cooking surface to combustible overhead. Partial coverage often creates hot spots and smoke accumulation under the structure, so confirm your grill’s manual for vertical and side clearances, then verify the pergola structure uses noncombustible materials within any required clearance zones.
Do I need a separate shutoff valve even if the gas line already has one elsewhere?
For built-in grill setups, plan for an accessible dedicated shutoff near the appliance. Even if there is a main or branch shutoff elsewhere, having a local valve within a few feet of the grill is typically required for safe service and is aligned with manufacturer installation expectations. Also confirm whether a pressure test is required before first use in your area.
What’s the most common electrical mistake on grill patios?
Running standard outdoor receptacles without GFCI protection or using indoor-rated boxes without a proper weatherproof cover. Another frequent miss is not using conduit for rough-in (or using direct-burial wire incorrectly) when future changes are likely, since grill patios often add lighting or a bar outlet later.
Can I tile over a concrete slab directly, or do I need a specific underlayment?
You can tile outdoor areas, but you still need a surface built for moisture and freeze-thaw movement. If you plan to tile adjacent to the grill or under a countertop area, focus on correct concrete curing before finishing, use appropriate exterior-rated mortar and grout, and consider that the countertop zone near the grill should remain noncombustible and heat-tolerant.
How thick should the base be under pavers versus under a slab if I only have a small patio?
Even for small areas, keep the same base discipline. For pavers, use a compacted crushed aggregate base (commonly around 4 inches) and compact in lifts with a plate compactor. For a concrete slab, the base typically needs more depth (often 4 to 6 inches) plus proper slope, because a thin base is what leads to settlement and cracking over time.
Should I compact the base to a percent standard, or is “it feels solid” enough?
“Feels solid” is not enough. The project’s long-term performance depends on achieving consistent compaction throughout the depth, usually verified by using proper lift thickness and equipment. Rent a plate compactor and compact in layers (not one thick lift), then re-check after any rework so you do not lock in voids.
Do I really need a vapor retarder under the slab?
For outdoor slabs, it is strongly recommended for moisture performance in climates with seasonal ground moisture changes. If you skip it, you increase the risk of dampness issues that can affect finishes and contribute to long-term wear. A 6-mil polyethylene minimum, with wider overlap and taped seams, is a common practical approach.
What should I do after the first rain to catch problems early?
Do a second inspection right away. Look for localized puddling at the grill enclosure and any low seams, then mark high or low spots so you can correct drainage before you install final sealing (for slabs) or finalize joint materials and maintenance plans (for pavers).
How often should I seal, and what happens if I seal too early?
Seal after adequate curing, typically at least 28 days for a new concrete slab. Sealing too early can trap moisture and reduce the effectiveness of the sealer. In cold climates, reapply on a schedule, often every 2 to 3 years, especially if your patio is exposed to heavy freeze-thaw cycles.
Can I put a sink or ice bin drain into the patio without connecting it to a proper line?
You generally should not. If you plan water-heavy additions like a sink or ice bin, plan the drainage path as part of the overall system and connect to an appropriate drain line, rather than relying on surface routing. Without proper tie-in, runoff can overwhelm patio drainage and increase deterioration near the grill area.
Is a standalone grill pad the best first DIY project?
Often yes. A compact pad teaches base prep, compaction, and slope control without the added complexity of enclosure framing, detailed clearance math, and utility rough-ins. Once you have a successful standalone pad, you can scale up by adding the enclosure and utilities with a more predictable process.