You can build a solid outdoor patio bar in a weekend or two using basic framing lumber or concrete block, a weather-rated countertop, and a few key dimensions: a finished bar height of 40 to 42 inches, a bar-top overhang of 12 to 18 inches on the serving side, and bar stools sized at 28 to 30 inches seat height to match. Get those numbers right, prep your base correctly for drainage and freeze-thaw movement, and the rest is straightforward carpentry or masonry work that any intermediate DIYer can handle.
How to Make a Patio Bar: Plans, Build Steps, and Finishing

Nolan Carver
2 Jun 2026

Pick your patio bar style and layout first
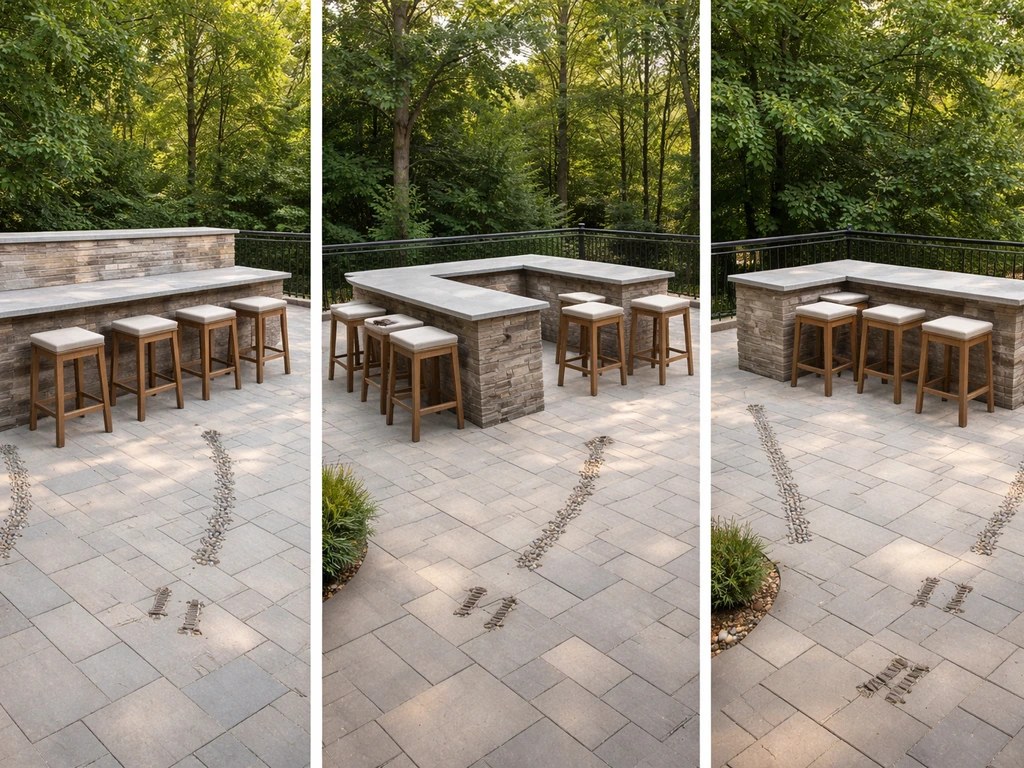
Before you sketch a single measurement, decide on the overall layout. The three most common formats for a DIY patio bar are a straight run (one working surface against a wall or fence), an L-shape (adds a return wing for prep space or extra seating), and an island (freestanding, accessible from multiple sides).
For most backyards, a straight bar attached to an exterior wall is the easiest starting point because the wall handles one side of the structure and simplifies both framing and any optional wiring or plumbing runs. An L-shape makes sense if you want to connect a bar to a grill station or an outdoor kitchen setup. A freestanding island requires more material and more careful anchoring but gives you the most flexibility in placement.
Think about traffic flow before you lock in a footprint. The bar itself takes up space, but the space around it matters just as much. People standing at a bar need about 18 inches of clearance behind their stools before you hit any traffic lane, so factor that into how close you position the bar to a wall, fence, or adjacent structure.
If you are building something that doubles as an outdoor kitchen or grill zone, keep in mind that those builds have their own layout logic that overlaps with a bar project. The patio bar and grill concept is a natural extension once your bar frame is done. If you are specifically planning how to build a small patio for grill use, measure the grill footprint and clearance before you finalize the bar location bar and grill concept.
If you are also adding a grill, treat the bar and cooking station as one layout so the services and clearances line up patio bar. If you are also planning the grill area, use this guide as a starting point for how to build a BBQ patio around the bar and cooking zone.
- Straight bar: simplest to build, ideal when one side backs against a wall or fence
- L-shape: connects bar seating to a prep or grill station, good for larger patios
- Island/freestanding: most flexible placement, needs solid anchoring on all sides
- Wall-mounted ledge bar: minimal footprint, just a countertop bracket system, no real storage underneath
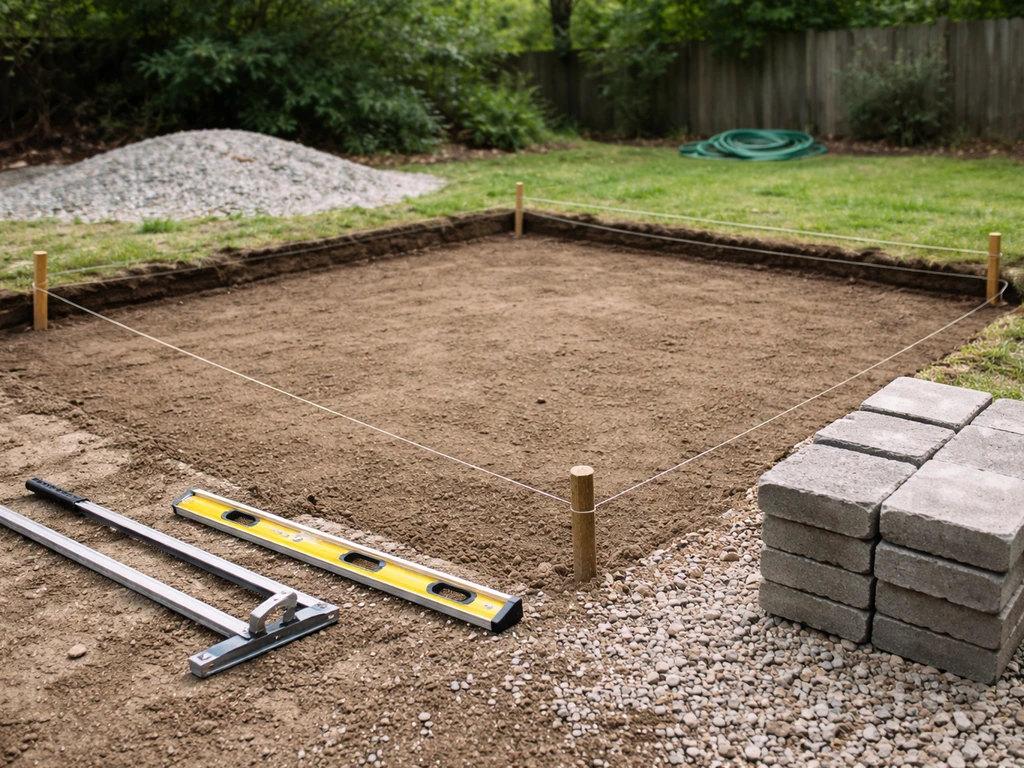
Measure, site-plan, and deal with outdoor conditions
Once you know your layout style, go outside with a tape measure and stakes. Mark the full footprint including the bar overhang and the seating zone behind it. A good rule of thumb: the bar structure itself is typically 24 to 28 inches deep (front to back), the overhang adds another 12 to 18 inches on the serving side, and the seating zone behind that needs at least 36 inches of clear space minimum (48 inches is more comfortable). Add those up before you assume the bar will fit where you want it.
Slope and drainage are the two things that kill outdoor structures faster than anything else. Water has to move away from the bar base and away from your house foundation. The standard recommendation is a 1/8-inch-per-foot slope away from any structure. If your patio already has good drainage pitch, you are fine. If your planned bar location sits in a low spot or against a wall that collects runoff, address that before you build. A bar base sitting in standing water will rot, heave, or crack within a few seasons regardless of what material you use.
For the base itself, you have two main choices: pour a dedicated concrete slab, or build on an existing paver or slab surface. If you are starting from bare ground, excavate down at least 4 to 6 inches (deeper in cold climates, more on that below), compact the native soil, lay a geotextile filter fabric to keep soil from migrating up into your base material, then add a 3 to 4 inch layer of 3/4-inch minus compacted gravel in lifts, topped with a 1-inch bedding layer of concrete sand before your surface material. In cold climates where freeze-thaw cycles are a reality, going 6 to 8 inches deep on the gravel base (or using a frost-depth footing for any posts) is not overkill. Frozen water expands and will push your structure out of level if the base is not properly drained.
Get the dimensions right for comfort
This is where a lot of DIY patio bars go wrong. People build the frame to a comfortable working height and then realize the stools do not fit or there is no knee clearance. For blank" rel="noopener noreferrer">knee clearance under the bar overhang, a cited guideline specifies leaving at least 24 inches from the finished floor and adjusting cabinet or face heights accordingly. Here are the numbers that matter: Hardwoods Incorporated also recommends keeping the bar-top overhang to a minimum of about 8.5 inches and up to about 10 inches to help prevent knees from hitting the bar front blank" rel="noopener noreferrer">knee clearance.
| Dimension | Standard Measurement | Notes |
|---|---|---|
| Bar top height (finished) | 40 to 42 inches | Most comfortable for standing service and bar-stool seating |
| Bar stool seat height | 28 to 30 inches | Pairs with a 40 to 42-inch bar top for a comfortable 12-inch lap gap |
| Bar top overhang (serving side) | 12 to 18 inches | Minimum 8.5 to 10 inches just for knee clearance; 12 to 18 inches for comfortable seating |
| Knee clearance (height below overhang) | 24 inches minimum from floor | Affects how you design any cabinet face or lower shelf under the bar |
| Seating zone depth (behind bar) | 36 inches minimum, 48 inches preferred | Plus 18 inches extra if the zone is also a traffic lane |
| Per-seat bar width | 24 inches minimum per stool | 26 to 28 inches feels more comfortable for adult seating |
| Counter/work surface height (non-bar side) | 34 to 36 inches | Standard prep and mixing height on the bartender's side |
The 40 to 42-inch finished height is the key number. It is higher than a standard kitchen counter (36 inches) but that extra height is exactly what makes bar stools work. If you drop to 36 inches, you are building a counter-height surface, which pairs with 24-inch stools and a completely different feel. Decide which you want before you cut a single piece of lumber because the entire frame height changes.
Materials and tools you will need
For a basic wood-framed patio bar, pressure-treated 2x4 or 2x6 lumber is the right choice for any framing members that are close to ground level or will face moisture exposure. For a masonry build, concrete block (CMU) is extremely durable, handles weather well, and gives you a solid substrate for any tile or stone countertop finish. Here is a practical breakdown by build type:
| Component | Wood Frame Option | Masonry/Block Option |
|---|---|---|
| Frame/base structure | Pressure-treated 2x4 or 2x6 lumber, exterior screws | Concrete block (CMU) with mortar or construction adhesive |
| Bar top substrate | 3/4-inch exterior-grade plywood or cement board | Cement board or direct tile over block |
| Bar top finish | Concrete, tile, stone, or treated hardwood/butcher block | Same: tile, stone, concrete overlay, or poured concrete |
| Sheathing/exterior finish | Pressure-treated plywood, cement board, or stone veneer | Stone veneer, stucco, tile, or painted block |
| Countertop sealer | Penetrating silane/siloxane sealer for concrete or stone | Same, or food-safe urethane gel for wood tops |
| Fasteners | Hot-dipped galvanized or stainless steel screws and hardware | Masonry anchors, galvanized hardware |
| Base/foundation | Concrete slab, paver base, or concrete footings | Same; block walls need a solid footing or slab base |
For tools, you need a circular saw or miter saw, a drill/driver, a level (at least 4 feet long for checking frame plumb and level), a tape measure, a chalk line, and safety glasses. For masonry builds, add a masonry blade, a rubber mallet, and a margin trowel. If you are pouring a concrete countertop, a mixing tub or mixer rental, float, and trowel round out the list. Nothing exotic here.
Step-by-step: frame, base, countertop, and bar top
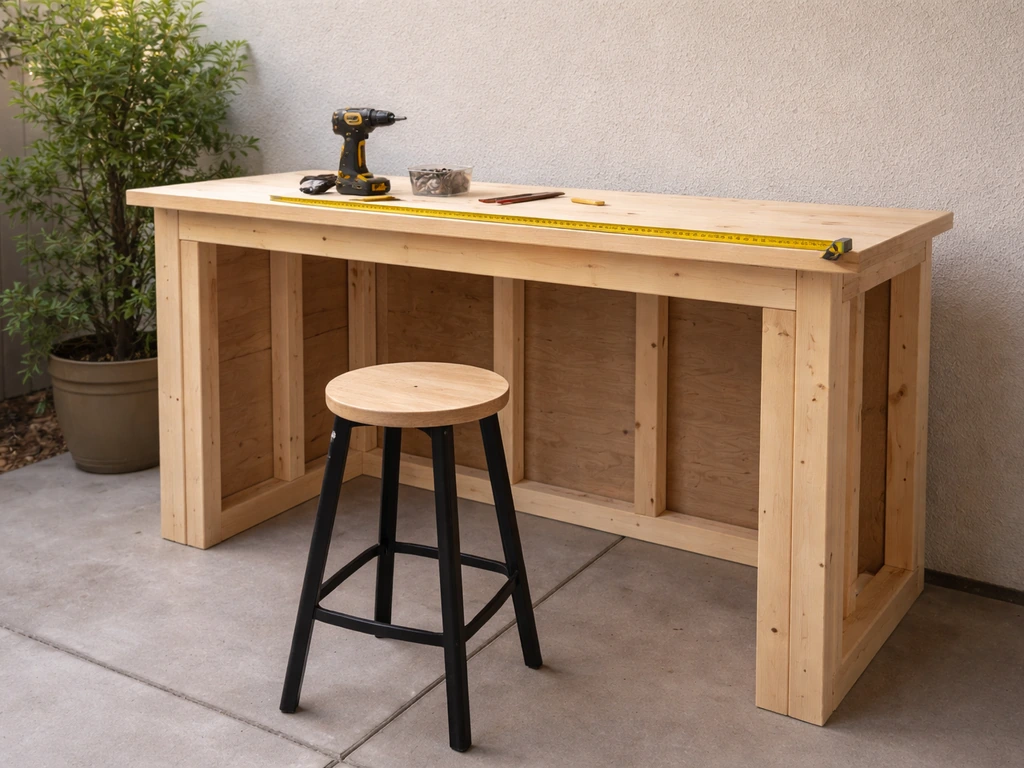
Step 1: Build the base frame or block walls
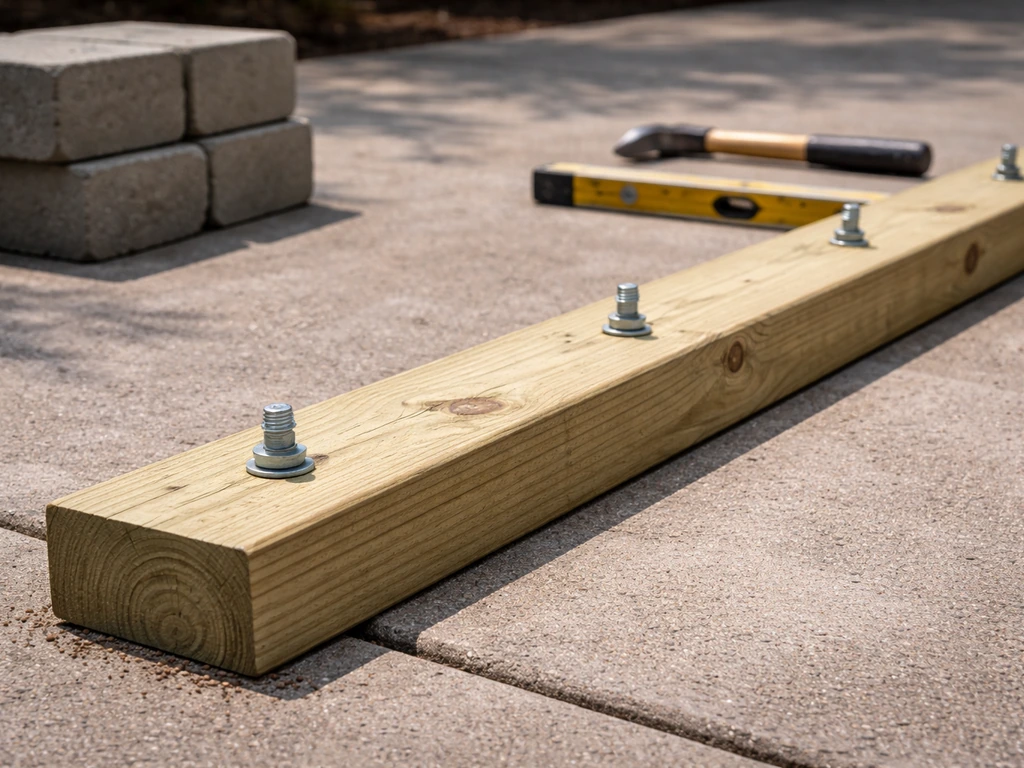
For a wood-framed bar, start with a base plate of pressure-treated 2x6 laid flat on your slab or paver surface. Anchor it to the slab with concrete anchors every 16 to 24 inches. Then frame vertical studs at 16 inches on center from base plate to top plate, targeting your finished bar height minus the thickness of your countertop substrate and top finish material. For example, if your goal is 41 inches finished height and your countertop build-up (plywood substrate plus tile) is 1.5 inches, frame your stud walls to 39.5 inches. Build a top plate across all studs, then add blocking at 24 inches from the floor on the customer-facing side to support the overhang.
For a block build, lay your first course of CMU blocks on a mortar bed over your cured slab. Use a level constantly. Stack courses with staggered joints (running bond pattern) and apply mortar between courses. Fill select cores with rebar and grout for added rigidity, especially at corners. Stop your block wall at the height needed to receive your countertop substrate.
Step 2: Sheathe and waterproof the frame exterior
Once the frame is up, cover the exterior faces with cement board (also called backer board) screwed to the studs with 1.5-inch cement board screws every 8 inches. Cement board is impervious to rot and gives you a substrate that can receive tile, stone veneer, or stucco. If you want a wood look, use pressure-treated or cedar shiplap over a layer of house wrap. Either way, tape all joints in the cement board with alkali-resistant mesh tape and thin-set before applying any finish material. This step is what separates a bar that lasts from one that starts peeling and rotting after the first winter.
Step 3: Install the countertop substrate
On top of your frame or block walls, lay a substrate layer. For a tiled or stone countertop, use 3/4-inch exterior plywood as the first layer, then cement board on top of that, screwed down and seams taped. For a poured concrete countertop, you can form directly on the cement board substrate. For a natural stone slab (like granite or bluestone), the cement board layer alone is sufficient if your frame is solid. Make sure the substrate extends far enough to support your full overhang length without any unsupported span greater than 12 inches on the customer side.
Step 4: Install the bar top finish surface
Concrete, tile, natural stone, and treated hardwood are all viable outdoor bar top materials. Concrete is the most popular for DIY because you can pour it yourself, grind it smooth, and seal it. Tile is durable and comes in many styles, but grout lines need consistent sealing outdoors. Natural stone slabs look great but require careful support given the weight. Treated butcher block or hardwood can work outdoors if sealed aggressively and maintained, but it is the highest-maintenance option. Set tile or stone in exterior-rated modified thin-set and use a non-sanded grout rated for joints under 1/8 inch or sanded grout for larger joints. Allow full cure before applying sealer.
Finishes, waterproofing, and protecting against weather
Waterproofing is not optional outdoors. Even materials that seem impervious will fail over time if water gets into pores and then freezes. The right sealer depends on your countertop material, but the logic is the same across all of them: you want a penetrating sealer for concrete and stone, not just a surface film. Penetrating sealers based on silane, siloxane, or silicone chemistry work by filling the pores of the material itself, rather than sitting on top as a membrane. Membrane or acrylic sealers are shorter-lived and can actually trap moisture underneath if applied over damp material, which accelerates the exact freeze-thaw cracking you are trying to prevent.
For concrete countertops and slabs, apply a penetrating sealer after the concrete has fully cured (28 days for full cure, though most DIY builds use 7 to 14 days as a practical minimum). Reapply annually or whenever water stops beading on the surface. For wood tops like butcher block, a food-safe urethane gel or exterior-rated wood sealer is the right choice. Apply multiple thin coats, sanding lightly between each, and plan to recoat every season. For tile and grout, use a penetrating grout sealer every year. For the bar frame exterior, any cement board or masonry surface covered in tile or stone does not need additional sealing, but any exposed grout joints do.
If you are in a freeze-thaw climate (anywhere that regularly dips below 32 degrees Fahrenheit in winter), your base prep from earlier is your first and best defense. Beyond that, keep drains clear, avoid letting standing water pool on or around the bar, and consider a waterproof cover or bar cover for the winter months. Covers cost very little relative to the repair bills from a cracked countertop.
Adding a sink, outlets, or lighting (optional but very doable)
A lot of DIYers start thinking about a sink and some outlets once the bar frame is up and they realize how much more functional it would be. Here is an honest overview of what is involved and where the line is between DIY and calling a professional.
Plumbing: sink and drain
Adding a small bar sink is very achievable if you have a water supply line and drain point within reasonable distance (roughly within 20 to 30 feet without getting into complex pressure or venting situations). The supply side is usually simpler: tap into an existing outdoor hose bib or run a dedicated 1/2-inch supply line from inside. The drain side is where most DIYers hit complications.
You need a proper trap and a drain that ties into your home's drain, waste, and vent system or runs to a dry well if local codes allow it. If your bar is on a deck or elevated patio, running a drain line back to the house is often straightforward. If you are building on a ground-level slab far from the house, it gets more involved.
Check local codes, and if you are uncertain about the drain side, have a plumber look at it before you pour your countertop. It is much easier to plan for a drain before the counter is in.
Electrical: outlets and lighting
Outdoor electrical for a patio bar is governed by the National Electrical Code, and the two things that matter most for a DIYer to understand are GFCI protection and weatherproof covers. Every outdoor outlet at a patio bar must be GFCI-protected per NEC 210. 8(F), which protects against shock in damp conditions. The outlet covers need to be weatherproof enclosures rated for damp or wet locations depending on your specific installation point.
If the outlet might be exposed to direct rain or spray, you need a while-in-use cover that seals even when a plug is inserted, not just a standard flip-lid cover. For lighting, low-voltage LED landscape lighting is the easiest DIY path: it runs on a transformer that plugs into a standard outlet and does not require permits in most areas.
For 120-volt circuits (standard outlets and overhead lighting), pulling a new circuit from your panel is permitted territory in most jurisdictions, meaning you either need an electrical permit and inspection or a licensed electrician. Do not skip the permit step for 120-volt work outdoors. It is a safety issue, not a bureaucratic one.
A practical middle-ground approach: rough in conduit (rigid PVC conduit is fine) through your bar frame before you close it up with sheathing, even if you are not running wire yet. Conduit costs almost nothing, and having it in place means you can pull wire later without tearing apart a finished bar. Plan conduit runs from the bar to the nearest exterior wall, and stub a junction box location into your countertop substrate while the structure is still open.
Finishing touches and your next steps
Once the structure is built, sealed, and any optional plumbing or electrical is roughed in, the finishing details are what make a patio bar feel complete. Add bar rail molding to the front edge of the countertop overhang (this is both decorative and functional, giving guests somewhere to rest their arms). Install a towel bar or bottle opener on the bartender's side. Add a small undercounter shelf or cabinet door panels to close off the storage space under the bar. Consider a removable wood lattice or decorative panel on any open sides.
For your immediate next steps: take your final measurements today and draw a simple plan to scale on graph paper (1 square = 1 foot works fine). Confirm your bar height target (40 to 42 inches for bar-height, 36 inches for counter-height) and work backwards from that to your frame height. Order or gather your lumber or block, buy your cement board, and price your countertop material options. If you are building on bare ground, plan the base excavation and compaction first, before any lumber touches the site. A weekend of base prep makes everything else easier and more durable.
If this project eventually grows into a full outdoor cooking zone, building a patio bar is a natural first phase toward a larger outdoor kitchen or BBQ patio setup. The framing skills, material knowledge, and base-prep experience you gain here carry directly into those more complex builds. Start with the bar, get comfortable with the process, and expand from there.
FAQ
How do I size the bar opening and stool spacing so people can sit comfortably?
Use a seating clearance of at least 18 inches behind the stools for a standing traffic path, and add a bit more if your bar is near a doorway or grill zone. Also confirm the stool seat height (28 to 30 inches for a 40 to 42 inch bar) lines up with the countertop edge so guests do not feel cramped at the knee area.
What’s the safest way to adjust bar height if I already know my countertop thickness?
Set your frame to hit the finished height after you include every build-up layer (plywood substrate, cement board, tile or stone). A common approach is to target the bar’s 40 to 42 inch finished height, then subtract the countertop assembly thickness to find the top of framing or block cutoff.
Can I build a patio bar directly on existing pavers or a patio slab?
Yes, but only if the surface is solid, level, and not in a low spot that holds runoff. If the area drains poorly, you should regrade or create a new drainage path before anchoring the base plate, because sealing and waterproofing will not prevent freeze-thaw movement on a saturated foundation.
Do I need a permit for electrical outlets or lighting I add to the bar?
If you are adding any 120-volt circuit (new receptacle circuit, overhead lighting, or tying into the panel), permits and inspection are common. Low-voltage LED lighting often avoids that step, but you should still match outdoor-rated components and verify GFCI requirements for each outlet location.
What wiring should I plan for even if I am not ready to install it yet?
Rough in conduit from the bar to the nearest exterior wall before you close it up, then stub a junction location into the countertop substrate. That lets you add outlets, a sink pump, or under-counter lighting later without tearing off tile or stone.
How far from the house should the bar be to avoid moisture problems?
Keep water away from the bar base and the foundation by making sure your drainage slope directs runoff away from both the bar and the house. If the bar sits close to a wall that collects runoff, rework drainage or elevation first, because standing water against any structure accelerates rot and cracking.
What do I do if my patio is in a freeze-thaw area and I cannot dig very deep?
Prioritize drainage and separation first, using a properly compacted gravel base with geotextile to prevent soil migration, and consider frost-depth solutions for any post-style elements. If you cannot reach recommended depths, expect higher risk and consider consulting a local builder for a base design that matches your frost depth and soil conditions.
How do I support a long overhang so it does not crack tile or stone?
Keep unsupported spans conservative. The article notes no more than about 12 inches unsupported on the customer side, so plan blocking and substrate so the overhang has structural support underneath, especially at the ends and along the length where tile or stone curvature can concentrate stress.
Can I use an indoor countertop product outdoors?
Usually not as-is. Only use materials and installation systems that are explicitly rated for outdoor exposure, including exterior modified thin-set, appropriate grout, and outdoor-rated sealers. Indoor adhesives, non-rated grout, or sealers that do not penetrate can fail when temperatures swing and moisture cycles freeze and thaw.
How often should I reseal a concrete or stone countertop?
A practical rule is to reseal annually and recheck the surface whenever water stops beading. If water begins absorbing instead of beading, it is a sign the pores are no longer protected and moisture can eventually drive freeze-thaw damage.
What are the most common sink-related DIY mistakes on a patio bar?
The biggest issues are planning the drain tie-in too late and underestimating complexity when you are far from your house plumbing. Confirm there is a viable drain path that matches code requirements, and if venting, slope, or pressure is unclear, have a plumber review before you pour the countertop to avoid demolition.
Is it okay to wait to waterproof everything until after the bar is finished?
No, waterproofing planning should start with the base and continue through the finish system. Ensure the frame and underlayment have the right weather protection strategy (cement board seams and tapes, correct thin-set) before you set tile or stone, and seal after full cure so the countertop does not trap moisture.