You can build a small patio yourself in a weekend or two. The basic process is: measure and plan your space, excavate about 7 to 9 inches deep, lay a compacted gravel base, screed a 1-inch sand bed, set your pavers or stones, lock in the edges, and sweep polymeric sand into the joints. Done right, it will stay flat, drain properly, and last decades without a contractor. After that, you can apply the same basics to help you plan what to do with a small patio once it is finished.
How to Build a Small Patio: DIY Step-by-Step Guide

Nolan Carver
16 May 2026

Define your scope and measure the area first
Before you buy a single paver, walk outside with a tape measure. Common small patio sizes are 6x6 feet, 8x8 feet, and 10x10 feet. A 10x10 (100 square feet) is a genuinely useful size for a bistro table and two chairs with a little room to move. Anything under 8x8 starts feeling cramped once furniture is in place. If you are in metric territory, think of roughly 8 to 10 square meters as a workable starting point for social use.
The single biggest planning mistake people make is measuring the outdoor space without thinking about furniture dimensions. Pull out the actual chairs and table you plan to use, or note their footprint from the product page, and add at least 2 to 3 feet of clearance on each side for pulling chairs back and walking around. That circulation room is what makes a small patio feel comfortable instead of cramped. Once you have a target size, mark the perimeter with spray paint or stakes and string so you can visualize it on the ground before you commit.
Also look at your constraints now: property lines, existing fences, tree roots, utility lines, and how close you are to the house. Most building codes do not require a permit for a simple ground-level paver patio, but it is worth a quick check with your municipality before you start digging. Call 811 (in the US) to have underground utilities marked before any excavation.
Plan layout, materials, and budget
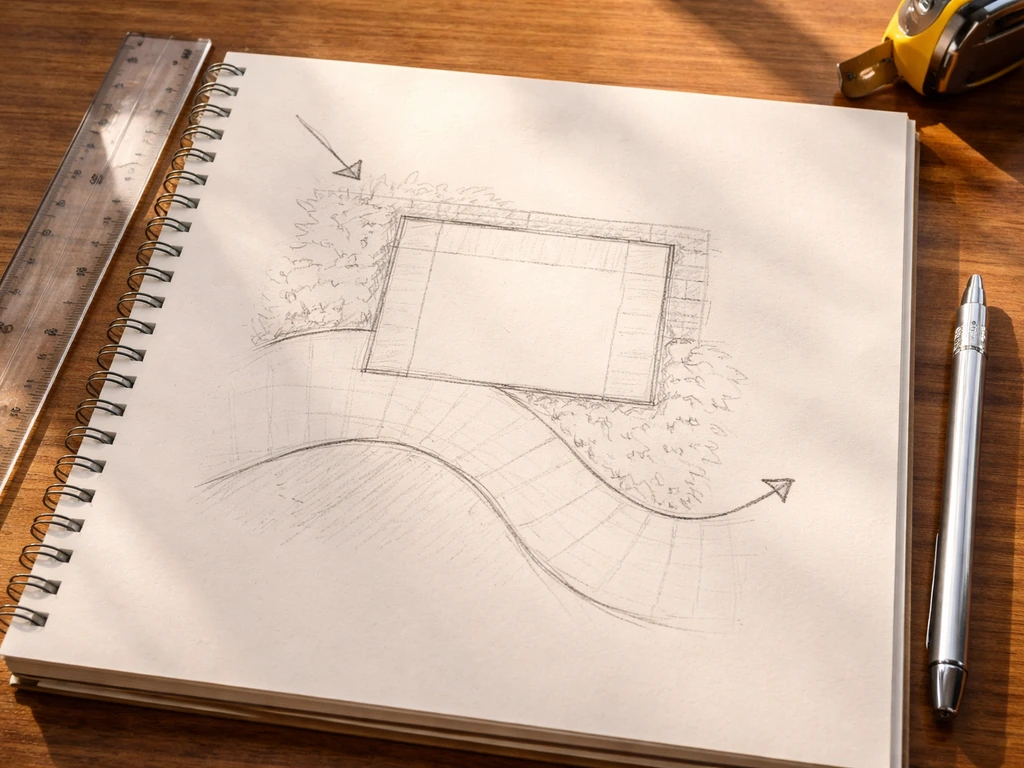
Once you have your measurements, sketch the layout on paper with the dimensions to scale. Note where the sun hits, where you want shade, and where traffic naturally flows in and out of the space. A small backyard patio usually works best positioned close to a door for easy access, set slightly away from the house foundation to allow drainage.
Which surface material is right for you?
For a small DIY patio, you have three main surface options: concrete pavers, natural flagstone, and poured concrete slabs. Each has real trade-offs in cost, difficulty, and long-term maintenance.
| Material | Typical Cost (materials only) | DIY Difficulty | Durability | Repair-ability |
|---|---|---|---|---|
| Concrete pavers | $2–$6 per sq ft | Beginner-friendly | Excellent | Easy (swap individual pavers) |
| Natural flagstone (dry-set) | $3–$8 per sq ft | Moderate | Very good | Moderate (re-set individual stones) |
| Flagstone (mortar-set on concrete) | $5–$12 per sq ft | Advanced | Excellent | Harder (requires grinding/chipping) |
| Poured concrete slab | $3–$7 per sq ft | Advanced | Good | Difficult (cracks require patching) |
For most beginners tackling a small patio, concrete pavers are the best choice. They are forgiving, easy to cut with a rented wet saw or angle grinder, and you can lift and re-set individual pieces later if one sinks or shifts. Flagstone has a beautiful natural look and works well dry-set on a sand and gravel base (similar process to pavers), or mortar-set on a concrete slab for a more permanent result. For mortar-set flagstone, MasonryCalcs recommends a mortar bed thickness of about 1/2" to 3/4" and notes grouting after the stone has set (about 24 hours) mortar-set on a concrete slab. A poured concrete slab is durable but less forgiving for a first-timer, and cracks are harder to fix cleanly.
Estimate your material quantities
For a 10x10 patio (100 square feet), here is roughly what you need for a standard paver installation:
- Pavers: 100 sq ft plus 10% overage for cuts, so about 110 sq ft worth
- Crushed gravel (3/4" clean or processed): about 1.5 cubic yards for a 4-inch base (add more if going 6 inches deep)
- Coarse bedding sand: about 0.3 cubic yards for a 1-inch layer
- Polymeric jointing sand: 1 to 2 bags (50-lb bags) depending on joint width
- Plastic paver edge restraints: enough linear footage to go around the perimeter plus spikes
- Landscape fabric (optional): same square footage as the patio area
Budget-wise, a basic 10x10 concrete paver patio using mid-range materials typically runs $400 to $800 in materials if you DIY. Renting a plate compactor for a day adds $60 to $100. You can cut costs by choosing standard 12x12 or 16x16 concrete pavers over premium tumbled stone, and by hauling your own gravel instead of paying for delivery.
Site prep: clear, level, and manage drainage
This is where the project is won or lost. If you want the fastest path to results, review this how to make a small patio overview alongside the site-prep steps so you do not miss critical layers and drainage details site prep. Spend real time on site prep and your patio will stay flat and drain properly for years. Rush it and you will be re-doing pavers in two seasons.
Clear the area
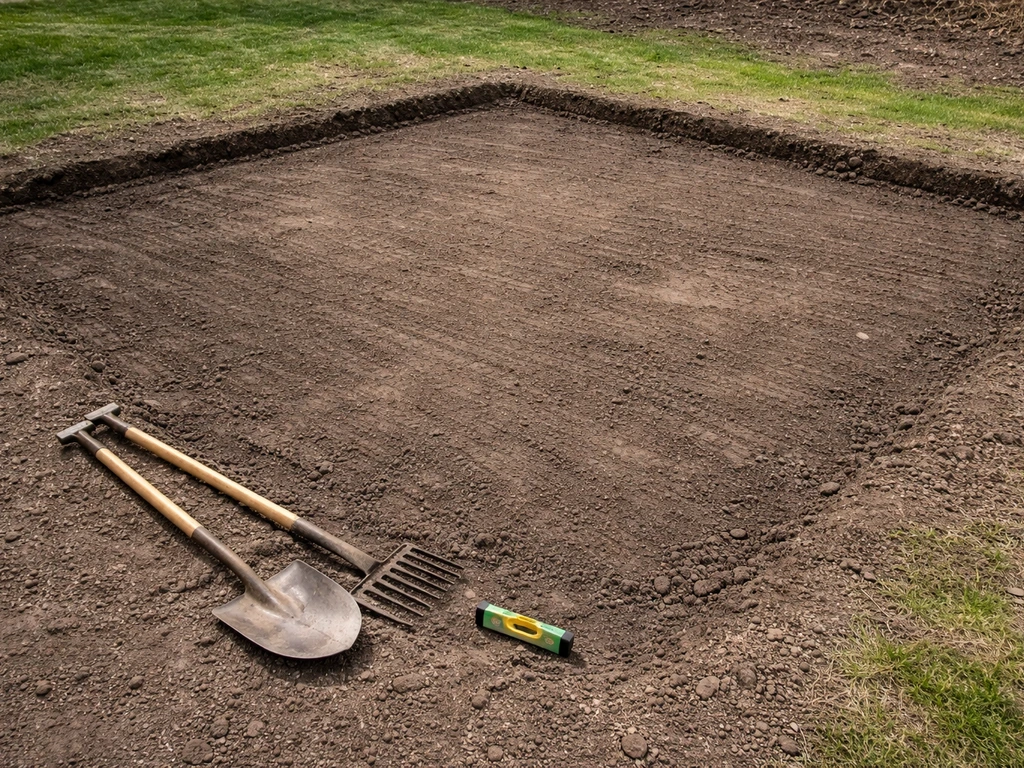
Remove all sod, plants, and organic material from the patio footprint. Grass and organic matter decompose over time and cause settling, so you need to get it all out. Extend your clearing about 6 inches beyond the planned patio edge on all sides so you have room to set edge restraints properly.
Excavate to the right depth
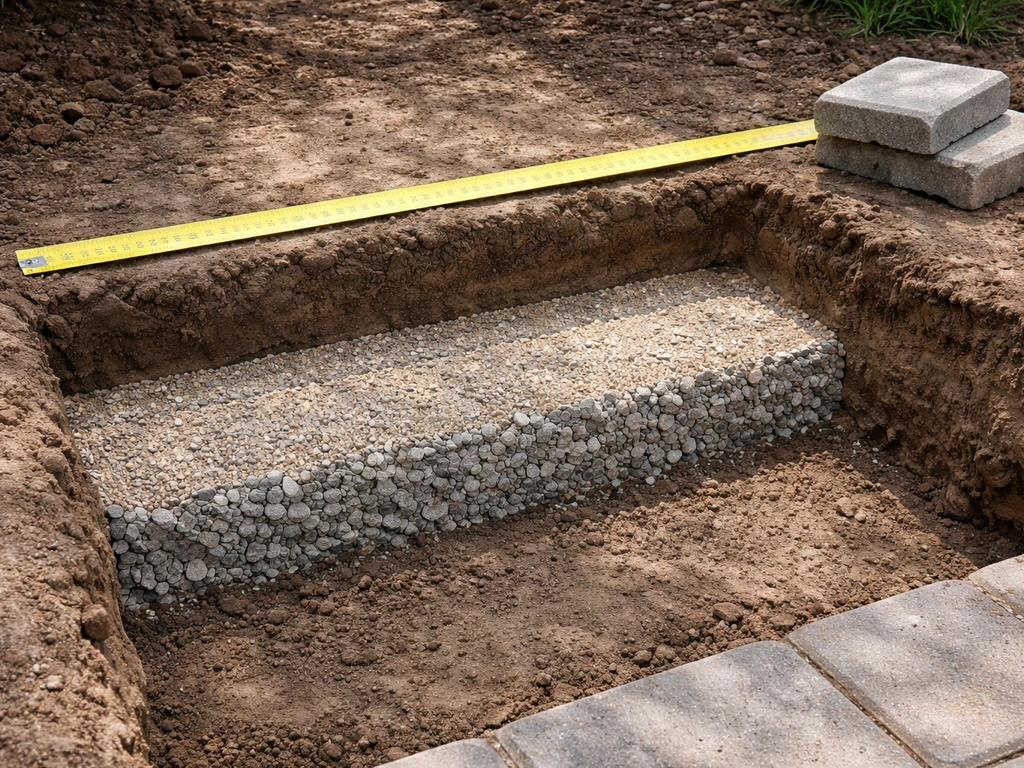
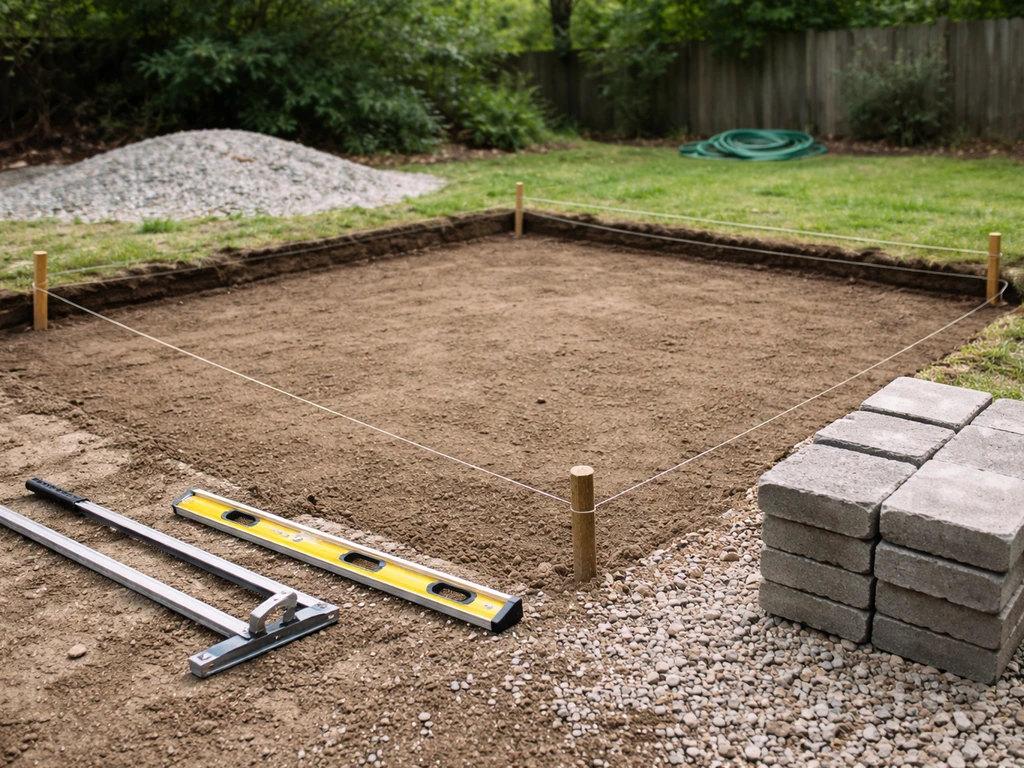
For a pedestrian-use patio, you need to dig down enough to fit your full material stack. A standard setup for a residential paver patio looks like this: 4 to 6 inches of compacted gravel base, plus 1 inch of bedding sand, plus the paver thickness (usually about 2 3/8 inches for a standard concrete paver). That adds up to roughly 7.5 to 9.5 inches of total depth below your finished surface grade. Mark that depth on a stake at each corner and use a string line to keep your excavation consistent.
Plan for drainage slope away from the house
Never build a flat patio. Water needs somewhere to go, and that somewhere is away from your house. The standard recommendation is a slope of at least 1/4 inch per foot away from the building, which is roughly a 2% grade. For a 10-foot-deep patio, that means the far edge of your patio should be about 2.5 inches lower than the edge closest to the house. Set this slope in your string lines before you lay a single piece of gravel. Every layer you add afterward, including the gravel base and the sand bed, should follow the same slope. If water pools next to the foundation, you will eventually deal with water in your basement or under your slab.
If your yard slopes toward the house naturally, you may need to regrade slightly or add a simple channel drain at the far edge of the patio. This is worth addressing now rather than after everything is installed.
Build the base and foundation for a stable patio
A solid base is the single most important part of any paver patio. The surface is just the finish layer. The gravel base is what keeps everything stable.
Compact the subgrade first
Once you have excavated, compact the exposed soil with your plate compactor before adding any gravel. If the soil is loose or disturbed from digging, it will settle over time and take your patio with it. Make two or three overlapping passes with the compactor. If the soil is very soft or wet, give it a day to dry out before compacting.
At this stage, you can optionally lay landscape fabric over the compacted subgrade to suppress weed growth. This is a matter of preference, and opinions vary, but it can help in areas with aggressive weeds pushing up through joints over time.
Add and compact the gravel base in layers
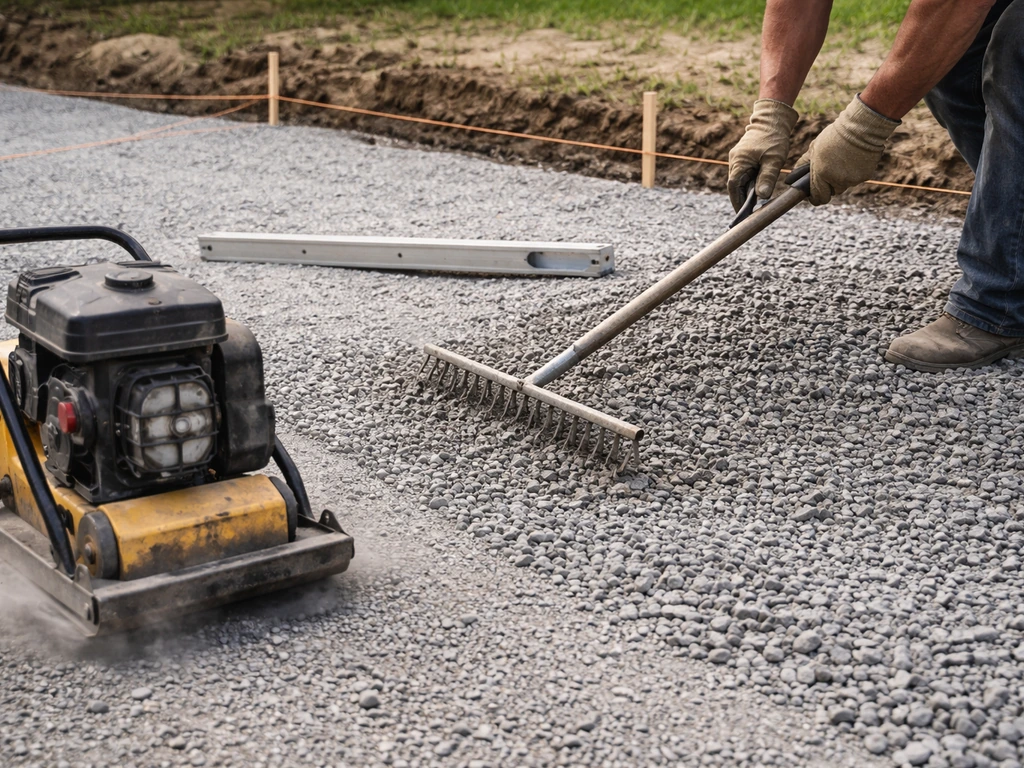
Pour in your crushed gravel and rake it roughly level, maintaining that 1/4-inch-per-foot drainage slope you set with your string lines. For pedestrian use, you want a final compacted depth of 4 to 6 inches of gravel. Do not try to dump it all in at once. Add it in 2 to 3 inch lifts, compact each layer thoroughly, then add the next. This step-by-step compaction is what gives you a rock-solid foundation. Use a 3/4-inch clean crushed stone or a compactable gravel (sometimes called Class II base or road base depending on your region). These compact tightly. Pea gravel and rounded stone do not compact well and should not be used for a structural base.
After your final compaction pass, check the surface with a long level or straightedge to make sure it is consistent and holding your target slope. Fix any low or high spots now, because they are very hard to correct once the sand and pavers are in place.
Add the bedding sand layer
Bedding sand (coarse concrete sand, not play sand or mason sand) goes on top of the compacted gravel base. You need exactly 1 inch of sand, not more. Too much sand makes the surface unstable and pavers will rock. Spread the sand and screed it flat using two pieces of 1-inch-diameter metal conduit or pipe laid parallel on the gravel, about 5 to 6 feet apart. Drag a straight 2x4 across the pipes to get a perfectly smooth, consistent 1-inch layer. Remove the pipes and fill in the grooves they leave with a little sand, tamped gently by hand. The sand should be moist but not wet when you screed it.
Install patio pavers or stones step by step
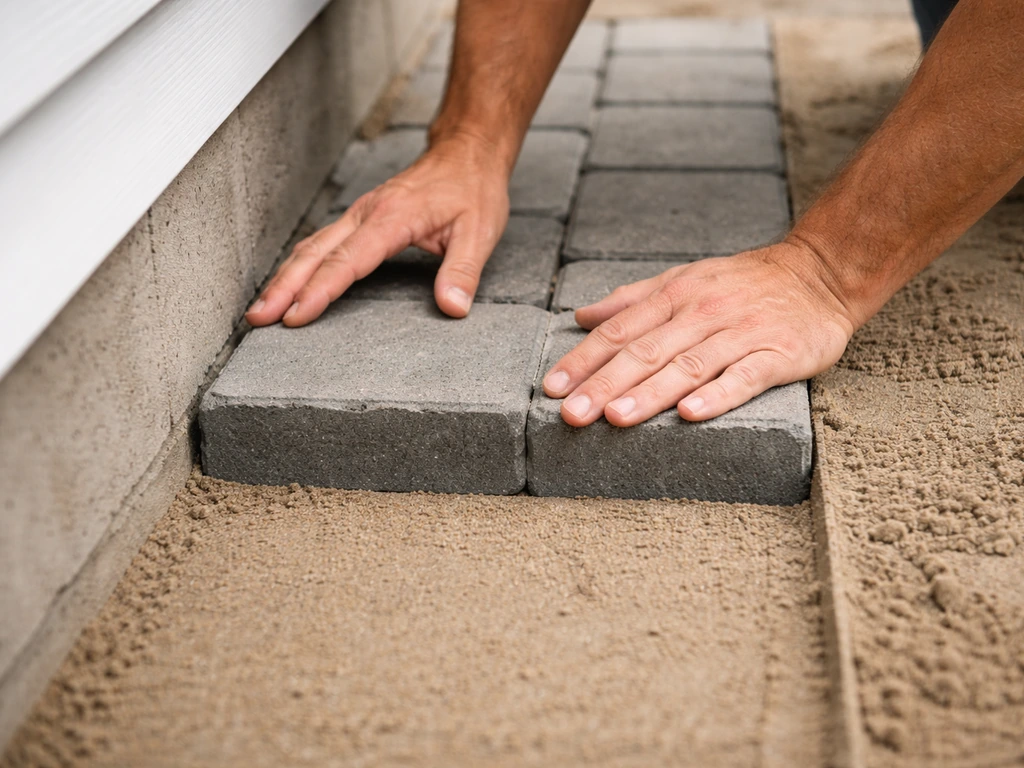
Start laying pavers from a fixed, straight edge, which is usually the house wall or a chalk line you snap across the area. Do not start in the middle of the space and work out. Having a consistent reference edge is what keeps your pattern straight.
- Snap a chalk line or use your house wall as your first reference edge. Make sure it is truly straight and square to your patio shape.
- Set the first paver down gently onto the sand. Do not slide it. Place it, press it lightly, and move on. Sliding pavers displaces the sand underneath and creates uneven spots.
- Work row by row, keeping consistent joint spacing (usually 1/8 to 3/16 inch for concrete pavers). Many pavers have small built-in spacer lugs that handle this automatically.
- Check your work every few rows with a level and a string line. Small errors accumulate quickly, so catch them early. If a paver is slightly high or low, lift it, add or remove a pinch of sand beneath it, and reset.
- Cut pavers to fit the edges using a rented wet saw or angle grinder with a diamond blade. Measure twice, cut once. For simple straight cuts, a rented splitter works faster and cheaper than a wet saw.
- As you progress across the patio, kneel on a piece of plywood or a board placed on already-set pavers to spread your weight and avoid disturbing the surface you have laid.
- For flagstone (dry-set method): the process is similar, but because flagstone is irregular in thickness, you will adjust the sand bed depth under each stone individually rather than screeding a uniform layer. Each stone should sit stable without rocking before you move on.
Edges, leveling, and compaction for a clean finish
Edge restraints are not optional. Without them, the outer pavers will slowly migrate outward over time, joints will open up, and the whole surface will start to look messy and shift. Install plastic paver edging (the kind designed for concrete paver installations) hard against the outside edge of your patio perimeter. Spike it through the flange into the compacted gravel base using 10-inch steel spikes every 12 inches. The restraint goes on top of the compacted base and butts tight against the pavers and bedding sand. Do not install it after adding sand and before pavers or it will not hold correctly.
Once all pavers are in place and edge restraints are installed, run the plate compactor over the entire patio surface. This vibrates the pavers down into the bedding sand and locks them in. Make at least two passes in perpendicular directions. If any pavers crack under the compactor (usually a sign of a void in the sand underneath), pull them, fill the void, reset the paver, and compact again. After compaction, do a final check with your level across the whole surface. Any pavers that are still noticeably high or low should be lifted, the sand adjusted, and the paver reset.
Now sweep polymeric sand into all the joints. Pour it over the surface and use a push broom to work it into every joint until they are full. Blow or brush excess sand off the paver faces (any sand left on the surface can cause a white haze called polyhaze when it gets wet). Compact the patio one more time with the plate compactor to vibrate the polymeric sand down into the full depth of the joints. Then mist the surface lightly with water. Mist, let it absorb, and mist again. The polymeric sand contains a binder that activates with moisture and hardens the joints to resist weeds and ant intrusion. Follow the product instructions for misting timing, as different brands vary.
Curing, maintenance, and fixing common problems
Let it cure and do a first inspection
Polymeric sand typically takes 24 to 48 hours to fully cure. Keep foot traffic off the patio during that window and do not let it get rained on in the first few hours after you mist it. Once cured, walk the whole surface slowly and check every paver. Press on the corners and look for any that rock or feel soft underneath. Mark them. Those need to be lifted, the sand re-screeded underneath, and the paver reset while it is easy to fix.
Ongoing maintenance (it is easier than you think)
- Inspect joints once a year (spring is ideal) and top off any that have eroded with fresh polymeric sand. This is the single best thing you can do to prevent pavers from shifting over time.
- Clean the surface with a garden hose or low-pressure washer. If you use a pressure washer, keep the pressure moderate and hold the wand at an angle to avoid blasting the jointing sand out or exposing the aggregate on the paver face.
- Address any standing water spots immediately. Pooling water accelerates joint erosion, promotes moss growth, and can contribute to salt deposits called efflorescence (white staining) on the paver surface. The fix is usually re-grading a low spot and adding fresh jointing sand.
- Seal the patio every 3 to 5 years if you want enhanced color and an extra layer of stain protection. This is optional but helps in high-traffic or staining-prone areas.
Troubleshooting common small patio problems
Sunken or rocking pavers are the most common complaint. The fix is almost always the same: lift the affected pavers, check whether the bedding sand has eroded or the base has settled, replenish and re-screed the sand (or add a thin layer of compacted gravel if the base itself has dropped), reset the pavers, compact, and re-joint. If you already have an existing small patio that is uneven or cracked, the same planning, drainage, base, and leveling ideas can guide how to fix up a small patio without starting over. Do not just force a sinking paver back down without investigating what is underneath it.
White haze or polyhaze on the paver surface after polymeric sand installation usually means excess sand was left on the faces when you misted, or the product got rained on before it cured. Prevention is the best fix: blow all excess sand off before you mist. If you already have haze, some products can be removed with a diluted muriatic acid wash (follow manufacturer safety instructions carefully) or a dedicated efflorescence cleaner.
Pavers migrating outward over time almost always means the edge restraints were not installed correctly or the spikes are working loose. Pull the edging away from the patio edge, reset the border pavers, reinstall the restraint tight against them, re-spike into solid base material, and compact again.
Uneven ground going into the project is something many small backyard patios deal with. If your site slopes significantly or has a serious grade change, correct as much as you can during excavation. For extreme slopes, you might need a small retaining wall or a step between grade levels before the patio surface begins. That is a bigger project, but building it into your plan from the start is far easier than dealing with it after the patio is in.
Your next steps starting today
Here is the practical sequence for this week: go outside and measure your space today, mark the perimeter with stakes and string, and take a photo so you can sketch it. Then decide on your surface material, calculate your quantities using the dimensions above, and price materials at your local supplier and a big-box store to compare. Call 811 before you schedule any digging. Rent the plate compactor for the day you plan to lay your base, not your paving day, because that is where you will need it most. Once the base is done and the surface is in, the finishing work on a small patio is genuinely satisfying and fast. Once you have the build dialed in, you can start thinking about how to landscape around it, how to style the space with furniture and lighting, and what small additions can make the area feel like a real outdoor room. If you want, follow a simple plan for how to landscape a small patio with plants, mulch, and edge details that match your layout landscape around it.
FAQ
What should I use as my height reference when I’m building a slope?
For a paver patio, use the prepared finished-surface height as your reference and only adjust the slope using that same reference. For example, if you set a 10-foot run with a 2 percent grade, every layer (gravel base, sand bed, and paver thickness) must “stack” to that math, not just the gravel. A quick check is to measure from a fixed string line down to the subgrade marks you made at each corner before you start adding material.
Do I need landscape fabric under pavers to prevent weeds?
Not always, but do not skip it without planning. Landscape fabric can reduce weed pressure, but it can also trap fines and change how water and sand move under load. If your soil is already well draining and you install a well-compacted base with the correct slope, fabric is optional. In high-weed areas, use it as a preference layer over compacted subgrade, keep it flat (no wrinkles), and avoid blocking drainage paths at the patio edges.
How do I know I filled the joints correctly before misting polymeric sand?
It depends on the type of polymeric sand you bought. Many products require a specific sand particle size and a defined joint depth, and some do not tolerate heavy washing or repeated misting. Follow the bag instructions, but as a practical rule, joint filling should be done before the first mist, and you should compact only after the joints are full. If your joints are shallow, top up the joints with the correct polymeric sand before activating with water.
What if I get polyhaze after installing polymeric sand?
If you see haze soon after misting, assume excess sand on the paver faces is the cause and reduce it next time by blowing off faces before misting. If it has already cured, some brands can be treated with a product designed for efflorescence, but not all polymeric systems respond the same way. Avoid strong cleaning before reading the manufacturer guidance, because harsh acids or pressure washing can damage the joint binder.
Can I build a small patio that connects to a walkway or driveway?
Yes, but you have to plan the edges differently. If one side meets a walkway, driveway apron, or a step-down area, use restraints and a consistent transition detail so pavers do not end up “floating” at the border. For step transitions, consider a small landing built as part of the same base and slope, rather than butting pavers to an unsupported edge.
Which patio surface is best if I want the easiest DIY repairs later?
Choose based on how you will use the patio, not just cost. Poured slab is durable but harder to repair if it cracks or settles, and cutting a slab later is a bigger job. Pavers are the most forgiving for DIY, because you can lift and re-set individual units if something shifts. Flagstone can be excellent if the base is correct and you like the look, but uneven pieces require more careful setting to avoid rocking.
Do I need expansion gaps or special detailing near the house?
A “small patio” can still need expansion and movement consideration. If you are placing pavers adjacent to a rigid structure (like a foundation wall), keep an appropriate gap and use edge restraint so the patio can move slightly without pushing into the building. If you extend the patio with future sections, plan the joints and restraint layout so the new area does not force the existing pavers to migrate.
What should I do if pavers crack when I compact them?
If your compactor creates hairline cracks, the most common cause is a void in the sand bedding or an area where the base was not compacted evenly. Do not just swap the cracked paver and continue. Lift the affected pieces, check for voids or soft spots, add or re-screed the bedding sand to restore support, then re-compact before continuing. This prevents the same failure from spreading to nearby pavers.
What’s the safest way to pause the project during rainy weather?
Yes, but you should plan the workflow so the base and slope are finalized before bringing in the rest. If you pause, keep the site clean, prevent water from pooling during rain, and protect the excavated subgrade from getting churned up. Covering the sand or stopping mid-layer can lead to uneven settling later, so try to keep each layer complete and compacted on schedule.
How long do I need to keep foot traffic off the patio after polymeric sand?
Use the time window around the poly sand curing steps. Keep people and pets off the patio during the 24 to 48 hour cure period, and avoid running sprinklers that can wet joints too soon. If it rains shortly after misting, stop and reassess once dry, because extra water can cause weaker joints or more haze. When in doubt, delay foot traffic and follow your specific product’s cure and mist timing instructions.