Setting up a patio yourself is completely doable, even if you've never done it before. The basic workflow is: plan the layout, pick your material, excavate and compact a solid base, set your surface, lock in the edges, and finish the joints. Get those steps right and you'll have a patio that drains properly, stays level for years, and doesn't turn into a weed farm. Skip any of them, especially the base prep, and you'll be pulling it all up in three years. This guide walks you through the whole process with real measurements so you can make confident decisions and get it done without hiring a contractor.
How to Set Up a Patio: Step-by-Step DIY Guide

Nolan Carver
7 Jun 2026
Planning your patio layout and purpose
Before you order a single paver, spend real time on your layout plan. This is the step most DIYers rush, and it's where most costly mistakes happen. Start by asking: what is this patio actually for? A dining area for six people needs a minimum of about 12x14 feet just for the table and chairs with enough room to pull chairs out. A simple lounge or fire pit zone might be comfortable at 10x10. A multipurpose patio covering both can push to 20x20 or larger. Get specific about how you'll actually use the space.
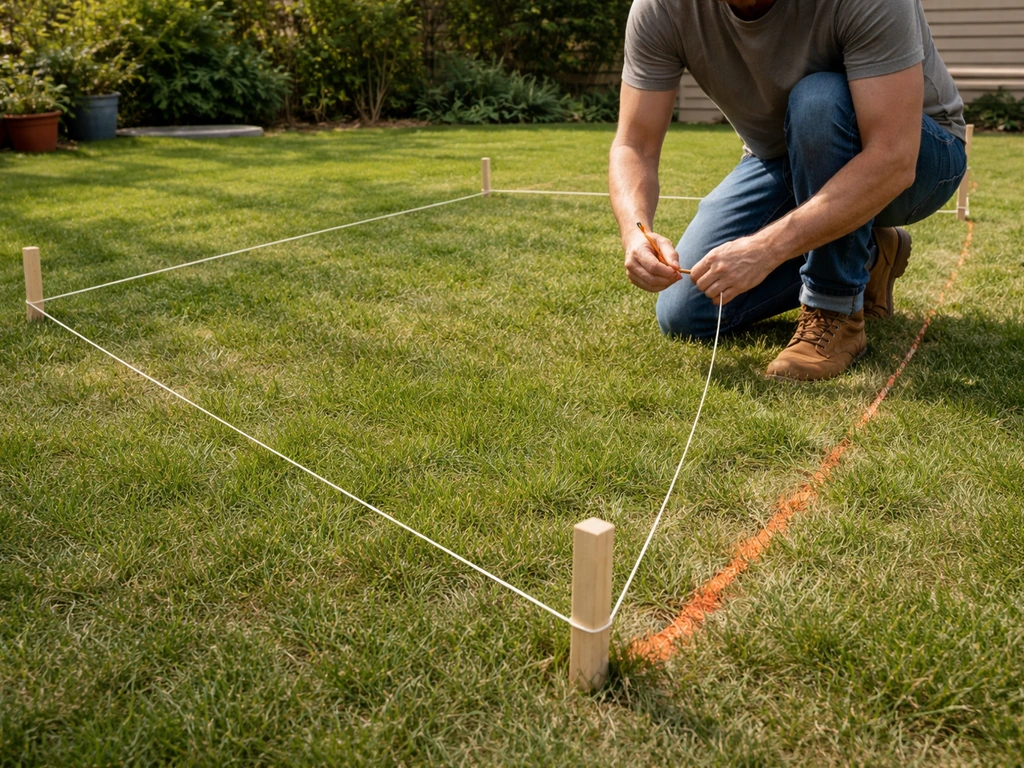
Walk the site and mark the footprint with spray paint or stakes and string. Check where doors open onto the patio, you don't want a door swinging into a table. Note any paths leading to the yard, garage, or gate so you can leave room for easy movement. Pay attention to sun and shade patterns through the day. A patio that bakes in afternoon sun with no shade becomes unusable in July, so factor in where you might want an umbrella, pergola, or shade sail.
Measure the space carefully and sketch it on paper with actual dimensions. Note the location of any downspouts, utility covers, or tree roots near the edges. Then check local permit requirements, many municipalities don't require a permit for patios below a certain size or that aren't attached to the house, but calling your building department before you dig takes five minutes and saves potential headaches.
- Mark your patio boundary with stakes and string or spray paint before doing anything else
- Allow at least 3 feet of clearance around outdoor furniture for comfortable movement
- Leave at least 18–24 inches between a fire pit and the edge of seating
- Check that door swings, paths, and gate access are all accounted for in your footprint
- Verify local permit requirements—especially if you're building a raised patio or attaching it to the house
Choosing patio materials and design options
Your material choice affects your budget, the difficulty of the build, how long it lasts, and how much maintenance you'll do down the road. Here's an honest breakdown of the most common options so you can choose based on your real situation.
| Material | Typical DIY Cost (per sq ft) | Skill Level | Durability | Best For |
|---|---|---|---|---|
| Concrete pavers | $8–$20 installed DIY | Beginner–Intermediate | Excellent (30+ years) | Most DIYers—forgiving, replaceable, widely available |
| Poured concrete | $6–$12 DIY materials | Intermediate–Advanced | Excellent if done right | Large, flat areas; requires forming, finishing, and joint planning |
| Flagstone | $15–$30+ | Intermediate | Very good | Natural, irregular look; works well with sand or mortar bed |
| Concrete tile | $10–$25 | Intermediate | Good (crack risk in freeze/thaw) | Modern aesthetic; needs very solid, flat base |
| Gravel/decomposed granite | $2–$6 | Beginner | Fair (needs refreshing) | Budget patios, informal spaces, curved layouts |
Concrete pavers are the most DIY-friendly choice for most homeowners. They're modular, so mistakes are fixable, you just pull up a section and relay it. They come in dozens of sizes and colors, handle freeze-thaw cycles better than poured concrete or tile, and have a well-documented installation system that's hard to mess up if you follow it. Poured concrete is cheaper on materials but harder to execute well, you need to get the pour, finishing, and control joints right in a short window, and a bad pour is expensive to fix. Flagstone looks beautiful but the irregular shapes require more patience during layout and cutting. Tile looks sharp but is unforgiving on an imperfect base and can crack in cold climates. Gravel is the fastest and cheapest but needs edging to stay put and regular raking.
For a first patio build, concrete pavers are almost always the right call. If you want a more natural look, irregular flagstone set in a sand bed is a close second. Both are covered in the installation steps below.
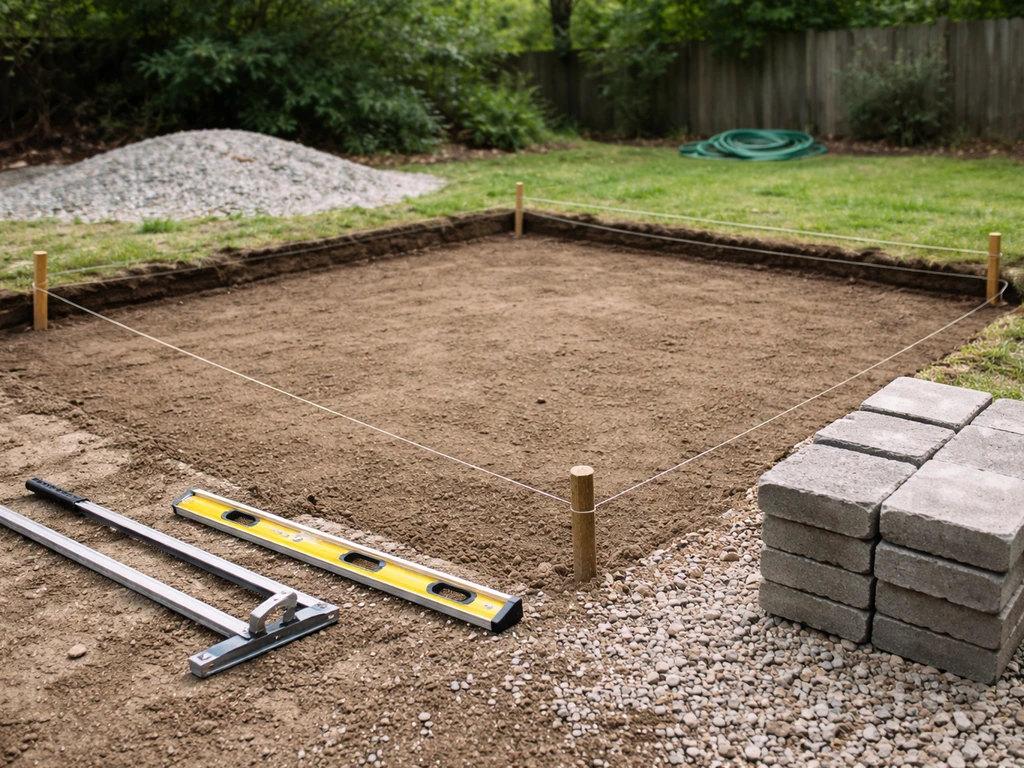
Site prep: leveling, slope, drainage, and base prep

This is the most physically demanding part of the job and the part that determines whether your patio lasts five years or thirty. Don't shortcut it. The most common reason patios settle, tip, or drain toward the house is a poorly prepared base, not a bad surface material.
Establish your slope first
Every patio needs to drain away from your house. The standard recommendation is a slope of 1/8 inch to 1/4 inch per foot of run, that's roughly a 1% to 2% grade. For a 12-foot deep patio, that means the far edge should be 1.5 to 3 inches lower than the edge against the house. You set this slope during base prep, not after. Use a string line with a line level or a 4-foot level on a straight board to check your grade as you work. Get this right and drainage handles itself. Get it wrong and water pools on the patio, or worse, flows toward the foundation.
Excavation depth: the layered calculation
This is where a lot of beginners make their biggest mistake. You don't dig just deep enough for the pavers. You need to calculate your full layer stack from the bottom up and excavate for all of it. For a standard sand-set paver patio, that stack is: compacted aggregate base + 1-inch bedding sand layer + paver thickness. For example, with 4-inch base, 1-inch sand, and a 2.375-inch paver, you're digging about 7.5 inches below your desired finished surface height. Measure from the finished height you want and dig down. Mark that depth on your stakes so you're checking it constantly as you dig.
Clearing and excavating
Remove all sod and vegetation from the marked area plus about 6 inches beyond the edge on all sides. You need that extra margin for your edge restraints later. Pull roots where possible, any organic material left in the base zone will decompose and create soft spots. Once cleared, compact the native soil with a plate compactor. Don't skip this step even if the soil feels firm. Compacting the subgrade before you bring in base material prevents future settling.
If your soil is particularly clay-heavy or has poor drainage, consider laying a geotextile landscape fabric directly on the compacted subgrade before adding your base aggregate. This fabric acts as a separation layer, letting water pass through while preventing your base aggregate from mixing down into the native soil over time. It's a cheap insurance policy on problem soils.
Foundation and base construction for long-lasting results
The base is what your patio actually rests on, and it has to be solid, properly thick, and correctly compacted. For pedestrian-use patios (which covers almost every residential patio), the minimum compacted base thickness after compaction is 4 inches of crushed aggregate. This isn't a number to negotiate down, it's the minimum established by industry standards for interlocking concrete pavement in pedestrian applications.
Use crushed stone aggregate, often called road base, Class II base, or 3/4-inch minus crusher run depending on your region. This material compacts tightly because it contains a range of particle sizes including fines. Pure gravel (rounded stones) doesn't compact as well and isn't the right choice here. Add your base material in lifts of no more than 3 to 4 inches and compact each lift with a plate compactor before adding the next. Check your depth and slope after each lift. This is where you're building your drainage slope into the ground, it's much easier to fine-tune grade at the base level than to correct it later.
One important note: if you plan to use plastic edge restraints with spike anchors (which you should, more on that in the finishing section), use a 3/4-inch minus crusher run for your base. The fine particles in crusher run help anchor the spikes securely. Without those fines, your edge restraints won't hold as well.
The bedding sand layer
Once your compacted aggregate base is solid and at the right grade, add your bedding sand layer. For pavers, this is typically 1 inch of coarse concrete sand (not play sand, not mason sand, coarse sand). For flagstone, you'll typically use about 2 inches of sand. Screed the sand flat and smooth using a long 2x4 dragged across screed rails (pipes or lumber set at the correct height). The bedding sand is not the layer you compact, it's the final fine-tuning layer that individual units will press into as you set them. Do not compact bedding sand after screeding and before setting pavers, or you'll lose your smooth reference surface.
Installing patio surfaces (pavers, stones, concrete, or tiles)
Setting pavers or flagstone
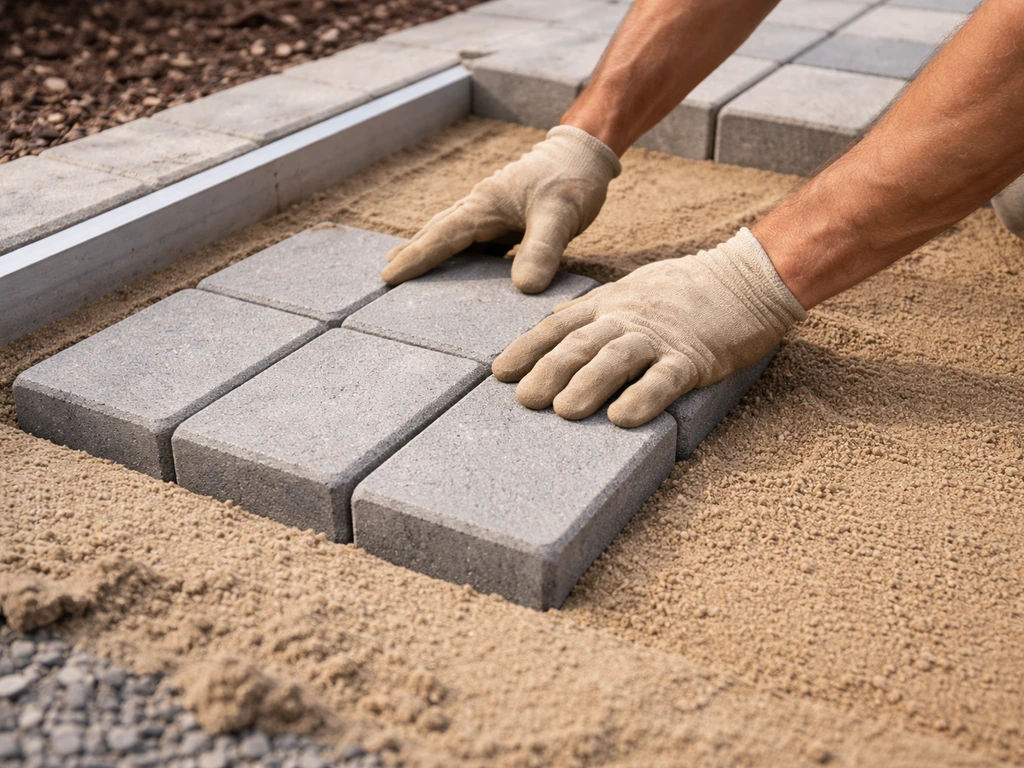
Start setting pavers from a corner or a straight edge, typically from the house side or a fixed boundary. Work outward and across, never standing on your freshly screeded sand bed. Instead, kneel on the pavers you've already set or use a piece of plywood to distribute your weight. Set each paver gently, place it, don't slide it, and keep joints tight and consistent. Check every few rows with a string line to make sure you're staying straight. Irregularities compound quickly, so catch them early.
For flagstone, the process is similar but more patient. Each stone gets trial-placed, then lifted to check contact with the sand bed, then set firmly. Use a rubber mallet to tap each stone level with its neighbors. Leave joints between 1 and 2 inches wide, or adjust for the look you want. Save cutting for last, complete all the full stones first, then measure and cut border pieces with an angle grinder or wet saw.
Poured concrete patios
Poured concrete follows the same base prep steps but requires forming before the pour. Build your wood forms to the exact perimeter shape and height, braced well enough to hold wet concrete without bowing. For a 4-inch slab (standard residential), you'll pour and screed the concrete level with the top of the forms. Plan your control joints before you pour, control joints prevent random cracking by giving the slab a weak point to crack along. For a 4-inch slab, space control joints no more than 8 to 12 feet apart (roughly 2 to 3 times the slab thickness in feet). Cut joints to a depth of about 1/4 to 1/3 of the slab thickness using a concrete saw within 4 to 12 hours of the pour, or use a groover tool while the concrete is still wet. Let concrete cure fully, a minimum of 28 days, before applying any sealer.
Filling joints after setting pavers
Once all pavers are set, run a plate compactor over the entire surface to seat the pavers into the bedding sand. Use a rubber pad protector on the compactor plate to avoid chipping. After the first compaction pass, fill joints with jointing sand. For most paver patios, polymeric sand is the best choice, it hardens when wet, resists washout, and helps suppress weed growth. Sweep it into the joints, then compact again to work the sand fully into the joints. Follow the manufacturer's instructions for watering to activate the polymer binder. One caution: don't use polymeric sand on heavily textured paver faces where the granules can get stuck in the surface texture.
Edges, finishing details, and maintenance / common troubleshooting
Installing edge restraints
Edge restraints lock your pavers in place laterally. Without them, pavers migrate outward over time, joints open up, and the whole surface destabilizes. Use plastic or aluminum spiked edge restraints, not timber. Timber warps and eventually rots, which defeats the purpose entirely. Install the restraint tight against the last row of pavers and drive spikes through the predrilled holes into your compacted base every 12 inches. If any gap between a paver and the edge restraint is larger than 3/8 inch (10 mm), fill it with a cut paver rather than leaving it as a sand-filled gap.
Sealing (when and whether to do it)
Sealing a paver patio is optional but recommended if you want to enhance color, further suppress weeds, and make cleaning easier. Apply sealer after your polymeric sand has fully cured per the manufacturer's instructions. For poured concrete, wait a minimum of 28 days before sealing, sealing too early traps moisture and causes sealer failure. Choose your sealer type carefully: penetrating sealers don't change the look much but protect well, while film-forming glossy sealers enhance color but can make the surface slippery when wet. If you use polymeric sand in the joints, use a compatible paver sealer and follow the product's specific instructions.
Common problems and how to fix them
- Settled or rocking pavers: Pull up the affected pavers, add or remove bedding sand as needed, re-screed, and reset. This is the most common issue and it's almost always caused by thin or inconsistently compacted base material under that section.
- Poor drainage / water pooling: Check your slope. If it's less than 1/8 inch per foot away from the house, you may need to remove sections and re-grade the base layer. Catch this during construction, not after.
- Weed growth in joints: If you used regular sand, you'll battle weeds more. Use polymeric sand on the next refresh. Pull weeds early before roots go deep and disrupt the sand bed.
- Joint sand washing out: Usually means the slope is too steep (water velocity), joints are too wide, or you used plain sand instead of polymeric. Re-fill joints with polymeric sand after clearing out old material.
- Cracks in concrete slab: Fine hairline cracks are common and mostly cosmetic. Large cracks through the slab often indicate base failure or missing/too-widely-spaced control joints. Repair with concrete crack filler and monitor; major heaving requires base re-work.
- Gaps at edge restraints: Cut a paver to fill any gap wider than 3/8 inch. Don't pack the gap with sand—it won't stay.
- Uneven surface alignment: Use a string line every few rows while setting to stay on track. Catch misalignment early. Once polymeric sand has cured, re-leveling requires removal and resetting.
Ongoing maintenance
A well-built paver or flagstone patio needs very little annual maintenance. Sweep off debris regularly so organic material doesn't stain the surface or break down in the joints. Re-apply jointing sand if it settles noticeably in the first year, a little settling is normal as the base fully consolidates. Reseal every 3 to 5 years depending on your climate and sealer type; your sealer manufacturer will give a specific recommendation. Inspect edge restraints each spring to make sure they haven't been displaced by frost or soil movement and re-spike if needed.
Your next steps checklist
- Sketch your patio footprint with dimensions and mark the slope direction (always away from the house)
- Confirm local permit requirements with your building department
- Choose your surface material based on budget, climate, and skill level
- Calculate your full excavation depth using the layer stack: base + bedding sand + paver/stone thickness
- Order materials: crushed aggregate base, bedding sand, pavers/stone, edge restraints, polymeric sand, and sealer
- Gather tools: plate compactor (rent if needed), string line and stakes, 4-foot level, screed rails, rubber mallet, and safety glasses
- Clear and excavate to full depth, compact the subgrade, and lay geotextile fabric if needed on clay soil
- Build and compact your aggregate base in lifts, checking slope and depth constantly
- Screed your 1-inch bedding sand layer and set pavers or stone working outward from a fixed edge
- Compact the surface, install edge restraints, fill joints with polymeric sand, compact again, and water to activate
- Let everything cure, then apply sealer if desired—no sooner than 28 days for concrete slabs
If you're working with a smaller or more limited space, the same principles apply, you just have less room for error on grade and drainage, which actually makes planning even more important. If you're working on how to set up a small patio, use the same base, slope, and drainage principles, just scale the layout carefully. And once your patio is built, how you arrange furniture and accessories within that space is its own art. If you're figuring out how to organize a small patio, start by mapping your furniture to the traffic paths and usable zones style a compact setup. Whether you're looking to organize a larger outdoor area or style a compact setup, getting the hardscape foundation right first gives you the best starting point for whatever comes next.
FAQ
Can I build a patio directly over existing concrete or pavers?
Usually, no. If you lay new units over an existing surface, you lose control of slope and the new layer can lock in moisture, leading to heaving or movement. A safer approach is to remove the old material or install over a properly prepared subgrade with rebuilt base layers so you can achieve the required drainage grade.
What if my yard slopes toward the house, how do I still get proper drainage?
You still need the patio surface to fall away from the house, but you may have to excavate deeper near the house or add compacted base thickness to create the correct 1/8 to 1/4 inch per foot grade. Plan the slope early so the far edge is lower, and recheck grade at multiple points before setting any pavers.
How do I know my base is compacted enough before I lay bedding sand?
Do a firm, no-ruts check with your full weight boots and a straightedge for waves, but more importantly confirm you compact in lifts (3 to 4 inches) and you don’t move when you walk the base. If you see pumping or the surface softens when pressed, it is not ready for bedding sand.
Is landscape fabric always required under the crushed stone?
No. The fabric is most useful when your soil is clay-heavy or poorly draining, because it prevents base material from mixing down into native soil. On well-draining soils, fabric can be unnecessary, and in some situations it can reduce water movement if installed incorrectly or layered over thick, disturbed subgrade.
Do I need to use coarse concrete sand, can I substitute play sand?
For paver bedding, use coarse concrete sand, not play or mason sand. Fine or dirty sand can wash or migrate, and it can make it harder to maintain a consistent seating layer. If you are unsure, do a quick test by rubbing sand between fingers, play sand tends to feel smoother and finer than the coarse bedding sand meant for pavers.
How tight should paver joints be, and what happens if they are too wide or too narrow?
For most interlocking pavers, keep joints consistent and follow the product’s recommended joint width. Joints that are too wide waste bedding and allow paver movement, joints too tight can prevent proper compaction and locking. If a gap near the edge exceeds about 3/8 inch, fill it with a cut paver rather than relying on sand.
Can I cut pavers after everything is set, or should I plan cuts in advance?
You can cut later, but plan border pieces first so you minimize awkward slivers and maintain a clean edge line. Cutting only after the field is completed often forces tiny, hard-to-place pieces at the perimeter, which increases the risk of shifting and uneven joint widths.
What’s the best way to prevent weeds if I use polymeric sand?
Polymeric sand helps because it hardens when activated and resists washout, but weeds still can appear if organic matter remains in the base zone or if drainage channels allow sand washout. Focus on removing sod and roots beyond the edge, then ensure the patio drains away from the house and joints stay sealed over time.
When should I use polymeric sand, and when should I avoid it?
Use it only after you have compacted the pavers and the joints are clean and dry enough for activation. Avoid it on heavily textured paver faces where granules can lodge in the surface texture, since that can create a rough appearance or permanent spots after watering.
How much water should I use to activate polymeric sand?
Follow the manufacturer’s watering instructions exactly, since overwatering can cause premature washout before the binder cures. If the sand looks like it is dissolving or running out of joints, stop and re-evaluate timing, since many products require specific water volume and temperature conditions.
Do I need to compact after filling joints with jointing sand?
Yes, generally you should compact again after sweeping jointing sand in, so the sand works deeper into the joints. But use a rubber pad protector on the compactor plate to avoid chipping paver edges, and stop once joints are filled and stable to prevent over-consolidation.
How long should I wait before using the patio after jointing and compaction?
Avoid heavy foot traffic until the jointing sand has fully settled, and for polymeric sand, wait until activation and cure are complete per the product label. If you walk on it too soon, you can loosen joints and force sand to smear or migrate out.
Can I seal right away, or do I need to wait?
Don’t seal immediately after jointing. For pavers, apply sealer after the polymeric sand has fully cured per the manufacturer’s instructions. For poured concrete, wait at least 28 days before sealing to avoid trapping moisture, which can cause sealer failure or discoloration.
How often should I inspect and re-spike edge restraints?
Check edges each spring for displacement, lifted restraints, or widened gaps, especially after freeze-thaw cycles. If soil movement has loosened spikes or shifted the restraint, re-drive them and add cut pavers to eliminate any gap larger than about 3/8 inch so lateral movement cannot restart.
What are the most common signs my patio base is failing?
Look for rocking pavers, persistent pooling after rain, or joints that keep opening even after sweeping in fresh sand. Another red flag is weeds returning rapidly in the same spots, which can indicate channels that let sand wash out or areas where organic material remained under the base.