Yes, you can absolutely build a pallet patio, and it can look great and hold up well outdoors if you do the prep work correctly. Once you are ready to upgrade from a basic pallet patio to a dedicated entertaining spot, learning how to make a patio bar out of pallets can be a great next step pallet patios. The secret is not in the pallets themselves but in what goes underneath them and how you treat the wood before and after installation. With the right base, properly selected pallets, and a coat of penetrating sealer, you can have a functional outdoor surface for well under $200 in most cases, often much less if you source free pallets locally.
How to Build a Pallet Patio: Step-by-Step DIY Guide

Nolan Carver
14 May 2026
Is a pallet patio actually doable (and what to watch for)
Pallet patios are genuinely practical for ground-level outdoor spaces. Plenty of homeowners have built them in a weekend and used them for years. That said, there are real failure modes you need to know about going in. Pallets sitting directly on soil or grass will rot fast, usually within one season in wet climates. Untreated or chemically fumigated pallets can be a health risk. And a patio laid without proper grading will heave, rock, and collect puddles that accelerate decay. None of these problems are hard to avoid, but you have to plan for them upfront.
The main thing that separates a pallet patio that lasts three to five years from one that turns into a soggy mess in eighteen months is the base preparation and the wood treatment. We will cover both in detail. The other thing worth knowing is that a pallet patio is best suited as a ground-level platform, a garden hangout space, or a budget-friendly temporary surface. If you want something elevated or attached to your home, you are really looking at a pallet deck project, which is a related but structurally different undertaking. If you want that kind of higher, house-adjacent layout, you will likely be doing a pallet deck project instead of a ground-level pallet patio.
Choosing, sourcing, and preparing pallets for outdoor use

Pallet safety: the one thing you must check first
Before you grab any free pallet off a loading dock, you need to check for the IPPC stamp, which looks like a small wheat-sheaf symbol. Under the international ISPM 15 standard, pallets used in shipping must be either heat-treated (stamped HT) or fumigated with methyl bromide (stamped MB). You want HT pallets only. Methyl bromide is a toxic pesticide that penetrates deep into the wood fibers, and you do not want that in a surface you are going to walk on barefoot or let your kids play around. Look for the stamp on at least two opposite sides of the pallet. It will include the wheat-sheaf symbol, a two-letter country code, and the HT or MB designation. If there is no stamp, or if you see MB, pass on it.
Inspecting pallets for structural soundness
Beyond the chemical treatment issue, you need pallets that are structurally solid. Reject any pallet with visible mold, boards that are warped or bowed significantly, sagging deck boards, loose or popping nails, broken stringers (the thick boards running lengthwise), or signs of prolonged wet storage like dark staining and soft wood. Give each pallet a bounce test by stepping on it firmly. It should feel rigid and not flex noticeably. If it creaks and dips, it will only get worse outdoors under foot traffic, furniture, and weather cycles.
Where to find good pallets
- Garden centers, nurseries, and plant wholesalers often have solid pallets they cannot return
- Hardware and home improvement stores sometimes have pallets from tile, brick, or bagged concrete deliveries
- Furniture stores receive large furniture on heavy-duty pallets that are usually in excellent condition
- Facebook Marketplace and Craigslist free sections are reliable sources, especially in suburban and industrial areas
- Small manufacturers and warehouse operations will often let you take pallets directly if you ask politely
Cleaning and prepping before you build
Scrub each pallet with a stiff brush and a diluted bleach solution (about 1 cup bleach per gallon of water) to kill any surface mold or bacteria, then rinse thoroughly and let them dry completely before you do anything else. Damp wood traps moisture under your sealer, which defeats the whole purpose. Depending on your design choice (more on this shortly), you may also need to pull nails, sand rough edges, and cut pallets to size. A belt sander or orbital sander on the top surface makes a real difference for comfort and appearance if people will be walking on it barefoot.
Planning your layout, measuring, and deciding whether to disassemble
Working out your dimensions
The standard North American pallet (sometimes called a GMA pallet) measures 48 inches by 40 inches. That is your building module. Sketch your patio area on paper first and work in those increments as much as possible. A 10 by 10 foot space, for example, works out to roughly three pallets wide and three pallets deep with minor trimming. Mark the footprint of your patio on the ground with stakes and string before you move any dirt. This step saves an enormous amount of rework.
Intact pallets vs. disassembled boards
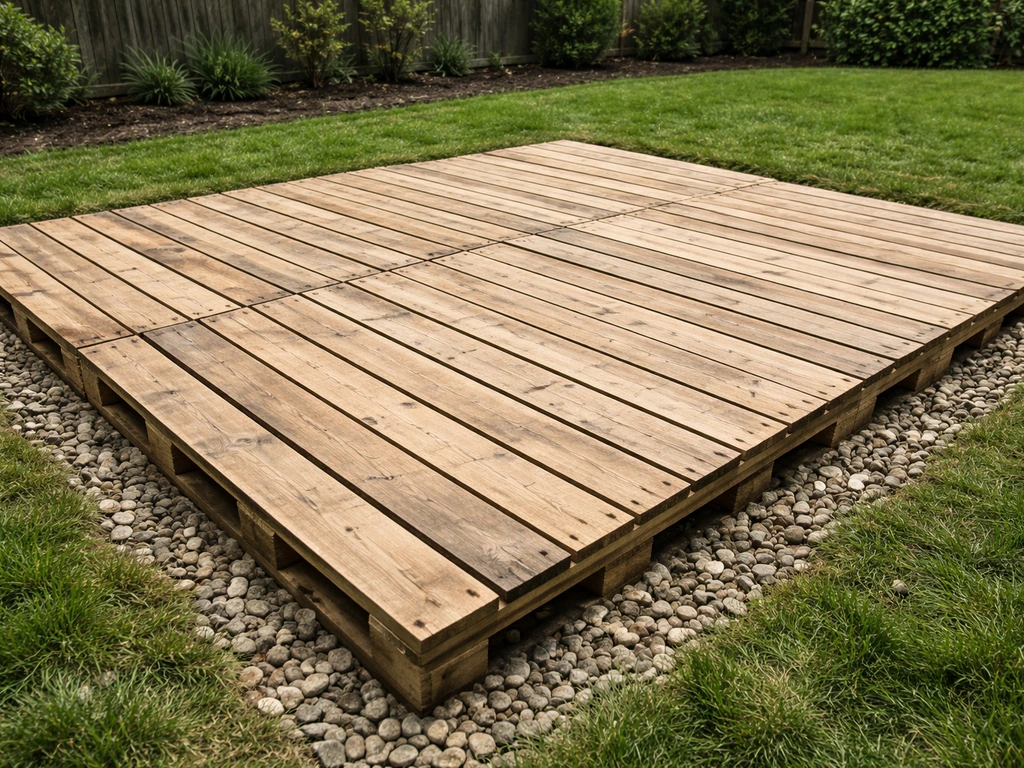
This is a real choice with real tradeoffs. Using pallets intact is faster, requires fewer tools, and works well if your pallets are uniform in size and height. The downside is that standard pallets have gaps between the top boards, which can catch heels and furniture legs. Disassembling pallets and relaying the boards tightly gives you a much more finished, comfortable surface that looks more like a traditional wood patio deck. It takes significantly more time and effort, you need more tools (a circular saw, drill, screws), and you need a frame or substructure to nail the boards to. If this direction interests you, it overlaps closely with building a wood patio on the ground, which is a broader topic worth exploring separately. If you are aiming for a classic look with more control over spacing and finish, use this guidance alongside the steps for how to build a wooden patio building a wood patio. For this guide, we will focus primarily on the intact-pallet method with tips for tightening the surface.
Orientation and pattern options
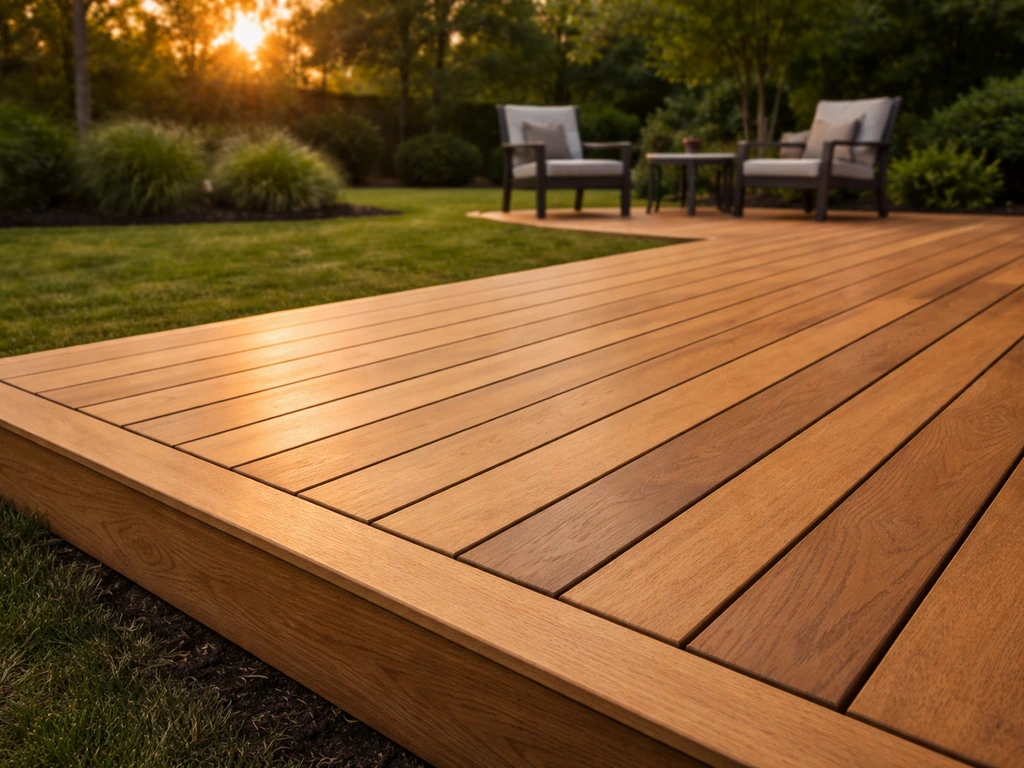
All pallets running the same direction gives the cleanest look. A checkerboard pattern where alternating pallets are rotated 90 degrees adds visual interest and helps disguise slight size variations between pallets. Both work. If your pallets are not identical in dimensions, the checkerboard can actually be easier to make look intentional rather than accidental.
Building the base: grading, drainage, and what to lay underneath
This section is where most DIY pallet patios fail or succeed. A good base keeps moisture away from the wood, prevents the pallets from sinking into soft ground, and gives you a stable, level surface. Do not skip this part or cut corners here.
Grading the ground first
Your patio surface needs to shed water away from your house (or in whatever direction makes sense for your yard). The standard guideline is a slope of about 1/4 inch per foot. So a 10-foot-deep patio should drop about 2.5 inches from the house-side edge to the outer edge. Use a long level and a tape measure to check your existing grade. If water tends to pool in the area, you have a drainage problem to address before anything else. In clay or fine-silt soil where water concentrates, the right approach is to pitch the subgrade at that same 1/4 inch per foot slope toward a perforated drain pipe that slopes to daylight or a drainage area. This is extra work but it dramatically extends the life of any wood surface.
Excavation and base layers
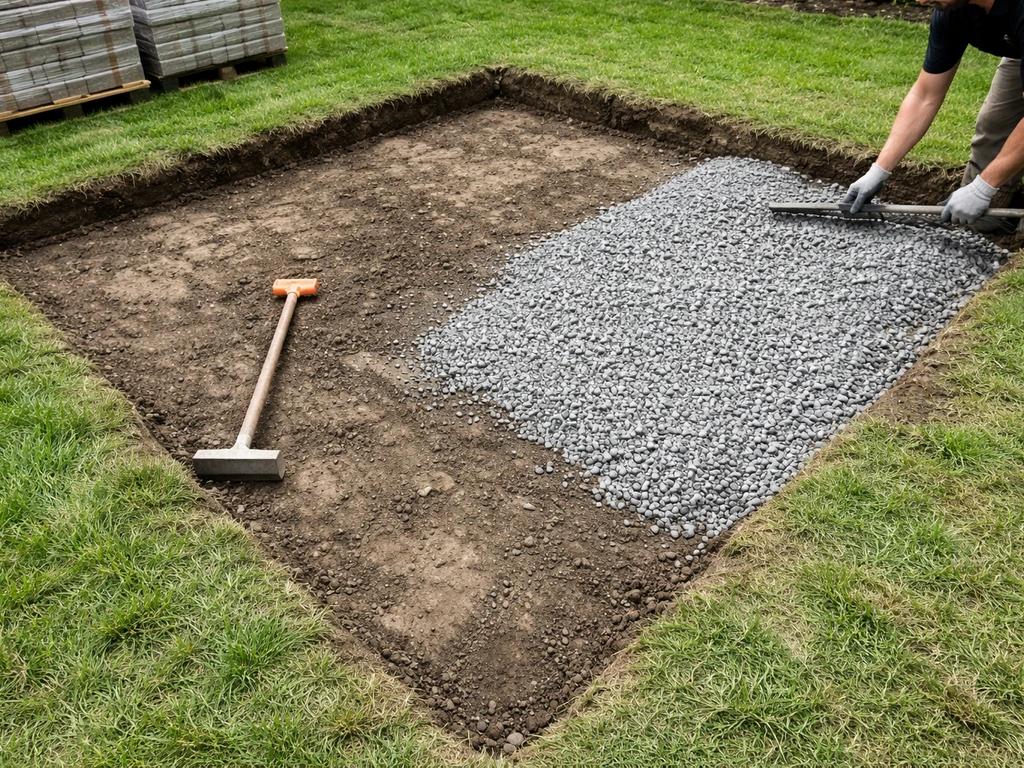
- Mark and excavate the patio footprint. Remove sod and topsoil to a depth of about 4 to 6 inches to get down to subsoil.
- Compact the subgrade with a hand tamper or plate compactor (rentable for about $50 per day) until it feels firm underfoot.
- Lay landscape fabric over the compacted subgrade to suppress weeds without blocking drainage.
- Add 3 to 4 inches of clean, washed gravel (also called drainage gravel or pea gravel). The key word is clean: do not use crusher run, quarry process, or anything labeled 'sure-pack' because these materials contain fines that pack hard and block water drainage.
- Spread and roughly level the gravel, then set pallets in place to check your overall height and slope before doing final grading.
The gravel base serves two purposes. First, it keeps the pallets from sitting in soil or on soggy ground. Second, it is permeable, meaning rainwater passes straight through it rather than pooling under your wood. This is the single biggest factor in how long your pallet patio lasts.
Optional: adding ground-contact treated lumber sleepers
If you want extra height, better air circulation under the pallets, or a more stable footing on slightly uneven gravel, you can lay 4x4 pressure-treated lumber sleepers (short horizontal beams) across the gravel before setting pallets on top. Space them about 24 inches apart and check that they are level with each other before placing pallets. This adds cost (roughly $15 to $30 depending on your patio size) but gives you a much more rigid result.
Installing pallets and getting a level, stable surface
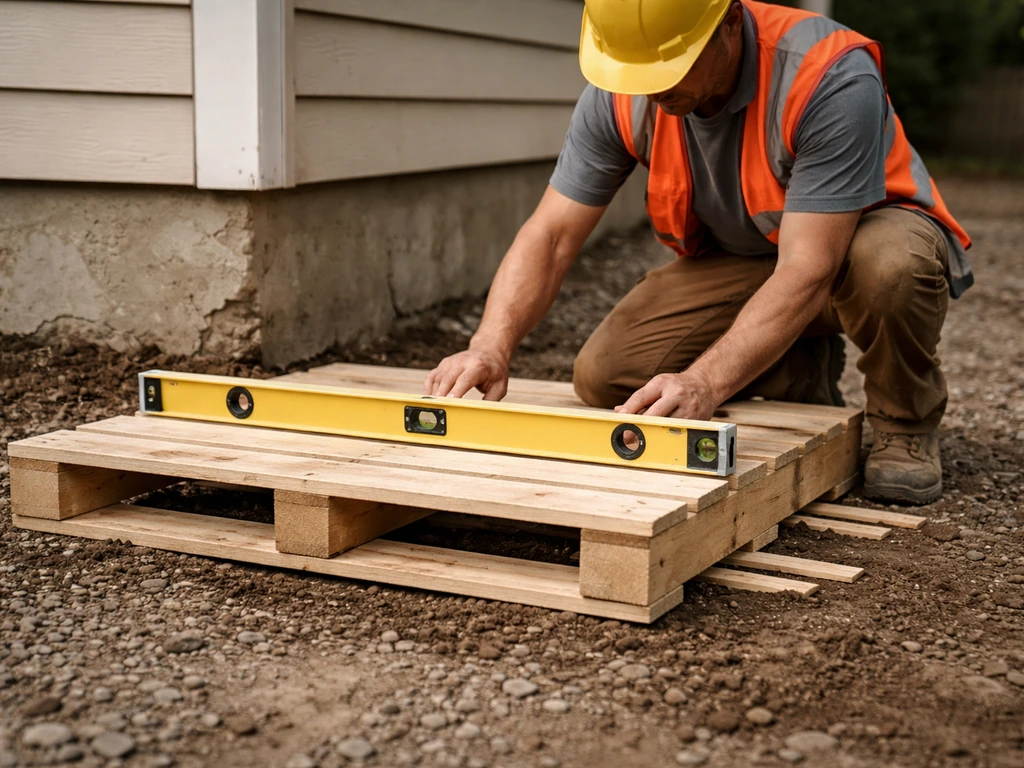
Setting and leveling each pallet
Start at one corner, ideally the corner closest to your house or the highest point of your grade. Set the first pallet, then check it with a 4-foot level in both directions. Add or remove gravel beneath it until it sits level. Then butt the next pallet tightly against it and repeat. Check level across adjacent pallets too, not just within each individual one. A 1/8-inch height difference between two adjoining pallets is barely noticeable; a 1/2-inch difference becomes a trip hazard.
Keeping pallets from shifting
Pallets will try to slide or drift over time unless you secure them. You have a few options. The simplest is to run 3-inch deck screws or structural screws down through the top boards of adjacent pallets at an angle into each other at the joint, effectively stitching them together. Alternatively, you can attach L-brackets or metal connector plates to the underside at the joints before setting the pallets down. On the perimeter, you can drive stakes into the gravel at the outside edges to act as stops. If you are using sleepers underneath, screw the pallets down into the sleepers with 3-inch structural screws for a very solid result.
Handling the edges
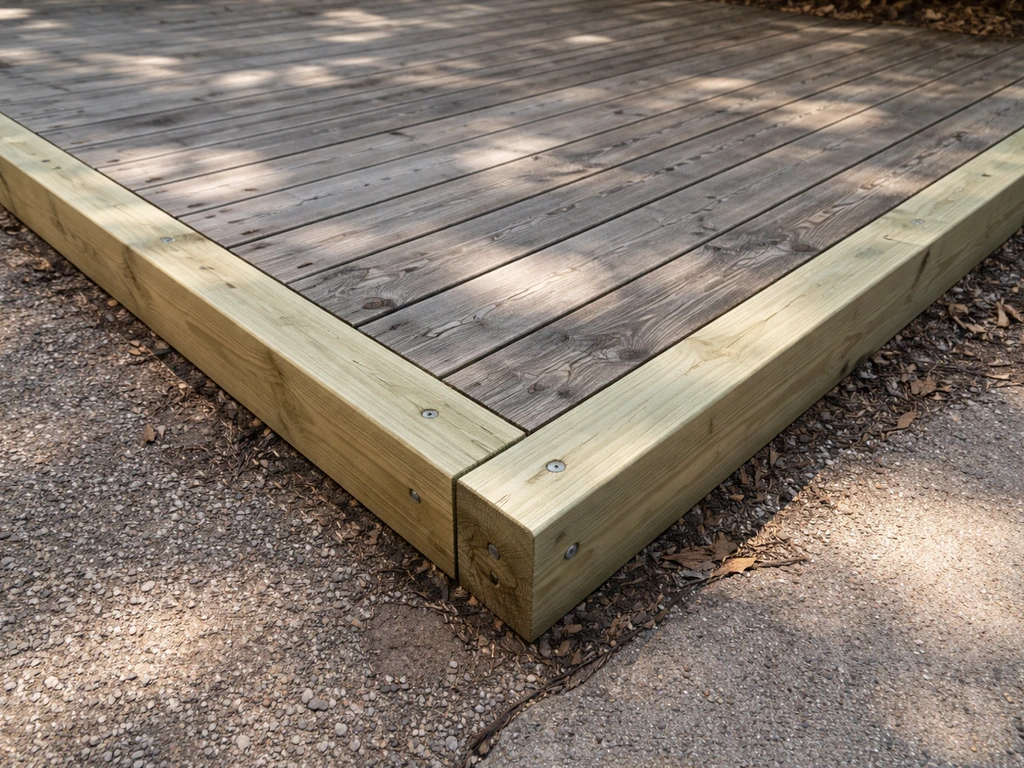
The raw edges of your pallet installation look unfinished and can be a toe-stubbing hazard. A simple fix is to screw 2x4 or 2x6 pressure-treated boards along the perimeter as edge trim. They frame the patio, hide the pallet ends, and give you a clean border. Another approach is to fill in around the edges with gravel, river rock, or mulch so there is no exposed drop-off.
Securing, filling gaps, and weatherproof finishing
Dealing with gaps between pallet boards
Intact pallets have gaps between the top deck boards, typically 1 to 2 inches wide. You have a few ways to handle this. The easiest is to simply fill the gaps with outdoor-rated rope, twisted sisal, or flexible caulk that matches your stain color. This softens the look and reduces trip risk without major work. A more thorough fix is to rip thin strips of matching lumber and glue or screw them into the gaps flush with the surface. If gaps bother you enough to reconsider the whole approach, that is a good reason to look at disassembling pallets and relaying the boards as a tight deck surface instead.
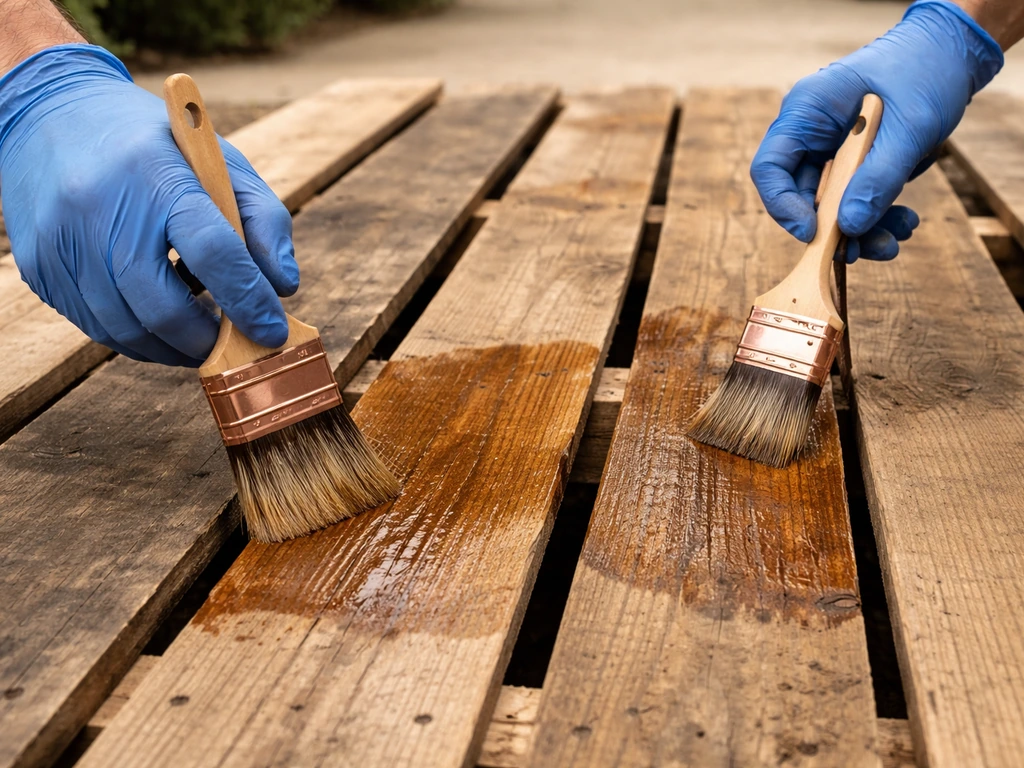
Sealing and weatherproofing the wood
This step is not optional if you want your pallet patio to last. Bare, untreated wood outdoors will gray, crack, and begin to decay within a season or two. Then, after you seal the wood, follow the same spacing and fastener tips so your pallet patio stays level and sturdy over time pallet patio to last. The best approach for pallet wood is a penetrating oil-based stain and sealer rather than a film-forming product like paint or varnish. A penetrating finish soaks into the wood fibers, hardens inside, and provides protection without forming a surface film that can peel. Products like Ready Seal (an oil-based semitransparent stain/sealer) or Watco Exterior Wood Finish are good examples of this type. They provide UV and mildew protection, which is exactly what you need for an exposed horizontal surface.
Make sure the wood is completely dry before you apply any finish. If you cleaned the pallets with bleach water, give them at least 48 to 72 hours of drying time in decent weather. For reapplication down the road, plan on doing a light clean and recoat every two years on this horizontal surface. That maintenance cycle keeps the wood protected without requiring a full strip-and-refinish.
If you used water-repellent treated wood or pre-treated pallets
If any of your pallets or framing lumber was pre-treated with a water repellent, you need to wait before applying an oil-based stain. The rule of thumb is at least 30 days before applying an oil-based semitransparent stain, and up to six months before applying an oil-based solid-color stain. Applying finish too soon over water-repellent treated wood means poor penetration and a finish that peels prematurely. When in doubt, do a simple water bead test: sprinkle a few drops of water on the wood surface. If the water beads up, the wood is not ready yet. If it soaks in within a minute or two, you can apply your finish.
Troubleshooting common problems and your build checklist
Common problems and how to fix them
| Problem | Likely cause | Fix |
|---|---|---|
| Pallets rocking or wobbling | Uneven gravel base or one corner is too high/low | Add or remove gravel under the low/high corner, re-check with level |
| Water pooling on surface | Insufficient slope away from the area | Re-grade the base to achieve 1/4 inch per foot slope toward drainage |
| Wood graying fast | No sealer applied or applied too thin | Sand lightly, clean, let dry fully, apply penetrating oil-based stain/sealer |
| Pallets shifting laterally | Not stitched together or edge-secured | Add screws at pallet joints and perimeter stakes or edge framing |
| Mold or mildew appearing | Moisture trapped under pallets or sealer worn off | Check base drainage, clean with dilute bleach, reapply sealer |
| Surface feels spongy in one spot | That pallet has a soft or cracked board | Replace the individual board or the whole pallet if structurally compromised |
| Weeds pushing through gaps | Landscape fabric missing or shifted | Pull weeds, re-tuck or patch fabric, cover gaps with fill material or caulk |
DIY build checklist
- Confirm all pallets are stamped HT (heat-treated) under the IPPC/ISPM 15 standard. No MB pallets.
- Inspect every pallet: reject any with mold, severely warped or sagging boards, broken stringers, or popping nails.
- Clean all pallets with dilute bleach solution, rinse, and dry fully (48 hours minimum).
- Mark patio footprint with stakes and string. Check that your area fits a whole number of 48x40-inch pallet modules with minimal cutting.
- Excavate 4 to 6 inches of topsoil within the marked footprint.
- Compact the subgrade and establish a 1/4 inch per foot slope away from structures or toward a drain.
- Lay landscape fabric over the compacted subgrade.
- Install 3 to 4 inches of clean washed drainage gravel. Do not use crusher run or any material with fines.
- Optionally set pressure-treated 4x4 sleepers across the gravel for additional support.
- Set pallets starting from one corner, leveling each one individually and across adjacent pallets.
- Stitch pallets together at joints with 3-inch deck screws or L-brackets.
- Install perimeter edge trim or gravel border to finish the edges.
- Fill surface gaps with rope, caulk, or wood strips as desired.
- Sand top surface if needed for comfort and to open wood grain before sealing.
- Apply penetrating oil-based stain/sealer to all exposed wood surfaces. Let dry per product instructions.
- Plan a maintenance recoat schedule: every 2 years for this horizontal surface.
Quick budget breakdown
| Item | Estimated cost | Notes |
|---|---|---|
| Pallets | $0 to $60 | Often free from local businesses; buy-grade pallets run $10 to $20 each |
| Landscape fabric (50 sq ft roll) | $10 to $20 | Standard weed barrier from any hardware store |
| Washed drainage gravel (half-yard) | $30 to $60 | Covers roughly 50 sq ft at 3 to 4 inch depth |
| Deck screws (1 lb box, 3-inch) | $8 to $12 | For stitching pallets and edge trim |
| Pressure-treated 2x6 edge trim (optional) | $20 to $40 | For perimeter framing |
| Penetrating oil-based stain/sealer (1 gallon) | $25 to $45 | Covers 150 to 200 sq ft depending on wood porosity |
| Total for a 10x10 ft patio | $93 to $237 | Lower end if pallets are free and you own basic tools |
Once your pallet patio is built and sealed, the main ongoing tasks are simple: check for loose fasteners each spring, do a light cleaning, and reapply sealer every couple of years. A pallet patio built with this level of care can easily give you four to six seasons of use, and if individual pallets deteriorate you can swap them out without tearing up the whole project. If you find yourself wanting to push further with wood-surface outdoor builds, exploring a full disassembled-board patio or a timber patio frame will give you a more permanent and polished result with many of the same base-prep principles applied here. If you want a more permanent wood patio method, see the full guide on how to build a wood patio on the ground, including base layers and drainage details. If you decide to move beyond pallets, learning how to build a timber patio frame is the next step to get a more permanent wooden surface.
FAQ
Can I build a pallet patio directly on pavers or concrete instead of gravel?
Yes, but it changes the moisture risk. If you use hard pavers or slab, you still need drainage and a permeable layer or air gap so water does not sit under the pallets. A common approach is a sloped compacted base plus gravel directly under the pallets (or sleepers over the base) so rain can move through rather than pool at the wood underside.
How thick should the gravel base be for a pallet patio?
Aim for enough depth to stay stable and to hold your drainage slope, typically several inches. The key is not one exact number, it is compaction plus permeability. If the gravel layer is too thin, it can become a leveling problem later, pallets sink slightly, and the slope toward drainage degrades, causing pooling.
What should I do if my yard is very uneven, and the slope cannot be maintained?
If you cannot achieve the recommended slope by regrading, you may need to add a pitched subgrade or use a drainage plan (like directing water toward a perforated drain pipe). Otherwise, pockets of water will collect even if the surface looks level at first. Use a long level across the full footprint before laying any pallets.
Do I need to remove the top boards, or can I keep pallets intact forever?
Most DIY pallet patios keep pallets intact, but “forever” depends on wood condition and sealing quality. If the pallet boards have wide gaps, significant warping, or repeated soft spots during inspection, disassembling and rebuilding a tighter surface with board re-spacing is usually the safer long-term comfort and durability path.
Is bleach cleaning safe for the wood and the surrounding area?
It can be, but rinse thoroughly and let the wood dry completely. Bleach residue can interfere with how a penetrating finish absorbs. Also consider protecting nearby plants and preventing runoff into soil, since diluted bleach can damage grass and seedlings.
How do I tell whether a pallet is HT without relying only on the stamp location?
Check at least two opposite sides for the IPPC stamp, and confirm the designation reads HT. If you see MB on any inspected face, do not use the pallet. If the stamp is missing or incomplete, treat it as unknown and source a different pallet, because stamps can be painted over or knocked off.
What if some pallet boards are loose or have popping nails?
Fix it before installation. Tighten or replace fasteners while the pallet is still accessible, because moving nails outdoors can work loose under foot traffic. If you cannot stabilize a pallet board or the stringer feels broken, remove that pallet from the layout so the base does not become uneven later.
Should I seal the pallets before installing them or after?
Either can work, but drying and access matter. Sealing after installation is common, but you risk missing underside edges where water can reach. If possible, seal all sides, especially the end grain, and ensure pallets are dry enough so the finish penetrates rather than sitting on moisture.
How often should I reapply sealer on a horizontal pallet surface?
A light clean and recoat every two years is a practical default for many climates. Recoat sooner if you notice darkening, roughening, or water starting to soak in faster instead of beading or staying on the surface temporarily.
Can I use a deck screw or exterior screws of any type to secure the pallets?
Use screws rated for exterior use, and do not rely on thin, non-rated fasteners that corrode quickly. For “stitching” joints, aim for structural or deck screws long enough to bite solidly without splitting the wood. If you are using sleepers, screw into the sleepers for rigidity.
What is the safest way to handle pallet gaps for kids or bare feet?
The safest comfort approach is to reduce gaps, either by filling with outdoor-rated rope that does not fray or by installing narrow strips flush with the top surface. If you plan on barefoot use, the “tight deck surface” approach (disassembling and re-laying) is usually the most reliable for eliminating toe-trap spacing.
Will my pallet patio be stable enough for furniture like a grill or table?
It can be, if the base is compacted, the pallets are rigid, and fasteners are secure. For heavier items, check that the patio does not rock at the item location by testing with body weight and pushing down at different corners. If it shifts, you need base correction before sealing.
When is it better to avoid a pallet patio and switch to a wood deck instead?
Avoid pallet patios if you need an elevated or house-attached structure, because the structural requirements and moisture management are different. Also consider a deck if you want a fully finished, uniform surface without maintenance cycles, since pallets are more variable in board condition and longevity.