You can build a patio yourself in a weekend or two. The process goes like this: pick your material, mark the footprint, dig out the area, build a compacted gravel base with proper slope, set edge restraints, lay your bedding sand, install pavers or slabs, then fill joints and seal. That sequence is the whole game. Get the base and drainage right and the rest is just careful, satisfying work.
How to Build a Patio Step by Step for DIYers

Nolan Carver
18 May 2026
This guide walks through every step with real measurements and practical tips. Whether you're tackling a simple 10x10 slab or a larger paver patio, the core workflow is the same. If you're just starting out and want a stripped-down version of this process, a beginner-focused walkthrough covers the essentials without overwhelming detail. But if you want the full picture from dig to done, you're in the right place.
Choosing Your Patio Type and Materials
Before you dig a single shovelful, decide what your patio is made of. This affects how deep you dig, what base you build, and how long the whole project takes. The three most common DIY options are concrete pavers, natural stone slabs, and poured concrete.
| Material | Typical Thickness | DIY Difficulty | Cost Range (per sq ft) | Best For |
|---|---|---|---|---|
| Concrete pavers | 2 3/8 in. (60 mm) | Easy to moderate | $3–$8 | Most DIYers, flexible repairs |
| Natural stone (flagstone) | 1.5–2.5 in. | Moderate | $5–$15 | Rustic or natural look |
| Poured concrete slab | 4 in. | Moderate to hard | $4–$8 | Smooth, low-maintenance finish |
| Patio slabs (cast concrete) | 1.5–2 in. | Easy | $2–$5 | Budget-friendly, fast install |
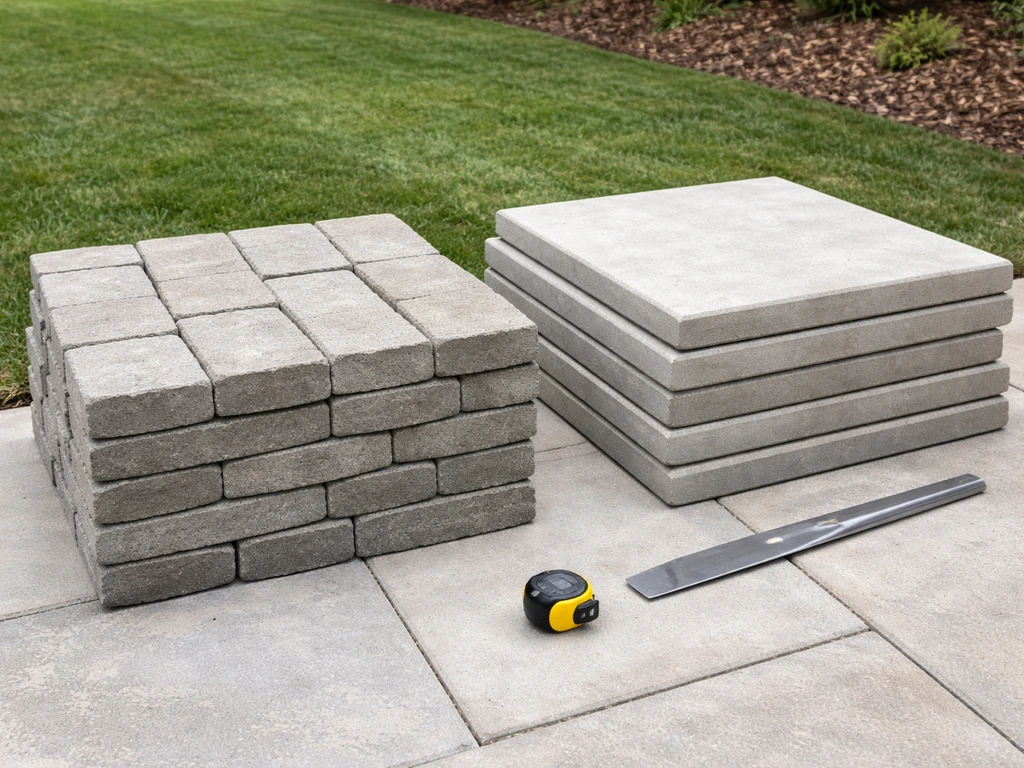
Concrete pavers are the most beginner-friendly option and the one this guide focuses on most. They're forgiving, repairable (you can pull up and reset individual pieces if something shifts), and they come in dozens of shapes and colors. Standard residential pavers are about 2 3/8 inches thick, which is the 60mm thickness you'll see listed at most home improvement stores. A poured concrete patio is durable and looks clean but is harder to DIY because you're working against a clock once the concrete is mixed. Residential concrete slab patios are commonly specified at about 4 in. thickness (a typical residential standard) to resist foot traffic and furniture loads. If you're on your first build, pavers are the smart starting point.
Planning, Measurements, and Layout Marking
Grab a tape measure, a notepad, and a cup of coffee. Spend time here and everything downstream gets easier. The single most useful thing you can do before touching a shovel is draw a rough sketch of your yard with the house footprint, any obstacles (trees, AC units, downspouts), and where the patio will sit. Then go outside and walk the space.
Sizing Your Patio
A common starting size for a dining set and a few chairs is around 12x12 feet (144 square feet). A 10x10 works well for a bistro table or a small seating area. Measure what furniture you plan to use and add at least 2 to 3 feet on each side for comfortable movement. Once you have your target dimensions, round them to match your paver size so you minimize cuts.
Marking the Layout
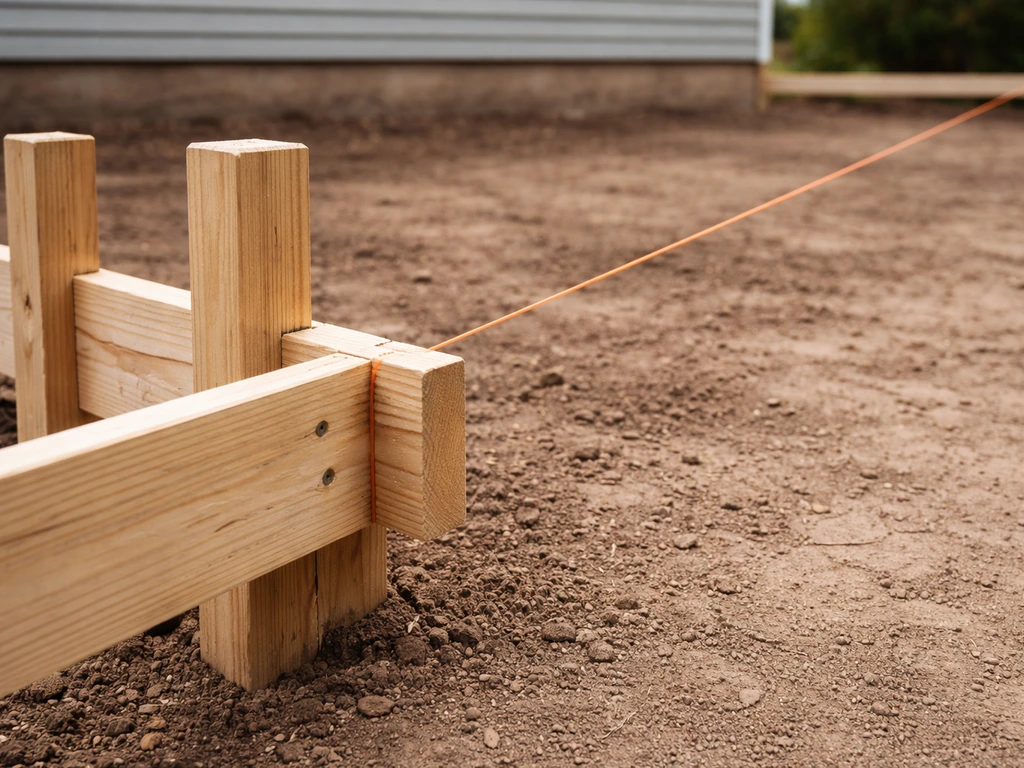
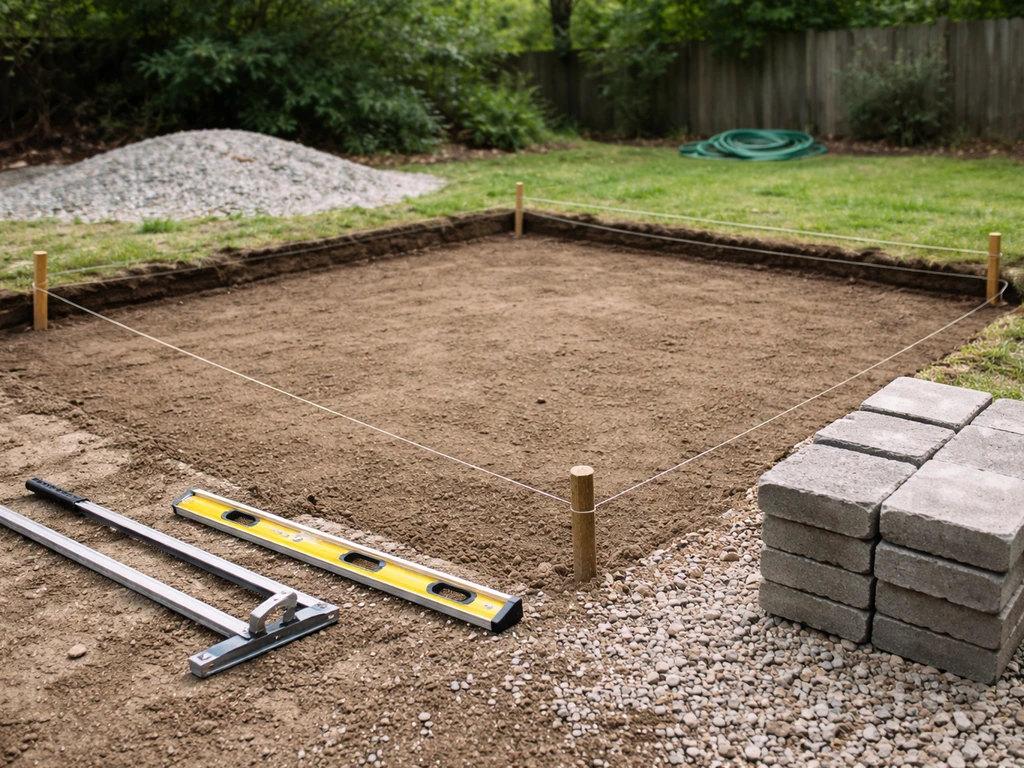
Use batter boards and mason's line to mark the exact perimeter of your patio before you dig. Drive 2x4 stakes about 2 feet outside each corner of the planned area, then run string line between them to define the edges. This gives you reference lines that stay put even after you start excavating. Use a framing square or the 3-4-5 triangle method to confirm your corners are square: measure 3 feet along one string, 4 feet along the adjacent string, and the diagonal between those two points should be exactly 5 feet. If it's not, adjust until it is. Crooked patios drive you crazy every time you look at them.
Mark the slope into your string lines now. Your patio needs to drain away from the house at 1/8 inch per running foot. That means a 10-foot-deep patio should drop 1.25 inches from the house edge to the outer edge. Set your strings level, then lower the outer string by that amount using a line level or a long level with a straightedge. That slope gets built into every layer from here on out.
Site Prep and Excavation
This is the most physically demanding part and also the most skipped-over in bad tutorials. A lazy excavation is the number one reason patios fail. You need to remove all organic material (grass, roots, topsoil) and dig to the correct depth based on your material stack.
How Deep to Dig
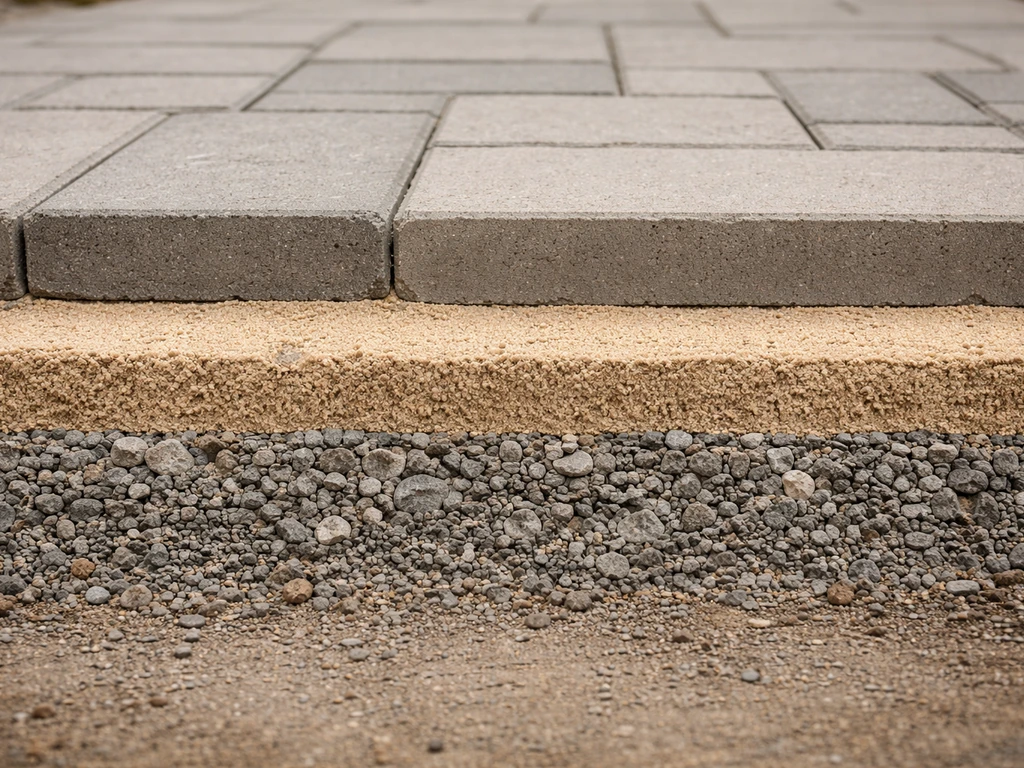
For a standard paver patio in a pedestrian area, your material stack from the bottom up looks like this: 4 inches of compacted gravel base, 1 inch of bedding sand, and 2 3/8 inches of paver. That's about 7.5 inches total. Add a half inch of buffer and plan to excavate about 8 inches below your finished patio surface. Since your finished surface should be roughly flush with or just above your lawn grade, measure down from your string lines to figure out exactly how deep to dig at each point.
If you're in a cold climate with frost, some installers go 6 inches of base gravel instead of 4 to reduce heaving risk. In most residential pedestrian applications, 4 inches of compacted base is the ICPI (Interlocking Concrete Pavement Institute) standard recommendation, stepping up to 6 inches for areas that will see light vehicle traffic like a driveway apron.
Digging and Disposing
For a small patio (10x10 or 12x12), you can excavate by hand with a flat spade and a mattock. Anything larger than 200 square feet, seriously consider renting a mini excavator for the day. It runs around $200–$300 and saves you 6 to 8 hours of brutal digging. Haul the soil away or use it to grade low spots elsewhere in your yard. Don't just pile it next to the patio, it'll compact back over time and cause drainage problems.
Before you dig, call 811 (in the US) to have underground utilities marked. This is free, takes a couple of days, and prevents you from hitting a gas line. Not optional.
Building the Base and Getting Drainage Right
Your base is the most important part of this whole project. A beautiful patio on a bad base will crack, sink, and shift within a few years. A basic-looking patio on a solid base will last decades. Take this section seriously.
What to Use for Base Material
Use crushed stone aggregate, specifically what's commonly called 'Class II base', 'road base', 'crusher run', or '3/4 minus' depending on your region. Ask your local landscape supply yard for the gravel they use for paver base. Do not use rounded pea gravel or river rock. These don't compact properly and will shift underfoot. You want angular, crushed material that locks together when compacted.
Compacting in Layers
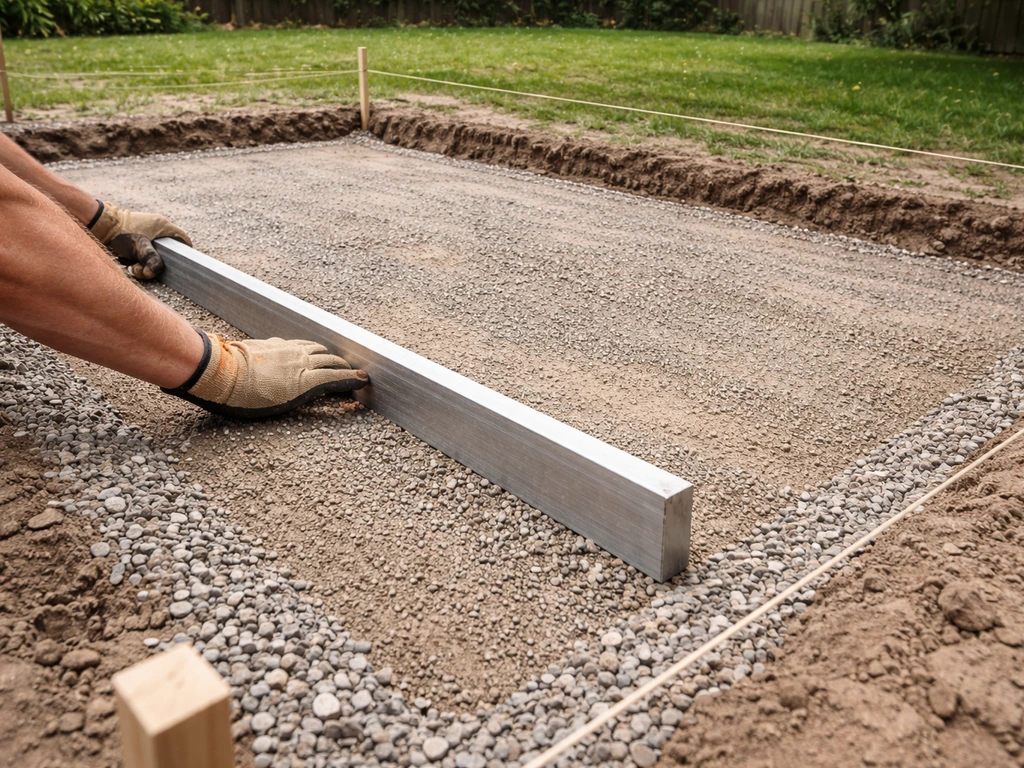
This is where most DIYers cut corners and pay for it later. You cannot dump 4 inches of gravel and compact it all at once and get proper density. Add the gravel in 2-inch lifts, compacting each layer before adding the next. For a 4-inch base, that means two passes with the plate compactor. Rent a plate compactor for this, it's $60–$100 per day and absolutely non-negotiable for a patio that won't shift. Make multiple passes in different directions over each lift until the surface feels firm and stops giving.
Keep that 1/8-inch-per-foot slope going through your gravel base. Check frequently with a long level and a tape measure against your string lines. It's much easier to correct slope in the gravel than it is to correct it in the sand layer later.
Landscape Fabric: Use It or Skip It?
Place a layer of geotextile landscape fabric directly on the subsoil before you pour gravel. This separates the native soil from your base material and prevents the fine clay particles from migrating up into your gravel over time (a process called 'pumping' that kills base stability). It also suppresses weeds. Just don't use the cheap woven plastic from the dollar bin, use a real non-woven geotextile fabric rated for hardscape applications.
Setting Edge Restraints and Prepping the Sand Bed
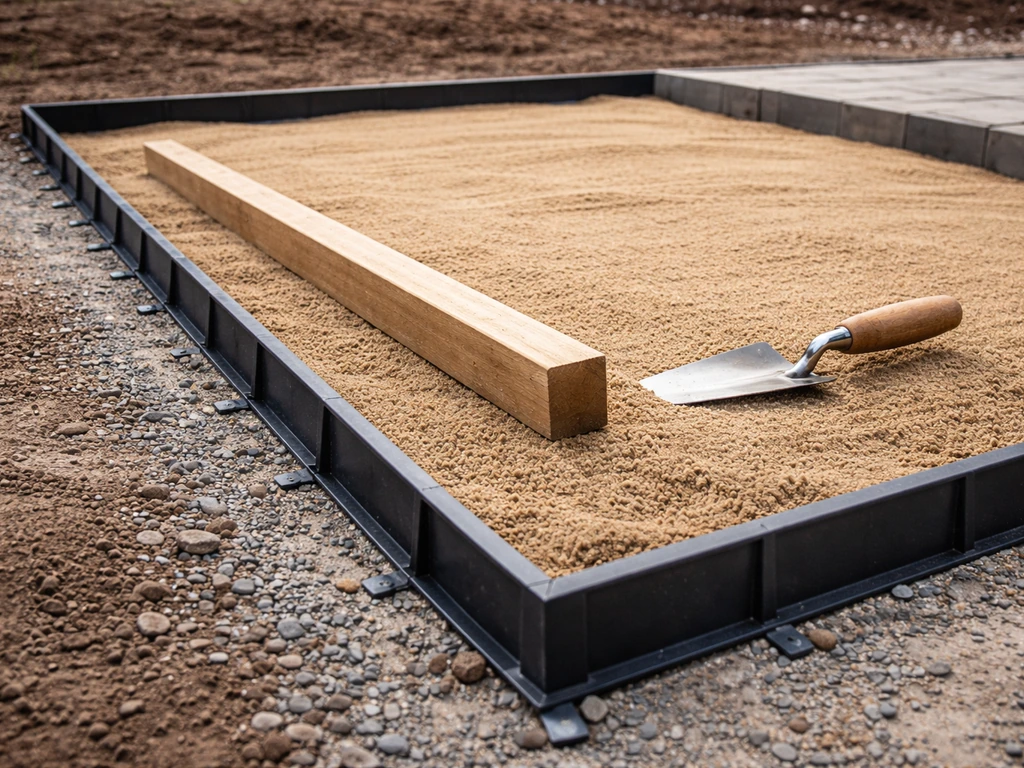
Before you add bedding sand, install your edge restraints. These are the plastic or aluminum borders that run around the perimeter of the patio and physically hold the pavers from spreading outward over time. Without them, the edges of your patio will slowly migrate and your whole pattern will loosen. They're cheap (usually $1–$2 per linear foot) and easy to install with spikes driven into the compacted base.
Set your edge restraints to the correct height so that when you add your 1-inch sand bed and then your 2 3/8-inch pavers, the top surface sits at your desired finish grade. This is where your string lines earn their keep, reference them constantly. Spike the restraints firmly into the base every 12 inches or so and check that they follow your layout lines exactly.
Screeding the Bedding Sand
Spread coarse concrete sand (not play sand, not polymeric sand) over the compacted base to a depth of about 1 inch. Use two lengths of 1-inch diameter conduit or pipe laid parallel as screed rails, then drag a straight 2x4 across them to create a perfectly flat, 1-inch-thick sand bed. Pull the pipes out and fill those grooves with loose sand afterward. The goal is a smooth, consistent bed that the pavers will rest on without rocking.
Do not compact the bedding sand. This surprises a lot of people, but the sand layer is meant to stay loose so you can set and adjust pavers. Compaction happens at the very end, after all the pavers are in place.
Installing the Patio Surface
Start laying pavers from a corner that will be most visible (usually a house-facing corner) and work outward. Set each paver firmly by hand, pressing it straight down into the sand. Don't slide them into place or you'll disturb the sand bed. Keep consistent joint spacing (typically 1/8 to 3/16 inch for interlocking pavers) using the small nubs molded into the sides of most concrete pavers. Check your pattern frequently with a string line to keep rows running straight.
Cutting Pavers for the Edges
You'll almost certainly need to cut some pavers to fill gaps at the borders. Rent an angle grinder with a diamond blade or a wet saw (masonry saw) for this. A wet saw gives cleaner cuts. Mark your cut line with a pencil or chalk, make the cut, and test-fit before setting permanently. For curved edges, you can use a series of smaller cuts or score-and-snap with a chisel and hammer for rough cuts that will be hidden by edging.
Checking for Flat and Level
As you go, frequently lay a long straightedge or a 4-foot level across sections of installed pavers. You're not looking for perfectly level (remember, you have that intentional slope), you're looking for consistency. No single paver should rock or sit higher than its neighbors by more than 1/8 inch. If one is high, lift it, remove a little sand, and reset it. If it's low, add a pinch of sand. This is the painstaking part, but it's what separates a polished result from an embarrassing one.
Finishing Touches: Joints, Compaction, Sealing, and Cleanup
Final Compaction
Once all your pavers are laid, run the plate compactor over the entire surface. Use a rubber pad attachment or a piece of carpet between the compactor plate and the pavers to avoid scratching or cracking them. Make at least two passes in different directions. This seats the pavers firmly into the sand bed and locks them into their final position.
Filling the Joints
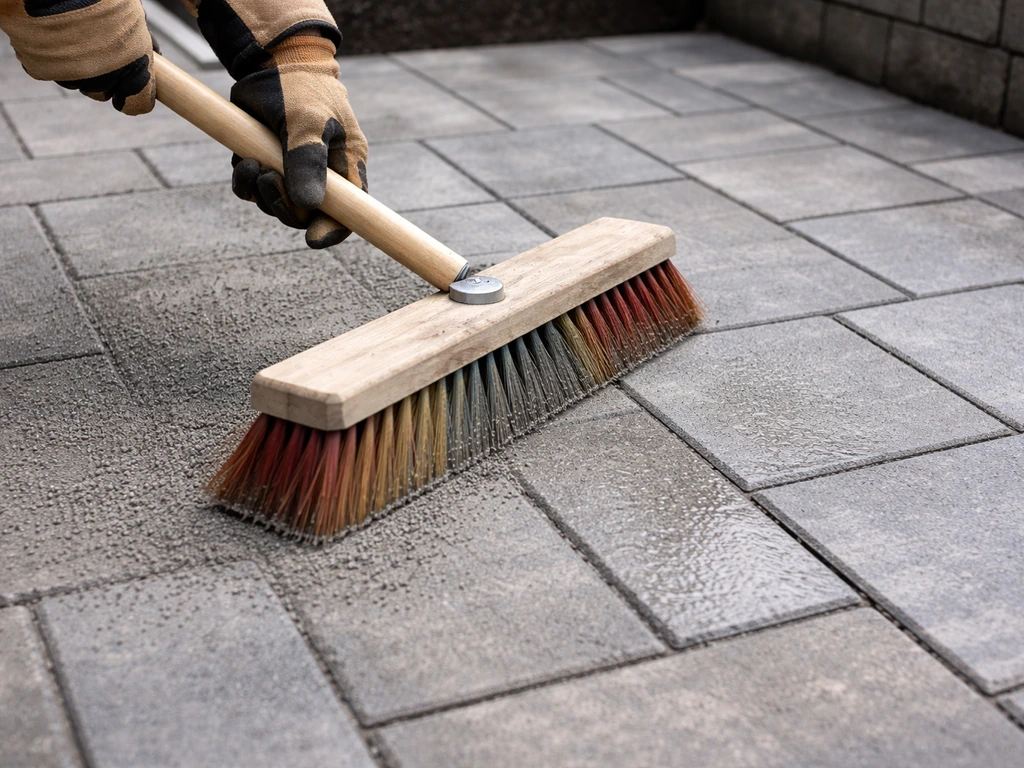
Sweep polymeric sand across the entire patio surface and work it into the joints with a push broom. Polymeric sand contains binding agents that harden when wet, which helps lock pavers together and resist weeds and ants. Make multiple passes to ensure joints are fully packed. Then blow or sweep off every trace of sand from the paver faces. If you leave any on the surface when you wet it down, it will haze and bond to the pavers. Lightly mist the entire surface with water according to the manufacturer's directions and let it cure for 24 hours before walking on it.
Sealing the Patio
Sealing isn't strictly required, but it's a smart move for longevity and appearance. Wait at least 30 days after installation before applying sealer so the pavers can fully cure and efflorescence (white mineral deposits) can appear and be cleaned off first. Use a penetrating or film-forming concrete paver sealer and apply it with a roller or sprayer. Sealer protects against oil stains, UV fading, and weed growth in joints, and it makes cleanup much easier for years to come.
Final Cleanup and Inspection
Once the polymeric sand has cured and any sealer has dried, do a thorough walkover of the entire patio. Press down on pavers to check for any that rock or feel hollow. Look for any joints that are under-filled and top them up with a little extra sand. Check that water drains toward the outer edge and doesn't pool anywhere near the house. Sweep away any debris, backfill soil against the edge restraints on the outer perimeter to hide them, and plant grass or mulch up to the edge.
Common Mistakes to Avoid
- Skipping the slope: Water that pools on a patio or drains toward your house foundation will cause serious problems. Always build in that 1/8-inch-per-foot grade away from the structure.
- Not compacting in lifts: Dumping all your base gravel at once and compacting once is a recipe for settling. Two-inch lifts, compacted separately, are non-negotiable.
- Using the wrong sand: Coarse concrete sand (not play sand, not polymeric sand) goes under the pavers as your bedding layer. Polymeric sand goes in the joints after installation.
- Skipping edge restraints: Without them, your patio will slowly spread outward and the whole pattern will loosen within a few years.
- Starting from the wrong corner: Begin laying from the most visible, most-used corner and work outward so any cut pieces end up at the least visible edges.
- Neglecting utility marking: Always call 811 before digging. It's free and could save your life.
Tools and Materials Checklist
| Category | What You Need |
|---|---|
| Layout | Batter boards, mason's line, line level, framing square, tape measure, marking paint or stakes |
| Excavation | Flat spade, mattock, wheelbarrow (or mini excavator rental for large areas) |
| Base build | Crushed stone aggregate (4 in. deep), geotextile landscape fabric, plate compactor (rental) |
| Edging | Plastic or aluminum edge restraints, spikes, hammer |
| Sand bed | Coarse concrete sand, 1-in. diameter conduit (x2 for screed rails), straight 2x4 |
| Installation | Rubber mallet, long straightedge or 4-ft level, string line |
| Cutting | Angle grinder with diamond blade or wet masonry saw (rental) |
| Finishing | Polymeric sand, push broom, garden hose with mist setting, paver sealer and roller |
Your Next Steps to Get Started Today
The best way to start is to go outside right now and walk your intended patio area. Take measurements, note any slopes or drainage issues you can already see, and sketch a rough layout. Then price out your materials at a local landscape supply yard (they're almost always cheaper than big box stores for gravel and sand) and plan your rental equipment needs. A basic 10x10 or 12x12 paver patio is completely achievable over a single weekend with one helper, the right rentals, and this process locked in your head.
If you want to dial in your specific size first, detailed guides for both 10x10 and 12x12 patio builds break down exactly how much material you'll need and how the process scales. For a 12x12 patio specifically, make sure you measure for 144 square feet of paver coverage and plan your cutting and layout accordingly 12x12 patio builds. And if you're newer to this kind of project, a beginner-focused walkthrough strips the process down to its simplest form so nothing feels overwhelming. Pick your size, order your materials, and get digging.
FAQ
How do I figure out the patio depth if I have existing landscaping or a door threshold to match?
Before you start, confirm you have enough clearance for the paver thickness plus the bedding sand and base (about 7.5 inches for a typical paver stack), and leave room for the slope to drop away from the house. If an existing patio, walkway, or door threshold is in the way, you may need to redesign the height or step the patio rather than trying to “fit it” by reducing the base.
What should I do if the patio drains toward the house or pools after installation?
If water pools, the fix is usually to correct the base slope, not just the pavers. After pavers are installed, small pooling areas can sometimes be corrected by lifting and resetting the affected pavers (adding or removing bedding sand), but persistent pooling near the house usually means the gravel layer was off and should be reworked.
Can I use polymeric sand as the bedding sand to make the patio lock in faster?
Use polymeric sand only for paver joint filling, not as bedding sand. If you use polymeric sand in the joint instead of concrete sand, it can haze more easily and may reduce adjustability during installation. For bedding, use coarse concrete sand, keep it un-compacted, then compact only after pavers are set.
Do I need expansion gaps near the house, posts, or steps?
Plan for expansion and edge conditions. Even if you follow the slope, patios can heave or shift if they are rigidly trapped against structures. At walls, stair returns, or columns, include a small gap (typically with a compressible joint material) so the patio can move slightly without cracking against the rigid surfaces.
Why do some pavers rock or feel hollow even after compacting the patio?
Do not compact the bedding sand, and do not expect to correct an uneven gravel base once sand and pavers are down. If your pavers rock, the cause is almost always a hollow in the sand layer caused by debris under the pavers, or a sand bed that is not consistent across the area. The fix is to lift the affected paver(s), clean out any material, add or remove sand, and reset until they sit firmly.
How do I handle layout so I do not end up with tiny paver slivers around the edges?
For cuts at the perimeter, the goal is a consistent border row width that minimizes narrow “sliver” pieces that can crack or look misaligned. Dry lay the paver pattern first, then shift the whole layout so the smallest cuts are acceptable, and adjust your perimeter lines before you dig if needed.
What changes should I make for a patio in a cold climate with frost?
In freezing climates, the frost concern is about moisture and freezing expansion. If you are installing in an area with more freeze-thaw exposure or where the patio is near vehicle loads, consider a thicker base (some installers use 6 inches of gravel) and make sure drainage slope is correct. Also ensure the soil under the geotextile is free of organics, because trapped organic material can hold water and worsen frost movement.
Can I build a patio directly over roots or thick tree sections if I remove the grass?
You generally want to avoid building over thick roots or cutting out only part of the root zone. Remove all vegetation and organic material in the excavation area, and if tree roots are extensive, consider relocating the patio or installing a root barrier system designed for hardscape. Otherwise, root growth can lift pavers and break joint spacing.
How do I avoid polymeric sand haze or joint failure after watering?
If you install polymeric sand too soon or without proper curing, it can clump, haze, or fail to lock joints. Ensure the pavers are fully seated and joints are packed, then mist lightly and follow the recommended cure window (often about 24 hours) before traffic. Also sweep off any sand from the paver faces before wetting.
Can I build a curved patio with the same steps, and what are the common mistakes?
Yes, but plan for access and layout. You will likely need more cutting, and you may need to slightly adjust base thickness and edging so the curve stays true. For curves, dry lay pavers first to confirm you can maintain consistent joint spacing, then set restraints at the curve points to prevent edge migration.