To draw a patio plan you can actually build from, start by measuring your yard and sketching a scaled base drawing on graph paper, then layer in dimensions, drainage slope, and materials until you have a single sheet that tells you exactly what to dig, fill, and lay. Most homeowners can do this with a tape measure, a pencil, and a $2 pad of quarter-inch graph paper, no design software required.
How to Draw a Patio Plan and Design for DIY Builders

Nolan Carver
4 Jun 2026
Start with measurements and a simple base sketch
Before you draw anything, go outside and measure. You need three things: the overall dimensions of your yard or the area you're working with, the position of the house wall (and any doors leading outside), and any fixed obstacles like trees, AC units, or fence posts. Write every measurement down on a rough freehand sketch, it doesn't have to be pretty, it just needs to be accurate.
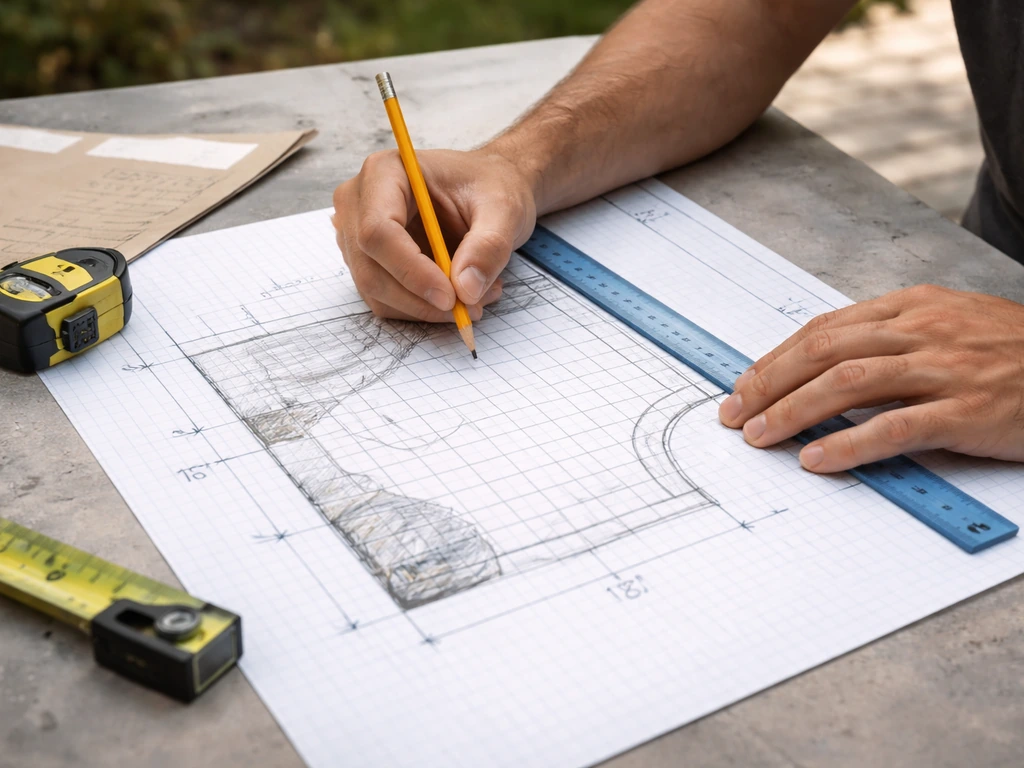
Once you have your measurements, move to graph paper. A 1/4-inch scale works well for most residential patios: every quarter-inch square on the paper represents one foot of real space. So a 16-foot by 20-foot patio would be 4 inches by 5 inches on your sheet. This is the standard architectural 1:48 scale, and it keeps the drawing manageable while still fitting useful detail.
Draw the house wall first. Mark every exterior door that opens onto the patio area, and note the door width and the threshold height if there's a step involved. Those fixed points are your anchors, everything else in your design will radiate out from them. Add a north arrow in one corner of the sheet (just a simple 'N' with an arrow pointing north). This matters later when you're thinking about sun exposure and shade.
At this stage, keep it simple. A rectangle showing the house footprint, a few door marks, property boundaries, and any big obstacles is all you need. This is your base plan. Think of it as the blank canvas you'll draw the patio on top of.
Choose a patio layout and capture it in a plan
Now that you have your base sketch, it's time to decide where the patio actually goes and what shape it takes. For a complete guide, include the right patio layout, dimensions, drainage, and materials in your design before you start building decide where the patio actually goes. Lightly pencil in a few different options, you can erase. The most common layouts are attached patios that connect directly to the house, detached patios set out in the yard, and L-shaped or wraparound patios that follow a corner of the house.
An attached patio is usually the easiest starting point for drawing because your house wall acts as one edge. The patio extends outward from a door, and you're essentially defining three sides. Detached patios need all four sides defined and should include a clear path from the house. Mark that path on your plan too, even if it's just a dotted line for now.
Once you've picked a layout, draw it cleanly on your base plan. Use solid lines for the patio perimeter and dashed lines for anything that isn't a hard edge, like a future garden bed or a proposed path. Label your drawing with the scale (e.g., '1/4 inch = 1 foot') and your north arrow. This turns your rough sketch into what's officially called a base plan, the foundation for every more detailed drawing you'll add later. If you're also thinking about landscaping around the patio, keep a separate layer or sheet for that so the patio drawing stays clean and readable.
Decide on dimensions, shapes, and orientation

This is where you lock in the numbers. The most useful thing you can do at this stage is write actual dimensions on every edge of the patio shape in your drawing. Don't leave any side unlabeled, when you're in the yard staking things out, you'll want to read the numbers off one sheet without doing mental math.
For shape, rectangle and square patios are the easiest to draw, build, and cut pavers for. Curved or irregular shapes look great but add complexity in both the drawing and the build. If you want a curved edge, you can approximate it on paper using a compass or tracing a round object. Just know that each curve means more cutting on-site. L-shapes are a nice middle ground, they're geometric but add visual interest and can wrap around a door or corner.
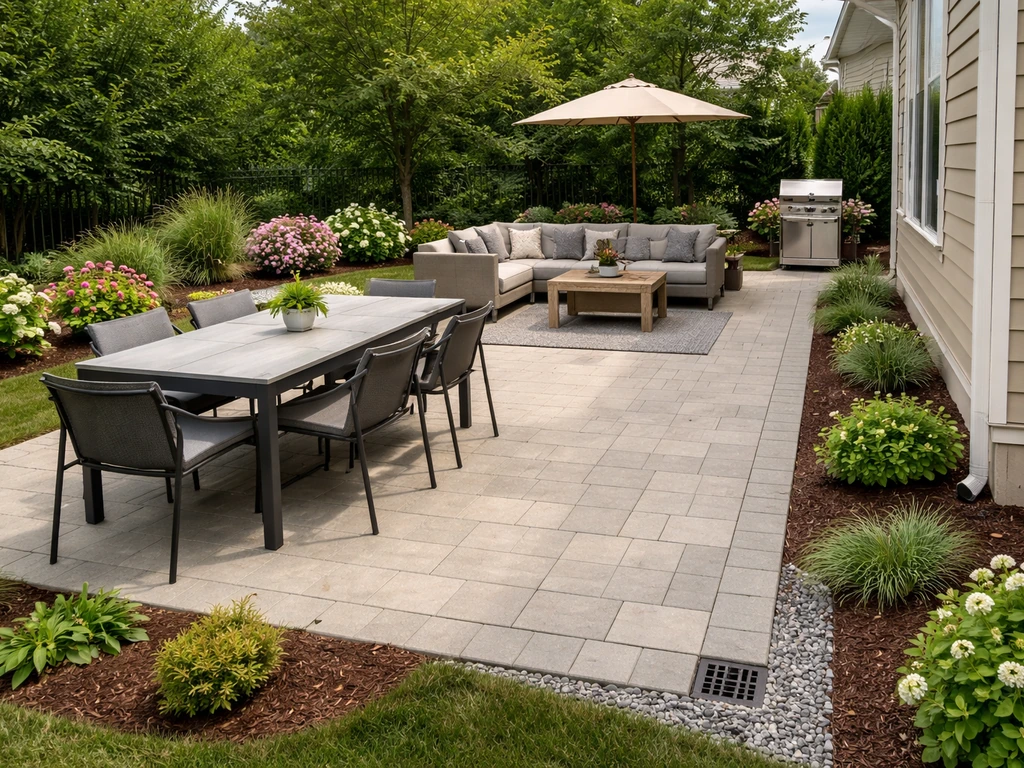
On your drawing, mark the distance from the patio edge to the house wall, to property lines, and to any structures. Also mark where you want outdoor furniture to go, roughly sketched boxes for a table and chairs, a sofa set, or a grill station. This isn't decoration, it's how you verify the patio is actually big enough before you start digging. Once you have the basic measurements, you can start using this kind of sizing logic to guide how to design patio layouts that fit your space and needs verify the patio is actually big enough. A dining set typically needs a 10-by-12-foot zone minimum, and a lounge area needs similar space.
Orientation matters more than people expect. If you want a step-by-step walkthrough on the full design process, use this guide on how to design outdoor patio plans from measurements to materials Orientation matters more than people expect.. A south-facing patio in the northern hemisphere gets the most sun year-round, which is great in spring and fall but brutal in summer. If your planned location is south-facing, note where a shade structure or pergola might go on the drawing. If it's north-facing, it will be shaded and cooler, fine for hot climates, but maybe not ideal for a spot where you want to sit on winter mornings. Marking sun path on your plan takes about 30 seconds and saves real regret later.
Add grading and drainage details to the drawing
Drainage is where most DIY patio drawings fall short, and it's the detail that matters most for long-term performance. Your patio surface needs to slope away from the house, the standard minimum is 1/4 inch per foot (that's a 2% slope). So a patio that's 12 feet deep needs to drop about 3 inches from the house wall to the outer edge. This keeps water from pooling against your foundation.
On your drawing, show slope with a simple arrow pointing in the direction water should flow, labeled with the slope rate. For example: an arrow pointing away from the house with '1/4 in./ft. slope' written beside it. If your yard has a natural slope that conflicts with this, note both the existing grade and the finished grade you're targeting. Some installations need 1/8 inch per foot as an absolute minimum, but 1/4 inch per foot is the number to aim for if you want reliable runoff in heavy rain. TCC Materials installation guidance also specifies a minimum 1/8 inch per foot for proper drainage and recommends compacting the base layers uniformly to the required depth and slope Some installations need 1/8 inch per foot as an absolute minimum, but 1/4 inch per foot is the number to aim for if you want reliable runoff in heavy rain..
If the patio has more than one section or drains toward a low corner rather than a single edge, use multiple slope arrows. The goal is that anyone reading the drawing can look at it and immediately understand where water goes. Mark any areas where water might pool, a low spot between the patio and a fence, for example, and note whether you'll address that with a channel drain, a gravel trench, or regrading the surrounding soil.
Also note the existing ground level at the house wall versus the outer edge on the drawing. This tells you how much grading work is needed before you even start laying base material, and it helps you figure out whether steps are required to transition from the door threshold to the patio surface.
Specify materials, joints, edges, and features on the design
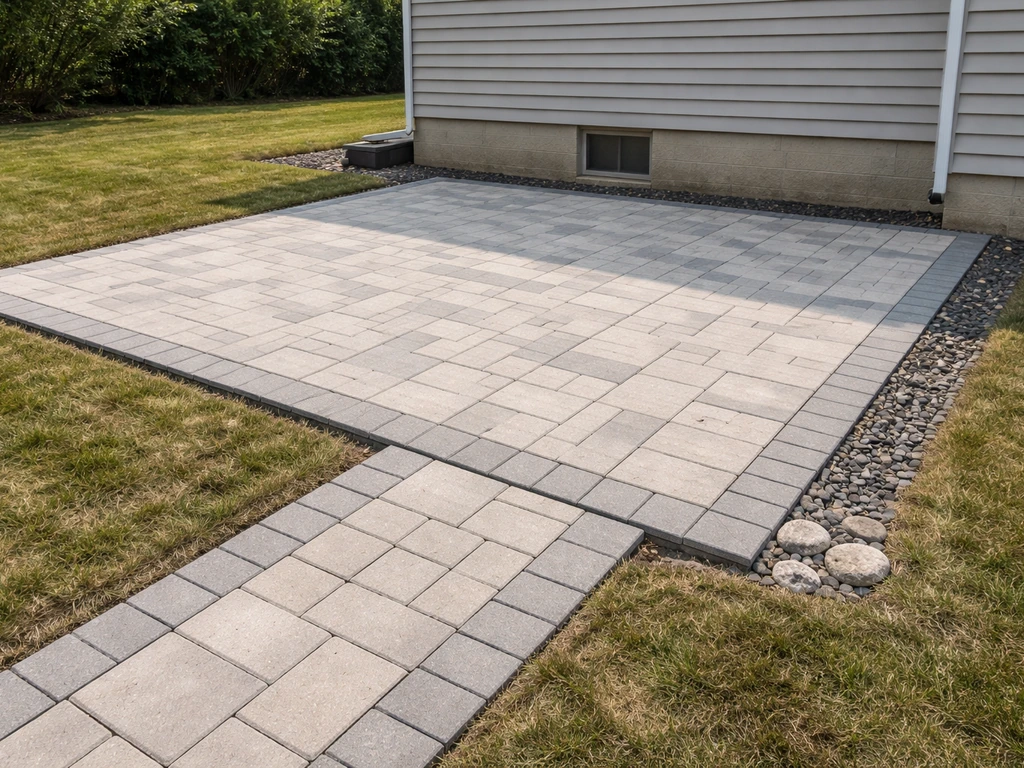
Once your plan shows the shape and slope, start adding material callouts. These are short labels on the drawing that tell you (and anyone helping you build) exactly what goes where. For a paver patio, the typical callouts include the paver type and size, the laying pattern, the edge restraint type, and any special features like steps or a border course.
For lay pattern, the most common options for a DIY patio are running bond (staggered rows like brick), basketweave (pairs of pavers alternating direction), and herringbone (pavers set at 45 or 90 degrees in a zig-zag). Running bond is the easiest to lay and draw. Herringbone is the strongest structurally and handles traffic well but requires more cuts along the edges. Pick a pattern and note it in the drawing's legend or as a callout on the patio area itself.
Edge restraints go along all exposed edges of the patio to hold the pavers in place and prevent spreading. Mark them as a thick line along the perimeter on your drawing and label the material (plastic edging, steel edging, or concrete soldier course). Where the patio meets the house, note whether you'll use a gap filled with polymeric sand or a narrow expansion joint. For concrete patios, expansion joints should be placed where the slab meets the house wall and are typically filled with a resilient material about 1/4 to 1/2 inch thick. Sundek’s expansion joint whitepaper references joint spacing guidance and notes that expansion joints are critical in concrete construction to manage slab movement expansion joints should be placed where the slab meets the house wall.
Add any features you're planning: steps (with riser height and tread depth noted), a fire pit zone (mark a clear zone around it for safety), a built-in planter wall, or a pergola footprint. Each feature gets a label and a dimension on the drawing. If a feature like steps involves a grade change, note the height difference. You don't need architectural drafting skills for this, just clear labels and consistent dimensions.
| Drawing Element | What to Include | Why It Matters |
|---|---|---|
| Paver pattern | Pattern name (e.g., running bond, herringbone) and paver size | Determines cut waste and layout starting point |
| Edge restraint | Material type and all edges where it's needed | Prevents paver spread over time |
| Expansion/control joints | Location and gap width (1/4 to 1/2 in. for concrete) | Manages slab movement and cracking |
| Steps | Number of risers, riser height, tread depth | Ensures safe transition and correct material quantity |
| Special features | Fire pit, pergola footings, planters with dimensions | Confirms clearances and affects base prep |
Draft a build-ready patio plan with layers, notes, and next steps
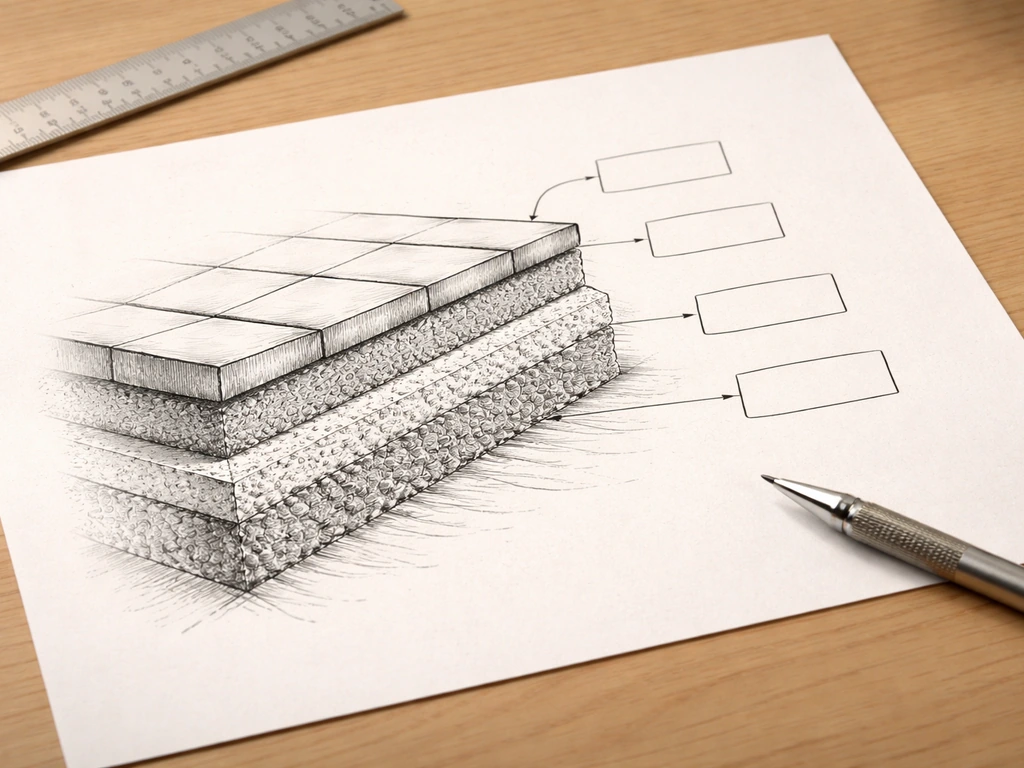
The final drawing is where everything comes together on one sheet. Think of it as a cross-section view that you add to your top-down plan. In your cross-section (a side-view slice through the patio), you show every layer from the native soil up to the paver surface. For a standard paver patio, that stack is roughly: compacted native soil, about 4 inches of compacted crushed gravel base, about 1 inch of bedding sand, then the pavers themselves. Label each layer with its depth and material.
On the top-down plan, add a few final touches to make it truly build-ready. Include a legend (a small box in the corner that explains any symbols you used). Add a scale bar so the plan can be read even if it's printed at a different size. Double-check that every dimension is shown, every edge restraint is marked, and your slope arrows are visible. Write a note about where the string lines or layout stakes will go, this is especially useful if you're referencing the plan on-site.
Here's a quick checklist of what your finished build-ready plan should include before you consider it done: Once your drawing is set, you can translate it into a cement patio build by choosing the right thickness, mix, and joint layout.
- Overall patio dimensions with all edges labeled
- Distance from house wall and any property lines
- North arrow and scale notation (e.g., 1/4 in. = 1 ft.)
- Slope arrows with rate labeled (1/4 in./ft. away from house)
- Base layer callout in cross-section (4 in. gravel, 1 in. sand, pavers)
- Paver pattern and size noted on the plan
- Edge restraint marked on all exposed edges
- Expansion joints noted where patio meets house or other structures
- Steps dimensioned (riser height, tread depth, number of steps)
- Any features labeled with clearance zones (fire pit, pergola footings)
- Legend explaining any symbols used
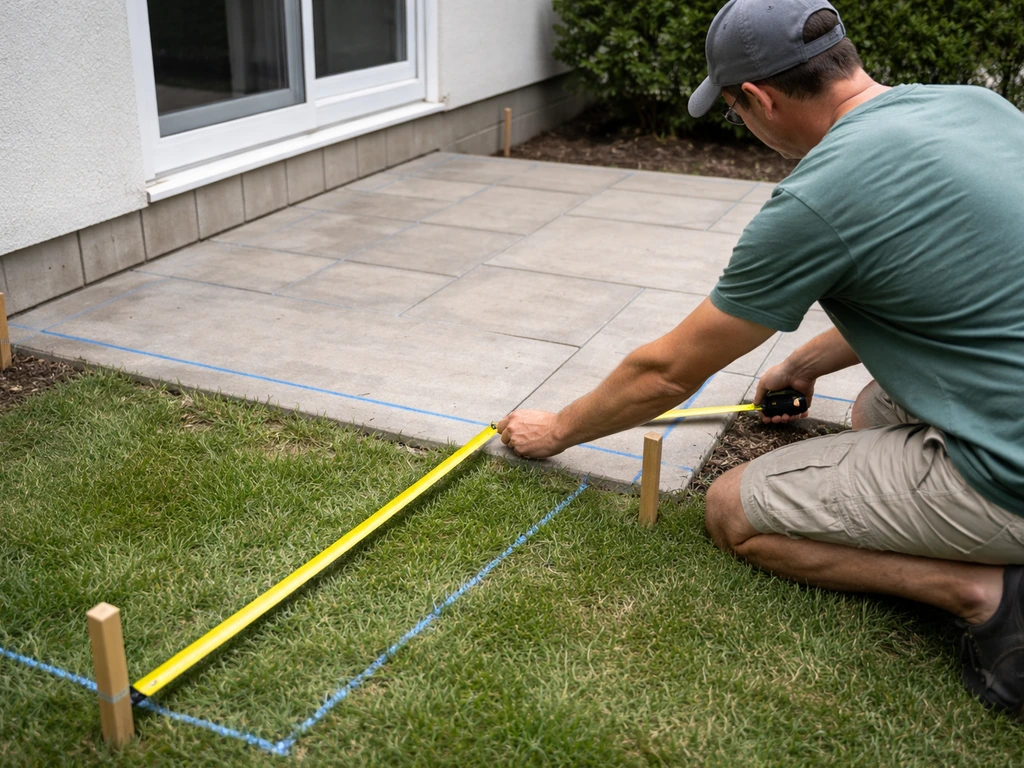
Once your plan checks all those boxes, you're ready to take it outside and start staking. Use your drawing to set your string lines for the perimeter, confirm the slope with a level and a tape measure, and verify the base depth you need to excavate. The drawing doesn't need to be beautiful, it needs to be accurate and complete. A clear, hand-drawn plan on graph paper will serve you just as well as a CAD drawing for a residential patio build. If you want to go deeper on the design and construction decisions, follow a complete guide on how to design and build a patio.
If you find yourself wanting to go deeper on the design side, thinking through furniture zones, landscaping around the edges, or how to handle a complex yard shape, the planning and design process deserves its own focused attention. If you want those edges to look intentional, learn how to design patio landscaping so plantings, lighting, and pathways work with your layout landscaping around the edges. This article covers the drawing mechanics, but the bigger picture of how to design a patio layout, how to think through your outdoor space, and how to approach design and build as one continuous process are all natural next steps once you have a solid plan in hand.
FAQ
What scale should I use if my patio is bigger or smaller than the typical 16-by-20-foot example?
Pick a scale that keeps the whole plan on one sheet with readable numbers. If 1/4 inch equals 1 foot makes the patio too small to label, move to 3/8 inch equals 1 foot or reduce the scale (for example 1/8 inch equals 1 foot) but update it consistently in your legend and dimension callouts.
How many inches of slope should I draw if I am using an irregular patio shape?
Use the 1/4 inch per foot rule as your target, then apply slope arrows for each drainage direction you plan. If two edges shed water to two different low points, show separate slope rates and clearly label which corners or sections are the receiving areas.
Do I need to show steps, door swings, and threshold heights on the patio drawing?
Yes, at least roughly. Mark the door opening direction and the threshold elevation relative to the patio surface so you can check clearance and whether the patio needs a transition step, ramped height, or a level landing at the doorway.
What common mistake should I avoid when labeling dimensions on a patio plan?
Avoid leaving any edge “implied.” Every straight segment of the patio perimeter, plus key offsets to the house, property line, and obstacles, should have a dimension. If a measurement is important for digging or cutting, it belongs on the drawing, not only in your notebook.
How should I indicate where water will pool, and what should I do if my yard has an existing low spot?
Mark the low area on the plan and show how you’ll handle it (more drop toward a drain, a channel drain location, or a gravel trench). If the low spot cannot be corrected with grading, you may need to revise the patio footprint or add a dedicated drainage outlet so water does not back up against the foundation.
Should my furniture layout be “to scale” on the drawing?
You can keep it approximate, but do show spacing zones. Sketch the table and seating boxes with at least enough room for walkways, then confirm the clearance by measuring real-world distances from the plan, not by sight alone.
How do I draw and plan for curved patio edges without turning the job into a cutting nightmare?
Approximate the curve with a few straight chords (facets) or use a simple arc drawn with a compass, then expect more edge cuts. On the plan, label the method you chose (arc radius or number of facets) so the installer can reproduce the curve consistently.
What should I put in a legend if I’m using dashed lines and thick perimeter lines?
Include at least what the line styles mean (solid perimeter, dashed future bed or path, dashed layout reference) and any symbol meanings (for example, a small box for furniture, a triangle for grill zone). Keep it short so someone can interpret the plan quickly during staking and excavation.
Do I need a cross-section drawing for a DIY patio plan?
It’s strongly recommended, especially if drainage, steps, or different surface materials are involved. A simple cross-section showing soil, gravel base thickness, bedding sand thickness, and the paver height clarifies how much material depth you need and prevents surprises when the base is excavated.
How can I check my plan is buildable before I start digging?
Do a quick field verification using the drawing: set the perimeter with stakes or string lines, confirm the planned slope with a level, and measure base depth and transitions. If door clearance, slope direction, or setbacks do not match what you intended, revise the plan before you remove soil.
Are expansion joints or polymeric sand joints required to be detailed on the patio drawing?
Yes, detail them where they matter. Mark the joint location between the patio and the house (and any slab transitions if present) and note whether the joint uses a resilient filler or polymeric sand. This helps prevent cracks from being sealed incorrectly or skipped during installation.