Designing a patio yourself comes down to six things done in the right order: assess your site, set your dimensions, pick your materials, plan your drainage and base, decide on features, then build a realistic budget and timeline. If you skip ahead to picking pavers before you've figured out your slope situation or how you'll actually use the space, you'll end up redesigning mid-project. Follow the sequence below and you'll finish with a complete, buildable plan you can execute yourself.
How to Design a Patio: DIY Layout, Materials, Drainage

Nolan Carver
19 May 2026
Start with your site and goals

Before you sketch a single line, spend 20 minutes walking your yard at different times of day. You're looking for four things: sun exposure, prevailing wind direction, the natural grade of the ground, and the relationship between the patio location and your house's back door. A south-facing patio that gets full afternoon sun in summer might need shade structures; a north-facing spot might be pleasant all day. Wind matters more than most people expect, especially if you want to use the patio for dining.
Next, get honest about how you'll use the space. Dining areas, lounging zones, and cooking stations each have different space requirements and affect your layout choices completely. A patio built primarily for a dining table needs clearance around chairs (plan for 24 to 30 inches of pull-out room per seat), while a lounging patio built around deep sectional furniture has a completely different footprint. Mixing both is totally doable, but you need to plan for it from the start.
Check your grade carefully. If the ground slopes significantly toward the house, drainage will be your biggest design challenge. Walk the perimeter, look for low spots where water pools after rain, and note where any existing downspouts discharge. Also check your back door threshold height. The IRC limits how far below the threshold a landing or patio surface can be (no more than 1.5 inches lower than the top of the threshold at an exit door), so that measurement will influence your finished surface elevation.
If you're planning anything with a structure, a fire pit, a gas line, or significant excavation, check your local permit requirements before you finalize the design. Some jurisdictions require permits for patio slabs over a certain square footage; others have specific setback rules. It takes one phone call or a quick look at your city's website to confirm, and it saves real headaches later.
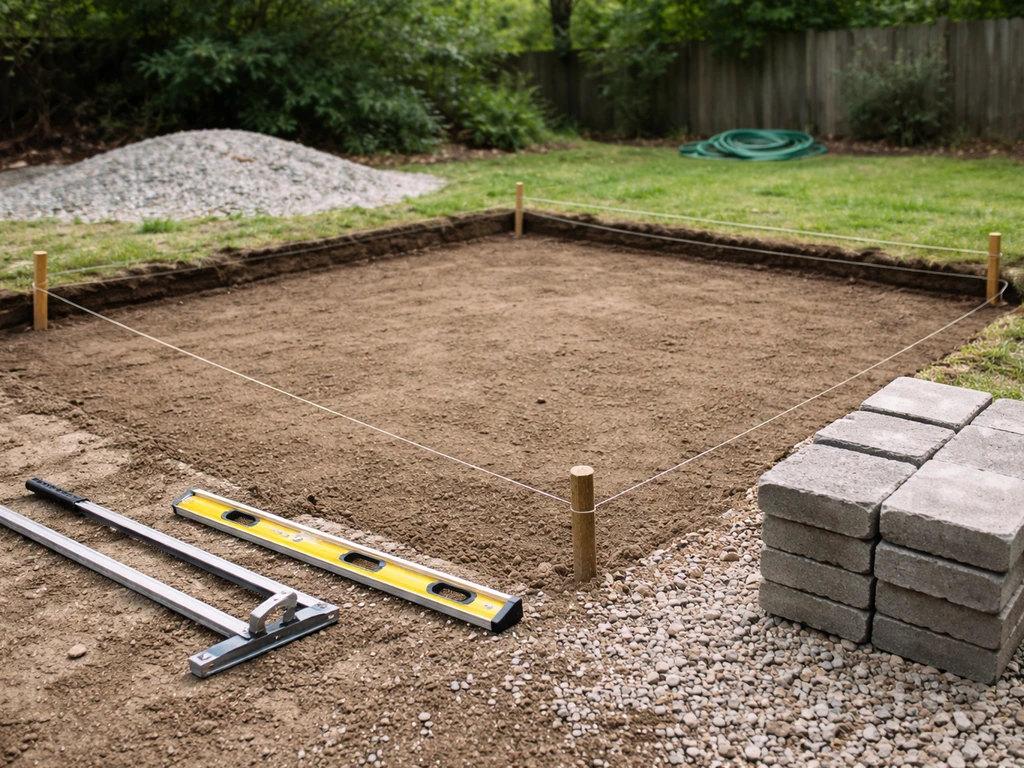
Plan your layout and dimensions
Sketch your layout on graph paper or use a free tool like SketchUp or even just your phone's notes app with rough measurements. If you want to go deeper after you sketch your layout, see how to design patio landscaping for more end-to-end guidance. The goal at this stage is not a perfect drawing but a scaled representation you can use to check whether your furniture actually fits. A 10x10 patio (100 square feet) is the absolute minimum for a small bistro table and two chairs. A standard 4-person dining set with chairs pulled out needs roughly 12x12 feet. If you want a separate lounging zone and a dining zone, budget 300 to 400 square feet to do it comfortably.
Leave circulation paths of at least 36 inches wide between zones or between furniture and walls, which aligns with standard accessibility and comfort benchmarks. If two people need to pass each other regularly, 48 inches is more comfortable. Between seating zones, such as between a lounge area and a dining route, keep at least 30 inches clear. These aren't arbitrary numbers; they're the difference between a patio that feels spacious and one that constantly feels cramped.
When you're drawing the shape, keep it simple unless you have a specific reason to go complex. Rectangular patios are far easier to install correctly than curves or irregular angles, especially for DIYers. Curves look great but require cutting pavers or custom-formed concrete, which adds both time and material waste. L-shapes work well for wrapping a corner of the house or separating zones. If this is your first build, a clean rectangle will give you the best result with the least frustration.
Mark your layout in the yard using stakes and string lines before you commit to anything on paper. If you are still working out the patio details, follow this step-by-step process to learn how to draw a patio layout that fits your space. This is the step most people skip, and it's the one that saves the most regret. Stand inside the staked area and imagine your furniture there. Walk through it. Adjust the stakes until it feels right, then measure and record those final dimensions.
Choose your surface material (cost vs. durability)
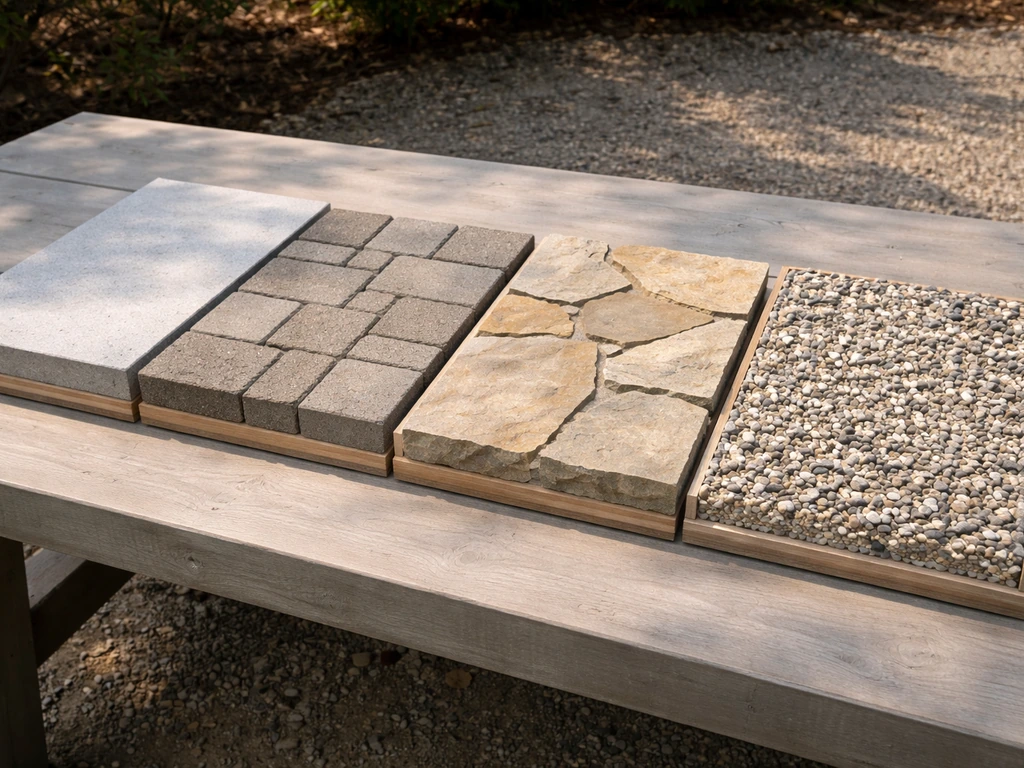
Material choice affects your budget, your installation process, your maintenance load for the next 20 years, and how the patio actually feels underfoot. Here's a practical comparison of the most common options for DIY builds.
| Material | Installed Cost (2026) | DIY Difficulty | Maintenance | Durability | Best For |
|---|---|---|---|---|---|
| Concrete pavers | $8–$25/sq ft installed; lower DIY-only | Moderate | Low to moderate (polymeric sand, sealing) | Excellent; individual units replaceable | Most DIYers; flexible design |
| Poured concrete | $6–$15/sq ft installed | Moderate–High | Low (seal every few years) | Good; cracks without control joints | Large flat surfaces, clean look |
| Natural stone | $15–$35+/sq ft installed | Moderate–High | Moderate (sealing, weeding) | Excellent if installed correctly | High-end aesthetics, longevity |
| Gravel/decomposed granite | $2–$6/sq ft installed | Easy | Moderate (raking, topping off) | Fair; shifts over time | Budget builds, informal spaces |
| Brick | $10–$20/sq ft installed | Moderate | Low | Very good | Classic look, warm climates |
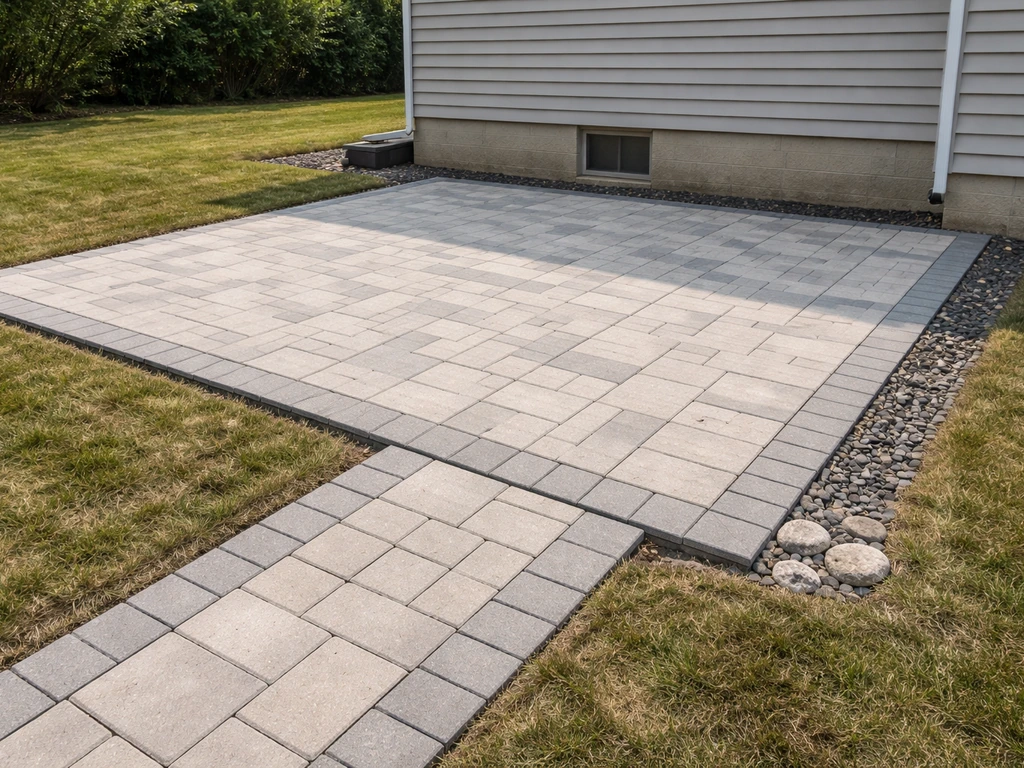
For most DIYers, concrete pavers are the sweet spot. They're forgiving during installation because you can adjust individual pieces before locking them in, and if one cracks years later you can replace just that unit. Poured concrete is cheaper per square foot but less forgiving of mistakes and requires control joints placed correctly to prevent cracking. Natural stone is beautiful but heavy, expensive, and harder to cut accurately without the right tools.
Slip resistance matters more than most people consider during the design phase. Textured concrete pavers and tumbled or brushed concrete both perform better when wet than polished stone or smooth poured concrete. If your patio will be shaded and damp or you live somewhere with frequent rain, prioritize texture in your surface choice.
Drainage, slope, and base preparation
This is the section most DIY guides gloss over, and it's the reason patios fail. If your base isn't built right and your slope isn't correct, you'll have water pooling on the surface, pavers shifting, and eventually a surface that's uneven and unsafe. Getting this right during the design phase (not the build phase) is what separates a 20-year patio from a 5-year fix-it project.
The slope rule you need to know
Your finished patio surface needs to slope away from the house at a minimum of 1/8 inch to 1/4 inch per foot. A 2% slope (1/4 inch per foot) is the standard minimum for exterior slabs, including concrete. For pavers, ICPI guidance confirms the slope-to-drain concept: finished surfaces should pitch away from structures so water moves toward a drain, lawn, or other permeable area rather than pooling or flowing toward your foundation. For a 12-foot-deep patio at 1/4 inch per foot, you're dropping 3 inches from house to outer edge. Work that into your grade planning before you dig.
Base construction basics
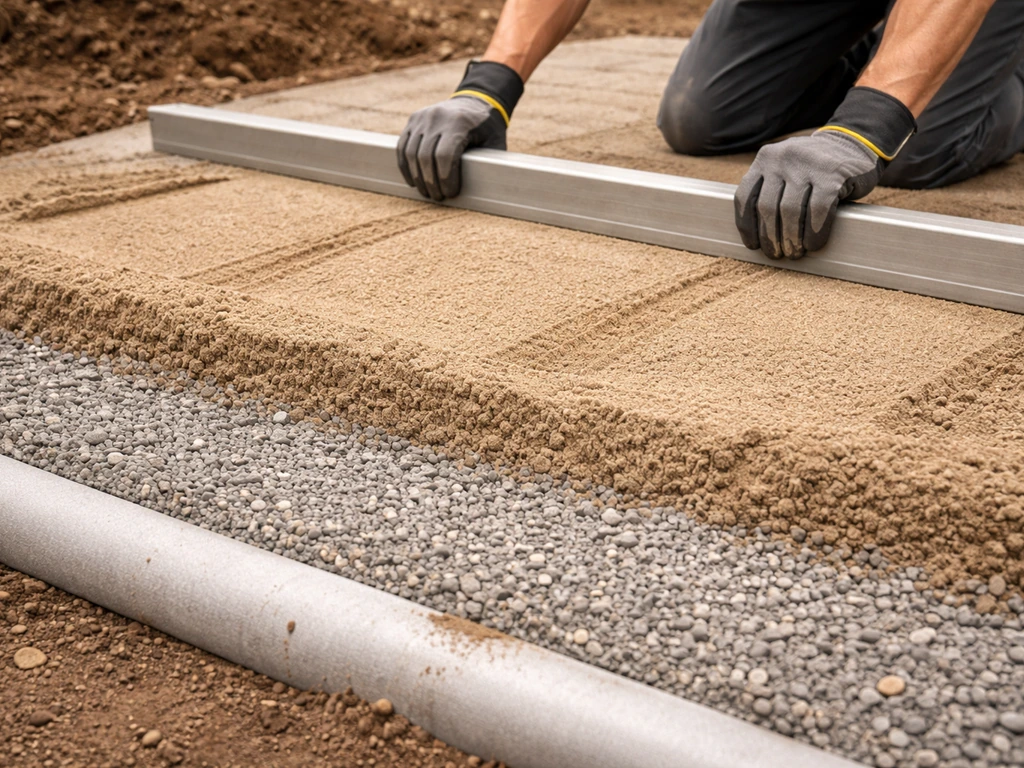
The ICPI's standard installation sequence for pavers goes like this: excavate and compact the subgrade, lay an optional geotextile fabric (highly recommended if you have clay soil, tree roots, or loose fill), install and compact your gravel base in layers, add bedding sand, screed it flat, then lay your pavers. Basalite’s installation guidance also emphasizes proper base and subbase compaction and notes that in conditions like freeze-thaw, you may need to adjust design thickness or conditions base and subgrade compaction. The gravel base is where most DIYers cut corners. In normal soil conditions you typically need 4 to 6 inches of compacted gravel base. In freeze-thaw climates or on soft or clay soils, that number goes up. Compact in 2 to 3 inch lifts using a plate compactor, not just by tamping by hand. The bedding sand layer on top should be about 1 inch thick after compaction.
If you're pouring concrete instead of laying pavers, the process is similar up to the base prep stage. If you're specifically considering a poured slab, see how to design a cement patio for the concrete-specific steps like forming, slopes, and control joints cement patio design. You'll excavate, compact, add gravel base (typically 4 inches), build your forms, then pour. Concrete needs about 24 to 48 hours before you can walk on it, 7 to 10 days before light furniture use, and a full 28 days to reach design strength. Don't rush that timeline.
For polymeric sand joints between pavers, protect the surface from rain for at least 24 hours after installation so the sand can cure without washing out. That detail alone saves a lot of re-doing work.
Features and add-ons worth planning for now
The best time to plan for a fire pit, an outdoor kitchen, built-in seating, or a raised section is before you break ground, not after. Retrofitting these features into an existing patio almost always costs more and looks less intentional than designing around them from the start.
Fire pits
If you want a fire pit, NFPA guidance is commonly summarized as keeping a fire pit at least 10 feet from any structure or combustible material, and many local jurisdictions have their own specific rules layered on top of that. Check with your local authority having jurisdiction (your city or county building or fire department) early, because some areas restrict open burning outright, and others require specific clearances or even permits. Design the fire pit zone into your layout from day one, including the 10-foot clearance radius, and make sure it doesn't conflict with your circulation paths or seating zones.
Outdoor kitchens and grills
Built-in grill areas need more clearance than most people expect. Design guidance for outdoor kitchens suggests a minimum of 32 to 48 inches of clear working space in front of a grill or cooktop, depending on the appliance type. If you're running a gas line, that needs to be part of the design plan (and typically requires a permit and licensed installer). Plan the location of your outdoor kitchen relative to your indoor kitchen or utility connections before you finalize your layout.
Raised patios and retaining walls
If your yard slopes significantly, a raised patio section with a retaining wall may be the cleanest solution. A raised patio levels out your usable surface and can create a dramatic visual effect, but it adds real complexity: retaining walls taller than a few courses need proper batter, drainage behind the wall, and in many jurisdictions a permit if they exceed a certain height (often 4 feet). If you're considering a raised design, plan for a gravel drainage aggregate behind the wall and a way for water to exit so it doesn't build up hydrostatic pressure.
Built-in seating and other upgrades
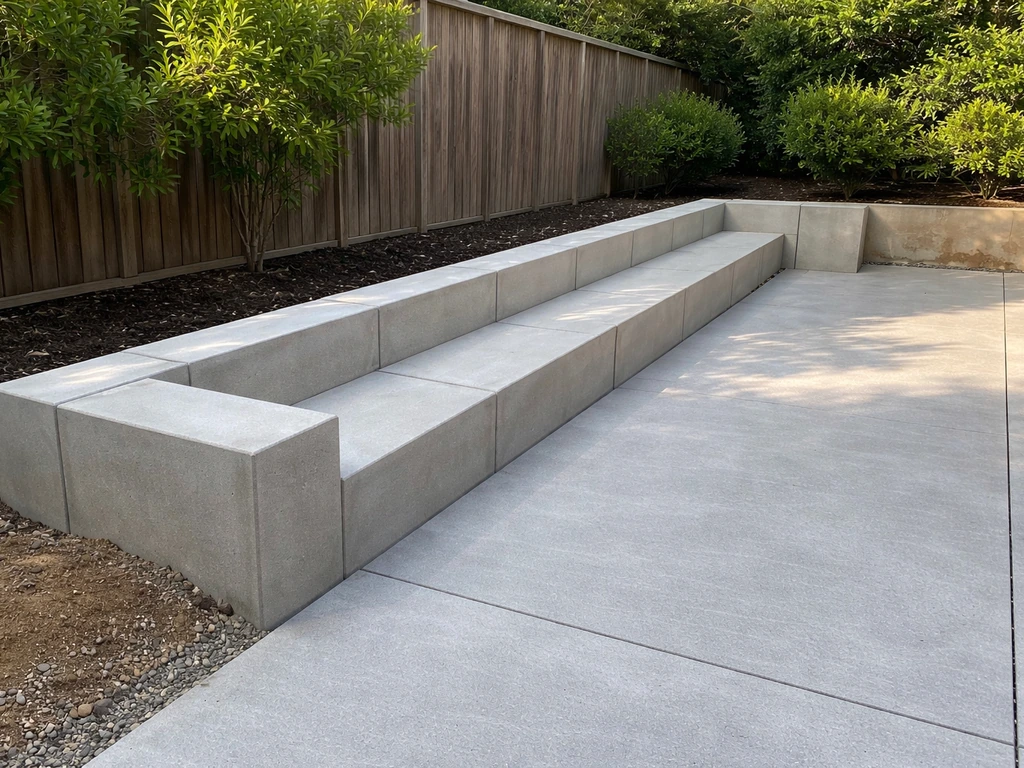
Built-in bench seating along a patio edge is one of the most cost-effective upgrades you can add, and it works especially well on smaller patios where freestanding furniture eats too much circulation space. If you're planning built-ins, design them into your perimeter from the start so edge restraints, paver cuts, and material quantities all account for them. Shade structures like pergolas also need footings, which means more excavation, so plan their post locations before you pour or lay your patio surface.
Budgeting, timeline, and DIY execution steps
What it actually costs
In 2026, installed paver patio costs typically run $8 to $30 per square foot depending on material choice, region, and complexity. DIY material-only costs are significantly lower, often $3 to $10 per square foot for standard concrete pavers plus base materials. A 200-square-foot patio in concrete pavers might cost $600 to $2,000 in materials if you do the labor yourself, versus $1,600 to $6,000 installed by a contractor. The savings are real, but so is the time investment.
Budget for base materials separately from surface materials. Gravel, compactable base, bedding sand, and edge restraints add up fast. A rough rule: your base materials will cost roughly 30 to 50 percent of your total material budget on a standard paver patio. Don't skip them to save money; that's exactly how you end up with a patio that heaves and shifts after one winter.
Realistic timeline for a DIY patio
| Phase | Task | Typical Time |
|---|---|---|
| Design | Site assessment, layout sketch, material selection | 1–2 weekends |
| Permits/Materials | Submit any required permits; order/pick up materials | 1–3 weeks (permit timing varies) |
| Excavation | Dig, remove soil, compact subgrade | 1–2 days (200 sq ft) |
| Base | Gravel base in layers, compact, add bedding sand | 1 day |
| Surface | Lay pavers or pour concrete | 1–2 days |
| Finishing | Edge restraints, polymeric sand, cleanup, curing | 1 day + curing time |
A typical 200 to 300 square foot paver patio done by one or two people over weekends can realistically be completed in 3 to 4 weekends from design to finished surface. Add a week or more if permits are required. Concrete patios have similar timelines but then need the full 28-day cure before heavy use.
Your execution checklist
- Assess your site: sun, wind, grade, drainage, and door threshold height
- Define your goals: dining, lounging, cooking, or combined
- Sketch your layout to scale and stake it out in the yard
- Check permit requirements with your local building department
- Select your surface material based on budget, durability, and DIY skill level
- Calculate your slope: plan for 1/8 to 1/4 inch drop per foot away from the house
- Design your base: 4 to 6 inches of compacted gravel, 1 inch bedding sand for pavers
- Add features to your plan: fire pit clearances, grill zones, raised sections
- Get firm material quantities and a total cost estimate before buying
- Order materials and rent equipment (plate compactor, screed rails)
- Excavate, compact subgrade, install geotextile if needed, build base in layers
- Lay your surface, add edge restraints, apply polymeric sand, and let it cure
If you want to go deeper on any single part of this process, the layout and dimensioning step has its own nuances worth studying before you break ground, and the concrete-specific design process has a few unique considerations around forming and control joints. If you want the full walkthrough, see how to design and build a patio for the complete end-to-end process. The core design principles in this guide apply whether you're building a simple ground-level rectangle or a more complex raised patio with steps. Start with the site assessment, get your slope figured out, and the rest of the decisions fall into place much more naturally.
FAQ
Can I design my patio to be level with the back door threshold?
Yes, but you must keep the finished surface elevation consistent with the door threshold rule you referenced. If your patio is lower than the threshold, doors may not open smoothly, snowmelt or runoff can collect at the step-down point, and accessibility gets harder. When transitioning from patio to a door, pick your finished patio height first (using the threshold measurement), then design the slope away from the house to meet the drainage goal.
If I add a patio drain, do I still need a slope away from the house?
For pavers, the “pitch away from the house” concept is easiest to manage if you decide where water will go before you choose a drain location. A common mistake is adding a surface drain but keeping the overall slab slope toward the home because the grade was set only around the patio perimeter. Instead, set a primary slope toward the drain or permeable area, then adjust minor leveling so individual pavers sit flat while still respecting the overall fall.
What happens if I compact the gravel base by tamping by hand instead of using a plate compactor?
You should not. A base that is not compacted in lifts can settle after the patio is finished, causing pavers to rock or concrete to crack along weakened planes. If you cannot rent a plate compactor, consider scaling the project down, switching to a system designed for lighter compaction requirements, or postponing until you can compact properly in 2 to 3 inch lifts.
Can I add a border or accent band around my paver patio?
Yes, but only if you control the edges and drainage. Edge restraints and a properly graded base are what keep pavers from creeping when the perimeter is cut into or finished with a border. If you want a border, design it early because the border width usually dictates how you lay the main field pavers and where the cuts land.
My pavers look uneven after rain, how do I tell whether it is a minor fix or a base problem?
You can sometimes avoid a full rebuild, but you need to identify the root cause. Uneven pavers after a season usually mean either an insufficiently compacted base, inadequate base depth for your soil, or slope that directs water the wrong way. Re-laying a small section without checking under the rest of the patio often leads to a repeat issue nearby.
What is the most common way polymeric sand joints fail, and how can I prevent it?
For paver joints, keep rain off the surface long enough for polymeric sand to cure, and avoid hosing immediately after installation. Also, do a light dry sweep after the sand sets as needed, and keep vegetation and soil from washing onto the patio. If polymeric sand is over-wetted, it can wash out or leave voids, which then allows joint erosion.
How do I handle movement and cracking risks where the patio meets a house or concrete walkway?
Plan for expansion and avoid rigid contact at the patio edges. Concrete needs control joints placed correctly, and even pavers can heave if they are locked too tightly against structures without allowances. Leave a small gap at abutting edges (filled with appropriate joint material) so movement due to temperature changes and base moisture can happen without cracking the surface or trapping stress.
Does freeze-thaw weather change the way I should design the patio base and slope?
On freeze-thaw sites, prioritize base depth and consistent compaction, then consider more conservative slope and drainage planning. In these climates, the base requirements typically increase, and shallow bases combined with poor drainage are a fast path to heaving. If you are unsure, treat freeze-thaw as a design constraint that affects excavation depth, not just material choice.
When designing an outdoor kitchen, should I plan the grill first or the seating first?
Yes. Some outdoor kitchens require venting, gas routing, and clearances that can conflict with your circulation routes and furniture spacing. A practical approach is to lay out the grill working zone first (front clearance), then trace where someone would walk carrying plates or tools, then finalize the rest of the patio zones around that path.
How do I choose patio surface materials if the area stays damp or shaded?
Start with the site and drainage, then choose materials for slip resistance and maintenance. If you expect wet conditions (shade, frequent rain, or sprinkler runoff), prioritize textured or tumbled/brushed finishes instead of smoother surfaces, because wet slip risk is highest when people are moving near entrances and around serving areas. This can also influence how you plan edging and how water flows toward drains or landscaping.