Planning a patio comes down to six things: knowing what you want to do out there, understanding your yard's physical realities, choosing a layout that fits both, sketching it to real dimensions, figuring out where plants and landscape features go, and making sure it's all buildable before you spend a dollar on materials. You don't need fancy software or a contractor to do this well. For example, if you're aiming for a cement patio, you can translate the same planning steps into a build-ready layout and proper base, slope, and finish. A tape measure, some graph paper (or a free app), and a clear afternoon are genuinely enough to get started.
How to Plan a Patio Layout with Garden and Drainage

Nolan Carver
20 May 2026
Start with goals, budget, and yard realities
Before you measure anything, answer two questions honestly: what will you actually do on this patio, and how much are you willing to spend? These two answers will drive almost every decision that follows. A patio meant for weekend dinners with four people needs different dimensions than one built for summer parties, a hot tub, or a kids' play zone.
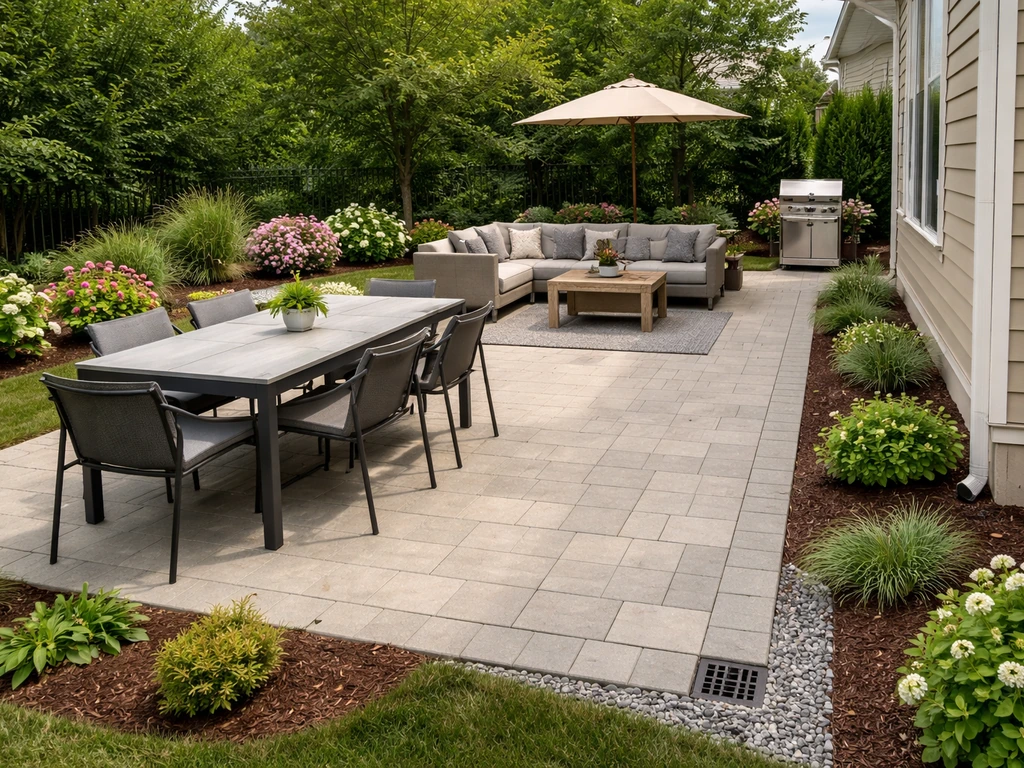
Write down your use cases. Dining? A grill station? Lounge chairs and a fire pit? A container garden? Each function takes up a predictable footprint, and listing them early prevents the most common planning mistake: building a patio that's too small for how you actually live. A basic outdoor dining set for four people needs roughly a 10x10 foot zone just for the table and pulled-out chairs. A sectional sofa setup with a coffee table can easily take a 12x14 foot area. A fire pit with seating around it typically wants a 15-foot diameter clear zone (more on clearances shortly).
On the budget side, be realistic about what you can spend and what you're willing to do yourself. A basic poured concrete patio runs roughly $6–$12 per square foot for materials. Concrete pavers are typically $8–$20 per square foot in materials, depending on style. Natural stone can push $25–$50+ per square foot. If you're doing the labor yourself, those material costs are your main expense, plus base materials (gravel and sand). Set a rough ceiling now so your design doesn't balloon past what you can actually build.
Measure and assess the site
Walk your yard with a tape measure and take notes. You're looking for four things: sun exposure, slope direction, drainage patterns, and access points. Each one directly affects where and how you build.
Sun and shade
Check the area at different times of day. A spot that feels perfect at 10am may be brutally sunny at 3pm or fully shaded by a neighbor's tree by evening. Note which direction the proposed patio faces. South-facing patios get the most sun all day. North-facing ones stay shaded and cool. East-facing spots get pleasant morning light. West-facing patios catch afternoon sun, which can be oppressive in summer. This affects whether you'll want a pergola, umbrella, or shade structure baked into your plan.
Slope and drainage
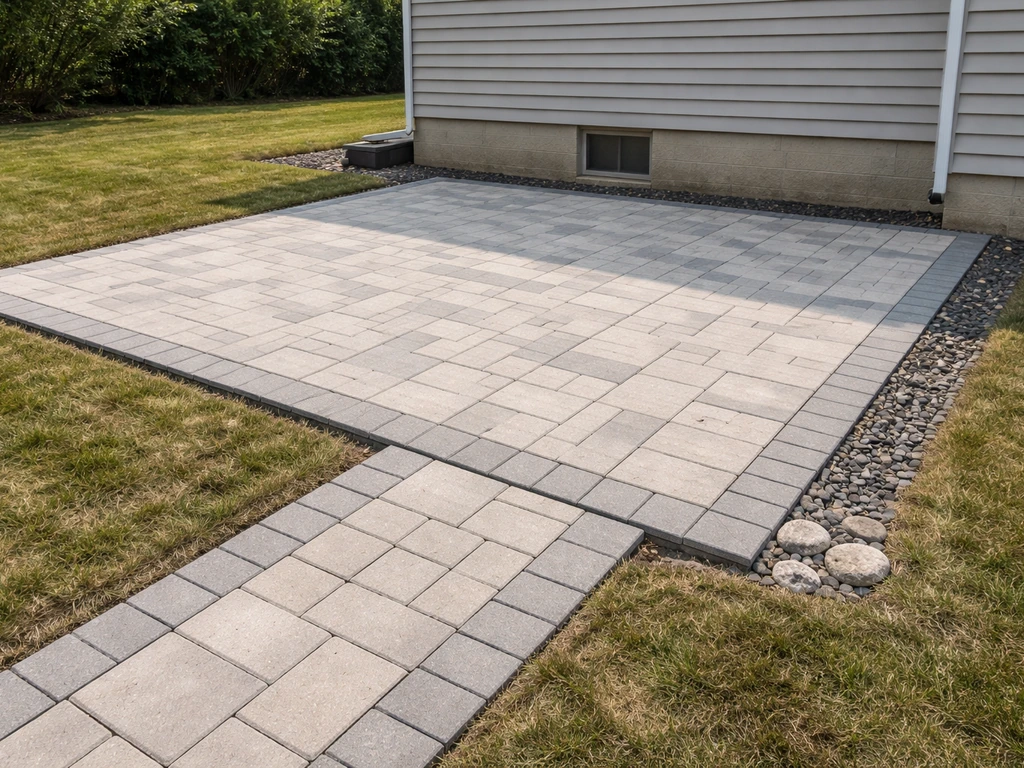
This is where most DIY patios get into trouble if it's ignored upfront. Your finished patio surface needs to slope away from your house at a minimum of 1/8 inch to 1/4 inch per linear foot (roughly 1 to 2 percent). Maricopa County’s weep screed guidance reflects the IRC intent that patio slabs and pavers be installed so they slope away from the building to help prevent trapped water slope away from your house. That's not steep enough to feel awkward underfoot, but it's enough to send water away from your foundation rather than pooling against it. Walk the area after a rain if you can. Note where water sits, where it flows, and whether any of it heads toward your house or a neighbor's yard. You'll need to work with that existing slope or plan to regrade before building.
For paver patios specifically, you'll also be excavating several inches of soil. A standard residential paver installation typically requires 4 to 6 inches of compacted gravel base plus a 1-inch layer of bedding sand before the pavers go down. Factor that excavation depth into your site assessment, especially near any tree roots, utility lines, or existing structures.
Access and traffic flow
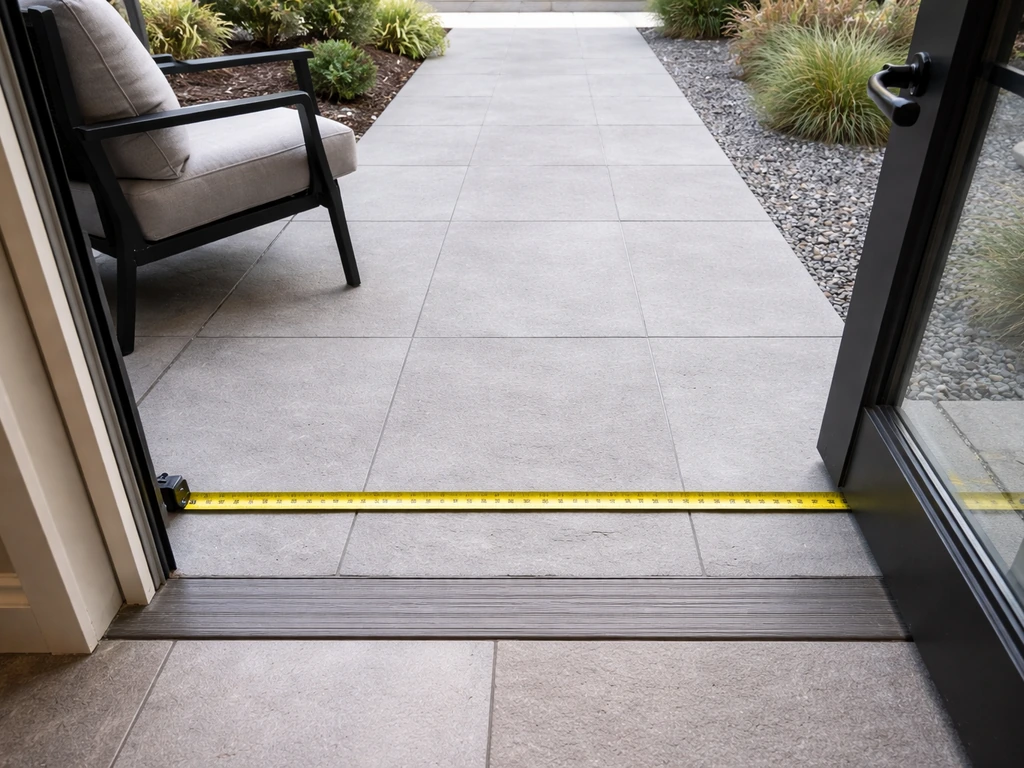
Measure every doorway, gate, and walkway that connects to the planned patio. A main path into the space should stay at least 36 inches wide even after furniture is in place and chairs are pulled out. Narrower than that and you're creating a bottleneck that feels uncomfortable and can genuinely be a safety issue. Mark on your site sketch where people enter and exit, and make sure those routes aren't blocked by your planned furniture zones.
Choose the patio style and layout zones
Once you understand your site, you can make informed choices about shape and layout rather than just picking what looks nice in a photo. The layout needs to match how people will actually move through and use the space.
Most successful patios are organized into zones: a dining zone, a lounging zone, a cooking/grilling zone, and sometimes a transitional zone that connects the patio to the lawn or garden. Yes, learning how to design an outdoor patio also means deciding which zones you need and how they flow together zones: a dining zone, a lounging zone, a cooking/grilling zone. You don't need all of them, but identifying which ones you want makes the layout sketch much easier to produce. Assign each zone a rough square footage based on the furniture or activity it needs to accommodate, then add those up to get your minimum total patio size.
For shape, rectangular and square patios are easiest to build and work well against most house walls. L-shaped patios naturally separate zones (dining on one leg, lounging on the other) and fit nicely into corners. Curved or freeform designs look more organic but require more planning and waste more material. If this is your first build, a clean rectangle is the most forgiving choice.
If a fire pit or outdoor fireplace is on your list, plan its position carefully from the start. A wood-burning fire pit needs about 15 feet of clearance to combustibles like your house wall, fencing, covered overhangs, and overhanging tree branches. Gas fire features often have shorter minimum clearances (sometimes 10 feet depending on your local code), but check your municipality's specific rules since they vary. This clearance requirement alone often determines where the fire feature can go, so nail that down before you finalize anything else.
Plan patio garden and landscape integration
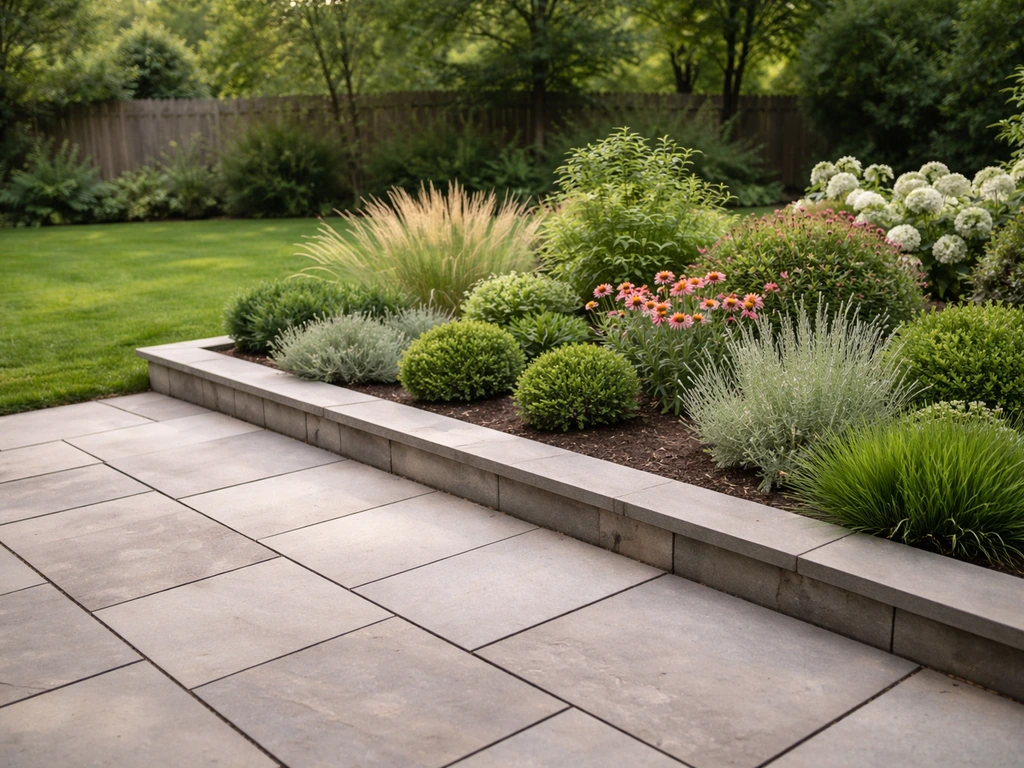
A patio surrounded by nothing but hardscape looks harsh and unfinished. Plants soften edges, provide privacy, add fragrance, and make the space feel like it belongs in the yard rather than sitting on top of it. A well-thought-out patio landscaping plan can also include the right plants, edging, and a clear sense of how the space will flow. The key is planning the softscape alongside the hardscape from the beginning, not as an afterthought. If you want your hardscape to feel finished, focus on patio garden and landscape integration so plants and pathways work with the patio instead of against it.
Where to put garden beds and borders
The most natural planting spots around a patio are along the outer edges, against walls or fences, and at transition points between the patio and the lawn. A 2 to 3 foot planting bed along the perimeter of the patio creates a visual frame and makes the hardscape feel intentional. Deeper beds (4 to 6 feet) give you room for shrubs or ornamental grasses that can provide privacy screening without needing a fence.
Mark these bed areas on your layout sketch at the same time you're placing furniture zones. This matters for dimensions: if you want a 2-foot planting border on three sides of a 16x16 foot patio, you need to account for that in the overall footprint of your project and make sure the hardscape area itself is still large enough for what you planned.
Edging and the hardscape-softscape transition
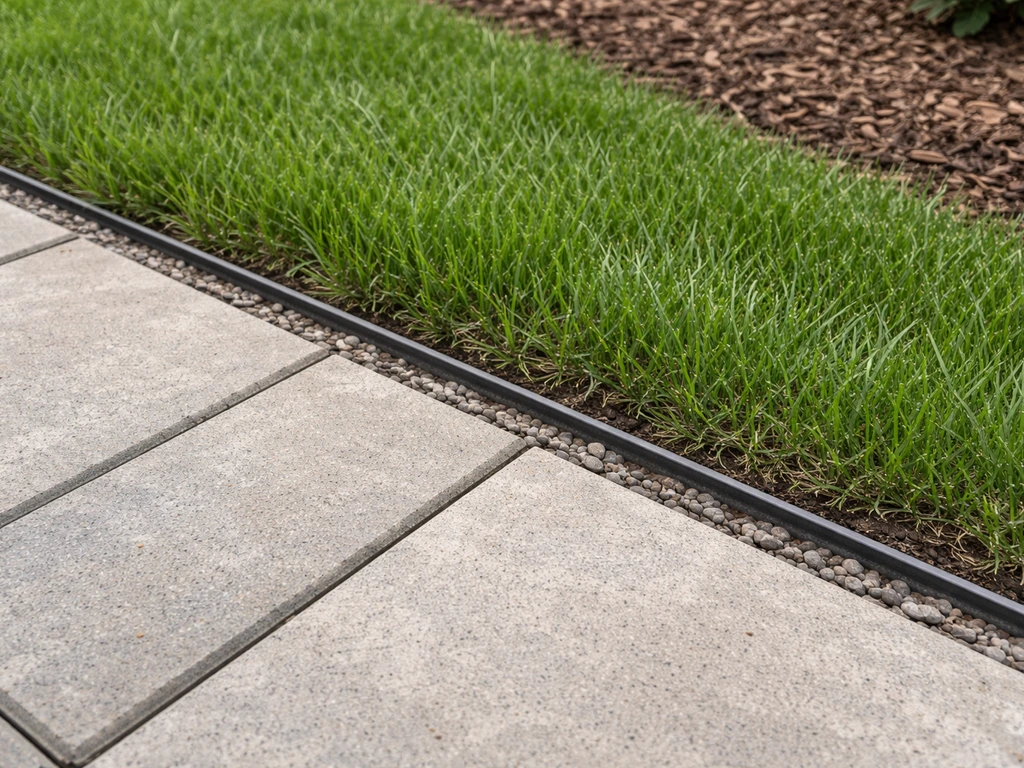
The edge where your patio meets the lawn or a planting bed is one of the most important details to plan. Without a defined edge, grass creeps under pavers, mulch washes onto the surface, and the whole project looks ragged within a season. Plan for a physical edging material: soldier-course pavers set on end, steel or aluminum landscape edging, natural stone, or timber. Your choice should match your patio material aesthetically and be planned for during layout, not added later.
For a patio that flows into a garden-style yard, stepping stones or a decomposed granite path connecting the patio to a garden bed creates a cohesive look and reduces lawn wear. If you're working on a patio design that includes more elaborate landscaping, you'll find it helpful to sketch the landscape plan at the same scale as your patio layout so everything fits together.
Existing trees and lawn coordination
If there are mature trees near your patio site, treat them as fixed constraints, not problems to solve later. Build the patio footprint around established root zones rather than cutting through them. As a general rule, stay outside the drip line (the outer edge of the canopy) with any hard excavation. Trees also affect drainage and sunlight in ways that will impact your material choice and base prep. Factor them in now.
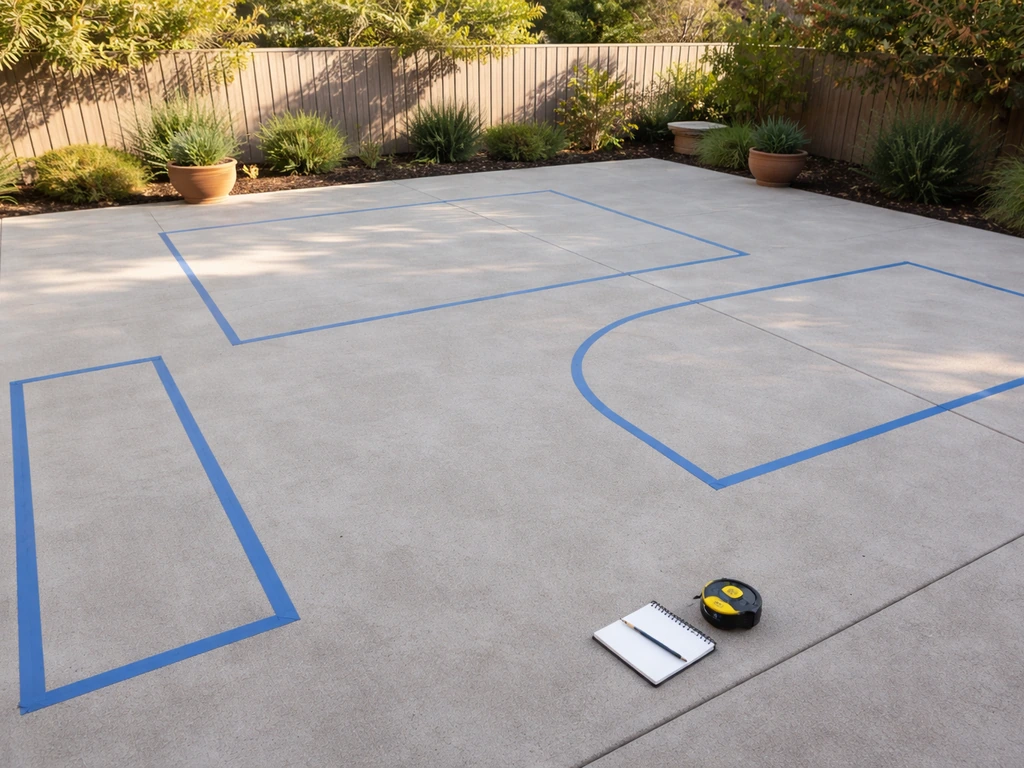
Convert your design into a build-ready layout and dimensions
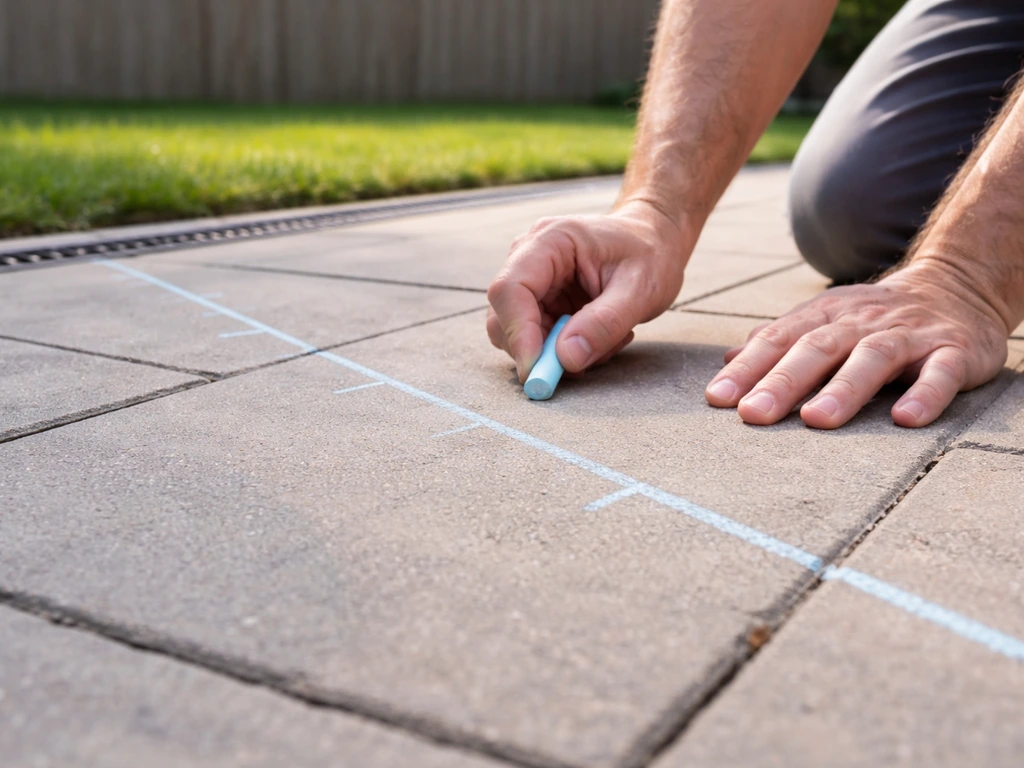
Now you move from ideas to actual numbers. Grab graph paper or a free tool like SketchUp Free, RoomSketcher, or even Google Slides, and draw your yard to scale. A common scale is 1 square = 1 foot. Start by drawing the house wall, then mark doors, windows, and any existing features. Then lay in your patio shape with real dimensions.
Place furniture to scale. This is where people get surprised. Pull actual measurements from the furniture you plan to use (or furniture you're planning to buy) and draw those footprints onto your layout. A standard 6-person rectangular dining table is roughly 36 by 72 inches. A chaise lounge is about 26 by 78 inches. Once you see these drawn accurately, you'll know immediately if the patio is big enough or if you need to adjust.
Confirm your 36-inch clearance paths around furniture are maintained, especially around the dining zone and any entry or exit points. Mark the direction of slope with a small arrow pointing away from the house. Mark where planting beds begin. At this stage, you should have a dimensioned sketch that shows the patio shape and size, furniture placement, traffic paths, slope direction, and adjacent landscape features. That's your build plan.
If your design involves a covered structure like a pergola or patio cover, note the footprint separately. Many jurisdictions allow uncovered patios at grade without a permit, but a pergola or attached roof structure typically triggers permit requirements, and local zoning may impose setback rules. For example, some municipalities require residential accessory structures to sit a minimum distance from property lines, and some allow permit-exempt detached structures only up to 200 square feet. For example, Portland’s Building Official Determination 21-01 notes that Oregon’s Residential Specialty Code does not require a building permit for certain non-habitable detached one-story accessory structures up to 200 sq ft when criteria are met, including attachment or detachment conditions some allow permit-exempt detached structures only up to 200 square feet. Check your local rules before finalizing a covered design.
Check requirements, materials strategy, and common planning mistakes
Permits and setbacks
Call your local building department or check their website before you finalize anything. An at-grade paver or concrete patio often doesn't need a permit in most jurisdictions, but a raised patio, retaining wall over a certain height, or any covered structure likely will. Setback rules (minimum distance from your property line, easements, and house foundation) vary by zone. Getting this wrong means tearing out work you already did, so spend 20 minutes confirming requirements upfront.
Material strategy before you buy
Once you have your dimensions, calculate your square footage and add 10 percent for cuts and waste. For paver patios, also calculate your base material quantities: multiply your square footage by your base depth (in feet) to get cubic feet, then divide by 27 for cubic yards of compacted gravel. For a 16x16 patio with a 5-inch base, that's about 256 square feet times 0.42 feet deep, or roughly 107 cubic feet (about 4 cubic yards) of gravel, plus roughly 21 cubic feet (about 0.8 cubic yards) of bedding sand. Having these numbers before you go to the supplier saves time and money.
The planning mistakes that actually hurt people
A few mistakes show up repeatedly in DIY patio projects. Skipping the slope plan is the most costly one: water that can't drain away from the foundation causes long-term damage that's expensive to fix. Building too small is the second most common: people underestimate how much space they actually need and end up with a patio that feels cramped once furniture is in place. Forgetting about utility lines (gas, electric, irrigation) during excavation planning is third: always call 811 (in the US) before digging. And designing without a budget ceiling leads to projects that stall halfway through because material costs added up faster than expected.
Your pre-build checklist
- Write down every activity you want the patio to support and estimate the square footage each needs
- Measure the site: overall yard dimensions, distances to property lines, existing doors and walkways
- Check sun exposure and note shady versus sunny zones at different times of day
- Identify slope direction and confirm water drains away from the house (1/8 to 1/4 inch per foot minimum)
- Locate underground utilities by calling 811 before any excavation planning
- Draw the patio to scale with furniture placed accurately at real dimensions
- Confirm all traffic paths are at least 36 inches wide with furniture in position
- Mark planting bed locations and edging material on the layout sketch
- Check fire feature clearance requirements if applicable (15 feet for wood-burning, check local code for gas)
- Contact your local building department to confirm permit and setback requirements
- Calculate total square footage, add 10 percent for waste, and price out materials before finalizing the design
Once you've worked through this list, you have everything you need to move into the actual build process. The design and layout work covered here is closely connected to deeper topics like finalizing your patio layout in detail, working out drainage and foundation prep for specific materials, and coordinating your patio with a broader landscape plan. After you pick your zones and dimensions, follow a step-by-step approach for how to design a patio layout that fits your space and lifestyle finalizing your patio layout in detail. But the foundation for all of that is a clear, accurate plan with real dimensions, and now you've got one.
FAQ
How do I figure out the right patio size if I am between two options (example, 10x10 vs 12x12)?
Start with the largest single use case you listed (usually dining). Then add clearances and circulation around it before comparing totals. For a dining zone, keep at least a 36-inch path so chairs can pull out without blocking movement to doors or the grill zone. If you are choosing between sizes, select the plan that preserves that clearance after you place actual furniture footprints on the sketch, not just the table size.
What should I do if my yard slopes the wrong way and I cannot regrade easily?
If water is currently flowing toward your house or neighbor, treat drainage as a design constraint. You can still build, but you may need to plan a stronger drainage solution than just relying on the patio slope, such as creating controlled drainage lines away from structures or incorporating a drain inlet and properly directed runoff. Walk the area after rain and trace where water goes, then decide whether minor grading is enough or whether drainage work is required before materials.
How can I plan for rain so water does not run off onto people or into doorways?
Besides sloping away from the house, plan where runoff will land. Put the down-slope edge so it discharges to a lawn or drainage area you are okay with, and avoid routing water toward entry steps, basement doors, or window wells. During layout, sketch a “water direction” arrow from the highest point and check that the low edge does not dump near traffic paths or utility connections.
Do I need an outdoor kitchen and grill station on the same zone as dining?
It depends on how you will host. If you expect frequent serving, placing the grill close enough to share a prep surface reduces walking, but you still want a separation so smoke and heat do not dominate the dining seating. A common approach is a cooking/grilling zone adjacent to dining with a defined working zone between them (for prep, storage, and utensil staging), while keeping the main circulation path unobstructed.
What is the safest way to plan clearance around a fire pit if people sit at different angles?
Do not treat clearance as one fixed circle only. Mark the seating arc for your likely chair positions and then ensure a clear path behind them so people can move without crossing the hot zone. If it is wood-burning, also keep combustible items and the finish edge of overhangs in mind, since clearance is what usually drives the final placement more than aesthetics.
How should I handle tree roots during excavation and base prep for pavers?
Plan the patio footprint around established root zones rather than assuming you can “cut through” them. If you must excavate near mature roots, reduce disturbance and adjust the hardscape layout so the base does not require deep removal right at the critical root area. On paver jobs, excavation depth is a major driver, so redo your dimensions early if roots fall within the needed base plus bedding layers.
What edge problems should I plan for when using pavers or concrete so grass does not creep in?
Plan a hard, intentional boundary at every patio edge, especially where the patio meets lawn or mulch beds. Use a physical edging material that matches your look and includes proper base support under the edge so it cannot shift. Also consider adding the planting bed outline on the sketch at the same time, because edging alignment changes your final patio footprint.
Do I need permits if I am only adding a patio, but I want a pergola or cover?
An uncovered patio at grade is often treated differently than a covered structure. If you are adding a pergola, posts, or any roof element, that frequently triggers zoning or permit review, sometimes including setbacks from property lines or easements. Confirm before you pour or excavate, because structural placement rules can force redesign after work is underway.
How do I estimate material amounts without underbuying for cuts and uneven areas?
Use the square footage calculation, then add waste for your specific layout complexity. A simple rectangle may need less waste, while curved edges and L-shapes typically need more. Add 10 percent as a baseline, then increase it if your furniture zones cause tight corners or if you are dealing with irregular yard boundaries. For pavers, compute gravel and bedding based on your chosen base depth and remember that excavation will vary slightly on slopes.
What is the most common mistake after the plan is drawn and before construction starts?
Most issues come from plan-to-site mismatch: the slope direction, drainage flow, or key dimensions get lost during excavation. Confirm slope and slope arrow directions on site before placing base material, and re-measure door and gate access widths with furniture mock-ups in mind. If you are relying on a 36-inch circulation path, verify it in the real space after excavation, not only on paper.