Framing a patio means building the structural border or skeleton that holds your surface material level, square, and properly sloped so water drains away instead of pooling. Whether you're laying pavers, pouring concrete, or setting tile, the framing system is what keeps everything from shifting, sinking, or going out of alignment over time. Get this part right and every step after it gets easier.
How to Frame a Patio: Step-by-Step DIY Guide

Nolan Carver
9 Jun 2026
Pick your framing system first
There are three main approaches to patio framing, and which one you choose depends on your surface material, your budget, and whether the patio is at grade or raised. Mixing up the framing type for the wrong application is one of the most common beginner mistakes, so let's sort this out before you buy anything.
Pressure-treated wood framing
Treated lumber (usually 2x8, 2x10, or 2x12 depending on span) is the go-to for raised or semi-raised patios where you need actual structural support. It's also commonly used as perimeter edge forms for ground-level poured concrete slabs. Use lumber rated for ground contact (UC4B or UC4C) any time wood will be touching or buried in soil. The big thing to watch: always use corrosion-rated fasteners with treated lumber.
Deck/porch connection corrosion risk is significant enough that many guides recommend upgrading galvanization (for example, ASTM A653 G185) or using stainless steel for corrosive exposures such as chemicals, soil, industrial air, or acid rain corrosion-rated fasteners. The preservative chemicals in modern pressure-treated wood are hard on regular steel.
Choosing the right steel edging and fasteners is especially important if you are building a steel patio. [Hot-dip galvanized fasteners rated to ASTM A153 are the baseline spec](https://www. jlconline. com/wp-content/uploads/sites/4/2020/0320c-jlc-pdb-feature-joist-hangers.
pdf), and connectors (like joist hangers) should meet ASTM A653 G185 galvanization at minimum. In high-exposure situations like direct soil contact, near salt water, or areas with acid rain or industrial air, step up to stainless steel. Mixing uncoated or lightly coated hardware with treated lumber is a recipe for early failure.
Metal edging and rail systems
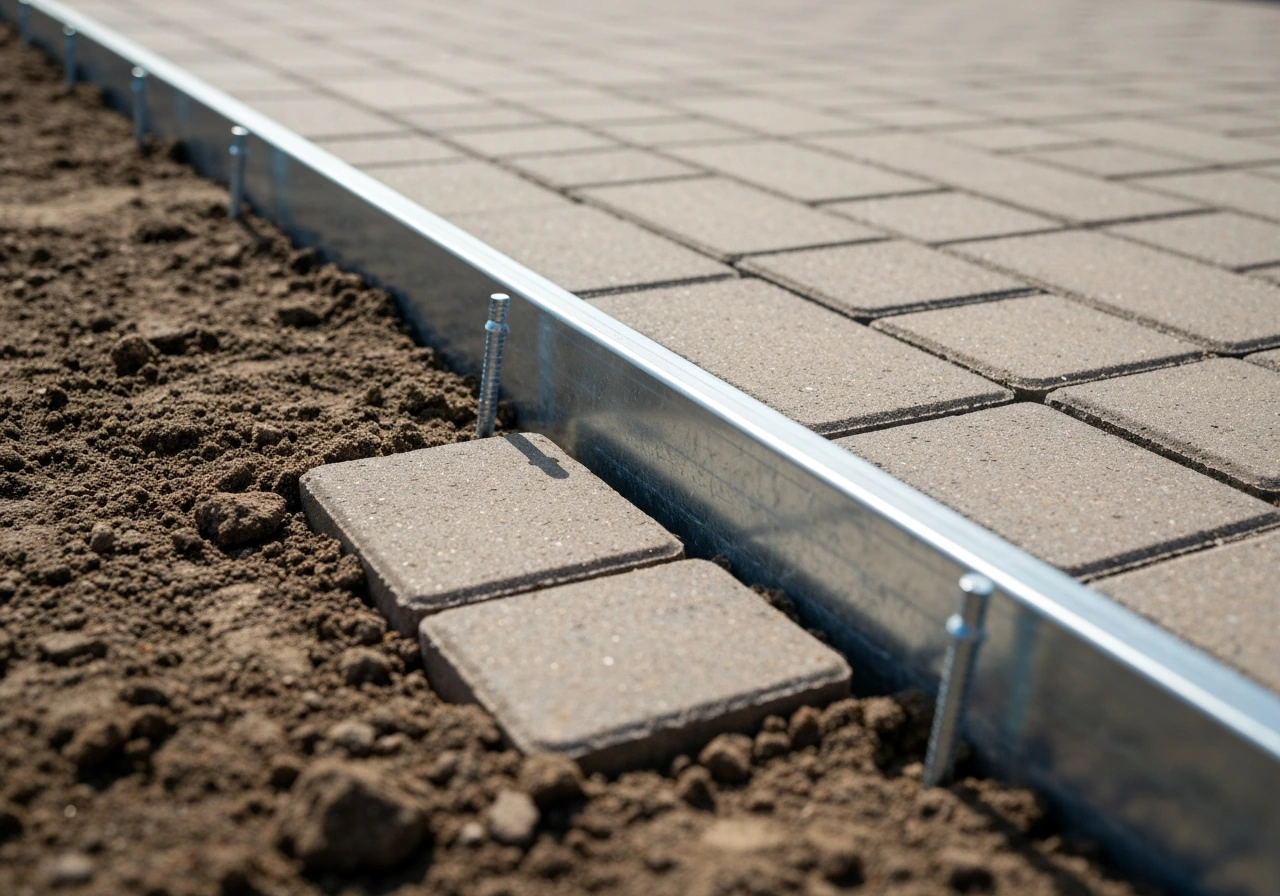
Galvanized steel or aluminum edge restraints are the standard choice for ground-level interlocking paver patios. They're fast to install, relatively inexpensive, and they hold the paver field tight so the edges don't migrate outward over time. HDPE plastic edge restraints secured with metal spikes driven into the compacted base are also widely used for paver installations and work well when installed correctly. Metal edging doesn't carry structural load the way framed lumber does, so it's not the right choice for a raised deck-style patio. It's a perimeter containment system, not a support system.
Concrete edge forms
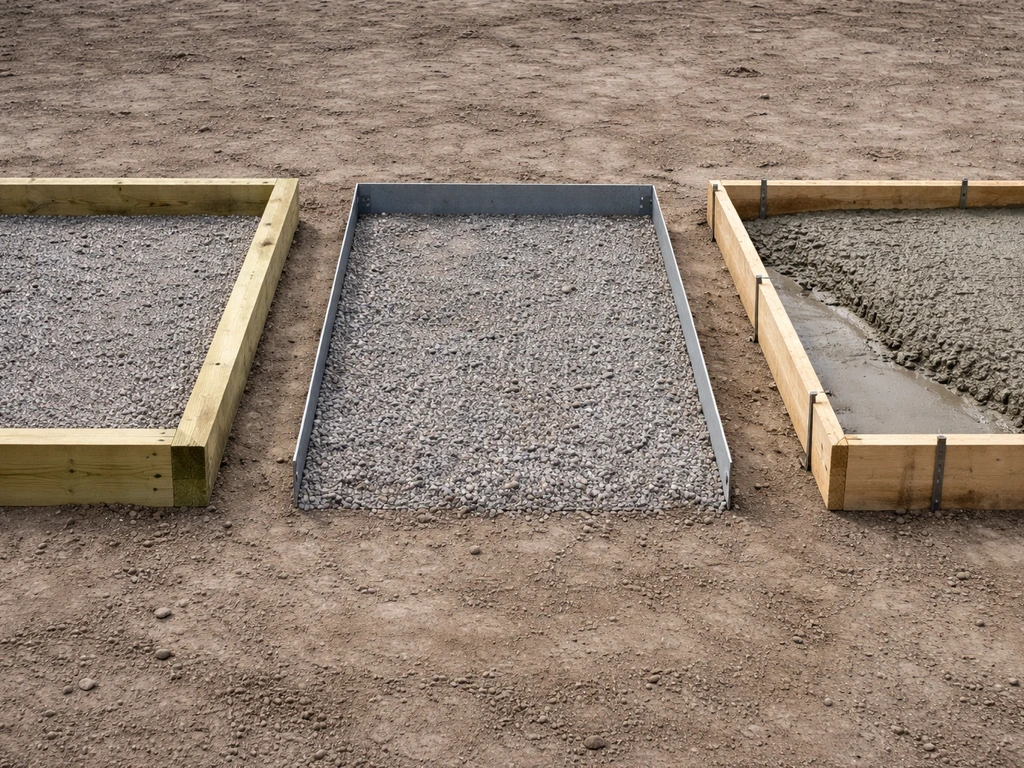
If you're pouring a concrete slab, your framing is the form work: typically 2x4 or 2x6 boards set on edge and staked into the ground to contain the pour. These boards establish the exact perimeter, thickness, and slope of the slab. They're usually removed after the concrete cures, though permanent forms (like composite edging or aluminum) are sometimes left in place. Concrete form framing has to be rock solid before you pour because wet concrete exerts a lot of outward pressure.
| Framing Type | Best For | Load-Bearing? | Typical Cost Range |
|---|---|---|---|
| Pressure-treated lumber | Raised patios, concrete slab edges, structural platforms | Yes | Moderate to high |
| Metal/HDPE edge restraints | Ground-level paver patios | No (perimeter only) | Low to moderate |
| Concrete form boards | Poured concrete slabs at grade | Temporary only | Low (often reused) |
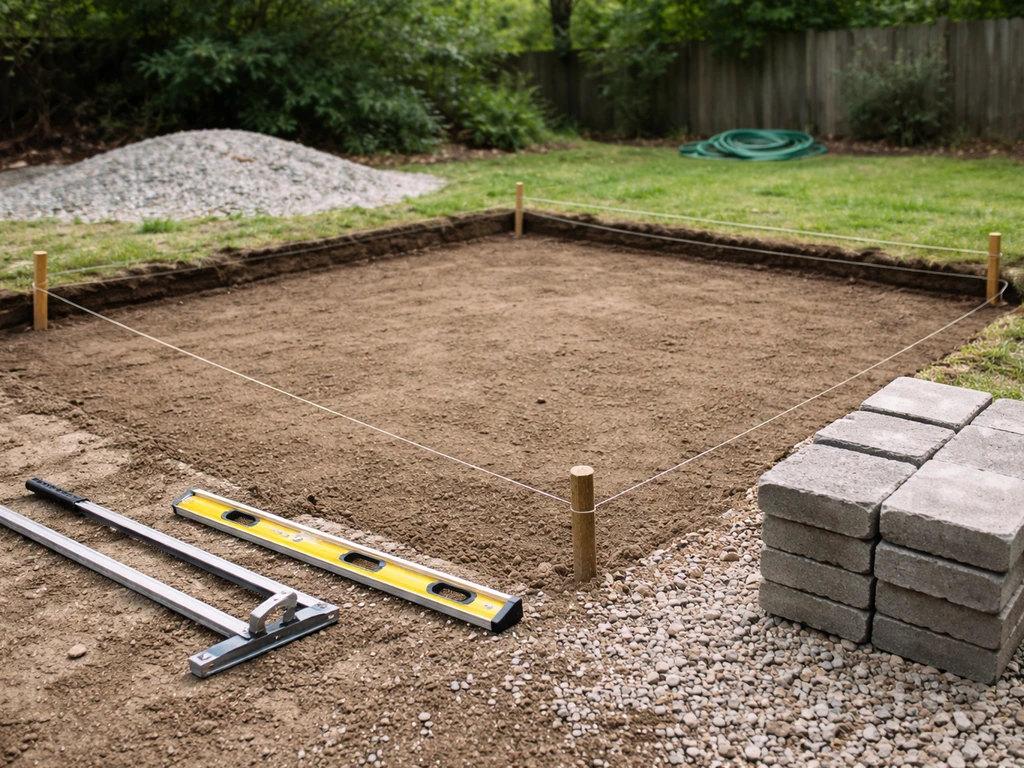
Measure and lay out the patio footprint
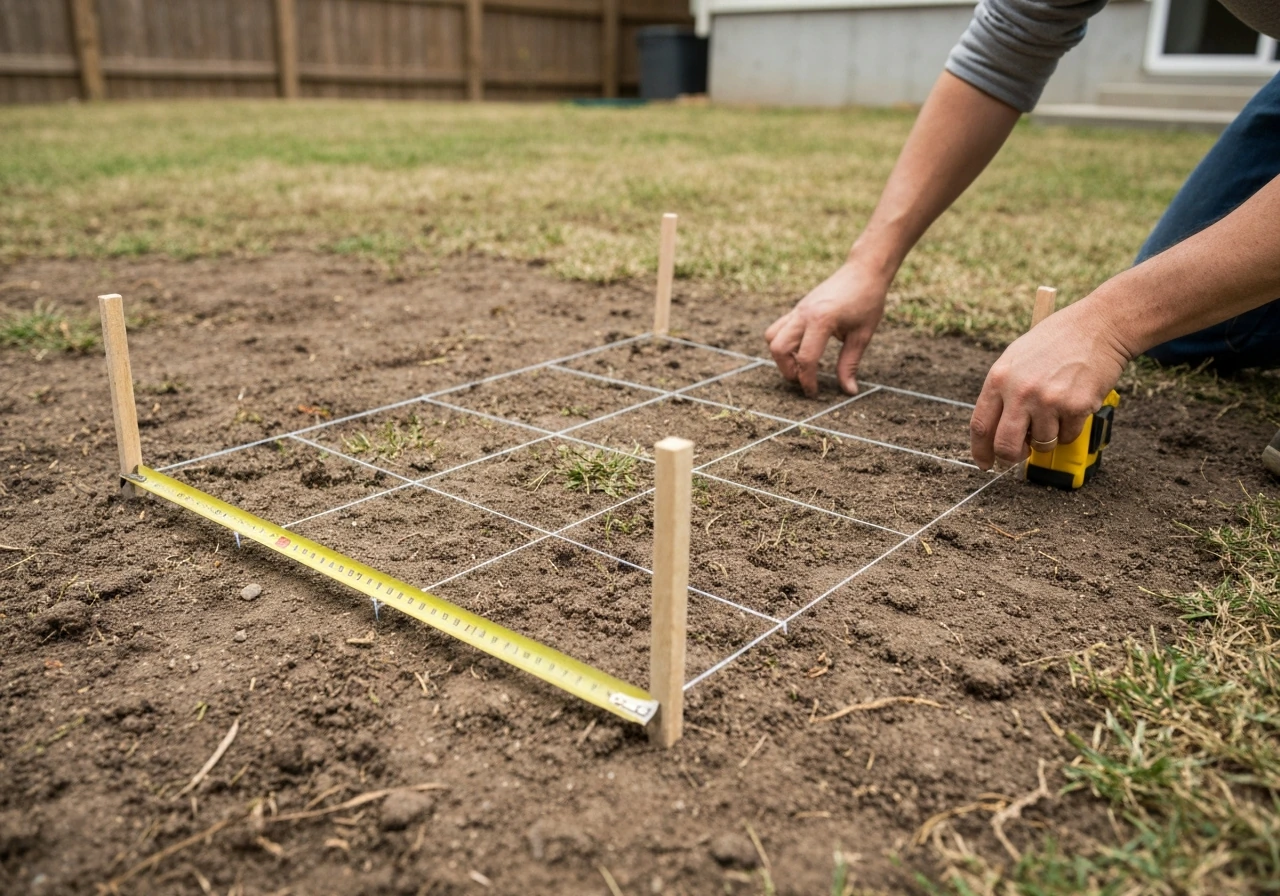
Before anything goes in the ground, you need a clear, accurate layout. Grab some stakes, string line, and a tape measure. Mark out your patio footprint with stakes at each corner and pull string lines tight between them. These lines will guide every cut, every stake, and every elevation decision you make.
Getting the corners square
Square the layout using the 3-4-5 triangle method. From one corner, measure 3 feet along one string and 4 feet along the other. The diagonal between those two points should be exactly 5 feet if the corner is a true 90 degrees. For larger patios, scale it up: 6-8-10 or 9-12-15 give you more accuracy over longer spans. Check all four corners, not just two. A patio that's out of square will haunt you when you start laying pavers or tile because the pattern will run crooked toward the edges.
Once the strings are set and squared, double-check by measuring diagonally corner to corner in both directions. If both diagonal measurements match, you're square. If they differ by more than half an inch on a standard patio, adjust your stakes before moving on. Mark your final corner positions with spray paint or stakes driven firmly into the ground.
Account for your surface material thickness
Know your surface material's thickness before you set any framing height. Concrete pavers are typically 2.375 inches (60mm) to 3.125 inches (80mm) thick. Natural stone varies but commonly runs 1.25 to 2 inches. Porcelain tile for outdoor use is usually 0.75 to 1.25 inches. For a raised wood-framed patio, you'll size your joists and set the top of the frame so the finished surface lands at the height you want after you account for material thickness plus any setting bed. Missing this step means your finished patio surface ends up too high or too low relative to the door threshold or adjacent lawn.
Set elevations and slope for drainage
Every patio needs to drain. Water sitting on a patio surface is a nuisance at best and a foundation problem at worst. The standard slope for patio drainage is 1/8 inch per foot (about 1%) away from the house or toward a designated drain. On a 12-foot-wide patio, that means the far edge sits 1.5 inches lower than the edge against the house. It doesn't look steep, but it's enough to move water effectively.
Use a builder's level, a laser level, or a water level to set your string lines at the correct elevation on each side. For a simple rectangular patio sloping away from the house, the two strings running parallel to the house stay level with each other, while the two strings running perpendicular to the house drop at your target grade. Mark the slope on your batter boards or stakes so you can reference it throughout the build without re-measuring constantly.
One thing that trips people up: setting everything level and forgetting slope, then wondering why there's a puddle near the door every time it rains. Set the slope into your framing from the very beginning. It's almost impossible to correct after the base and surface are down.
Prepare the base and install your framing
Excavate and prep the subgrade
Remove all sod and organic material from the patio footprint, plus a few extra inches on each side to give yourself working room. The depth you excavate depends on your surface material and base requirements. For most paver patios, you need at least 4 inches of compacted granular base (gravel or crushed stone) plus the thickness of your bedding layer (usually 1 inch of coarse sand) plus the paver thickness itself.
Add it up: a 3-inch paver on a 1-inch sand bed over a 4-inch compacted base means you're digging about 8 to 9 inches below your finished surface elevation. For a concrete slab, the slab itself is usually 4 inches thick, which sits on a 4-inch compacted gravel base, so plan for around 8 inches of total excavation. Compact the subgrade with a plate compactor before you bring in any base material.
If the native soil is soft or clay-heavy, add a layer of geotextile fabric to prevent the base material from migrating down into the soil.
Install and compact the base
Bring in your crushed stone or gravel base in 2-inch lifts and compact each lift before adding the next. Don't dump 4 inches in at once and compact it all together. Lifts compact better, and you'll get a firmer, more uniform base. The target is at least 4 inches of compacted granular material for pedestrian patio areas, and that measurement is after compaction, not before. Stone compacts, so add more than you think you need. Compact parallel lines across the whole area, then a second pass perpendicular, for even coverage.
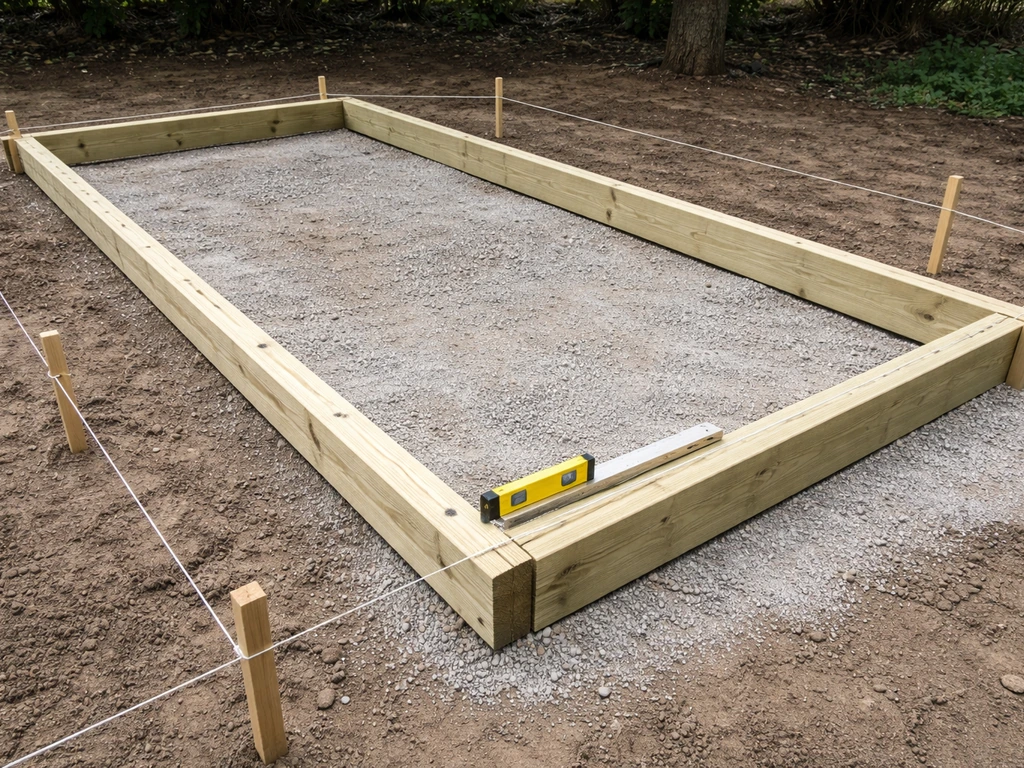
Set the framing in position
For wood-framed raised patios, start with the ledger if attaching to a house, then set your beam and post locations, and work outward from there. For ground-level paver patios with edge restraints, the perimeter framing goes in after the base is compacted and you've screeded the bedding layer. Set edge restraints flush with your string lines and secure them with spikes driven at the spacing recommended by the manufacturer (typically every 12 to 24 inches). For concrete forms, stake your form boards on the outside so the interior face of the board aligns exactly with your string line. Drive stakes every 2 to 3 feet and add extra stakes at corners.
Materials, fasteners, and framing spacing
For a wood-framed platform patio, joist spacing of 12 to 16 inches on center is standard for most decking or patio surface materials. If you're supporting a heavy stone surface, tighter spacing (12 inches on center) reduces deflection and keeps the surface more rigid. Rim joists and headers should be the same dimension lumber as your field joists. All connections should use joist hangers, not toenailing alone, for reliable load transfer. As mentioned, use hot-dip galvanized hardware rated to G185 minimum, or stainless steel in aggressive environments.
For concrete forms, 2x4 form boards work for slabs up to 4 inches thick. For thicker slabs (5 or 6 inches for a driveway-adjacent pad or heavy load area), use 2x6. Drive stakes every 2 feet and double-stake at corners. Brace outside of the stakes with kickers (diagonal boards driven into the ground at an angle) if the pour is large, because wet concrete pushes hard and form blowouts are messy and expensive to deal with.
For paver edge restraints, plastic HDPE restraints spiked into the base work fine for most residential paver installations. Use spikes that are long enough to penetrate into the compacted base material, not just the bedding sand. Short spikes that only reach the sand layer will pull loose over time, and your edge will creep outward.
| Application | Recommended Material | Fastener/Connection Spec | Spacing |
|---|---|---|---|
| Raised patio joists | PT lumber, UC4B or better | G185 galvanized or SS joist hangers (ASTM A153/A653) | 12–16" on center |
| Concrete form boards | 2x4 or 2x6 lumber | Stakes every 2 ft, kickers at large pours | N/A (perimeter only) |
| Paver edge restraints | HDPE or galvanized steel | Spikes into compacted base | 12–24" on center |
Check for stability and alignment as you go
Don't wait until the framing is fully installed to check level and square. Check constantly. After setting each section of form board or each joist, verify it with a 4-foot level and re-check your string lines. It takes 30 extra seconds and saves hours of teardown later.
For wood-framed patios, check for racking by measuring the diagonal of the framed rectangle in both directions. If the diagonals don't match, the frame is out of square and you need to push one corner to adjust before adding more fasteners. Temporary diagonal bracing (a scrap board screwed corner to corner inside the frame) holds things in position while you work. Once the ledger, beams, and outer rim joists are all connected and verified, the bracing can come off.
For concrete forms, check that every form board is at the correct height at multiple points along its length, not just at the ends. A long board can sag in the middle. Add a mid-span stake if needed. If you have a laser level, set it up and sweep it across all the form tops to verify they're all on the same plane (with the correct slope built in). Catching a low spot in the form before the pour is easy. Grinding down a low spot in cured concrete is not.
- Check level and slope at every corner and at mid-span of long boards
- Verify diagonal measurements match (confirms square)
- Confirm form boards and edge restraints are firmly staked with no wobble
- Recheck string lines haven't shifted after base compaction disturbed stakes
- Walk the perimeter and push on every board or restraint to test stability
Backfill, secure, and prep for the surface material
Once framing is set and verified, secure everything that can still move. For wood-framed platforms, add any remaining hardware connections, check all bolts, and install any blocking specified in your design. For concrete forms, do one final check that stakes are all tight and form boards haven't shifted. For paver edge restraints, drive any remaining spikes and make sure all restraint sections are connected to each other (most snap or pin together at the joints).
On ground-level patios, backfill the outside of the perimeter framing with compacted soil or gravel to prevent the outer edge from being undermined by erosion. Don't leave the outside of your form boards or edge restraints exposed and unsupported. Even plastic paver restraints can bow outward over time if there's nothing behind them. Compact the backfill material gently by hand or with a hand tamper to avoid disturbing your set framing.
Now prep the interior. For a paver patio, screed your 1-inch bedding layer of coarse sand (not fine mason's sand) over the compacted base, using your edge restraints as a screed guide. For a concrete slab, install any rebar or wire mesh reinforcement before the pour. For a raised wood platform, you're ready to start laying your decking or stone surface. If you're using large-format porcelain or natural stone, consider whether you need a mortar-set system over a concrete substrate rather than a sand-set system, as heavy or brittle materials can crack on an insufficiently rigid base.
Troubleshooting common framing problems
Drainage issues
If water is pooling after the surface is down, the framing slope wasn't quite right or the base settled unevenly. For pavers, you can often re-pull a section, add or remove a little bedding sand, and re-set those pavers with corrected elevation. For concrete, you're in harder territory and may need to cut a channel drain or apply a skim coat. Prevention is everything here: a laser level during form setup takes 10 minutes and eliminates this problem entirely.
Uneven or soft ground
If you've compacted the base and things still feel soft in spots, the issue is likely the subgrade, not the base material. Dig out the soft spot, look for saturated or organic soil, remove it, and replace with compacted stone. A geotextile fabric layer between subgrade and base gravel helps stabilize soft or clay-heavy soils. Don't try to just add more gravel on top of a bad subgrade. It'll settle eventually.
Frame movement or shifting
Wood form boards and edge restraints can shift during a concrete pour or under freeze-thaw cycles. Prevent this with adequate staking (every 2 feet for form boards), kicker braces on large concrete pours, and spikes driven fully into compacted base material for edge restraints. If a wood-framed platform patio is racking or wobbling, you likely need blocking between joists at mid-span and possibly diagonal metal bridging to stiffen the frame.
Out-of-square framing caught late
If you get deep into the installation before catching a square error, don't panic. With pavers, you can often absorb a small error with a cut border row at the far edge. With concrete forms, you can usually tap one corner stake over and re-check before the pour. The 3-4-5 check takes less than two minutes. Do it at the layout stage, after base compaction, and before the final surface goes down. Three checks, and you'll never have a square problem that bites you.
What comes next after framing
A solid, level, square, and properly sloped frame is the foundation for everything else. From here, the path splits depending on your surface: paver installation over a screeded sand bed, concrete placement inside your forms, or tile and stone set in mortar over a rigid substrate. Each of those is its own process, but none of them work well without the framing step done right.
If you're building a raised platform patio, the framing work covered here ties directly into how you build the full patio frame and platform structure. If you're also planning an opening or entry feature, the same framing mindset you used here for a raised platform patio also applies when you look at how to build a patio gate.
Next, you can build the full patio platform structure using the same framing approach, then finish with your chosen surface material how to build a patio platform. Once your patio frame is in place, you can plan the posts and supports you need for a safe patio railing that matches the deck structure.
Once you know the frame basics, the exact approach depends on whether you are building a raised wood platform, a ground-level paver edge, or a concrete slab form how to build a patio frame. If you're adding fencing, a gate, a trellis, or a railing to your finished patio, those elements all need to be planned around the perimeter framing you've established here, so it's worth thinking through those additions before you lock in your final dimensions.
If you want privacy, plan a patio privacy fence around the same perimeter layout so posts, brackets, and access work with your finished patio height and spacing fencing, a gate, a trellis, or a railing. If you're planning a patio fence, a gate, or a railing, you’ll need to account for post locations and how they tie into your patio perimeter framing.
FAQ
Should I build my patio frame at the final finished height or at the sub-base height?
Set your frame so the top surface lands at finished grade after you add material thickness plus any bedding or setting layer (sand bed, mortar, or deck build-up). For ground-level pavers, many mistakes happen when people frame to paver thickness only, forgetting the 1-inch coarse sand screed, which can leave the patio too high against door thresholds.
How do I choose the right slope direction if my patio is not a simple rectangle?
Pick one intended drainage path (away from the house, or toward a specific drain), then create a consistent plane using your strings, not random spot dips. For L-shapes or patios with multiple levels, you usually need separate slope planes meeting at a line, so confirm grades with a laser or water level before installing any framing.
Can I frame a patio and then “fix” puddling later with more sand or by adjusting individual pavers?
Minor elevation corrections are possible with pavers, you can lift a section, re-screed, and reset. But if the underlying frame and slope are wrong, you will end up with repeated rework at the perimeter and near doors. The reliable approach is to verify slope at the framing stage with string lines or a laser.
What’s the best way to confirm my layout is square if I’m working on uneven ground?
Do the 3-4-5 square check at the layout height you are using for string lines, not just at the dirt. If one corner is much higher, re-check diagonals after you set batter boards and establish grade, because uneven staking can create false alignment.
How do I prevent my wood-framed patio from shifting when it gets wet or goes through freeze-thaw?
Use ground-contact rated lumber and corrosion-resistant fasteners, then add adequate bracing for the framed rectangle. Also stake and block in a way that locks joists and rims against racking, because decking loads and seasonal movement can slowly rack a frame if it is only “mostly square” during assembly.
Do I need to backfill the outside of patio edge restraints, even with HDPE plastic?
Yes. Backfill the outside edge with compacted soil or gravel so the restraint has support and is not exposed to erosion. Even when the restraint is intended to be low-profile, un-supported edges can bow outward, leading to creeping gaps and uneven elevations.
How far apart should I place stakes or supports for concrete form boards on larger pours?
Follow the typical spacing for your board thickness and pour size, then add extra stakes where the board can deflect. A common mistake is staking only at ends, long boards sag in the middle, so check form top elevation along the entire run and add a mid-span stake if the laser or level shows variation.
What should I do if my paver base is compacted but some areas still feel spongy?
Treat soft spots as a subgrade issue, not a base issue. Remove the affected material down to sound soil, replace with compacted crushed stone, and consider geotextile separation in clay-heavy areas. Avoid adding more gravel on top of saturated or organic soil, it will settle later.
Can I use regular deck screws or common steel fasteners with pressure-treated lumber?
Avoid standard uncoated hardware. Pressure-treated wood can accelerate corrosion, so use hot-dip galvanized, stainless (for high-exposure conditions), and fasteners compatible with the lumber’s rated ground-contact chemistry to reduce early failures.
Is 1/8 inch per foot always the right patio slope?
It is a common target, but site specifics can change the choice. If you are working near a door threshold, a low spot, or a trench drain, you may need a slightly different grade to maintain drainage without creating a noticeable step. Use your final height check against door clearance before locking framing.
How do I handle patio framing near hardscape features like stairs, a gate, or a railing base?
Plan the perimeter first, then locate posts, hinges, and attachment points relative to the final frame height. For example, patio gates and railing posts need solid attachment to the patio structure, so verify post centers and clearances before closing in framing, otherwise you may end up cutting joists or mounting hardware to unsupported members.