The easiest DIY patio to build is a sand-set interlocking paver patio on a compacted gravel base. You dig out about 7 to 9 inches, add and compact a gravel base, screed roughly 1 inch of bedding sand, lay your pavers, lock the edges, and sweep in polymeric joint sand. Unilock’s DIY guidance also describes a typical setup of a clear stone or crushed stone/road-base material for the base and either coarse sand or small-gradation chip stone for the bedding depending on the specification a compacted gravel base, screed roughly 1 inch of bedding sand. It sounds like a lot, but every step is genuinely doable over a weekend or two, and you don't need concrete, special tools, or contractor skills. The secret to making it easy isn't cutting corners, it's doing the prep right so everything above it falls into place.
How to Make a Patio Easy: DIY Steps, Materials, and Tips

Choosing the Easiest Patio Type and Materials
Before you spend a dollar, pick the right system for your skill level. Three options come up most for DIYers: sand-set pavers, poured concrete, and gravel or decomposed granite. Here's the honest breakdown.
| Patio Type | Skill Level | Typical Cost (materials) | Biggest Advantage | Biggest Challenge |
|---|---|---|---|---|
| Sand-set interlocking pavers | Beginner–Intermediate | $8–$20/sq ft | Forgiving, repairable, no curing wait | Base prep takes time and labor |
| Poured concrete | Intermediate–Advanced | $5–$10/sq ft DIY | Durable, low long-term maintenance | Unforgiving—cracks are hard to fix |
| Gravel / decomposed granite | Beginner | $2–$5/sq ft | Cheapest and fastest to install | Needs edging, shifts over time |
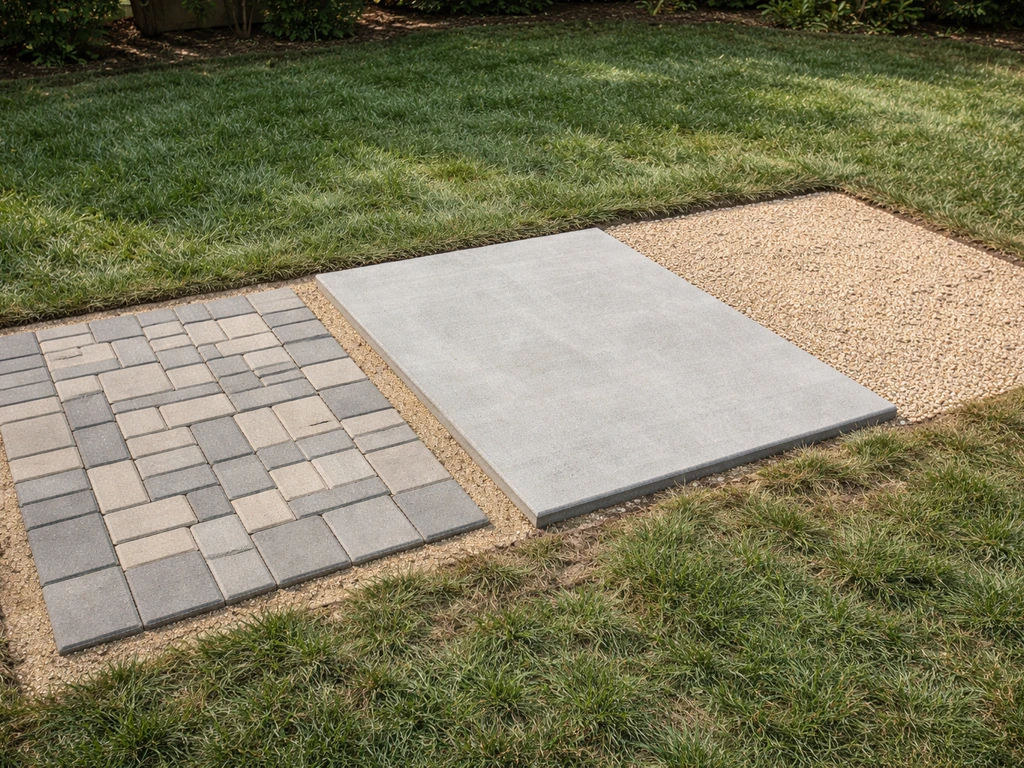
| Concrete pavers on gravel base | Beginner–Intermediate | $10–$25/sq ft | Tons of design options, replaceable | More upfront material cost |
For most homeowners reading this, sand-set concrete pavers are the clear winner for 'easy.' If you make a mistake, you pull up a paver and fix it. You can rent a plate compactor for one day instead of owning one. And the finished result looks genuinely professional. Poured concrete is cheaper in materials but far less forgiving, one bad pour or an incorrect slope and you're living with it. Gravel works great as a budget path, and if cost is your main constraint, that topic deserves its own deep dive separately. If you want more specifics, our guide on how to build a patio on a budget walks through materials and steps to keep costs down Gravel works great as a budget path.
For paver materials, standard concrete pavers (also called interlocking concrete pavers or ICPs) are your easiest pick. They come in standard sizes like 4x8 inches or 6x6 inches, are widely available at home improvement stores, and weigh a manageable amount per piece. Natural stone looks gorgeous but is heavier, harder to cut, and pricier. Stick with concrete pavers for your first build.
Planning Layout, Measurements, and Site Checks
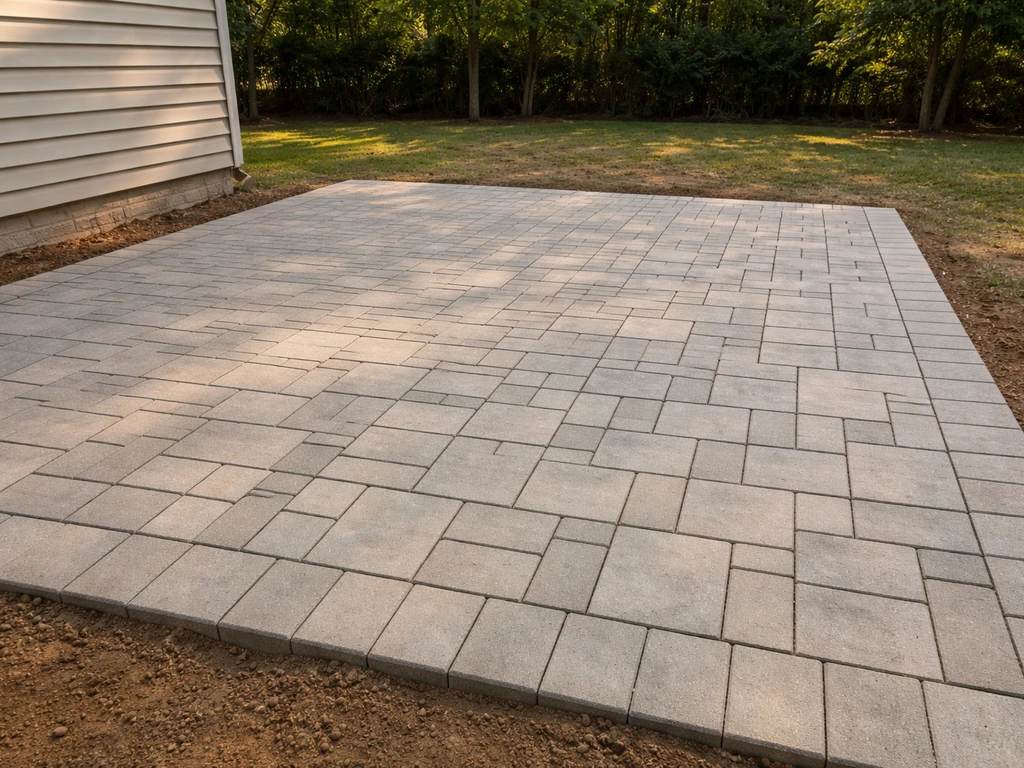
A little planning here saves a lot of rework later. Start by deciding the size and shape. A 10x12 foot patio (120 square feet) is a good beginner target, big enough to be useful, small enough to finish in a weekend. Rectangular shapes are easiest because they minimize cuts. A simple DIY plan for how to make a inexpensive patio usually starts with a straightforward rectangular layout, which is also why rectangular shapes are easiest because they minimize cuts.
Walk your site and check for three things before you commit to a layout: utility lines, drainage direction, and access. Call 811 (in the US) at least a few days before digging to have underground utilities marked, this is free and non-negotiable. Next, observe where water flows during a rain or from a hose. Your patio needs to slope away from your house at about 1/8 to 1/4 inch per foot (roughly a 1% grade). If water naturally pools where you want the patio, you'll need to address that in the base. Finally, think about how you'll get wheelbarrows of gravel in and out, tight side yards or fences can make base delivery genuinely miserable.
Mark the layout with stakes and string lines. Use the 3-4-5 triangle method to get square corners: measure 3 feet along one string, 4 feet along the other, and if the diagonal between those two points is exactly 5 feet, your corner is 90 degrees. Add about 6 inches on each side beyond your finished patio dimension, that's your excavation footprint, accounting for edge restraints and a little working room.
Tools and Materials Checklist for a DIY Patio
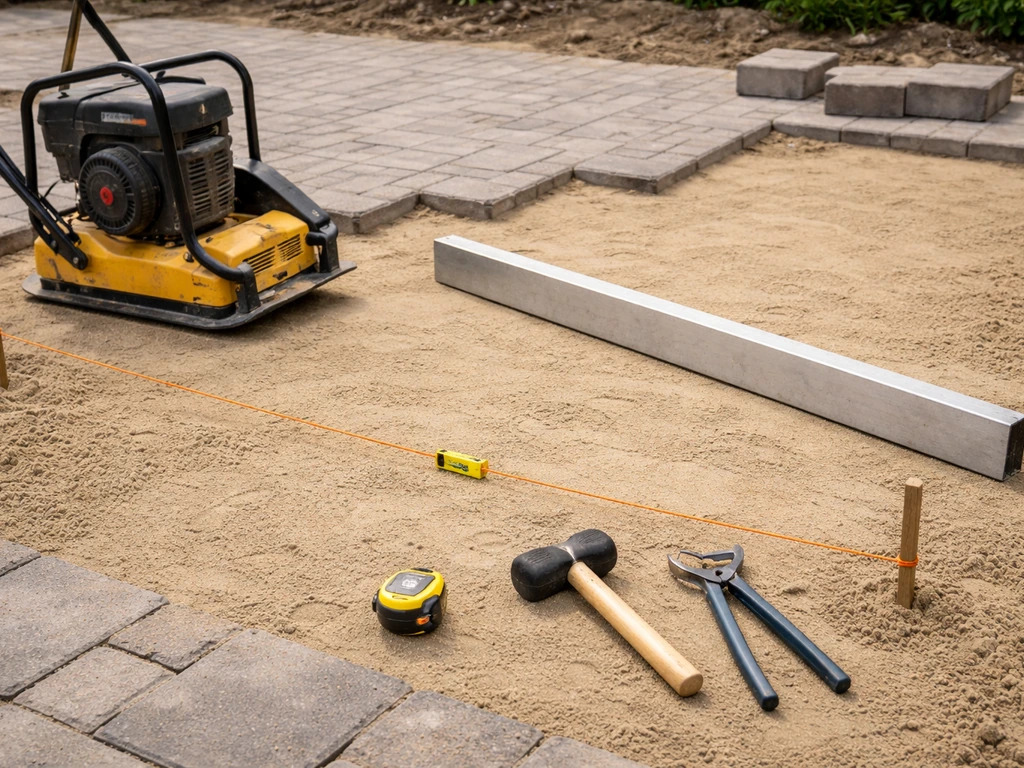
Here's everything you'll need for a standard 120-square-foot sand-set paver patio. Renting the plate compactor and possibly a wet saw is the smart move, buying them for one project rarely makes financial sense.
- Stakes and mason's string line (for layout)
- Line level or laser level
- Tape measure and marking paint or chalk
- Shovel and/or sod cutter (rent a sod cutter for large areas)
- Wheelbarrow
- Plate compactor (rent—roughly $60–$100/day)
- Long screed board (a straight 2x4 works fine)
- Rubber mallet
- Level (4-foot minimum)
- Wet saw or angle grinder with diamond blade (for cuts—rent if needed)
- Push broom and hand tamper
- Compactable gravel / crushed stone base (4–6 inches compacted depth)
- Coarse bedding sand or chip stone (HPB) for the 1-inch leveling layer
- Interlocking concrete pavers (order 5–10% extra for cuts and waste)
- Plastic edge restraints with landscape spikes
- Polymeric joint sand
- Optional: geotextile fabric for subgrade stabilization in soft soils
On quantities: for a 120-square-foot patio, plan on roughly 4 to 5 tons of compactable gravel and about 0.4 to 0.5 cubic yards of bedding sand. Your paver supplier can help you nail down exact quantities once you have your final dimensions. Always add that 5–10% paver overage at purchase, matching pavers from a different batch later is a headache.
Ground Prep, Slope, and Drainage (Don't Skip This)
This is the step that determines whether your patio looks great in year one and year ten, or starts rocking and sinking by year two. No exaggeration. The majority of DIY patio failures trace back to bad base prep, not bad paver installation.
Start by removing all sod and organic material. Grass roots, mulch, and topsoil compress and decompose under load, you do not want any of that under your base. Dig down to firm, undisturbed subgrade. The total depth you need depends on your climate (freeze-thaw cycles mean more base depth) but a reliable residential rule is 6 inches of compacted gravel plus 1 inch of bedding sand, for a total excavation of about 7 inches below your intended finished patio surface. In colder climates with significant frost, 8 inches of compacted base is safer.
Once you've dug out, build your slope into the excavation before you add any gravel. Set your string lines to slope away from the house at 1/8 inch per foot minimum. This means a 10-foot-wide patio should drop about 1.25 inches from the house edge to the outer edge. Check this with a level and tape measure as you go, it's much easier to set slope now than to correct it after adding base material.
If your subgrade is soft, clay-heavy, or consistently wet, lay a geotextile fabric on the excavated soil before adding gravel. The fabric separates the base from the subgrade without blocking drainage, it keeps your gravel from slowly migrating into soft soil over the years. If there's an existing drainage problem (water actively collects in this area), consider a French drain or channel drain before you build. No paver system fixes a fundamentally wet subgrade, and polymeric sand is definitely not a substitute for proper drainage.
Simple Base Installation and Leveling and Compaction
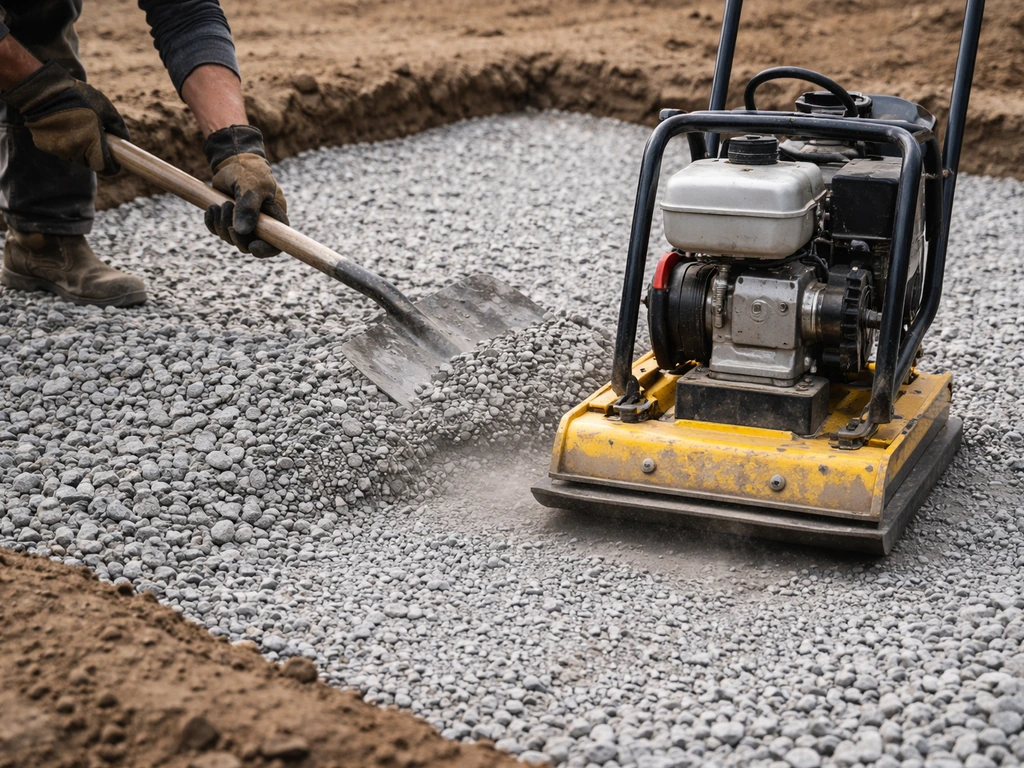
Add your compactable gravel base in lifts, layers of no more than 3 to 4 inches, and compact each lift with the plate compactor before adding the next one. Running the compactor over a full 6-inch depth all at once leaves the bottom loose. Two passes in perpendicular directions per lift gives you a solid, even base. By the time you're done, the base should not give at all underfoot.
Once the gravel base is compacted and sloped correctly, add your bedding sand layer. Spread it evenly and screed it to about 1 inch depth, no more. ICPI-aligned standards consistently cap the bedding layer at roughly 25mm (just under 1 inch) because thicker bedding sand compresses unevenly and causes pavers to settle at different rates. Use two 1-inch diameter pipes or conduit set on top of your gravel base as screed guides, rest your 2x4 screed board on them and drag it across to create a perfectly flat, 1-inch-deep sand surface. Do not compact the bedding sand after screeding. It needs to remain loose so pavers bed into it evenly when they're set and compacted.
Work in manageable sections, screed only as much as you can cover with pavers before walking on it. Footprints in screeded sand mean re-screeding that section, which isn't a disaster, just annoying. Keep your screed pipes in place until you've filled in around them, then carefully fill those channels with sand by hand and tamp gently.
Step-by-Step Paver and Concrete Installation Workflow
Once your base is prepped and bedding sand is screeded, you're ready for the satisfying part. If you want to add water to the patio, plan the pond location early and make sure the base and drainage are designed for the pond’s weight and water flow. Follow this sequence and you'll end up with a level, locked-in surface.
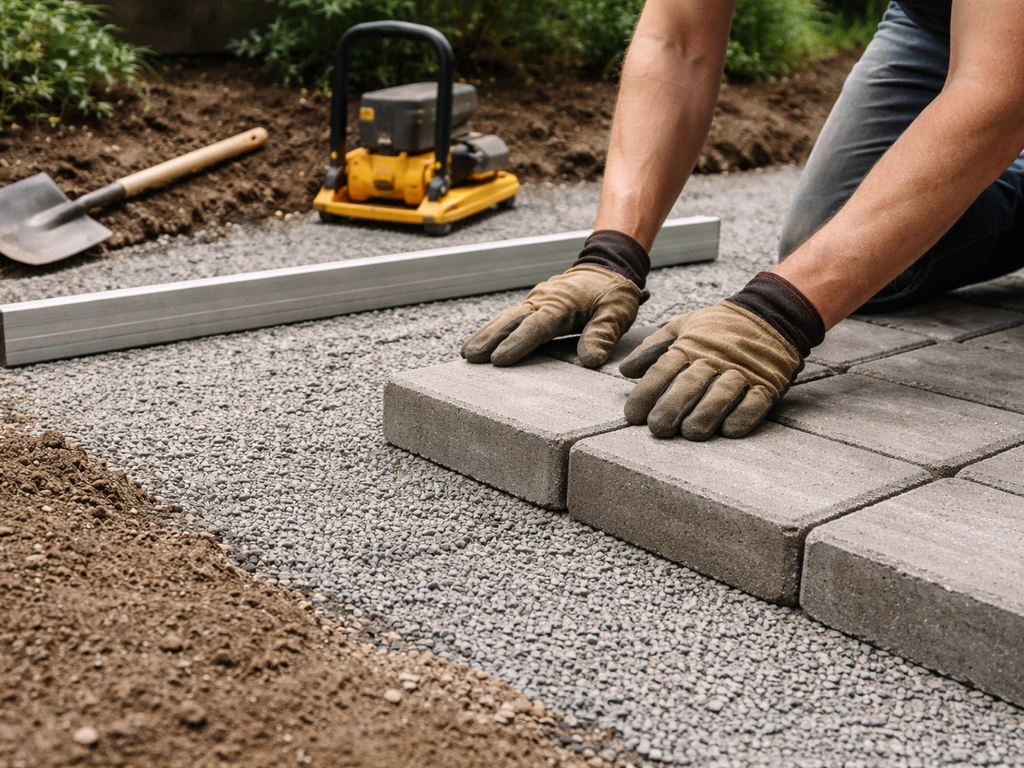
- Set your starting corner: pick the most visible corner (usually the house corner) and place your first paver there. This is your reference point for the whole pattern.
- Lay pavers in your chosen pattern, working outward from the starting corner. A running bond (like standard brick) or herringbone pattern both work well and are beginner-friendly. Place each paver gently onto the sand—don't slide it. Lower it straight down.
- Use your rubber mallet to tap each paver level as you go. Check with your 4-foot level frequently across multiple pavers, not just individual ones.
- Keep consistent joint spacing of about 1/16 to 1/8 inch. Most concrete pavers have built-in spacer nubs on the sides, which makes this automatic.
- Once you've filled the main field, mark and cut border pavers. A wet saw gives the cleanest cuts—an angle grinder with a diamond blade works for occasional cuts. Wear eye and ear protection.
- Install plastic edge restraints around the full perimeter, spiking them into the compacted gravel base through the bedding layer. Do this before final compaction so the restraints lock pavers in place properly. Edge restraints are what prevent your patio from slowly spreading outward over the years.
- Run the plate compactor over the entire paved surface (with a rubber pad or piece of plywood under the compactor plate to protect paver faces). This final pass drives the pavers down into the bedding sand and seats them uniformly.
- Spread polymeric joint sand over the surface and sweep it into the joints with a push broom. Make multiple passes, sweeping diagonally across the paver pattern to fill joints completely. Blow off excess with a leaf blower set to low, or sweep clean.
- Lightly mist the surface with water per the polymeric sand manufacturer's directions to activate the binding agent. Don't flood it—a gentle, even wetting is what you want.
- Keep foot traffic off for at least 24 hours while the polymeric sand cures.
Polymeric sand is worth the extra cost over plain mason's sand for joints. It binds when wet, resists weed germination, and doesn't wash out easily in rain. Techo-Bloc, Unilock, and most major paver manufacturers recommend it specifically for weed and joint stability. If permeability is a priority (you want rain to drain through the joints), there are permeable polymeric joint materials designed for that too.
Common Problems and Quick Fixes
Uneven or Rocking Pavers
This almost always comes down to inconsistent bedding sand depth. If you screeded to 1 inch in most spots but left a thick patch somewhere, those pavers will sit high and rock. The fix is straightforward: pull up the offending pavers, re-screed the sand in that section, and re-lay them. Don't try to tap them down into submission with a mallet, you'll just create a low spot later. Take 10 minutes to do it right.
Pavers Slowly Settling or Sinking
Settling after installation usually means one of two things: the base wasn't compacted in proper lifts and is still compressing under load, or organic material was left in the subgrade. If it's a small area, pull those pavers, add more base material, re-compact, re-screed, and re-lay. If large sections are sinking uniformly, you may have a subgrade issue and it's worth having a landscape professional assess drainage before you rebuild.
Pavers Spreading at the Edges
Edge pavers slowly fanning outward is a classic sign of missing or improperly installed edge restraints. The fix is to push the pavers back into position (add fresh bedding sand if needed), install proper plastic edge restraints spiked into the base material, and refill the joints. This is much easier to prevent than to fix, which is why restraints go in before final compaction, not as an afterthought.
Poor Drainage or Pooling Water
If water pools on the surface, your slope either wasn't set correctly or the patio surface is slightly concave in that spot. Minor pooling (less than 1/4 inch deep that drains within an hour) is usually acceptable. Real standing water means pulling up that section, adjusting the base slope, and relaying. Catch this during installation by using a level and checking slope as you go, it's a five-second check that saves hours of rework.
Weeds in Joints
If you used regular sand instead of polymeric sand, weeds will find those joints. The fix for an established patio is to pull weeds, apply a polymeric sand top-up, and activate it with water. For persistent weeds in older joints, a non-selective herbicide applied carefully can help before you re-sand. Going forward, polymeric sand is the best preventive measure.
Finishing, Sealing, and Easy Maintenance
Once the patio is laid and the polymeric sand has cured (minimum 24–72 hours per the joint sand manufacturer's instructions), resist the urge to seal immediately. Techniseal recommends waiting 60 to 90 days after installation before cleaning and sealing new pavers. This waiting period lets the pavers fully settle, efflorescence (the white mineral haze common on new concrete) to work its way out, and the polymeric sand to cure fully. Sealing over efflorescence traps it in and makes it look worse.
When you're ready to seal, clean the surface thoroughly first with a paver-specific cleaner or a light pressure wash, and let it dry completely. Apply a concrete paver sealer according to the product directions, most go on with a roller or pump sprayer in two thin coats rather than one thick one. A quality sealer enhances color, reduces staining, and makes future cleaning much easier. Reapply every 2 to 4 years depending on traffic and weather exposure.
For ongoing maintenance, the routine is simple. Sweep or blow off debris regularly, leaves and mulch left to rot in joints invite weeds and staining. Rinse the surface a couple of times a year. If joint sand starts washing out or weeds reappear, top up with fresh polymeric sand. For isolated damaged or stained pavers, the big advantage of a paver system is that you can pull up just those pieces, replace them, and re-sand the joints, no grinding, no patching, no color-matching a concrete repair.
Realistic time and cost expectations: a 120-square-foot paver patio typically runs $1,200 to $2,500 in materials depending on the paver style you choose, plus $100 to $200 in rental equipment. Budget a full weekend for excavation and base work, and a second day for laying pavers and finishing. That's genuinely it. If you want the full walkthrough, this guide covers the basics of how to make patio steps from layout and base prep through finishing. Most homeowners are surprised how achievable it is once they stop overthinking it and focus on getting the base right. If budget is your biggest constraint, the inexpensive patio approaches, like gravel or a simpler material mix, are worth exploring as a starting point before committing to pavers.
FAQ
Do I need a permit or inspection before I build a patio?
Often yes, especially if the patio is near property lines, attached to a structure, or changes drainage. Check your local building department before digging, and confirm whether there are rules about minimum setbacks, grading, and runoff control.
What patio size should I choose if I want it to be truly “easy” for a first-timer?
A simple rectangle around 10x12 feet is usually the easiest target because it minimizes cuts and awkward angles. If your site forces curves or many fixtures (trees, drains, posts), expect more layout time and more “dig, adjust, and re-screed” moments.
Can I build a patio directly over existing concrete or pavers?
Usually not with a sand-set system. Existing surfaces often stay slightly out of level, and you still need proper slope, so failures can show up as rocking or joint sand loss. In most cases the “easy” route is to remove the old material down to subgrade, or switch to a different system designed for overlays.
How do I know if my soil is too wet or soft to proceed?
If the excavated subgrade becomes muddy, pumps water when walked on, or holds water after a rain, treat it as a drainage or base problem. Add geotextile alone may not be enough, you may need more base depth, better grading, or a French drain before laying pavers.
What if I don’t have room to deliver gravel or move a wheelbarrow?
Plan logistics first. Measure the tightest path for a wheelbarrow and consider splitting the base into smaller drop-off quantities, using landscape carts, or scheduling delivery for one day so the excavation stays accessible and you do not end up waiting on supplies.
Do I need geotextile fabric under the gravel base?
It is most helpful when the subgrade is clay-heavy or consistently wet. For firm, well-draining sandy soil, it may not be necessary, but it can still reduce long-term migration of fine soil into the base. The key is that it should not block drainage, so avoid “impermeable” barrier layers meant for different uses.
How can I prevent uneven pavers caused by inconsistent sand depth?
Keep your screed setup stable and work in short sections. After screeding, do not compact the sand, and avoid walking on it. If you step in a spot, re-screed that section rather than trying to patch with extra sand on top.
Should I ever tap pavers down with a mallet if they look high?
Avoid that approach as a general fix. If pavers are sitting unevenly, the reliable correction is pulling the affected units, adjusting the bedding depth, and re-laying. Tapping can create low and high areas that cause rocking later.
What’s the right compaction approach to keep the base from settling?
Compact gravel in lifts no thicker than about 3 to 4 inches, and compact each lift before adding the next. Take two passes in perpendicular directions per lift, and ensure the base doesn’t move underfoot after compaction. Skipping lift-by-lift compaction is one of the fastest ways to get future sinking.
How much slope is enough if my patio is small?
Use a target grade of about 1/8 to 1/4 inch drop per foot away from the house. For a shorter patio, small measurement errors matter, so verify with a level and tape as you build the slope, not just at the end.
If water pools a little, is it always a “tear up and redo” problem?
Minor pooling can be acceptable if it drains within about an hour and stays under roughly 1/4 inch deep. Persistent standing water usually means the base slope or surface shape is wrong in that zone, and that section typically needs to be adjusted and relaid.
Do I need polymeric sand if I plan to weed regularly?
If you already know weeds will be a problem, polymeric sand is a preventive step, it locks joints when activated and resists washout. Regular sanding with plain sand tends to require more frequent top-ups because joints wash out and allow germination.
Can polymeric sand be used for a permeable patio that drains through the joints?
Yes, but you must choose a permeable joint material designed for that purpose. Standard polymeric sand can reduce permeability, so read product instructions and match the joint sand type to your drainage goal.
When should I activate and wet the polymeric sand?
Activate it only after the pavers are fully laid and the joints are filled. Do not over-wet or wash it out during activation, and follow the manufacturer’s cure timing before heavy rain, walking, or sealing so it binds correctly.
Is it safe to seal right after installation if rain is forecast?
Sealing too soon can trap efflorescence and worsen appearance. Wait at least 60 to 90 days for typical new paver conditions, and if rain is a concern, focus on proper joint activation and curing first, then seal when the surface is dry and ready.
How do I repair a cracked or damaged paver without disturbing the whole patio?
Lift only the affected units, remove and replace the bedding sand and any displaced base, then re-lay the pavers. Refill and re-activate joints with the correct joint sand type, this keeps the patch localized instead of forcing broad rework.
What maintenance is most likely to prevent future problems?
Remove debris that accumulates in joints, re-top the joint sand when it washes out, and do periodic rinsing rather than letting organic matter rot in place. If you address joint loss early, you usually reduce weeds, surface staining, and freeze-thaw damage.