You can build a functional patio pond in a single weekend using a preformed shell or a flexible rubber liner, a small submersible pump, and basic hand tools. The build comes down to five things done right: a stable, level base; a properly sized liner with enough overlap; a pump that moves the full water volume at least once per hour; a basic filter; and edges that hold everything in place.
How to Make a Patio Pond: DIY Steps, Tools, and Setup

Nolan Carver
3 Jun 2026

For liner sizing, use “Width + (2 × depth) + 2'” and “Length + (2 × depth) + 2'”, with overlap around the pond to help ensure a proper fit liner with enough overlap.
Get those five right and you'll have a pond that stays clear, doesn't leak, and actually looks good year after year.
Planning your patio pond

Before you buy a single thing, spend time on the spot where the pond will live. Walk out to your patio on a sunny morning and again in the afternoon. You want a location that gets 4 to 6 hours of direct sun per day if you're growing aquatic plants, but avoid full afternoon blaze, which drives up water temperature and feeds algae. Partial shade from a fence or pergola on the west side is ideal.
The surface underneath matters more than most people expect. Water is heavy: one cubic foot weighs about 62 pounds. A 4-foot by 4-foot pond that's 18 inches deep holds roughly 180 gallons, which is over 1,500 pounds of water alone before you add rocks, a pump, or plants. If your patio is concrete or pavers on a proper compacted base, you're almost certainly fine. If it's a deck, you need to know the joist spacing and load rating before you commit to anything larger than a container pond. For ground-level patios, the concern shifts to settlement: make sure the area doesn't puddle or sink after rain.
For sizing, a pond that's at least 18 inches deep at its deepest point is the practical minimum for keeping fish. Shallower than that and temperature swings get extreme. If you're going fish-free and just want moving water and plants, 12 inches works. As a rough rule, give yourself at least 50 gallons of water volume to make filtration manageable. Smaller than that and water quality swings wildly.
Visibility and access
Think about where you'll actually sit and watch the pond. After you’ve planned the patio layout, you can use the same compact, low-cost water features to create an inexpensive patio upgrade without a major rebuild. Position it so the water surface is visible from your main seating area, not tucked in a corner you walk past.
Leave at least 18 to 24 inches of clearance around the perimeter so you can kneel down to do maintenance without crawling over furniture. If you're building right up against a wall or fence, leave at least 6 inches behind the pond edge for the liner overlap and any plumbing. A common liner sizing approach uses length/width plus (2 × maximum depth) plus overlap, with instructions to order larger than required so you can trim after installation liner overlap.
Choosing the pond type and layout for a small patio
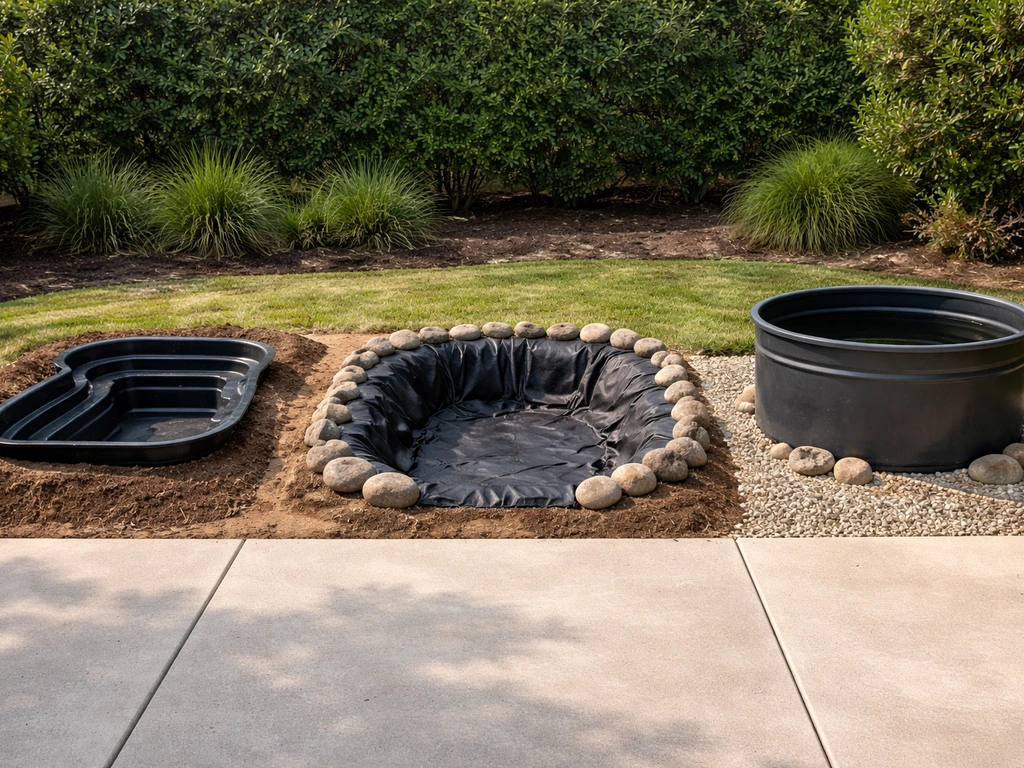
For most patio situations, you're choosing between three practical options: a preformed rigid shell, a flexible liner pond, or a container pond. Each has a real place depending on your patio size, budget, and how permanent you want the build to be.
| Type | Best for | Typical size range | Rough cost (materials) | Permanence |
|---|---|---|---|---|
| Preformed rigid shell | Beginners, smaller patios, in-ground or semi-raised builds | 50–300 gallons | $80–$350 | Moderate (removable) |
| Flexible EPDM liner pond | Custom shapes, larger builds, in-ground on ground-level patios | 100–1,000+ gallons | $150–$600+ | High |
| Container pond (half-barrel, stock tank) | Decks, small patios, renters, very tight budgets | 15–100 gallons | $40–$200 | Low (fully portable) |
For a standard patio pond with a footprint of roughly 4 feet by 6 feet or larger, a flexible EPDM liner gives you the most design freedom and the best long-term durability. EPDM rubber liners (45-mil thickness is the standard for ponds) last 20 or more years when protected from UV exposure. For something compact, a preformed shell is genuinely easier to install correctly because the shape is already fixed. Container ponds are perfect if you're on a deck or renting and can't commit to anything permanent.
Layout-wise, keep the shape simple. Kidney, oval, and rectangular forms all work well. Avoid tight S-curves or pinched necks in the shape because they create dead zones where water doesn't circulate and debris collects. If you're working on a small patio, a rectangular or circular form maximizes water volume relative to the footprint and looks intentional rather than cramped.
Materials and tools checklist
Here's what you actually need for a flexible liner pond build. I've separated the essentials from the nice-to-haves so you can calibrate to your budget.
Core materials
- EPDM pond liner, 45-mil thickness (calculate size using: liner width = pond width + (2 × depth) + 2 feet; liner length = pond length + (2 × depth) + 2 feet — always order larger and trim down)
- Pond underlayment or geotextile fabric (protects liner from puncture; use under and optionally over the liner beneath rocks)
- Submersible pump sized to turn the full pond volume over at least once per hour (check the GPH rating on the box)
- Biological/mechanical filter box or a pump with integrated filter media
- Flexible pond tubing to match your pump outlet (usually 3/4-inch or 1-inch ID)
- Hose clamps for tubing connections
- GFCI-protected outdoor electrical outlet within reach of the pump cord
- Edging material: flat fieldstone, concrete cap blocks, flagstone, or brick
- Construction sand (2-inch layer for the pond floor; also for leveling under rigid shells)
- Pond-safe foam or mortar for securing edging stones
Optional but useful
- UV clarifier (inline unit connected to pump output; dramatically reduces green water algae)
- Aquatic plant baskets and aquatic planting media
- Pond netting or protective mesh (for leaf fall or if you have fish and local predators)
- De-icer or pond heater for winter climates
- Pond treatment starter kit (dechlorinator, beneficial bacteria)
Tools
- Spade and digging fork (for ground-level excavation)
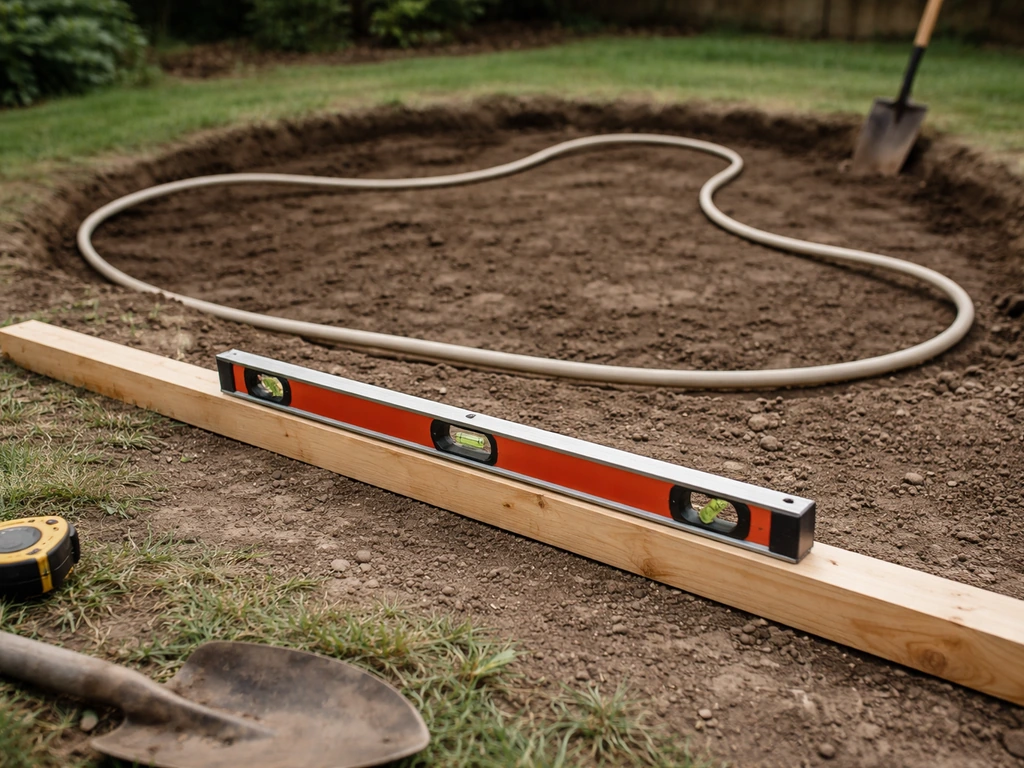
- Long carpenter's level and a straight 2x4 board (checking level across the full pond width)
- Tape measure
- Rubber mallet
- Utility knife or scissors (trimming liner)
- Garden hose with water source
- Wheelbarrow (for moving excavated soil)
- Work gloves
Step-by-step construction for a patio pond
This sequence covers a flexible liner pond built into or partially into a ground-level patio. If you're working with a preformed shell, follow the same steps but skip the liner sizing math, your shell dictates the hole shape.
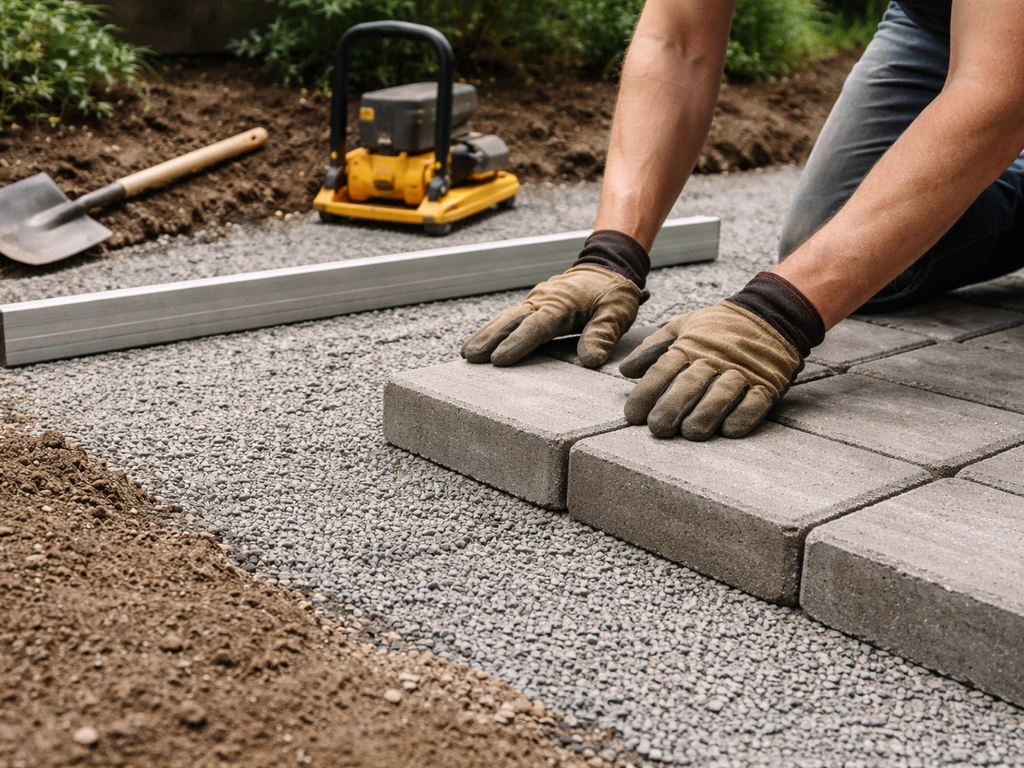
- Mark the outline. Use a garden hose or rope to lay out the pond shape on your patio surface. Step back and look at it from your seating area. Adjust until it looks right, then mark the outline with marking paint or chalk.
- Excavate the hole. Dig straight down to your target depth (minimum 18 inches for fish; 12 inches for plants-only). Angle the upper 6 inches of the walls at a slight inward slope (about 75 degrees) to help the liner conform without bridging. If you want plant shelves, cut a flat ledge about 9 to 12 inches wide at the 9-inch depth mark before going deeper.
- Level the top edge. This is the most important step. Use your 2x4 and level across multiple directions. If one side is even half an inch higher than the other, the water will expose liner on the low side. Take the time to get it right — shave high spots and pack low spots with damp sand.
- Lay the sand base. Spread a 2-inch layer of damp construction sand across the pond bottom and up the shelves. Pack it firm and smooth out any sharp bumps or stones.
- Install underlayment. Drape the geotextile fabric into the hole so it conforms to the shape. Overlap pieces by at least 6 inches. Let it run up and over the edges — you'll trim it after the liner goes in.
- Install the liner. Unfold the EPDM liner across the hole. Working from the center, gently push the liner down into the excavation, creating loose pleats at the corners rather than stretching it tight. Do not cut anything yet. Drape the excess evenly over all edges.
- Fill with water slowly. Start filling with the garden hose at a trickle. As the water weight pushes the liner down, keep smoothing the pleats so they lie flat. When the pond is about half full, stop and recheck the edge level. Adjust now if needed — you still can.
- Finish filling and secure the edges. Once filled, lay your edging stones or cap blocks around the perimeter on top of the liner overlap. The stones hold the liner down and cover the raw edge. Aim for about 4 to 6 inches of liner hidden under the edging material. Trim any excess liner that sticks out beyond the edging.
- Cut the liner at the pump and return points. Mark where your pump power cord exits and where any return pipe comes back into the pond. Make the smallest cuts possible, grommeting or silicone-sealing any penetrations.
- Install the pump and plumbing (see the filtration section below), fill any remaining gaps in the edging with mortar or foam, and fill the pond the rest of the way.
Building a small patio pond: what changes for compact builds
A small patio pond, anything under 100 gallons or with a footprint smaller than roughly 4 feet by 3 feet, follows the same basic process, but a few adjustments make a real difference in how well it works.
Container approach
For very small builds on a deck or finished patio surface, skip excavation entirely. A 100-gallon galvanized stock tank, a large glazed ceramic pot sealed on the inside, or a half whiskey barrel lined with a pre-cut liner piece all make excellent above-ground patio ponds. The build steps become: seal the container if needed (stock tanks are usually fine as-is; barrels need a liner or sealant), set it level on the patio surface, install a small fountain pump rated for 100 to 200 GPH, and fill. That's genuinely all there is to it.
In-ground small pond adjustments
If you're going in-ground but keeping it small, a preformed rigid shell is your best bet. Dig the hole to match the shell exactly: flip the shell upside down and trace its outline, then excavate 2 inches deeper than the shell's depth to leave room for your sand bed. Once the shell sits level in the hole with the rim flush to the patio surface, backfill the gaps around the shell with sand and tamp it firmly as you go. Gaps that aren't backfilled will eventually cause the shell to flex and crack under the water weight.
The practical challenge with small ponds is water quality: less volume means faster temperature swings, faster waste buildup, and quicker algae blooms. Keep the pump running 24/7, avoid overstocking with fish, and plan on partial water changes (about 25%) every two weeks during the growing season. A small UV clarifier on a compact build is well worth the $40 to $60 cost.
Filtration, aeration, water circulation, and plumbing basics
This is the section most DIY guides skim over, which is exactly why so many patio ponds turn into green, smelly disappointments six weeks after they're built. Getting the functional side right is what separates a pond you're proud of from one you drain and fill with dirt.
Sizing the pump
The basic rule: your pump should turn over the entire pond volume once per hour at a minimum. For a 300-gallon pond, that means a pump rated at 300 GPH or more. Always check the pump's flow rate at your actual head height (the vertical distance the water has to travel from the pump to where it exits, like the top of a waterfall or spitter). Most pump packaging shows a flow chart. A pump rated at 500 GPH at zero head might only deliver 250 GPH at 3 feet of head. Size up if you're close.
Mechanical and biological filtration
Mechanical filtration physically removes debris (foam, filter pads, or a basket). Biological filtration uses beneficial bacteria colonies growing on media to break down fish waste and organic matter into less harmful compounds. You need both. Many small submersible pumps come with a foam pre-filter sleeve, that handles basic mechanical filtration. For biological, you can use an external box filter (sits at the pond edge, water pumped through it and returned to the pond), an internal submersible filter box, or a DIY bucket filter filled with bio-media like lava rock or plastic bio-balls. A basic box filter setup costs $30 to $80 at any pond supply store and is the easiest way to get started.
Aeration
Moving water naturally aerates the pond, so a fountain head, waterfall, or spitter on your pump return handles this. If your setup moves water underground and returns it quietly below the surface, add a small air pump with an airstone to keep dissolved oxygen levels up, especially in warmer months. Fish need at least 6 to 8 mg/L of dissolved oxygen; warmer water holds less, so summer aeration matters most.
Basic plumbing layout
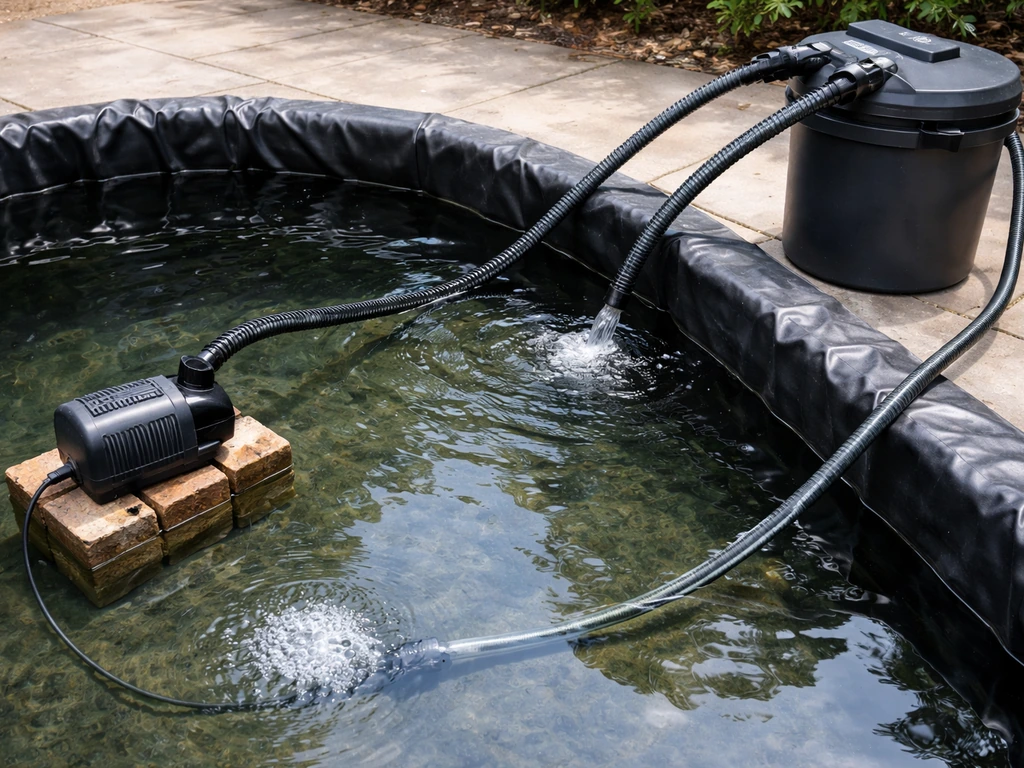
Most patio ponds use a simple loop: pump sits on the pond bottom (or on a brick pedestal to keep it above the silt layer), flexible tubing runs from the pump outlet to the filter or feature, and water returns to the pond by gravity or spills in via a waterfall, fountain head, or return pipe. Use barbed fittings and hose clamps at every connection. Silicone all penetrations through the liner with pond-safe silicone and let it cure 24 hours before filling. If you're running tubing along the patio surface to an external filter, use tubing clamps or cable staples to keep it tidy and prevent tripping hazards.
Electrical safety
Every pump, UV clarifier, and air pump must be plugged into a GFCI-protected outlet. This isn't optional, it's a basic safety requirement around water. If your patio doesn't have a GFCI outlet nearby, have one installed by an electrician before you fill the pond. Run cords discreetly under edging stones or through conduit to keep them out of sight and protected from foot traffic.
Finishing touches, maintenance, and troubleshooting
Finishing the look
Once the pond is filled and running, focus on the edging and planting. Lay flat stones or flagstone caps so they overhang the water by 1 to 2 inches, this hides the liner edge and gives the pond a finished, natural look. Use aquatic plants in submerged baskets: a mix of oxygenating plants (like hornwort or anacharis), marginals on the plant shelves (like pickerel rush or water iris), and one floating plant like water lettuce to provide shade and reduce algae. Aim to cover about 50 to 60 percent of the water surface with plants, this is one of the best natural algae control methods available.
Ongoing maintenance schedule
- Weekly: Check water level and top off with dechlorinated water; rinse the mechanical filter pad if it's visibly clogged
- Biweekly: Partial water change of 20 to 25% using dechlorinator in the replacement water
- Monthly: Check pump impeller for debris; clean filter media by rinsing in pond water (never tap water, which kills beneficial bacteria)
- Seasonally: Trim dead aquatic plant material in fall; remove pump and store above freezing if you live in a climate with hard winters (Zone 6 and colder); treat the pond with beneficial bacteria starter in spring when water temps reach above 50°F
Troubleshooting common problems
Leaks are the most feared problem, and most of them aren't actually liner punctures. If your water level is dropping, first check whether it's evaporation (normal: up to half an inch per day in hot, dry weather) or a real leak. Mark the water level with tape and wait 24 hours with the pump off. If the level drops less than a half inch, it's almost certainly evaporation.
If it drops more, check the edging first, the most common leak point is where the liner was trimmed too short or where a stone shifted and exposed a gap. Actual liner punctures are rare with EPDM but can be patched with a pond liner repair kit (clean the area, apply primer, press patch firmly, let cure 24 hours).
Green water almost always means a nutrient imbalance feeding algae. The fastest fixes are: run your pump 24/7 (if you weren't already), add more aquatic plants to compete for nutrients, and do a 25% water change. A UV clarifier will knock out suspended algae within 3 to 5 days once properly sized. String algae (the slimy thread-like kind on rocks and the liner) is a different issue, manual removal plus reducing sunlight exposure and nutrient load is the most effective long-term approach.
Pump or filter problems usually come down to one of three things: the impeller is clogged with debris (pull it out and rinse), the flow rate is too low for the pond size (time to upgrade), or the biological filter hasn't established its bacteria colony yet (this takes 4 to 6 weeks after a new setup). During that break-in window, do more frequent small water changes and don't add fish yet.
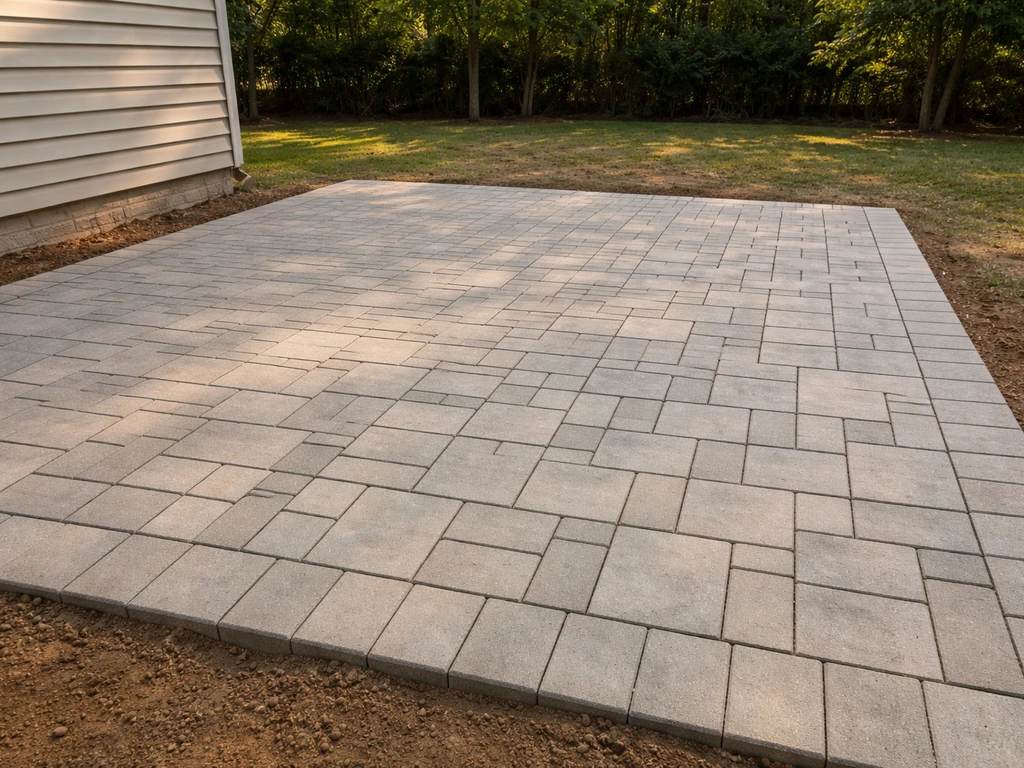
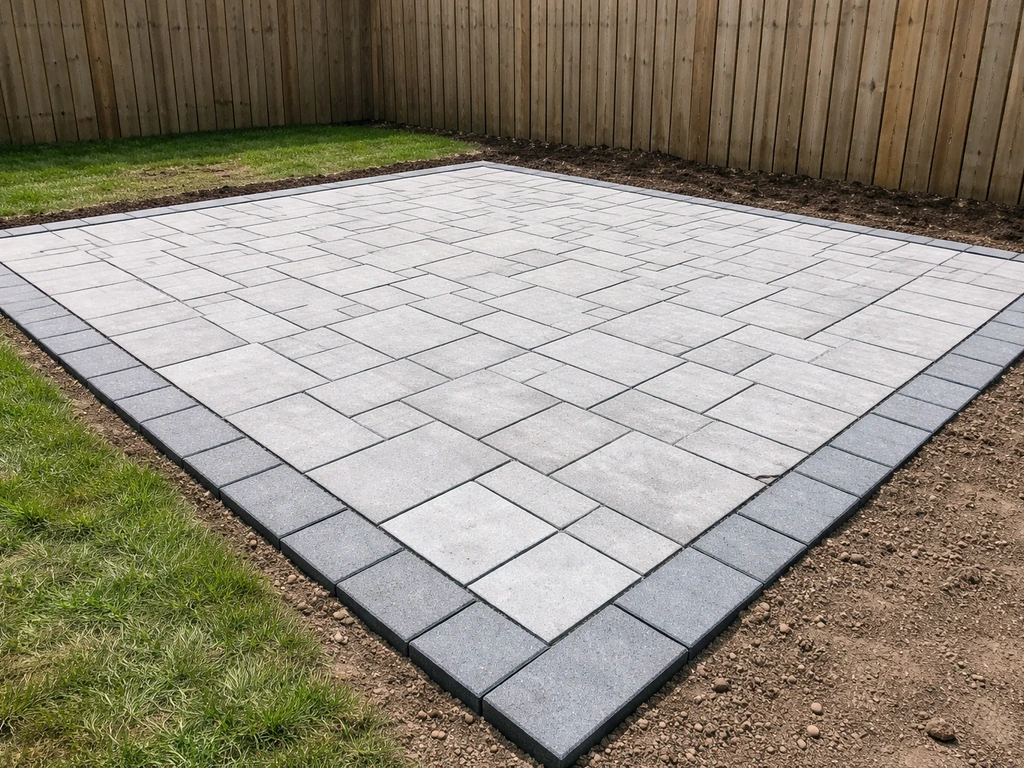
If you're building a patio from scratch or upgrading an existing one to add a pond, the same principles of levelness, stable base prep, and good drainage that matter for the patio surface carry directly over to the pond build. A well-built patio foundation makes for a much easier pond installation, and the two projects genuinely complement each other as a combined outdoor living upgrade.
FAQ
Can I build a patio pond if my patio is on a deck or raised platform?
Yes, but treat it like a structural project. Before installing, confirm the deck’s load rating and measure joist spacing. Even a small pond quickly becomes heavy when you include water plus liner, rocks, and equipment, so consider a lighter option like a container pond or reducing depth and total gallons.
How do I choose between a preformed shell, EPDM liner, and a container pond for a small patio?
Use a shell when you want a small in-ground pond and want the least liner-fitting work, use EPDM when you want the most flexibility and long-term durability, and use containers when permanence or excavation is not practical. If you are unsure about excavation or liner layout, a shell or above-ground container usually reduces mistakes.
What should I do about noise if my pond has a waterfall or spitter?
Start with gentle flow and avoid overdriving the feature. After filling, run the pump and adjust return fittings so the water level in the pond stays stable, then dampen vibrations by placing tubing securely and keeping pump cords and connections from contacting hard surfaces.
Do I really need both mechanical and biological filtration?
For most patio ponds with fish, yes. Mechanical filtration handles debris so waste does not clog the system, and biological filtration breaks down dissolved waste using bacteria. If you only run mechanical filtration, water can look clear while toxins still build up, especially during warmer weeks.
How do I calculate pump size if my return has a lot of height?
Use the pump’s flow chart at your actual head height, not its “max GPH” rating. Head height is the vertical distance from the pump outlet to the water exit point, such as the top of a spillway. If your head is significant, oversize the pump to ensure you still get near full-volume turnover per hour.
How long can I wait before adding fish after setup?
Plan for a break-in period. Biological filters typically need several weeks to build beneficial bacteria, often around 4 to 6 weeks. If you add fish immediately, you can overwhelm the system, leading to sudden algae or water quality problems.
What’s the best way to prevent the pond from filling with debris or causing gunk buildup?
Use a skimmer or pre-filter approach if you can, and keep plant baskets and decorative rock from trapping leaves. Also clean the mechanical stage regularly, rinse media in pond water when possible, and do not let the pump intake become buried in silt.
How can I tell whether water loss is a leak or normal evaporation?
Do a controlled test: mark the water line with tape, leave the pump off, and watch for 24 hours. If the drop is small (for example, under about half an inch in hot weather), it is usually evaporation. If it drops more, inspect edging and around stones before assuming a liner puncture.
How do I patch an EPDM liner if it does puncture?
First clean the area thoroughly and dry it, then use a pond liner repair kit designed for EPDM. Apply primer if the kit requires it, press the patch firmly to remove air gaps, and allow the recommended cure time before refilling so the patch bonds properly.
Why does my water go green even though my pond has a pump and plants?
Often it is either insufficient plant coverage, too much sun, or the filter not properly sized and running at adequate turnover. Make sure you can turn the full pond volume at least once per hour, increase plant density gradually, and consider a UV clarifier once the system is stable.
Can I run my pond equipment in winter without problems?
Often you should plan a winter strategy based on your climate. In many regions, you need to prevent freezing damage by using a safe de-icer or keeping a small opening in the ice, and you may reduce feeding or adjust aeration. If you have a waterfall, consider winterizing so components are not stressed by freeze-thaw.
Are GFCI outlets absolutely necessary for patio pond pumps and UV clarifiers?
In practice, they are strongly recommended because they reduce the risk of shock from equipment faults near water. If you do not have a GFCI outlet, have one installed before filling, and route cords so they are protected from foot traffic and weather.