You can absolutely build your own patio as a beginner, and most people finish a basic paver or gravel patio in a single weekend. The process comes down to four things done right: a solid excavated base, a consistent drainage slope of about 1/4 inch per foot away from your house, compacted layers beneath your surface material, and proper edging to hold everything in place. Get those four things right and your patio will last decades. Rush them, and you'll be releveling pavers or watching puddles form every time it rains.
How to Build Your Own Patio: Step-by-Step DIY Guide

Nolan Carver
27 May 2026
Planning your patio project
Before you buy a single bag of gravel, spend an hour thinking through size, purpose, and placement. This is where most DIYers skip ahead and regret it later. A patio that's too small feels cramped the moment you put furniture on it. A standard outdoor dining set with four chairs needs roughly 12 x 12 feet minimum to feel comfortable. If you're adding a grill zone or a fire pit, plan for at least 16 x 20 feet or consider splitting the space into functional zones.
Walk your yard and identify the best location. You want a spot that's reasonably flat (minor slopes are fine, but dramatic grades add serious work), gets the amount of sun or shade you prefer, and connects logically to your back door or living space. Check for buried utilities before you dig. In the US, call 811 at least a few days before you start, and they'll mark gas, electric, and water lines for free.
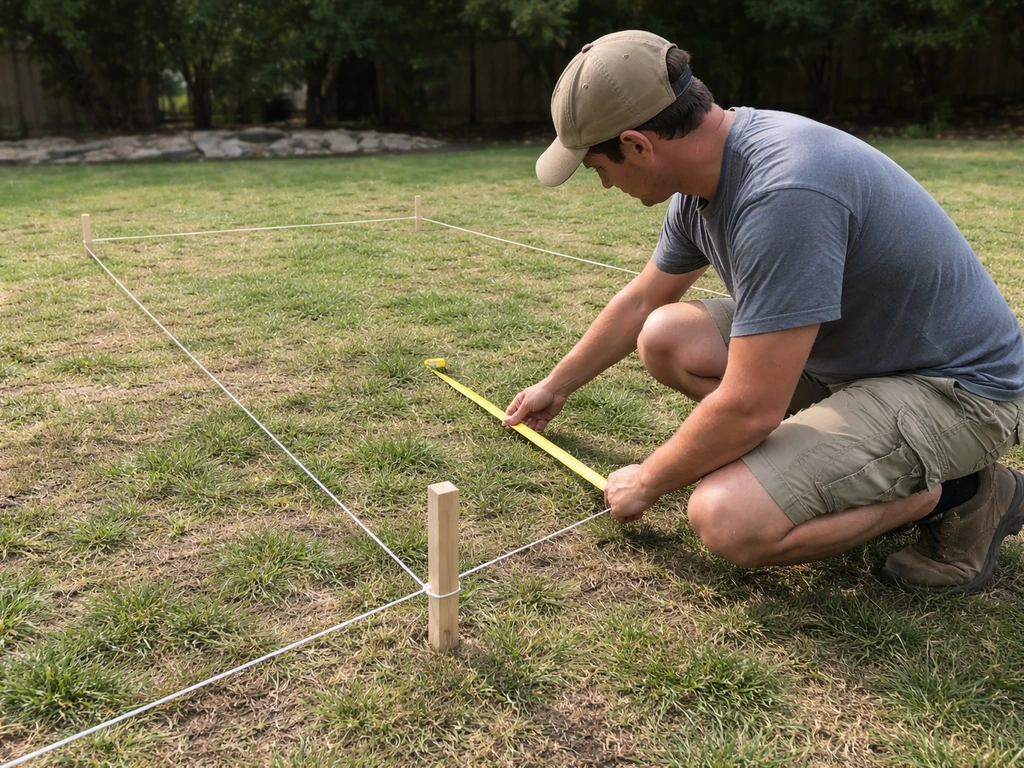
Sketch your layout on paper with real measurements. Use string lines and stakes to mark the actual footprint in your yard before committing. Walk around it, stand inside it, visualize the furniture. This also lets you spot problems early, like a tree root that's going to fight you or a low spot that collects water. If your patio will be attached to the house, check local building codes. Many municipalities require permits for permanent structures above a certain size, and some have setback rules from property lines.
- Minimum size for a comfortable dining area: 12 x 12 feet
- Add 4–6 feet for a grill station or fire pit zone
- Call 811 before digging to locate buried utilities
- Check local permit requirements for attached or large patios
- Use stakes and string to visualize the real footprint before excavating
Site prep and base design
This is the part that makes or breaks your patio. You can put down beautiful pavers on a bad base and watch them sink, shift, and heave within two seasons. Do the base right and you're set.
Setting your drainage slope
Every patio needs to slope away from your house to drain properly. The target is 1/4 inch of drop per linear foot, which works out to roughly a 2% slope. That sounds tiny, but it's enough to move water efficiently without looking or feeling like a ramp. Across a 12-foot patio, that's 3 inches of total drop from the house-side edge to the outer edge. Use a string line and a line level (or a long 4-foot level on a straight board) to measure and set this slope during excavation. Don't eyeball it.
Excavation depth
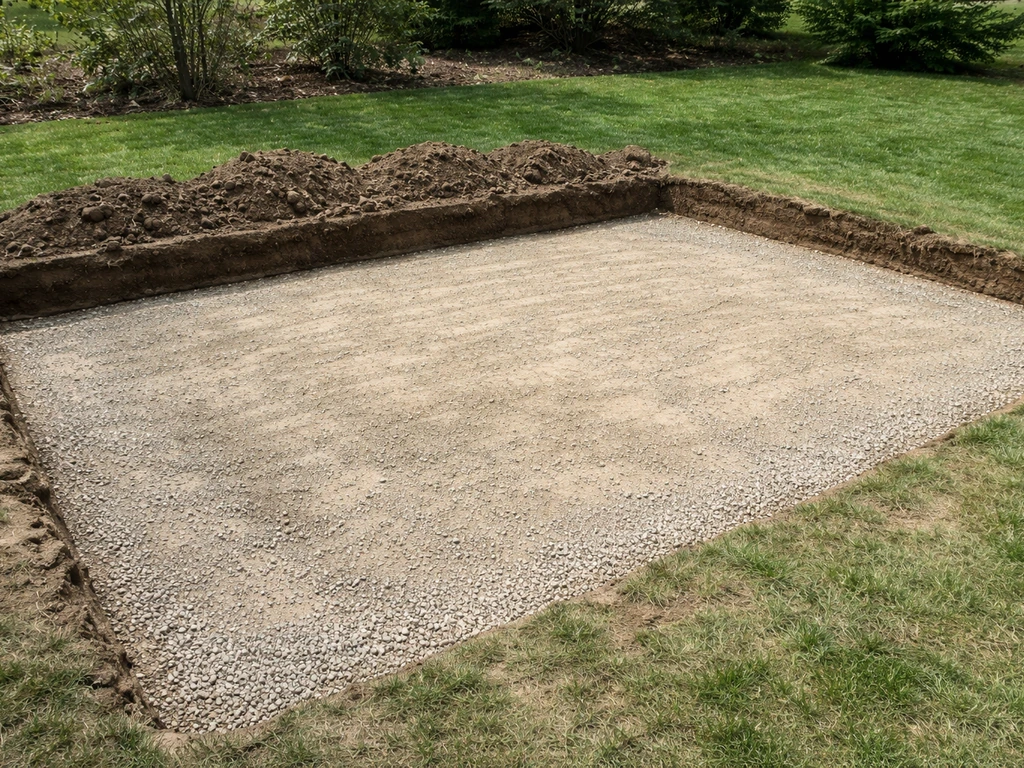
For a paver patio, you're typically digging down about 9 to 11 inches total from finished grade. That breaks down as: 4 to 6 inches of compacted crushed stone base, 1 inch of bedding sand, and then the paver thickness itself (standard concrete pavers run about 2 3/8 inches thick). A Tech Spec 2 reference from the ICPI Tech Spec library includes [grading requirements for bedding sand](https://www. siteone.
com/medias/sysmaster/PimProductImages/assets/ProductAssets/US/Orco/installationInstructions/472695installationinstructions_05262025/472695-installationinstructions-05262025. pdf), which is used as a standard reference point for paver-system design details. A practical target is 10 inches of total excavation for most residential paver projects. For a gravel patio, you can get away with 4 to 6 inches of compacted gravel and you're done.
For a poured concrete slab, aim for a 4-inch slab with a 4-inch compacted gravel sub-base beneath it, so about 8 inches of total excavation.
Remove all sod and organic material from the excavation area. Organic matter compresses and rots over time, which causes settling. Use a sod cutter or a flat spade and cut clean edges. If your soil is loose or sandy, you may want to compact the native subgrade with a hand tamper before adding base material.
Building the base layer
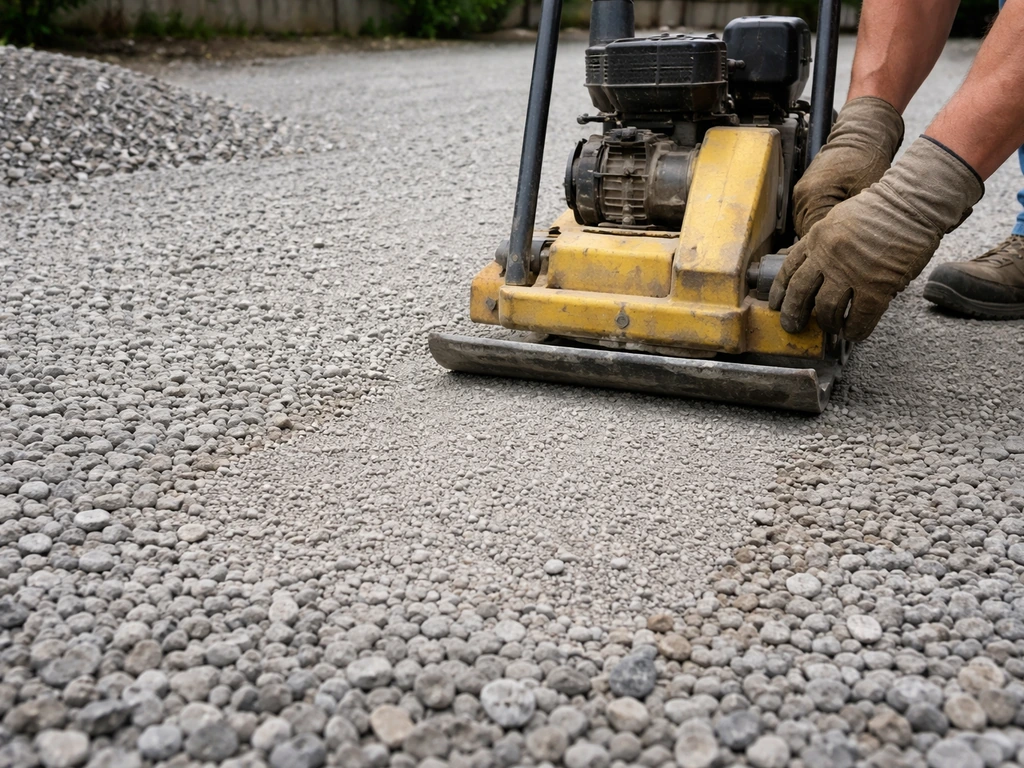
Fill in with crushed stone aggregate (also called road base, crusher run, or Class II base depending on your region). Spread it in 2-inch lifts and compact each lift before adding the next. This is where most beginners go wrong: they dump in 5 inches of gravel all at once and compact it once, and the base stays soft in spots. Compact in layers and you get a genuinely stable base. For compaction, rent a plate compactor from any equipment rental store. Barkman recommends a minimum 5,000 lbf-rated plate compactor for paver base work. A hand tamper works for small areas or tight corners, but it won't get you the same density on a full patio.
After your base is compacted, add the 1-inch bedding sand layer (for pavers only). Use coarse washed concrete sand, not play sand or polymeric sand. Screed it flat using a straight board dragged across two rails or pipe guides set at your target height. Do not compact the bedding sand layer after screeding. Walk on it as little as possible before setting pavers, because footprints create low spots that show up in your finished surface.
Choosing your materials and tools
The three most DIY-friendly patio materials are concrete pavers, poured concrete, and gravel. Each has different costs, difficulty levels, and long-term behavior. If you still feel unsure about which option fits your yard, revisit this guide on how to make your own patio for a clear project flow. Here's an honest comparison:
| Material | Approx. Cost (installed DIY) | Skill Level | Durability | Repairability |
|---|---|---|---|---|
| Concrete pavers | $3–$8 per sq ft (materials) | Beginner–Intermediate | Excellent | Easy (swap individual pavers) |
| Poured concrete | $2–$5 per sq ft (materials) | Intermediate | Good (cracks over time) | Harder (patch or resurface) |
| Gravel/crushed stone | $1–$3 per sq ft (materials) | Beginner | Moderate (shifts over time) | Easy (add and rake more gravel) |
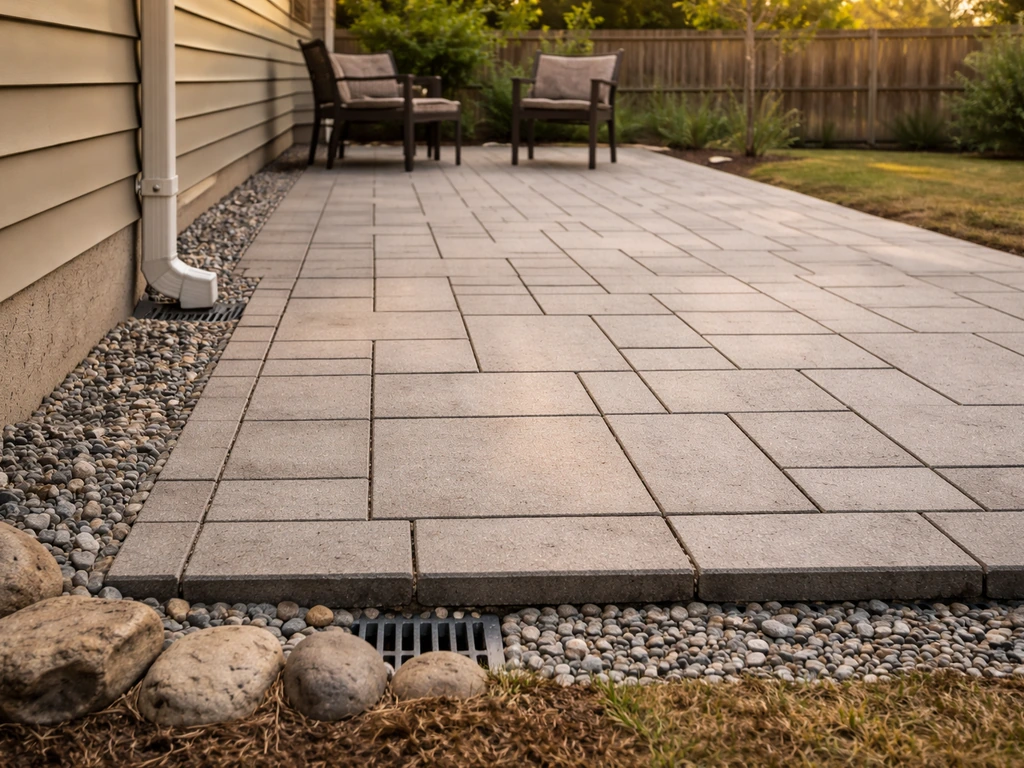
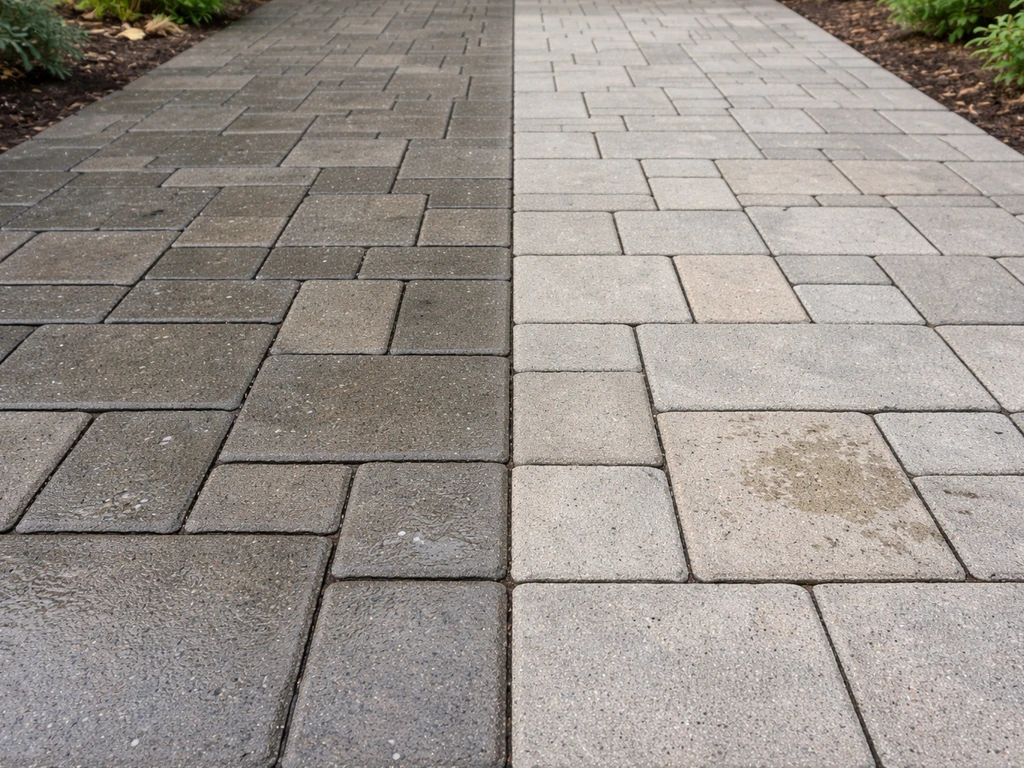
For most first-time builders, concrete pavers are the best choice. They're forgiving, you can pull and reset them if something goes wrong, and they look great. Poured concrete is cheaper per square foot in materials but much less forgiving if you make a mistake, and all concrete eventually cracks. Gravel patios are the easiest and cheapest, and they're a great option for a quick weekend project, though they need occasional regrading and aren't ideal for heavy furniture.
Tool checklist
- Tape measure and marking paint or chalk line
- Stakes and string line, plus a line level or line level app
- Spade and sod cutter (or rent a sod cutter for large areas)
- Wheelbarrow
- Plate compactor (rent for approximately $75–$100/day)
- Hand tamper (for edges and tight spots)
- Screed board (a straight 2x4 works fine)
- Rubber mallet
- Level (4-foot minimum)
- Broom (for sweeping joint sand)
- Paver saw or angle grinder with diamond blade (for cuts)
- Garden hose with misting nozzle (for polymeric sand activation)
Materials list (for a basic paver patio)
- Crushed stone aggregate (4–6 inches deep, calculate cubic yards based on your square footage)
- Coarse bedding sand (1 inch deep across your patio footprint)
- Concrete pavers in your chosen size and style
- Polymeric sand for joints
- Plastic or metal paver edge restraints with spikes
- Landscape fabric (optional, place under base in weed-prone areas)
Step-by-step patio construction
Here's the full workflow from start to finish. Follow this order and don't skip steps.
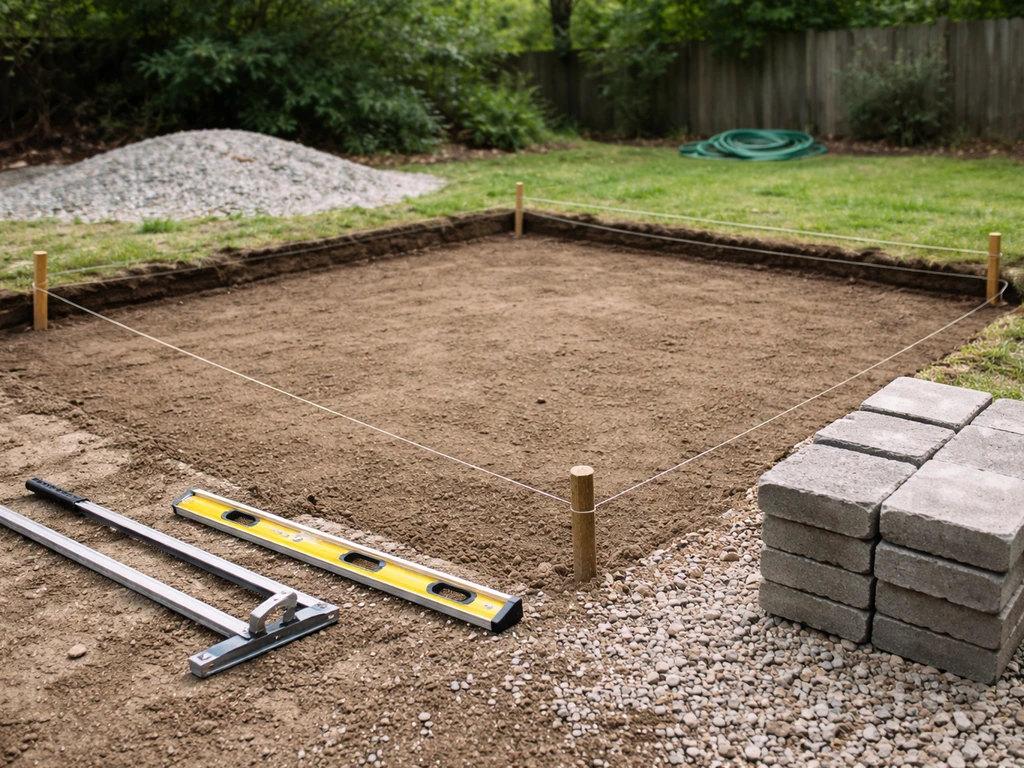
- Mark your patio footprint with stakes and string. Use the 3-4-5 triangle method to get square corners: measure 3 feet along one string, 4 feet along the perpendicular string, and the diagonal between those two points should measure exactly 5 feet. Adjust until it does.
- Excavate the entire area to your target depth (typically 10 inches for pavers, 8 inches for concrete, 4–6 inches for gravel). Pitch your excavation at the 1/4-inch-per-foot slope away from the house as you dig—don't try to correct for slope only at the top.
- Remove all organic material and compact the native subgrade with your plate compactor or hand tamper.
- Add crushed stone base in 2-inch lifts, compacting each lift thoroughly before adding the next. Your finished base should be 4–6 inches deep and compacted solid.
- Install edge restraints around the perimeter of the patio before laying any pavers. Spike them into the compacted base every 12 inches. Edge restraints are what keep your patio from spreading outward over time—this step is commonly skipped and always regretted.
- Spread and screed your 1-inch bedding sand layer using pipe guides or rails to maintain a consistent depth. Pull a straight screed board across the pipes to create a flat, even surface. Remove the pipes carefully and fill the channels with sand.
- Begin laying pavers from a straight reference edge (usually the house side or a defined corner). Work outward and to the side, kneeling on a piece of plywood to avoid disturbing screeded sand. Set each paver with a firm downward press and a light tap with a rubber mallet. Maintain 1/8-inch joint gaps between pavers using spacers or by eye.
- Cut border pavers to fit using a paver saw or angle grinder with a diamond blade. Mark cuts carefully—measure twice.
- Once all pavers are set, run your plate compactor over the entire surface (use a rubber pad attachment to protect the paver surface). This seats the pavers firmly into the bedding sand.
- Spread polymeric sand over the surface and sweep it into all joints with a broom. Run the plate compactor over the surface again to vibrate sand deep into the joints. Sweep off any excess from the paver faces completely—use a leaf blower on low if needed.
- Activate the polymeric sand with a gentle water mist. Do not flood or puddle. Follow the manufacturer's specific instructions; most require a light mist application that saturates the joints without washing sand out. Let it cure for at least 24 hours without foot traffic or rain.
If you're pouring concrete instead
After excavating and compacting a 4-inch gravel base, build your wood forms using 2x4s staked firmly into the ground at your slope pitch. For anything larger than 10 x 10 feet, plan for control joints (grooved lines tooled into the wet concrete every 8 to 10 feet) to control where the inevitable cracking happens. Mix and pour your concrete, screed it level with the forms, and finish the surface with a magnesium float followed by a stiff-bristled broom drag for slip resistance. Keep the slab damp and covered for at least 3 days while it cures.
Finishing details and long-term maintenance
Sealing your patio
Sealing is optional for concrete pavers but genuinely worthwhile. A good penetrating paver sealer enhances color, reduces staining, and helps the polymeric sand hold up longer. Apply sealer after the polymeric sand has fully cured (wait at least a week after installation). Clean the surface thoroughly first, then apply with a roller or low-pressure sprayer in thin, even coats. Most sealers need reapplication every 3 to 5 years depending on traffic and climate. For poured concrete, sealing is strongly recommended within the first few months to protect against freeze-thaw damage and staining.
Cleaning
Annual cleaning is all most patios need. Sweep regularly to keep debris from staining, and rinse with a garden hose. For joint finishing, Willow Creek Paving Stones’ installation steps describe sweeping joint sand into the joints with a broom before compaction and also note to follow the polymeric sand manufacturer’s instructions Avoid pressure washing polymeric sand joints directly.. For tougher stains, a mild dish soap and a stiff brush handle most situations. Avoid pressure washing polymeric sand joints directly. If weeds start appearing in joints, spot-treat them or plan to resand the joints as needed.
Repairs to watch for
The most common paver problem is individual pavers sinking or rocking, which usually means a soft spot in the base or a footprint in the bedding sand that wasn't caught before installation. The fix is simple: pull the affected pavers, add or remove sand to level, re-set the pavers, and resand the joints. This is one of the biggest reasons pavers beat poured concrete for DIYers. If you make a mistake, or if something shifts later, you can fix it yourself without a grinder or a new pour.
For poured concrete, hairline cracks that appear in the first year are usually normal shrinkage cracks. Fill them with a flexible polyurethane crack filler. Larger structural cracks that shift or heave usually point to a base problem underneath and may require more serious attention.
Common mistakes to avoid
- Skipping edge restraints: without them, pavers migrate outward and joints widen within a couple of seasons
- Compacting all base gravel in one pass: compact in 2-inch lifts or you'll have soft spots
- Using the wrong sand: play sand compacts too densely and causes drainage problems; use coarse concrete sand for bedding
- Walking on screeded sand before laying pavers: every footprint is a low spot waiting to show up in your finished surface
- Forgetting the slope: it's easy to get focused on level and forget about pitch—check your slope at every stage
- Flooding the polymeric sand: too much water washes the binding agents out of the joints before they can cure
Building your own patio is one of the most satisfying DIY projects you can take on as a homeowner. If you want a clear DIY path, use the steps below to plan, prep the base, and install your patio correctly how to install your own patio. The skills you develop here, reading a slope, compacting a base, setting pavers level, carry over into dozens of other projects. Start with a simple rectangular layout on flat ground, use pavers, and follow the layer sequence exactly. Once you've done it once, you'll understand every part of the system and feel confident tackling bigger, more complex designs like raised patios, retaining wall transitions, or freestanding structures.
FAQ
What size patio should I build if I’m not sure what furniture or uses I’ll have yet?
For most DIY patios, you want a minimum surface that can fit walking lanes and furniture comfortably. A common starting point is at least 4 ft deep from the house to allow foot traffic plus seating or a walkway. If you are placing a dining set, the article notes about 12 x 12 ft minimum for an outdoor dining set, but also plan extra length for door swings and to keep chairs from bumping the house-side edge. If your yard is tight, consider splitting into two zones (seating and grill) so the main patio stays large enough for comfortable movement.
Can I build a patio on uneven ground without it looking uneven?
Yes, but measure the yard slope and match your patio finish slope to it. You still need drainage away from the house, about 1/4 inch per linear foot, even if the surrounding yard is already sloped. If the grade is dramatic, you usually have two options: cut and fill under the patio to create a consistent thickness while keeping the required drainage slope, or use a raised patio supported by a properly built base and (often) a retaining wall transition. The key is keeping compaction consistent under the entire footprint.
How do I calculate excavation depth so my finished pavers end up at the right height?
Avoid “base thickness guessing.” Confirm your total excavation depth includes the base, bedding, and finished surface, then allow for a little adjustment. The article gives typical totals (about 9 to 11 inches for pavers, about 4 to 6 for gravel, about 8 for slab systems), but differences in paver thickness, sand type, and local base material can change the math. Before you dig, verify your target paver or slab thickness plus bedding, then use that to set your excavation depth and slope lines.
What should I use for the base, and what base material mistakes cause settling later?
In most regions, you should use crusher run or road base type material and compact it in lifts, then add bedding sand only where pavers require it. Do not use topsoil, screened fill, or organic-rich material under the surface, even if it seems level. If you are unsure of local availability, buy enough to match your planned lift thicknesses, because skipping lifts or using the wrong aggregate grade often leads to soft spots and later settling or rocking.
If my pavers start to rock after installation, what is the correct repair process?
After you set pavers, check flatness with a straightedge across multiple directions, not just by sight. If you see rocking, remove only the affected units, correct the sand height, then re-set. For stubborn low spots, pull the surrounding pavers and re-level the area as a group, because adjusting one paver often leaves the joint area too thin and it shifts again. Finally, re-sand and compact joints as needed per your joint system.
Why are weeds growing in the paver joints, and can I fix it without replacing everything?
Polymeric sand needs clean, dry joints to work well, and the article warns not to pressure wash joints directly. If weeds appear, it is usually because joints were not adequately filled, joints were washed out, or there is persistent moisture at the base. Spot-treat weeds carefully, then plan to re-sand joints. For best results, keep foot traffic off the patio for the recommended curing time after joint sand installation.
How should weather conditions change my DIY patio schedule, especially for concrete?
Yes, weather affects your schedule. Hot, windy days can dry bedding or concrete faster, and freezing conditions can prevent proper cure for concrete pours. For concrete slab curing, the article suggests keeping the slab damp and covered for at least 3 days, which is much harder to maintain in very hot sun or cold snaps. If your forecast is volatile, delay the pour or adjust with curing blankets, shade, and strict protection so the slab cures consistently.
My poured slab has cracks, when is it a normal fixable issue versus a base problem?
For poured concrete, the article notes shrinkage cracks can be normal early on and recommends flexible polyurethane filler for hairline cracks. Do not treat larger shifting cracks the same way, because those often indicate a base problem. If cracks widen or heave and the slab sounds hollow over a spot, stop treating it as cosmetic and inspect the base and slope, because repeated movement usually means the underlying compaction or drainage path is wrong.
When should I seal pavers after installation, and what’s the common mistake that ruins results?
Sealing timing and cleaning matter. The article advises waiting at least a week after polymeric sand cures before sealing, and it recommends thin, even coats. If you seal too early, you can trap moisture or reduce sealer performance in the joint areas. Also clean thoroughly first, because dirt and salts can interfere with bonding and create patchy color or reduced stain resistance.
Do I really need control joints if I’m pouring a small concrete patio?
For a poured slab, control joints are critical if you have larger dimensions, and the article mentions grooves for areas over about 10 x 10 feet with spacing typically around 8 to 10 feet. If you skip control joints or cut them too late, cracking can happen randomly and in the wrong places. Plan joint locations during form setup, and follow local requirements for spacing based on slab thickness and mix.