You can build a zen patio yourself in a weekend or two, even as a complete beginner. If you want a step-by-step plan for an outdoor patio from start to finish, follow the detailed process for building an outdoor patio how to make outdoor patio. The core idea comes from karesansui, the Japanese dry landscape tradition, where raked gravel or sand represents water, stones represent mountains or islands, and moss or low plants represent forest. You don't need flowing water, expensive stone, or a huge yard. You need a flat or gently sloped area, good drainage, a few well-chosen rocks, decomposed granite or pea gravel, and a rake. That's genuinely it.
How to Create a Zen Patio: Step-by-Step DIY Guide

Nolan Carver
22 Jun 2026
What a zen patio actually is (and what to include)
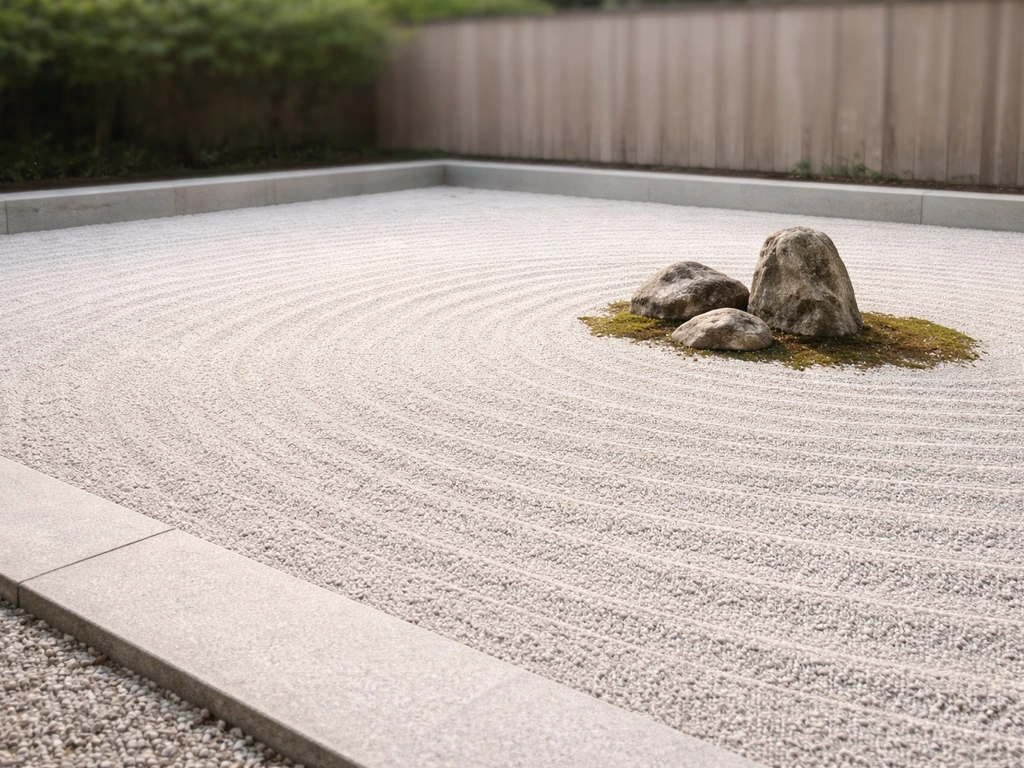
A zen patio is a minimalist outdoor space rooted in the karesansui (dry landscape) style developed at Japanese Zen temples. The most famous example is Ryoan-ji in Kyoto, a rectangle of raked white gravel with 15 stones arranged in 5 groups. Nothing else. The restraint is the whole point. Zen gardens work because they're intentionally simplified: every element earns its place, and empty space is treated as a design feature rather than something to fill.
In practice, this translates to a patio built around a few core elements working together symbolically. Gravel or sand represents water. Upright stones or boulders represent mountains or islands. Moss and low, pruned plants represent forest. Raked patterns in the gravel (called sazanami-mon when they're wave-like, or straight parallel lines for a calmer look) represent ripples or flowing water. A simple border or wall defines the edge and gives the space a contained, intentional feel.
- Raked gravel or sand as the primary ground cover (fine decomposed granite or pea gravel both work well)
- 3 to 7 stones or boulders placed in odd-numbered groupings for natural asymmetry
- Low plantings: moss, ornamental grasses, dwarf bamboo, mondo grass, or Japanese maples
- A defined border: timber edging, stone edging, concrete edging, or a low wall
- A simple seating area or stepping-stone path if you want to use the space, not just view it
- Optional: a small water feature like a tsukubai (stone basin) or bamboo spout
- Optional: privacy screening using bamboo panels, lattice, or planted hedges
Keep it simple at the start. A 10x10 foot area with gravel, three well-placed stones, and a border is more authentically zen than a cluttered space full of decorative objects. Restraint is your biggest design tool here.
Plan your space: size, layout, and vibe
Before you buy anything, spend time observing the area you want to transform. Where does the sun hit? Is there natural shade? Which direction do you usually look from when you're inside or sitting nearby? The best zen patio is one you can see and experience from a natural vantage point, often a window, a doorway, or a fixed seating spot.
Sizing it right
A zen patio doesn't need to be large. A 6x6 foot courtyard space or a 10x12 foot section of a backyard can be just as effective as a sprawling garden, because the style is defined by proportion and placement, not square footage. For a small balcony or apartment patio (under 50 square feet), use fine-grained sand in a shallow tray or contained area, with one or two small stones and a dwarf plant in a pot.
For a mid-size backyard section (100 to 200 square feet), you have room for a proper gravel bed, a few larger stones, stepping stones, and a border with plants. Anything over 200 square feet gives you space for a small water feature and a seating area integrated into the design.
Choosing a layout
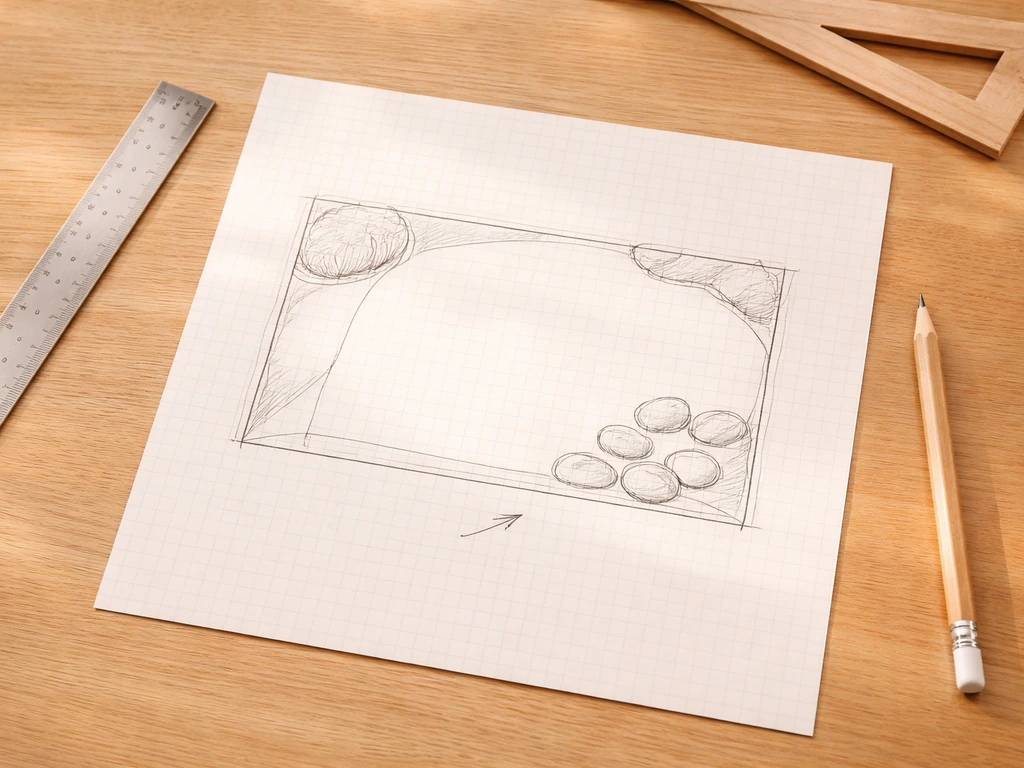
Sketch your layout on graph paper before touching the ground. A rectangular layout is the most traditional and easiest to build, and it makes raking patterns much simpler. A curved or free-form layout can look beautiful but requires more planning for the edging and raking. Mark where stones will go, where plants will go, and where you'll walk through (if at all). In the karesansui tradition, the garden is often meant to be viewed, not walked through, but if your patio needs to be functional, place stepping stones in a natural path and work your raking pattern around them.
Think about privacy and enclosure early. A zen space feels more intentional when it has a clear boundary. This could be an existing fence, a planted hedge, a bamboo screen, or even a simple low wall you build. Unlike a general outdoor living space or a patio oasis designed for entertaining, a zen patio prioritizes calm over openness, so some degree of enclosure almost always improves the feel. If you want to take it further, this guide on how to create a patio oasis will help you balance comfort, style, and calm.
Materials: what to buy and what it'll cost
Material choices have a big impact on both the look and the long-term maintenance of your zen patio. Here's a breakdown of the main categories and what to look for.
Gravel and sand
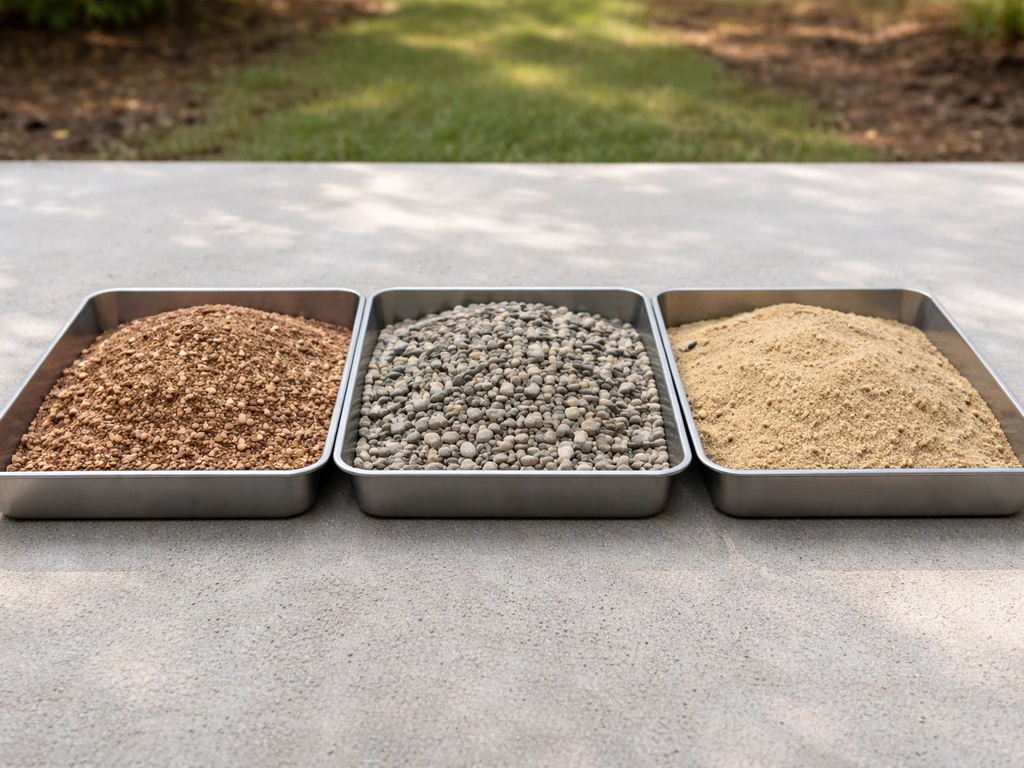
This is the heart of the design. You have three realistic options: decomposed granite (DG), pea gravel, or coarse builder's sand. Decomposed granite is the most popular for zen patios because it compacts lightly, holds raking patterns reasonably well, and comes in neutral tones. Expect to pay $40 to $75 per cubic yard in most regions. Pea gravel is rounded, smooth, and a bit harder to rake into crisp patterns, but it drains extremely well and looks clean. Coarse white sand (like pool filter sand or silica sand) is the most traditional and rakes the most beautifully, but it scatters in wind and needs more frequent maintenance. Avoid very fine beach sand, it blows everywhere and compacts poorly.
For a 10x10 foot area at a depth of 2 to 3 inches, you'll need roughly 0.6 to 1 cubic yard of material. Buy a little extra, having a half bag left over is much better than running short mid-project.
Stones and boulders
You don't need many stones, but the ones you choose matter. Look for stones with natural variation in shape and texture: flat slabs, upright boulders, and mid-size accent rocks work well together. Quartzite, basalt, granite, and river rock are all solid choices. Avoid anything too uniform or obviously machine-cut. For a 10x12 foot space, 3 to 5 stones ranging from 50 to 150 pounds each will feel proportionate. A landscape supply yard will let you hand-pick stones, which is worth the trip. Budget $50 to $200 for a small to mid-size stone collection, depending on weight and type.
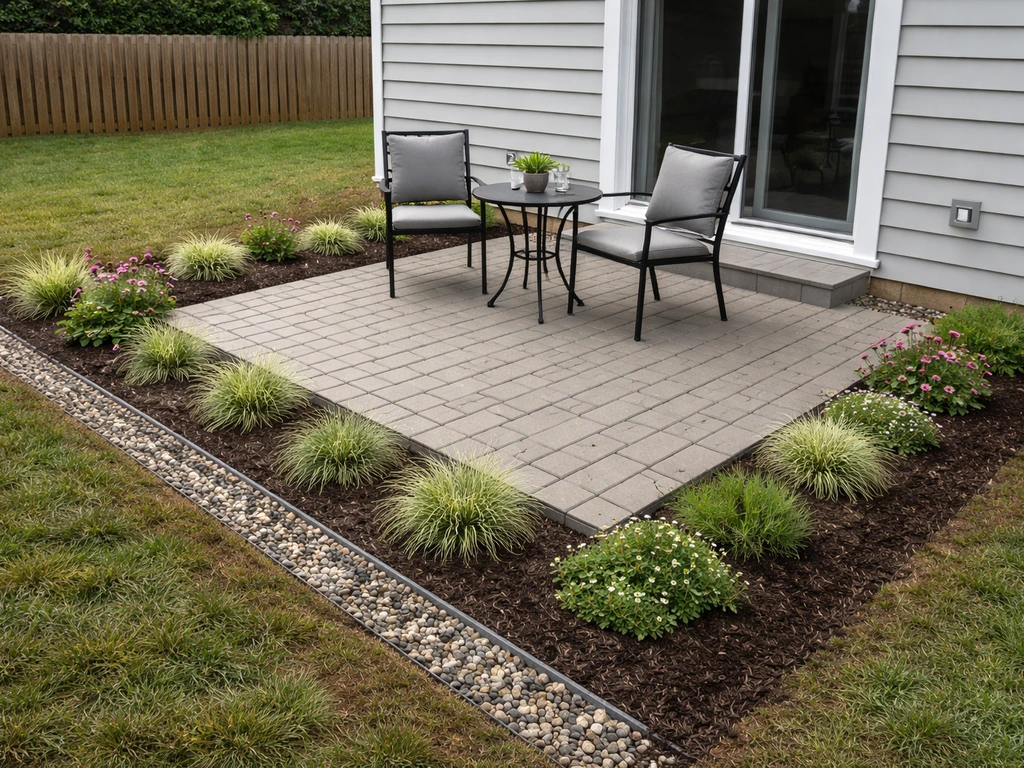
Plants
Less is more with zen plantings. Choose slow-growing, low-maintenance plants that won't overwhelm the gravel bed. Irish or Scottish moss is ideal for filling gaps around stones and grows flat and dense. Mondo grass and liriope create clean, dark green tufts. Dwarf nandina, Japanese forest grass (Hakonechloa), and boxwood pruned into rounded shapes all fit the aesthetic. If you have room for one larger specimen, a dwarf Japanese maple placed in a corner or near the border adds seasonal color without visual chaos. Plant in well-defined planting pockets cut into the gravel, lined with additional landscape fabric to keep roots and gravel separate.
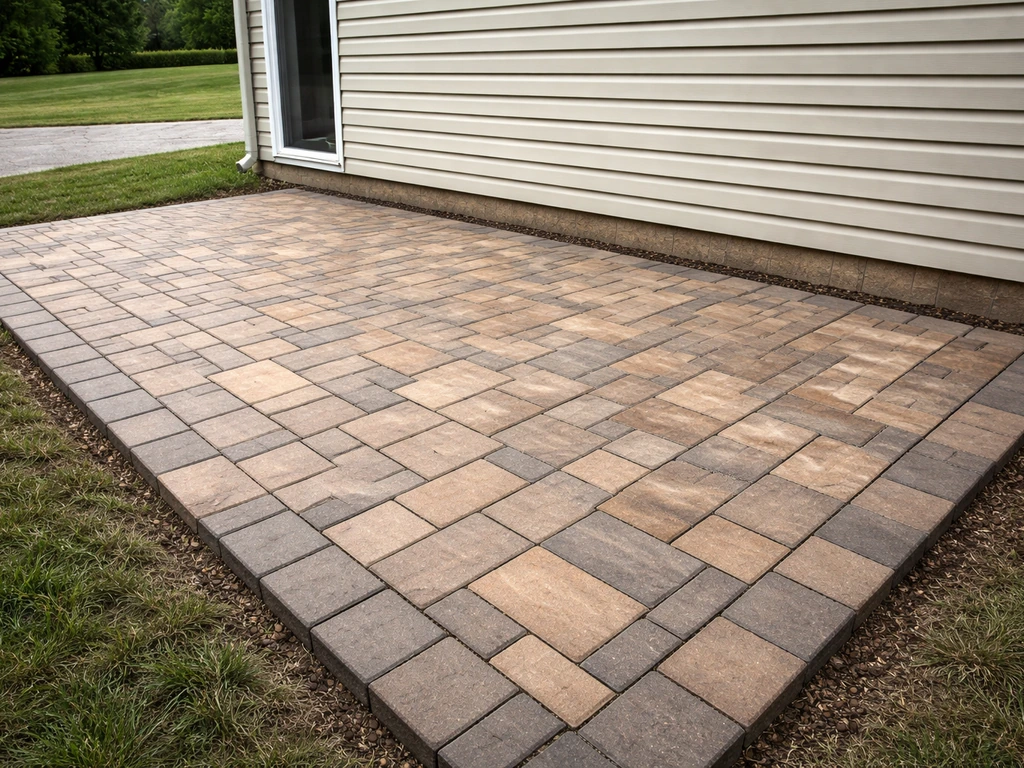
Borders and edging
Edging keeps your gravel contained and defines the space. Pressure-treated timber (4x4 or 6x6 beams) is affordable and easy to work with, typically $3 to $6 per linear foot. Steel or aluminum landscape edging gives a sleeker, lower-profile look at $1 to $3 per linear foot. Natural stone borders look the most authentic but require more fitting and leveling work. Concrete paver edging is a good middle ground: durable, inexpensive, and easy to set level.
| Material | Cost (per linear ft) | Durability | Look | DIY Difficulty |
|---|---|---|---|---|
| Pressure-treated timber | $3–$6 | 15–25 years | Natural/rustic | Easy |
| Steel/aluminum edging | $1–$3 | 20+ years | Clean/modern | Easy |
| Natural stone border | $5–$15 | Lifetime | Most authentic | Moderate |
| Concrete paver edging | $2–$5 | 20+ years | Neat/structured | Easy |
For most beginners, pressure-treated timber or concrete paver edging is the best starting point. Both are forgiving to install, hold gravel well, and look clean once everything is in place.
Site prep and drainage: the step most people skip
This is the part that separates a zen patio that looks great for years from one that turns into a weedy, uneven mess after one rainy season. Good drainage and proper base preparation aren't optional, they're the foundation of everything that goes on top. Once you have your plan and materials picked out, you can build your patio step by step for a clean, calming result zen patio that looks great for years.
Grading and drainage
Your patio area needs a slight slope away from any structures (house, garage, fence) to let water drain naturally. A grade of 1 inch per 8 feet is sufficient. Use a long level and a tape measure to check the existing slope. If the area is flat or slopes toward your house, you'll need to regrade it by removing soil from the high spots or building up the low spots before you lay your base. For most small zen patio projects (under 200 square feet), this just means moving a few inches of soil with a flat shovel and a wheelbarrow.
If your yard has clay soil or consistently wet spots, add a French drain or a perforated pipe along the low edge before you start. This is a few extra hours of work but prevents the gravel from becoming waterlogged and shifting. A saturated gravel bed loses its rakeable surface fast, and it can heave stones out of position when the ground freezes and thaws.
Base layers and weed control
Once the area is graded, here's the layering sequence that works:
- Clear all existing vegetation down to bare soil. Remove roots as thoroughly as you can.
- Spray the area with a non-selective herbicide and wait 7 to 10 days for any remaining plants to die back before proceeding. This pre-kill step dramatically reduces future weed pressure.
- Excavate 4 to 6 inches of soil across the entire area. This gives you room for your base layers without raising the finished surface too high.
- Compact the subgrade with a hand tamper or plate compactor. You can rent a plate compactor for about $60 to $90 per day, and it's worth it for anything over 50 square feet.
- Lay 3 to 4 inches of crushed gravel (also called road base or Class II base) and compact it. This is your drainage layer and structural base.
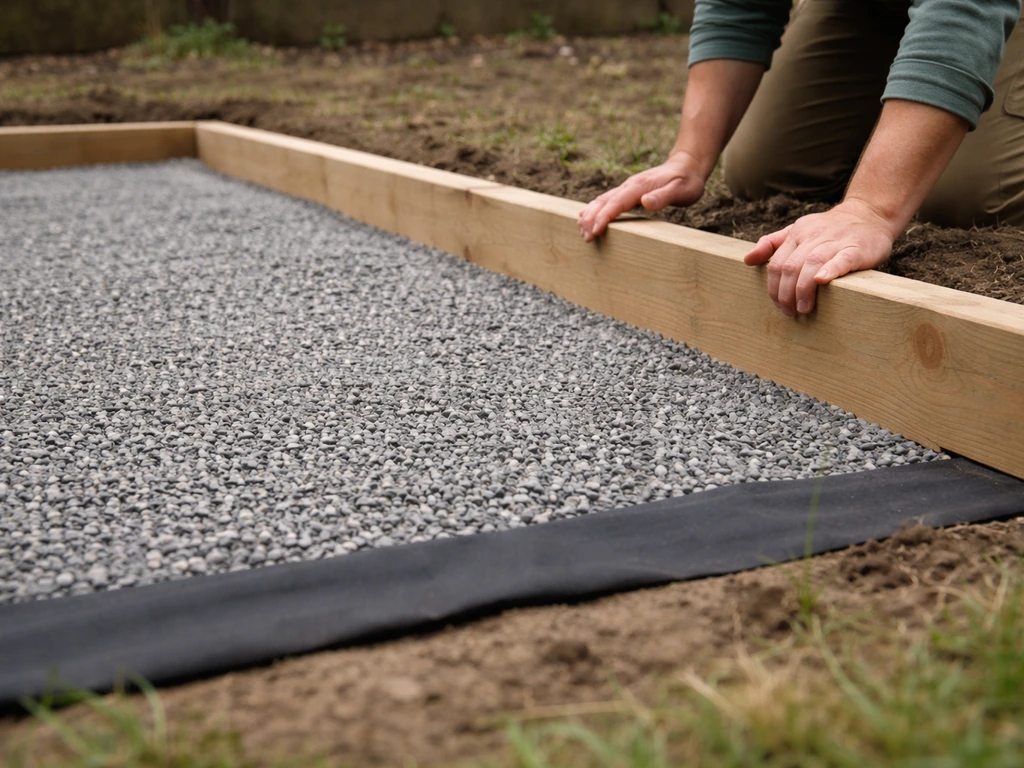
- Lay a high-quality, commercial-grade landscape fabric (geotextile fabric, not the cheap plastic film from the hardware store) over the compacted base. Overlap seams by at least 6 inches. This is your primary weed barrier.
- Install your edging around the perimeter now, before adding the top gravel layer.
Don't skip the landscape fabric or try to substitute cardboard (newspaper, cardboard, and other organic barriers break down within a season and weeds punch right through). Commercial-grade woven geotextile fabric costs about $0.15 to $0.30 per square foot and is one of the best investments you can make in this project.
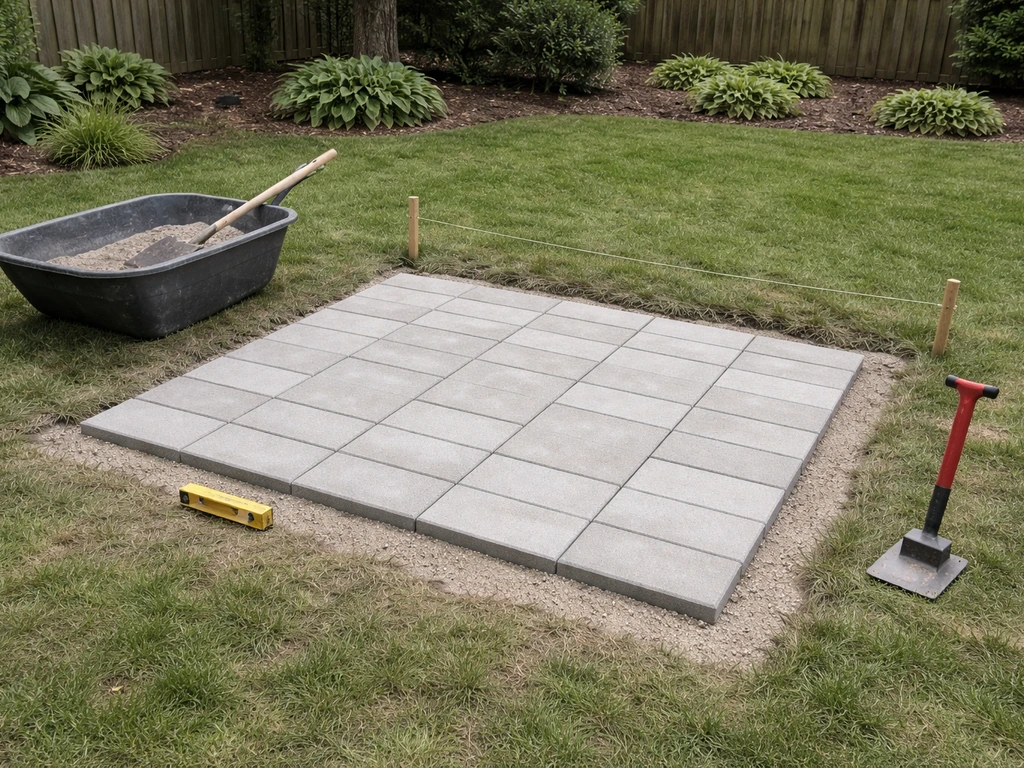
Building the patio: edging, gravel, and stone placement
Install the edging first
Set your edging directly on top of the compacted base layer and landscape fabric, with the inside face of the edging defining the finished perimeter of your gravel area. For timber edging, secure corners with 3/8-inch rebar stakes driven 12 to 18 inches into the ground. For paver edging, set each paver in a thin bed of coarse sand and check level as you go. Make sure the top of your edging is at or slightly above the finished gravel surface, this keeps gravel from spilling out and gives you a clean visual line.
Add the gravel or sand
Pour your gravel or sand inside the edged area to a depth of 2 to 3 inches. Spread it with a rake to get a roughly even layer, then use a board or a long straight edge to level it out before you worry about patterns. This is your blank canvas. A broom dragged lightly across the surface works well for checking whether the depth is consistent. For a 10x10 foot area, plan on spending 2 to 3 hours on gravel installation including spreading and initial leveling.
Place your stones
Lay out your stones before setting them. Prop them up temporarily with a bit of extra gravel to test different positions and see how the composition reads from your main viewing angle. Traditional karesansui groupings use odd numbers (3, 5, or 7 stones) with the tallest stone slightly off-center. Mix upright stones with flatter, horizontal ones for visual rhythm. Once you're happy with the placement, sink each stone about one-third of its height into the gravel and base layer for stability. Stones that sit flat on the surface tip over and look uncomfortable. A stone that's bedded in looks like it belongs there.
For heavy boulders (over 100 pounds), dig a shallow pocket in the base layer and set the stone directly on the compacted gravel base below the fabric. Cut a small X in the landscape fabric to accommodate the stone, folding the flaps under rather than cutting them away. Backfill with your top gravel around the stone once it's in position.
Add stepping stones (if needed)
If your design includes stepping stones, set each one on a 1-inch bed of coarse sand below the gravel layer so they sit level with or just above the gravel surface. Space them 18 to 24 inches apart (center to center) for a comfortable walking stride. Test the spacing by walking across them naturally before you finalize the positions. Stepping stones that are too close look cluttered; too far apart and you're constantly stretching.
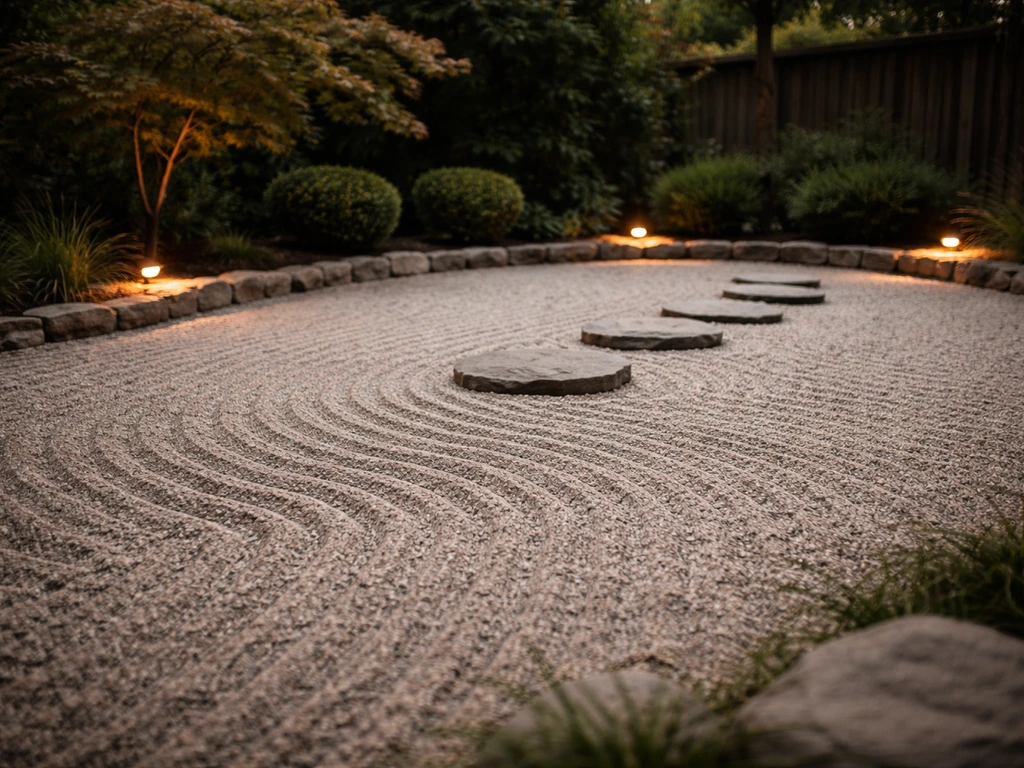
Finishing touches: raking, lighting, privacy, and water features
Raking patterns
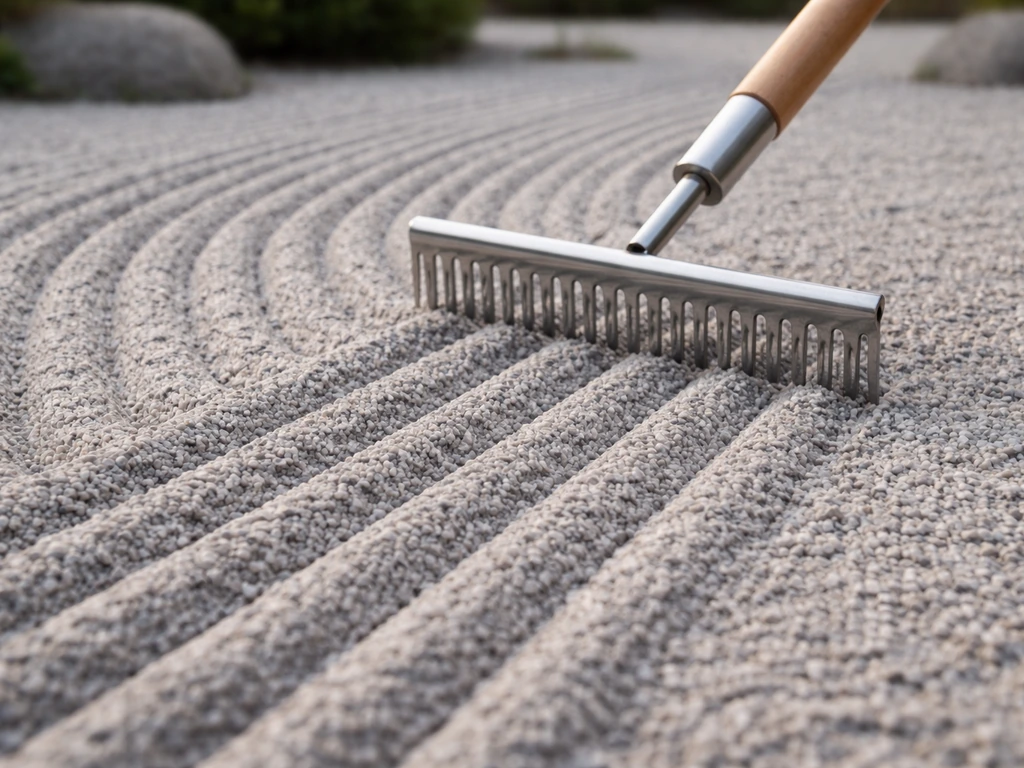
This is the most satisfying part of the whole build. For straight parallel lines, use a fine-toothed metal rake held at a consistent angle and pull it toward you in long, smooth strokes. Start from one edge and work your way across without stepping in the raked section. For wave patterns (sazanami-mon), gently curve your stroke in a slight S-shape as you pull. Rake around stones in concentric ovals or circles, as if the stone were a rock breaking the surface of water. For the best results, use a fine-toothed metal rake for smoothing first, then switch to a wider-toothed rake for drawing the pattern lines.
Raking patterns fade with rain and wind, and that's completely normal. Part of the maintenance rhythm of a zen patio is re-raking after significant weather. Treat it as a meditation practice rather than a chore, and the time it takes starts to feel like the whole point.
Lighting
Keep lighting subtle and low. Small solar path lights placed at the border work well and require no wiring. Low-voltage LED spotlights aimed upward at a key stone or plant can be dramatic at night without being harsh. Lantern-style fixtures (either solar or low-voltage) placed on flat stones or near the border echo the traditional Japanese garden aesthetic. Avoid bright floodlights, they destroy the calm atmosphere the rest of your design is working hard to create.
Privacy
A zen space feels more contemplative when it's visually separated from the rest of the yard or neighborhood. Bamboo panel screens (the kind sold in rolls at hardware stores) can be attached to an existing fence for an instant upgrade. A row of arborvitae, clumping bamboo, or tall ornamental grasses planted behind the border creates a living privacy screen that fills in within a season or two.
If privacy is a major priority for your design, it's worth planning this the same way you might when creating a private patio, because the sense of enclosure is fundamental to how the space feels. If you are wondering how to create a private patio, the key is combining enclosure with clean lines and intentional sightlines so the space feels calm and self-contained.
Optional water features
Traditional karesansui gardens represent water symbolically through raked gravel, so a real water feature isn't required. But if you want one, keep it simple. A tsukubai (a low stone basin with water) is the most traditional option: a small submersible pump, a stone basin, and a short bamboo spout is a weekend project that costs $100 to $300 depending on the stone you choose. A recirculating rock fountain is another approachable DIY option. What to avoid: large, loud fountains that dominate the space and compete with the quiet energy of the design.
Maintenance and troubleshooting after installation
A well-built zen patio is genuinely low-maintenance, but it's not zero-maintenance. Here's what to expect and how to handle the most common problems.
Ongoing maintenance checklist
- Re-rake the gravel surface after heavy rain or wind (takes 10 to 15 minutes once you get used to it)
- Pull or spot-treat any weeds that push through the fabric immediately, before they establish roots
- Top up gravel depth every 1 to 2 years as the material settles or displaces (keep a half cubic yard of matching material on hand)
- Check edging stakes and borders each spring for frost heave and re-secure any that have shifted
- Prune plants once or twice a year to maintain the clean, controlled shapes that suit the zen style
- Clear debris like leaves and seed pods from the gravel surface regularly, they stain sand and decompose into weed-friendly mulch
- Inspect stepping stones annually for settling and re-level any that have tipped or sunk
Troubleshooting common problems
| Problem | Likely Cause | Fix |
|---|---|---|
| Weeds breaking through gravel | Thin or torn landscape fabric, or seeds blowing in on top of gravel | Pull weeds immediately, apply a pre-emergent herbicide in early spring, add fresh gravel to reduce exposed soil on top of fabric |
| Gravel sinking or shifting unevenly | Insufficient base compaction or inadequate base depth | Remove gravel, re-compact base, add more base gravel, re-lay top layer |
| Standing water after rain | Insufficient grade or clogged drainage layer | Check slope with a level, improve grade or install a perforated drain pipe along the low edge |
| Raking patterns disappearing quickly | Gravel too coarse or too dry, or layer is too thin | Moisten gravel slightly before raking, add 0.5 inch of finer material on top, use a sharper-toothed rake |
| Stones tipping or sinking | Not buried deep enough or base not compacted | Re-seat stones one-third of their height into the base layer with a compacted pocket beneath |
| Moss dying or not establishing | Too much direct sun or insufficient moisture | Move moss to shadier spots, water more frequently in dry spells, choose a sun-tolerant ground cover instead |
| Edging coming loose or bowing outward | Inadequate staking or frost heave | Drive additional rebar stakes every 4 feet, check and re-stake each spring after frost season |
Your next-steps checklist
- Choose your site and observe it for sun, drainage, and viewing angle before marking the perimeter
- Sketch a layout on graph paper with stone placement, plant pockets, and any stepping-stone paths marked
- Order materials: landscape fabric, road base gravel, top gravel or sand, edging, and stones
- Kill existing vegetation and wait 7 to 10 days before excavating
- Excavate 4 to 6 inches, grade for drainage, compact the subgrade
- Install road base, compact, lay landscape fabric
- Set edging around the perimeter
- Place and bed stones, then fill with top gravel or sand to 2 to 3 inches depth
- Add stepping stones, plants, and any lighting or privacy features
- Rake your first pattern and step back to see how it reads from your main viewing angle
- Set a calendar reminder to re-rake after rain and inspect the space each spring
Building a zen patio is one of those projects where the planning and restraint do most of the heavy lifting. If you get the drainage right, use good landscape fabric, and place your stones thoughtfully, the finished space almost takes care of itself. Start simple, get the foundation right, and let the design settle before adding more elements. Once you choose your materials and layout, you can follow a step-by-step process for how to build outdoor patio features like gravel, stones, and edging. You can always add a water feature or more plants later, but you can't un-clutter a space without starting over.
FAQ
Which gravel or sand should I choose if I want very crisp raking lines?
If your goal is “zen” more than “traditional,” match the medium to your raking style. For crisp, repeatable lines, use decomposed granite or coarse builder’s sand. For a calmer, less fussy look, pea gravel is easier on drainage but harder to rake into razor-sharp patterns, and you’ll likely rely more on stone placement than fine texture.
Can I include a walking path through my zen patio without ruining the look?
Yes, but treat them as maintenance boundaries. Use them only for the minimal areas where you need function, like from a door to a viewing spot, and keep walking paths out of the main raked field. When stepping stones break up the gravel, it helps to rake around them in a clean rhythm so the overall pattern still reads as intentional.
How do I adjust the build for freeze-thaw winters so my stones don’t shift?
Dry landscape patios age differently in freeze-thaw climates. If you’re in an area with hard freezes, bed stones slightly deeper than you would in milder climates, and do not overcompact the final gravel surface. The goal is firm support with a stable base layer so stones don’t “work” loose over multiple seasons.
What should I do if water pools in my patio area after rain?
Start by checking drainage after a heavy rain. If you see water pooling longer than about a day, improve the base before you add gravel, either by regrading to the proper slope or adding a French drain along the low edge. Installing edging with poor drainage usually traps water and makes raking patterns collapse faster.
Is coarse white sand a bad idea on windy properties or near doors?
Plan for wind and scatter. Coarse sand rakes beautifully, but it can migrate into neighboring surfaces, especially on slopes or near openings. To reduce drifting, keep sand below edging, consider a slightly thicker 3-inch depth, and use more robust, taller edging at exposed edges.
How many plants can I add without losing the minimalist zen look?
You can, and it’s often the easiest way to keep the patio from feeling “flat.” Choose one seasonal anchor element, like a dwarf maple placed near a corner, and keep everything else low and consistent. Avoid adding multiple tall plants, because height changes break the minimalist sightline and can make the space feel busy.
Why do weeds still show up in some zen patios even with landscape fabric?
Don’t rely on the garden fabric alone to control long-term weeding. The fabric helps prevent root contact with gravel, but weeds often appear at edging joints, stone pockets, and under any gaps where gravel is thin. That’s why you should backfill around stones tightly and make sure planting pockets are properly lined and filled.
How often should I re-rake, and when is the first time I should do it?
For most beginner builds, allow raking time for your first season. Weather will naturally soften lines, and small settlement happens as the base compacts under rain. Re-rake lightly after the first few major storms, then move to a routine like once every couple of weeks during active windy or rainy periods.
What if my yard is completely flat and I cannot regrade easily?
If you don’t have a slope, you’re not necessarily blocked, but you must control runoff. The simplest option is regrading so the surface slopes about 1 inch per 8 feet away from structures. If you cannot regrade, you may need a drain strategy at the perimeter and a slightly thicker base to prevent washout.
What’s the best approach for a zen patio on a small balcony or under 50 square feet?
A good starting size depends on what you want to see. For a tiny balcony, a contained tray can work, but keep the “viewing frame” tight, position stones so they read from where you normally sit, and use one or two stones maximum. If you can, pick a spot where your eyes naturally rest (doorway, window line), then design outward from that vantage point.
How can I light the patio at night without making it look harsh or cluttered?
Yes, using lighting can help the garden feel calmer, not brighter. Keep lights low and aimed to wash one feature at a time, like a key stone or the base of a shrub, and avoid lighting the whole gravel field. If shadows look messy, adjust placement so shadows stay coherent and don’t cast bright “distractions” across raked areas.
Where should a small tsukubai or fountain go so it doesn’t dominate the design?
A tsukubai can fit the zen logic, but size matters. Keep the basin low and the water sound subdued, use a small pump, and place it at a secondary viewing zone rather than directly in the center of the raked field. Also plan access for pump cleaning, because maintenance is usually the real long-term commitment.