You can build a thriving patio garden by working through four steps in order: plan your layout and goals, decide between containers or raised beds and set up the right soil, pick plants that match your actual sun exposure and seasons, and make sure your patio surface drains properly so water moves away from roots and doesn't undermine the hardscape. Do those four things right and almost everything else is forgiving.
How to Make a Patio Garden: DIY Steps, Soil, Drainage

Nolan Carver
14 Jun 2026
Planning your patio garden layout and goals
Before you buy a single pot or bag of soil, spend 20 minutes figuring out what you actually want from this space. A patio garden means something different to everyone. Some people want fresh tomatoes and herbs three feet from the back door. Others want a lush, layered look with ornamental grasses, flowering perennials, and a couple of statement containers. Your goals drive every decision that follows, so get specific.
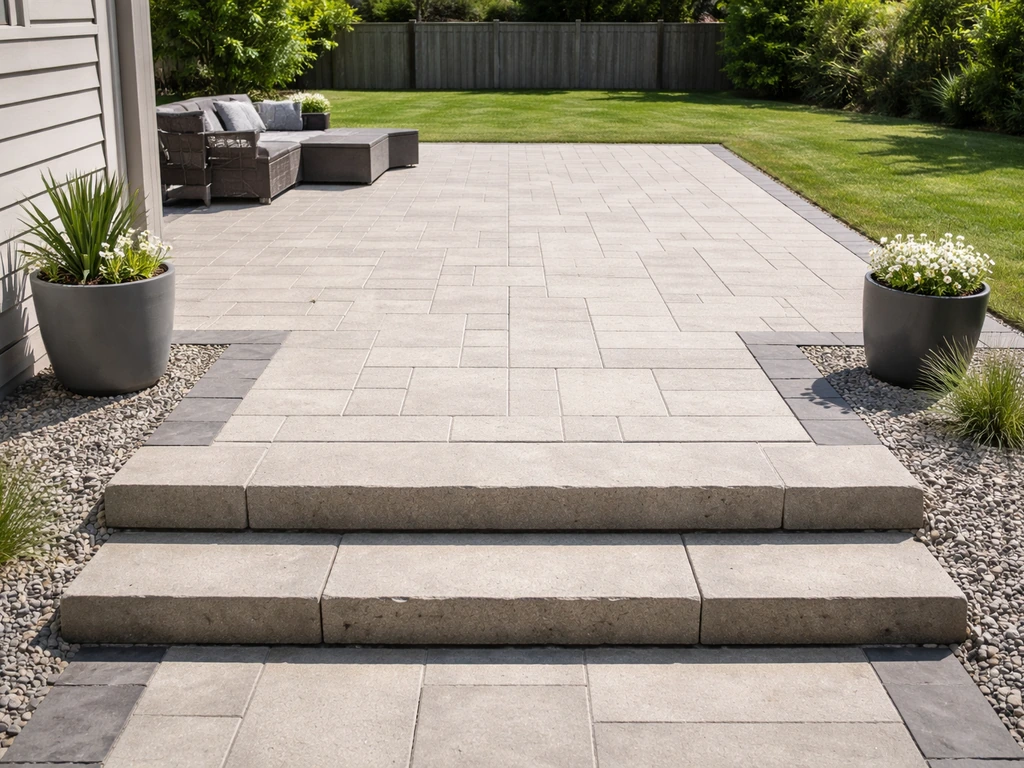
Start by measuring your patio. Sketch it on paper with real dimensions. Mark where doors, furniture, and traffic paths are. Note which direction the patio faces because this tells you whether you're working with full sun, part shade, or deep shade. Also note any overhangs, fences, or walls that block light or create wind tunnels. These are your constraints, and working with them instead of against them is the difference between a garden that thrives and one that struggles.
Think about access too. You need to be able to water, deadhead, harvest, and repot without having to move furniture or squeeze into awkward corners. A good rule of thumb is to keep any planting area within arm's reach (roughly 18 to 24 inches) from a clear pathway. If you're planning a vegetable-heavy setup, think about where your hose or watering can will travel. If you're leaning toward a decorative garden, think about sightlines from inside the house. Planning access now saves frustration later.
If you don't have a patio yet and are building one specifically to host a garden, your plant placement plan should actually inform the patio design. Where you put raised beds or large containers affects where you need drainage, where you pour concrete or set pavers, and how wide your paths need to be. It's much easier to build the patio around a clear garden plan than to retrofit a garden onto a patio built without one in mind.
Choosing containers vs in-ground beds (and soil setup)
This is the most consequential decision you'll make for a patio garden, and it comes down to your patio surface, your budget, and how much flexibility you want. Containers sit on top of any surface and can be moved. Raised beds on a patio also sit on top of the surface but are more permanent structures. True in-ground beds require cutting through or removing part of the hardscape, which is a bigger project but gives plants the most root depth and moisture stability.
| Option | Best for | Flexibility | Root depth | Cost to start |
|---|---|---|---|---|
| Containers | Renters, decorative gardens, herbs, small veggies | High — can move or swap | Shallow (6–18 inches) | Low to moderate |
| Raised beds on patio | Vegetables, perennials, permanent plantings | Low — semi-permanent | Moderate (12–24 inches) | Moderate |
| In-ground beds (patio removed) | Large food gardens, fruit shrubs, deep-rooted plants | None | Unlimited | Higher (demo + soil work) |
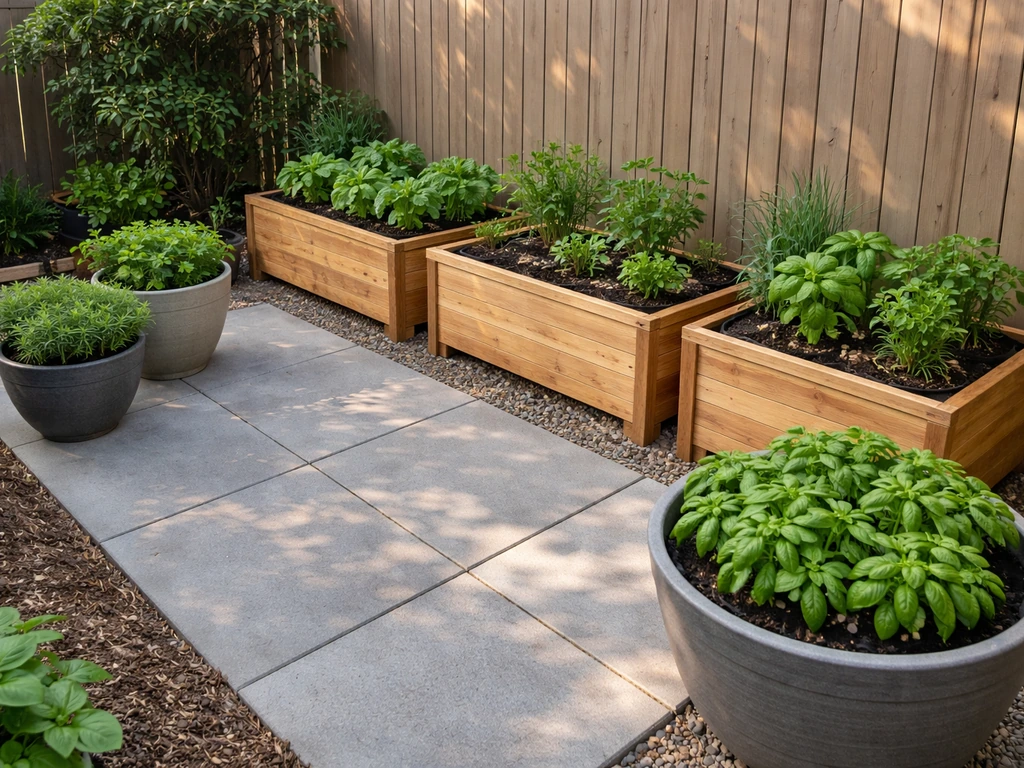
For most patio gardeners, the answer is a combination: a few raised beds or large planter boxes along the edges or against a wall, and smaller containers scattered through the space for herbs, annuals, and seasonal color. This gives you the growing depth where you need it and the flexibility to adjust the rest.
Getting the soil right for each option
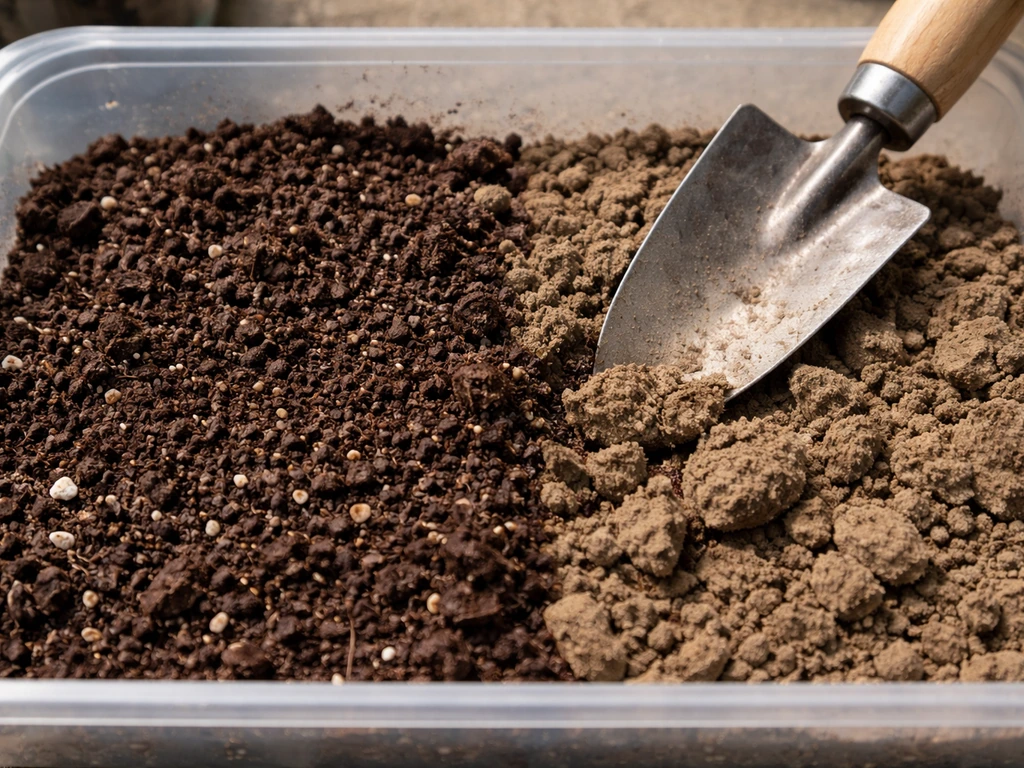
Soil is where most beginners go wrong, and the fix is simple once you know the rules. For containers, always use a true potting mix, not garden soil or topsoil. Garden soil compacts in pots, cutting off air and drainage. Purdue Extension similarly cautions that compacting garden soil in containers or raised beds reduces aeration and drainage [Garden soil compacts in pots, cutting off air and drainage.
](https://extension. purdue. edu/news/county/whitley/2021/11/gardening-in-containers-and-raised-beds. html).
A good potting mix contains perlite or vermiculite for drainage, plus compost or bark for organic matter and moisture retention. [The pH typically runs around 6. ](https://extension. umd.
edu/resource/growing-media-potting-soil-containers)2, which suits most vegetables and ornamentals. You can buy a quality all-purpose potting mix or make your own using vermiculite, peat moss (or coconut coir as a more sustainable option), dolomitic lime to balance pH, and a slow-release fertilizer.
For raised beds, the recipe is different. You want real soil structure, not the light fluffy mix designed for pots. A reliable raised-bed mix is roughly 60 to 70 percent topsoil and 30 to 40 percent compost. Penn State Extension recommends about 70% native or raised-bed soil to 30% compost by volume. University of Minnesota Extension similarly suggests a blend of one-half to two-thirds topsoil plus one-third to one-half plant-based compost. Avoid using straight potting soil in raised beds because it dries out too fast at scale.
One thing you absolutely should not do: put a layer of gravel or rocks at the bottom of containers or raised beds thinking it helps drainage. Nebraska Extension is clear on this, rocks at the bottom of containers don't improve drainage and can actually create a saturated zone right where roots are trying to grow. Just make sure your containers have drainage holes and your soil mix is well-aerated, and you're good.
For containers that will stay outdoors through winter, plan for the soil mass to stay unfrozen. Container roots are exposed to ambient air temperatures from all sides, unlike in-ground roots that stay insulated by the earth. University of Illinois Extension highlights this as the key challenge for overwintering container plants. This matters for your plant selection and for how you position containers against walls that hold heat.
Picking plants and designing for sun, shade, and the seasons
Here's the mistake nearly everyone makes: they pick plants they like, then find a spot for them. Flip that. Measure the sun your patio actually gets first, then pick your plants. Stand at the spot where your container or bed will sit and track how many hours of direct sun hit that exact location throughout the day. Don't assume based on your yard in general. A south-facing patio flush with pavers gets very different light than a spot under an overhang six feet away.
- Full sun: 6 or more hours of direct sun daily. Great for tomatoes, peppers, basil, lavender, most annual flowers, and pollinator-friendly plants like Agastache and Coreopsis.
- Part sun or part shade: 3 to 6 hours. Good for lettuce, spinach, kale, parsley, impatiens, and some native perennials like wild geranium.
- Full shade: fewer than 3 hours. Work with shade-tolerant ornamentals like blue mistflower, ferns, sedges, hostas, and shade-loving herbs like mint.
Also factor in your USDA Plant Hardiness Zone. The zone map is based on average annual extreme minimum winter temperatures, and it's the baseline for understanding what survives year to year. But your patio may have its own microclimate. Concrete and dark pavers absorb heat and radiate it back, which can push your effective growing zone up by half a zone. A patio against a south-facing brick wall is noticeably warmer than open ground nearby. USDA notes these heat islands from hardscape surfaces as real factors that affect plant survival. Use that to your advantage.
Plan for succession so the garden stays full from spring through fall. The idea is simple: as one crop or plant finishes, you pull it and replant. After your first round of lettuce bolts in early summer, drop in kale starts, scallions, or a flowering annual to fill that container. Keeping a short list of backup plants ready to go in saves you from staring at empty pots in August.
If you want to support pollinators, which is worth doing even on a small patio, Illinois Extension suggests native plants like Penstemon, lanceleaf Coreopsis, and Agastache for sunny spots, and blue mistflower or native sedges for shadier containers. These plants also tend to be lower maintenance once established, which is a bonus on a patio where every container requires individual watering attention.
Patio groundwork and drainage basics for a garden on a patio
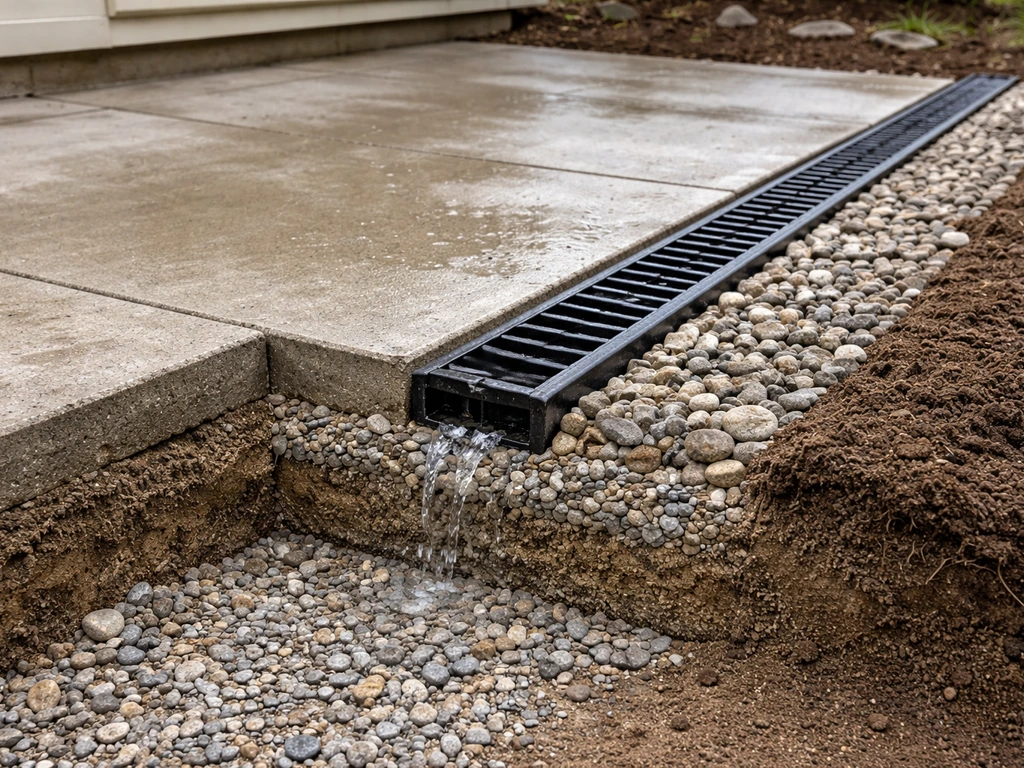
This section matters more than most gardening guides admit. A patio garden can fail or damage your hardscape if water doesn't move correctly. Whether you're building a new patio to host a garden or adding a garden to an existing one, drainage is something you need to get right from the start.
The baseline rule for any patio surface is a minimum slope of about 1/8 inch per foot, running away from your house or any structure. That slope keeps water from pooling under containers, saturating bed edges, and undermining your base material over time. If your patio is already poured and doesn't drain well, you'll notice standing water after rain, a problem that gets worse once you add heavy planters that concentrate water runoff.
When you set large containers or raised beds on pavers, the weight can press pavers down unevenly over time, especially if the base isn't well compacted. Use container feet or stand-offs (small rubber or metal risers) under pots to keep them slightly elevated. This lets water flow freely under the container rather than sitting and wicking up into the pot base or staining your pavers.
If you're building a new patio section specifically to support a garden area, consider adding a geotextile fabric layer in your base, particularly over clay or silt-heavy soils. This fabric allows water to drain through while preventing fine soil particles from migrating up into your gravel base and clogging it. It's a small addition that makes a real difference in how long your drainage stays effective.
One specific scenario worth planning for: if you're placing a large raised bed directly on pavers, the bed itself will hold significant weight (soil plus water can easily hit 80 to 100 pounds per square foot for a 12-inch-deep bed). Make sure the pavers beneath it are set on a solid, level compacted base. A poorly supported bed on settling pavers will gap at the sides, spill soil, and create drainage channels in the wrong places.
Step-by-step setup: install beds, containers, and pathways
- Mark your layout: Use chalk or painter's tape on the patio surface to mark where beds, large containers, and pathways will go. Walk through it physically — pretend to water, pull a weed, carry a bag of soil. Adjust before anything is permanent.
- Check drainage first: Pour a bucket of water in the area where heavy planters will sit. Watch where it flows. If it pools, address slope or add container feet before you place anything.
- Set raised beds or large planter boxes: If using wooden raised beds, assemble them flat, then set them in position before filling. Cedar and redwood are naturally rot-resistant. For a patio application, line the inside bottom with landscape fabric (not plastic) to keep soil in without blocking drainage. Fill in layers — add 6 inches of your topsoil/compost mix, water it, let it settle, add more until you reach within 2 inches of the top edge.
- Minimum soil depths by plant type: Herbs and lettuce need at least 6 to 8 inches. Tomatoes, peppers, and most root vegetables want 12 inches minimum. Fruit shrubs or perennials in raised beds benefit from 18 to 24 inches.
- Place containers: Set larger anchor containers first (these define the structure of the space), then fill in with medium and small pots. Group containers with similar water needs together to simplify watering. Leave at least 18 inches of clear path between container clusters.
- Fill containers with potting mix: Fill to within 1 to 2 inches of the rim. This gives you room to water without overflow and keeps soil from splashing out during rain. Do not pack the mix down — leave it loose so roots can establish easily.
- Plant your plants: For transplants, dig a hole twice the width of the root ball, set the plant at the same depth it was in its nursery pot, and firm the soil gently around it. Water thoroughly right after planting. For seeds, follow the seed packet depth instructions — most containers work best with transplants rather than direct seeding since space is limited.
- Build your access pathways: If you have multiple beds or large containers, lay stepping stones or small pavers between them to protect your main patio surface and give you solid footing when working in wet conditions. Even a simple line of 12-inch square pavers between beds makes a real difference in day-to-day usability.
- Set up your watering system: At minimum, make sure a hose can reach every container without stretching so tight it tips pots. For a serious setup, drip irrigation with a timer is worth the investment — containers dry out fast in summer, especially on reflective paver surfaces that amplify heat.
Budgeting, tools, and DIY mistakes to avoid
A basic patio container garden, a few quality pots, potting mix, and starter plants, can be put together for $100 to $250. A more serious setup with one or two wooden raised beds, good soil, and a drip irrigation system runs $400 to $800 depending on size and materials. Buying a few large containers rather than many small ones is almost always a better investment: larger pots hold moisture longer, give roots more room, and look better proportionally on a patio.
Tools you actually need
- A hand trowel for planting and transplanting
- A watering can with a gentle rose head (for seedlings) or a hose with an adjustable nozzle
- A small soil scoop or garden fork for mixing and filling containers
- A measuring tape for layout planning
- A level if you're setting raised bed frames on a patio surface
- Gloves — potting mix and wet pavers both get slippery
Common mistakes that are easy to avoid
- Using garden soil in containers: it compacts, drains poorly, and stunts growth. Always use a quality potting mix for any container.
- Skipping drainage holes: every container needs them. If a decorative pot doesn't have them, drill your own or use it as a cachepot with a plain nursery pot inside.
- Putting rocks at the bottom for drainage: this doesn't help and can create a perched water table right where roots are. Skip it.
- Ignoring the weight of filled beds: a 4-by-4-foot raised bed filled 12 inches deep can weigh 400+ pounds. Make sure your patio surface and base can handle it before you fill.
- Picking plants before measuring sun: you'll end up with sun-lovers in shade or shade-lovers scorched by reflected patio heat. Measure first, buy second.
- Underwatering in summer: containers on paved surfaces can need daily watering in hot weather. Check soil moisture by sticking a finger an inch into the soil — if it's dry, water now.
- Overcrowding containers: it looks great at the nursery but in two months you'll have plants competing for water and light. Follow spacing recommendations on plant tags.
- Not planning for winter: if you're in a cold climate, decide before fall whether containers will move indoors, get insulated, or be replanted with cold-hardy plants. Leaving tropical plants in thin containers through a hard freeze usually ends badly.
The honest truth is that most patio gardens fail because of a few avoidable problems: wrong soil, no drainage planning, and plants in the wrong light. Fix those three things and the rest of it, design, variety, aesthetics, gets to be the fun part. Start simple, learn what works in your specific space, and expand from there. A single well-maintained raised bed or a cluster of thoughtfully chosen containers is more satisfying than an overly ambitious setup that's hard to maintain.
If you're starting from scratch and want to think through the bigger picture before committing to a layout, working out your patio ideas and overall design first gives you a much better foundation to build the garden around. And if your interest runs specifically toward growing food, digging into the details of a patio vegetable garden setup will help you dial in soil depth, spacing, and succession planting for edibles specifically. If you want a more guided plan, this patio vegetable garden setup walkthrough can help you dial in soil depth and spacing right from the start. Those same steps for patio ideas also help you plan containers, sun exposure, and drainage before you start planting patio vegetable garden setup.
FAQ
Can I keep patio garden plants in containers through winter? What should I watch for?
Yes, but choose the right container material and plan insulation. Use frost-resistant pots (or wrap and protect them), and keep containers close to a heat-holding wall if your winters dip below the plants' hardiness range. Also add a mulch layer on top of the potting mix to slow freeze-thaw cycles.
Should I put containers on saucers or gravel trays to catch runoff?
Use a saucer only if you’re checking it. After watering, empty any standing water in the first 10 to 30 minutes, especially for herbs and vegetables, because trapped water can suffocate roots and invite fungus. A better approach is ensuring drainage holes plus a well-aerated potting mix rather than relying on saucers.
How can I tell if my patio raised bed has poor drainage before planting?
Don’t rely on a single soil test number for every layer. For raised beds, confirm drainage by doing a percolation check (fill a hole with water and see how long it takes to drain). If it drains slowly, adjust the bed design (more compost, better base, or a fabric-and-base strategy) before adding fertilizer.
What’s the best way to level containers on a patio that slopes?
If your patio is on a slope, set container feet or stand-offs so the pot stays level, not the base. A common mistake is placing a heavy pot directly on uneven pavers, which can wobble and create stress points that crack joints or cause soil to slump at one side.
How do I group plants in containers so I’m not constantly overwatering or underwatering?
For small herb containers, group plants with similar watering needs and harvest patterns. For example, keep basil near frequent-water spots, and place rosemary or thyme where the top of the mix can dry slightly between waterings. Mixing thirsty and drought-tolerant herbs in the same container almost always leads to one group failing.
Can I reuse topsoil or garden soil in patio containers to save money?
No. Topsoil and garden soil usually compact in pots, and they also increase weed seeds and disease carryover. If you want lower cost, you can blend compost into potting mix, but keep a true potting mix as the main bulk for containers.
What factors besides sunlight should I account for on a windy patio?
Plan for wind as well as sun, especially for taller containers or trellised crops. Add low-profile plants on the windward side, use sheltered placement, and for lightweight pots consider heavier bases to reduce tipping during storms.
How do I plan spacing and access so I can harvest, deadhead, and repot without wrecking the plants?
Start by defining your “maximum height” at maturity and leave clear walking space around it. A practical rule is to keep the garden area within arm’s reach from a main path for maintenance, but also maintain a separate, furniture-safe clearance so chairs and doors don’t force you to reach over plants.
My patio plants look unhealthy, how do I troubleshoot without making things worse?
Yes, and it’s usually easier than it sounds if you avoid overcorrecting. Swap potting mix for containers first, then adjust watering frequency, and only later consider fertilizer changes. If plants look pale, droop despite dry soil, or drop leaves after repotting, review light and watering before adding more nutrients.
Is drip irrigation worth it for patio containers, and how do I avoid dry or soggy spots?
A drip line is best for consistency, but you still need to set it up zone-by-zone. Use separate lines or emitters for containers grouped by light and watering needs, and periodically flush the system so emitters don’t clog in potting mix runoff.