You can absolutely build a back patio yourself. The basic process goes like this: plan the layout, get any permits, clear and excavate the area, compact a gravel base, add a sand or concrete bed, set your surface material, and finish the edges. Most DIYers with a free weekend (or two) and the right rental equipment can pull off a solid 200–400 square foot patio without hiring a contractor. The key to making it last is the base work and drainage, not the surface you pick.
How to Build a Back Patio: DIY Steps, Materials, and Drainage

Nolan Carver
5 Jun 2026
Planning your patio layout and purpose
Before you touch a shovel, spend real time on paper. Sketch your yard and mark where the patio will sit relative to your back door, any existing structures, trees, and the property line. Think about how you'll actually use the space: dining, lounging, grilling, a fire pit, kids playing. If you already know what you want your patio to do, this planning guide for how to turn backyard into patio covers layout, slope, drainage, and materials.
That use dictates both size and shape. A dining table with six chairs needs at least 12x14 feet just for the table area, plus walkway space around it. If you're adding a grill station or fire pit later, plan for it now so you're not cutting into finished work.
The connection to the house matters a lot. Your patio surface must end up slightly lower than your door threshold and slope away from the foundation. The building code requirement, based on the International Residential Code, is a minimum 2% slope away from the house (that works out to about 0.25 inch per foot) for the first 10 feet. If you ignore this, water will drain toward your foundation every time it rains, and you'll be dealing with moisture problems in your basement or crawl space down the road.
Check local permit requirements before anything else. Many municipalities require a permit for patios above a certain size (commonly 200 square feet), for any patio attached to the house, or for structures like covered patios or raised decks. A quick call to your local building department takes 10 minutes and can save you from a stop-work order or fines later. If you're also thinking about the design side of things, including how the patio connects to your overall backyard layout, that planning phase deserves its own deep dive.
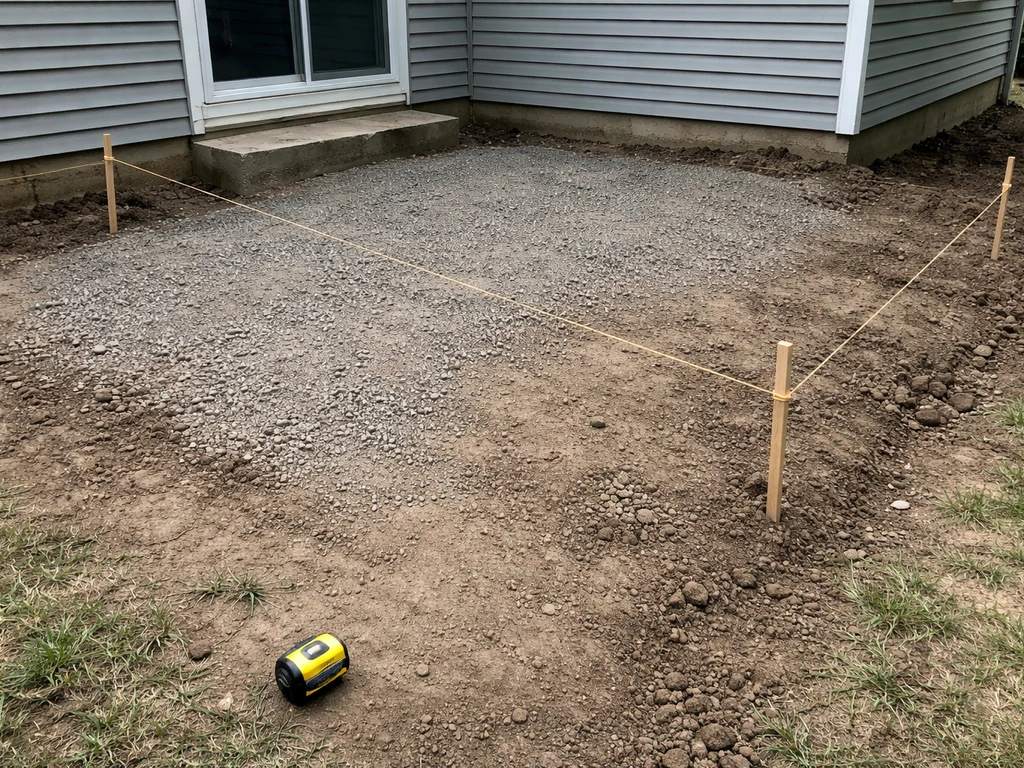
- Mark your layout with spray paint or stakes and string before committing to anything
- Account for slope: the finished surface should drop about 1/4 inch per foot away from the house
- Check setback requirements from property lines (typically 5–10 feet, varies by municipality)
- Call 811 before digging to have underground utilities marked
- Decide now if you want steps, a border, or a future fire pit area — they affect your base design
Choosing materials and tools
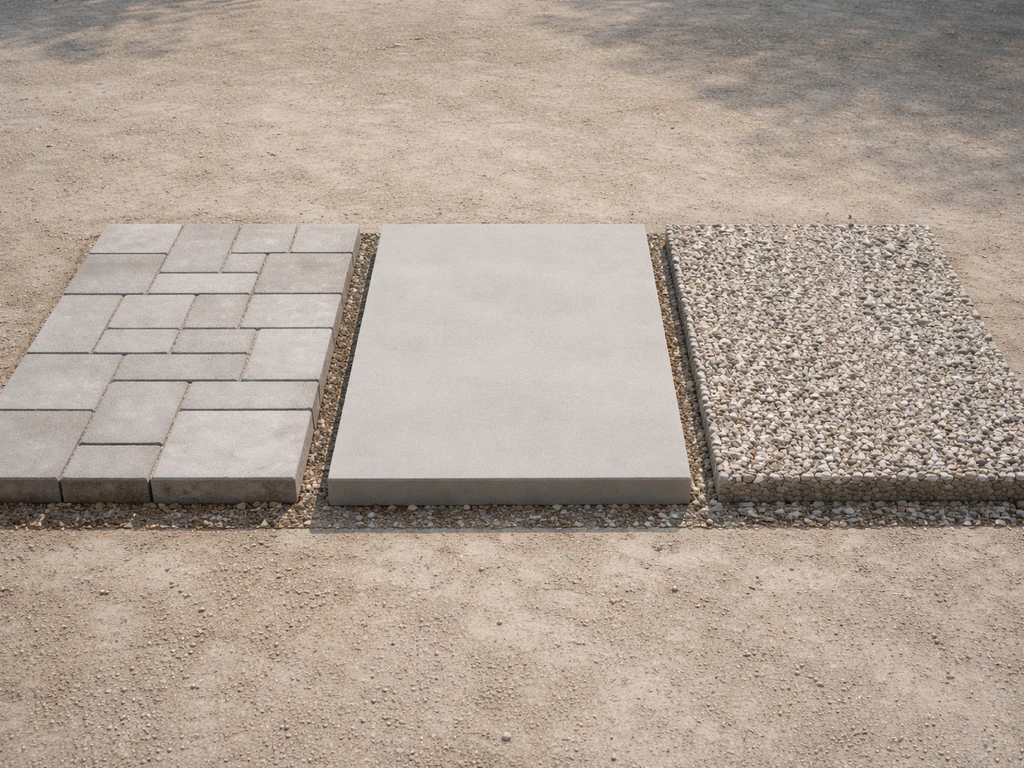
Your three main surface options are concrete pavers, poured concrete, and gravel/crushed stone. Each has real trade-offs in cost, labor, and durability. Here's a straight comparison so you can decide what fits your situation.
| Material | Cost per sq ft (installed DIY) | Lifespan | DIY difficulty | Best for |
|---|---|---|---|---|
| Concrete pavers | $8–$20 | 25–50+ years | Moderate | Most DIYers; forgiving and repairable |
| Poured concrete | $4–$8 | 25–30 years | Hard (requires forming, mixing/pouring, finishing) | Budget-focused; permanent look |
| Gravel/crushed stone | $1–$4 | Ongoing maintenance | Easy | Casual spaces; excellent drainage |
| Flagstone | $15–$30 | Decades | Moderate–Hard | Natural look; irregular shape work |
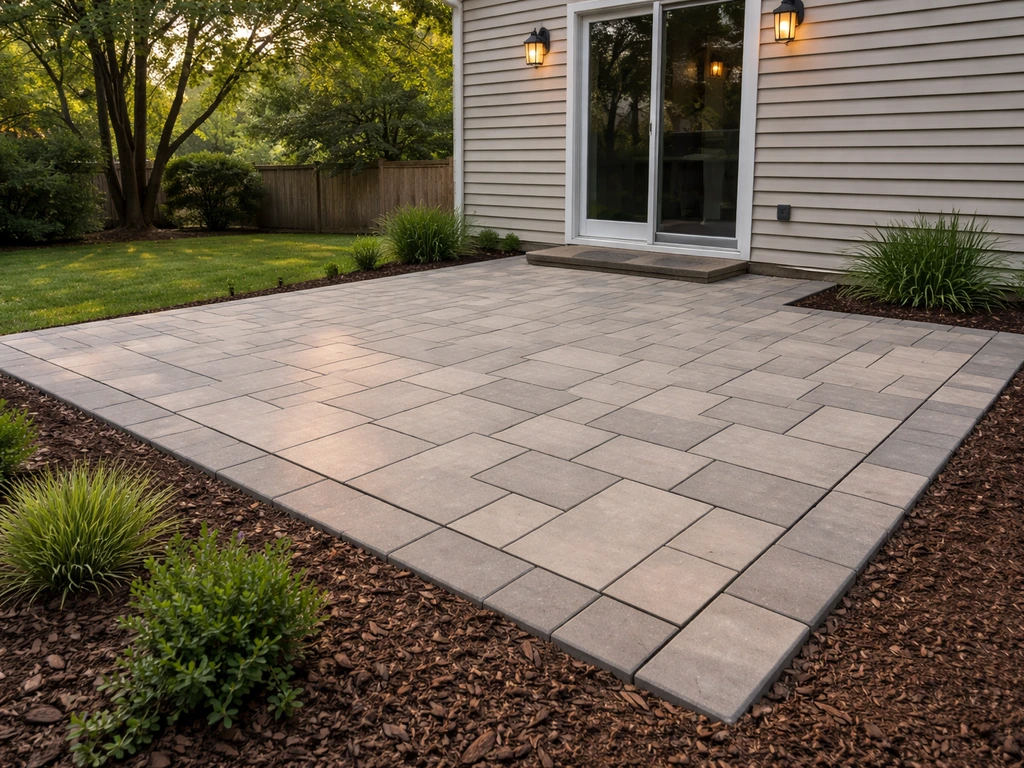
For most first-time DIYers, concrete pavers are the sweet spot. They're forgiving because you can pull and reset individual pieces if something goes wrong, they don't crack the way poured concrete does, and they handle freeze-thaw cycles better. Poured concrete is cheaper upfront but requires more skill to finish properly, and once it cracks, repairs are visible. Gravel is the easiest and cheapest but shifts underfoot and requires edging maintenance.
Tools you'll need
Some of these you can own; some are much smarter to rent. A plate compactor is the big one. Do not skip it or try to substitute a hand tamper for anything larger than a very small project. You can rent a plate compactor from Home Depot or any equipment rental yard for about $60–$80 per day.
- Plate compactor (rent) — critical for base compaction
- Circular saw with diamond blade or angle grinder (rent or own) — for cutting pavers
- Rubber mallet — for seating pavers
- Screed board (a straight 2x4 works) — for leveling sand bed
- Level and long straightedge (6–8 feet minimum)
- Line level and string line — for establishing slope
- Tape measure, spray paint or chalk line
- Wheelbarrow and garden rake
- Shovels: flat spade and pointed
- Tamping rod or hand tamper — for corners the plate compactor can't reach
- Safety glasses, gloves, knee pads
Site prep and base/foundation setup
This section is where most DIY patios either succeed or fail five years later. A weak base is the number one reason patios heave, settle, or develop drainage problems. Take your time here.
Clearing and excavation
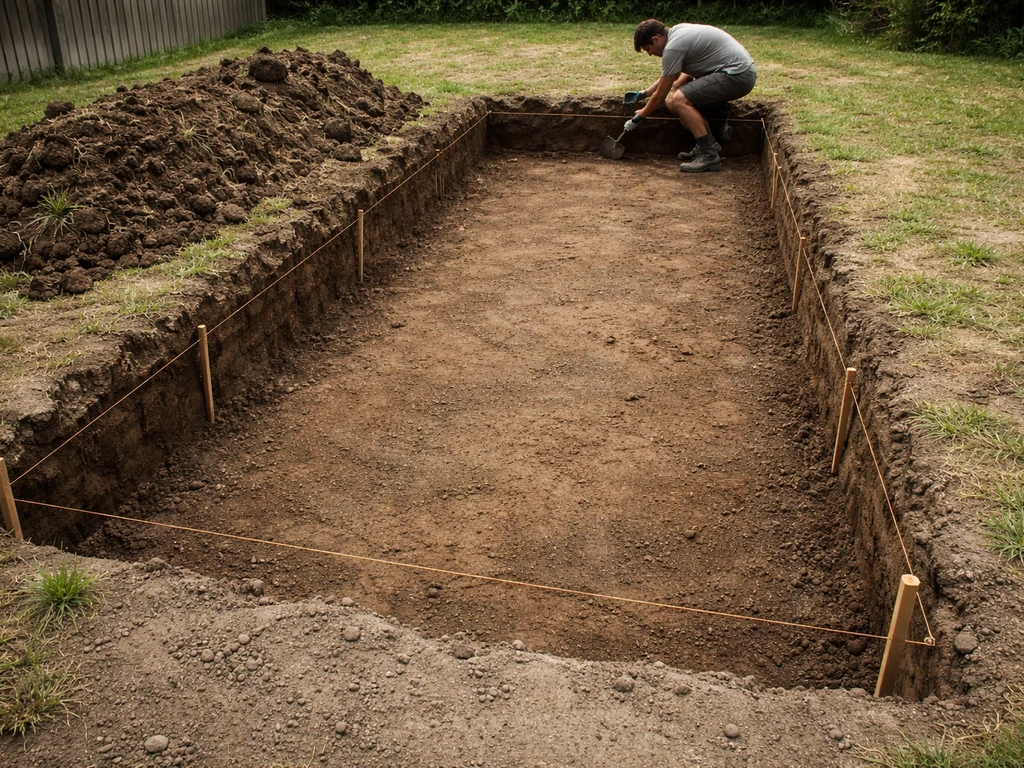
Remove all grass, roots, and organic material from the patio footprint. You need to dig down to solid, undisturbed soil. How deep you dig depends on your surface: for pavers, plan for 4–6 inches of compacted gravel base, plus 1 inch of bedding sand, plus the thickness of your paver (typically 2.375 to 3 inches). That puts your total excavation at roughly 8–10 inches below your finished grade. For a poured concrete slab, you need 4 inches of concrete (the standard residential thickness) plus 4 inches of compacted gravel sub-base, so excavate about 8 inches down.
Account for your slope during excavation. Your dig should mirror the finished slope, so the low end of your patio will be slightly deeper than the house end. String lines with a line level are the most reliable way to track this. Set your slope at 1/4 inch per foot away from the house, run string lines across the layout, and use them as a reference throughout every layer.
Soil compaction and geotextile fabric
Once you've excavated, compact the native soil with your plate compactor before adding any base material. If your soil is especially soft, silty, or clay-heavy, lay a layer of geotextile landscape fabric directly on the soil before adding gravel. This fabric separates the soil from your base material and prevents the gravel from slowly migrating downward into soft ground over time, which is one cause of patio settling.
Building the gravel base
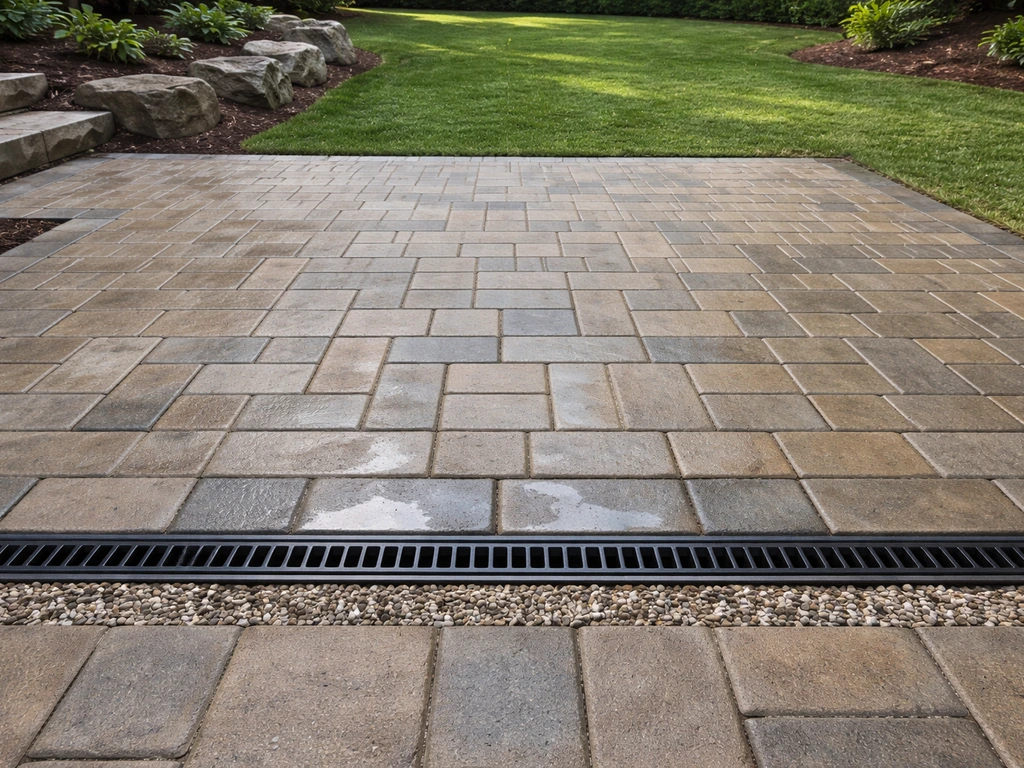
Use crushed angular gravel (sometimes called compactible gravel, road base, or Class II base) rather than rounded river rock. Angular gravel locks together under compaction; round stones roll and shift. Add gravel in 4-inch lifts, meaning you spread about 4 inches, compact it thoroughly with the plate compactor, then add the next 4 inches and compact again. Compacting in lifts is essential, dumping 8 inches of gravel and running the compactor over it once does not produce the same density or load-bearing capacity. For most residential patio applications, 4–6 inches of compacted gravel base is the standard spec.
Step-by-step patio construction (common surfaces)
Building a paver patio
- Establish your finished grade with string lines, accounting for your 1/4-inch-per-foot slope away from the house
- Excavate to the correct depth (base + sand + paver thickness, typically 8–10 inches below finished grade)
- Compact the native soil, then lay geotextile fabric if needed
- Add compacted gravel base in 4-inch lifts until you reach 4–6 inches of compacted depth
- Install plastic or metal paver edging along the perimeter before adding sand — this locks everything in
- Spread 1 inch of coarse bedding sand (concrete sand) over the compacted base and screed it flat using your slope as the reference
- Do not walk on or disturb the screeded sand — set up kneeling boards to work from
- Lay pavers in your chosen pattern starting from the corner closest to the house, working outward
- Use a rubber mallet to seat each paver; check with a level frequently as you go
- Cut edge pavers to fit using a circular saw with a diamond blade or a paver splitter (rentable)
- Run the plate compactor over the entire paver surface (put a rubber or carpet pad under the plate to avoid scratching the paver faces)
- Sweep polymeric sand into the joints, making sure all joints are fully filled
- Compact again lightly to distribute the polymeric sand into deeper joint areas
- Activate polymeric sand by watering it using a shower-setting nozzle — not a fine mist, which can cause white haze to form on paver surfaces
- Keep off the patio for 24 hours while the polymeric sand sets
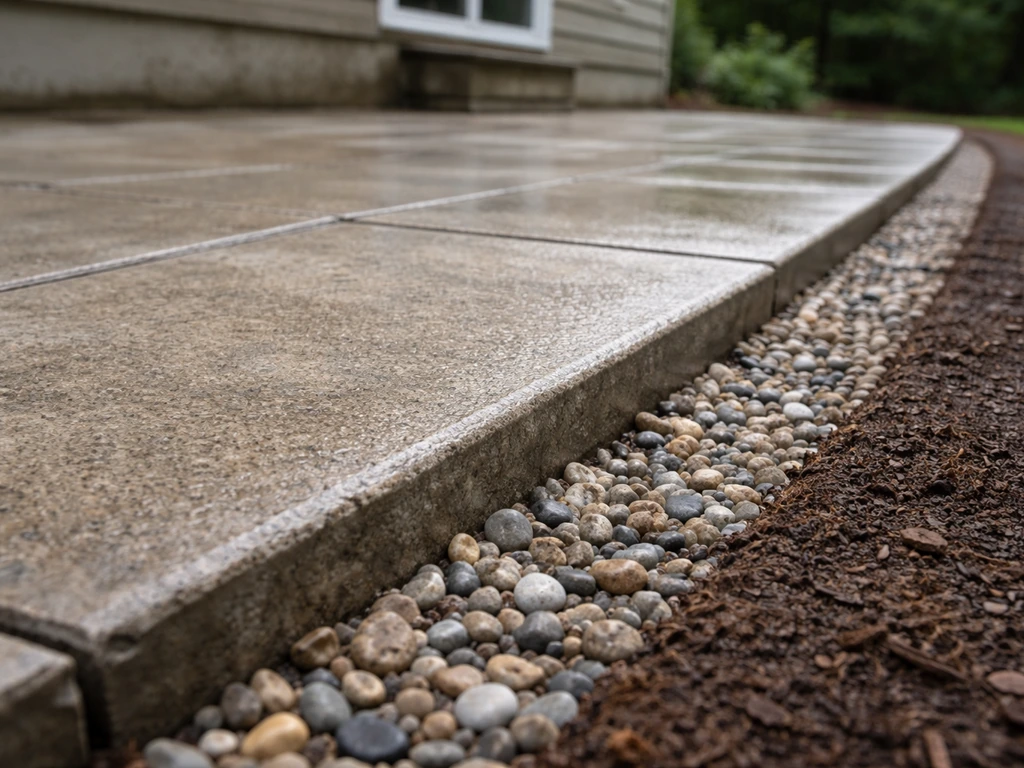
Pouring a concrete patio slab
Concrete is more labor-intensive and less forgiving than pavers, but it's a solid option if you want a clean, continuous surface. After excavation and base compaction, build your forms from 2x4 lumber, staking them at the correct height and slope. A 4-inch slab is the standard residential thickness for furniture and foot traffic. Rent a mixer or order ready-mix concrete delivery for anything over about 50 square feet. Pour in sections, screed to your form height, then finish the surface with a float and a broom texture for slip resistance.
Curing is where people get impatient and damage their work. Leave forms in place for at least 24–48 hours. Keep the surface moist by covering it with wet burlap or plastic sheeting and rewetting it once a day for 7 days. At the 7-day mark, a 4-inch slab reaches roughly 70% of its design strength, which is enough for light foot traffic. Full design strength (100%) comes at 28 days, so avoid driving heavy equipment or placing very heavy loads on it until then. A properly built concrete patio can last 25–30 years.
Leveling, drainage, and durability tips
Drainage is the issue that takes down more DIY patios than any skill problem. Water sitting on or under your patio will freeze in winter, wash out your base, and undermine your foundation. Here's how to get it right and how to diagnose problems early.
Getting the slope right
The minimum is 1/4 inch of drop per linear foot (that's a 2% slope), measured moving away from the house. Over a 10-foot patio, that means the far edge is 2.5 inches lower than where the patio meets the house. Set string lines before you pour or lay a single paver, check them with a line level, and keep checking as you build. It's much easier to fix slope during construction than after.
Handling water at the edges and beyond
Think about where the water goes once it leaves your patio. If it runs off toward a fence or a low spot next to the house, you may need a swale (a shallow drainage channel) to redirect it to a safe outlet. In tight yards where there's nowhere for runoff to go naturally, a channel drain or French drain along the low edge of the patio can collect and reroute water underground. Plan these features before construction, not after.
Common problems and how to fix them
- Pavers rocking or settling: usually means the bedding sand was too thick, too wet, or the base wasn't compacted enough. Pull affected pavers, recompact, re-screed sand to 1 inch, reset
- Pooling water on the surface: your slope is insufficient or the surface has dipped. For pavers, reset the low area. For concrete, you may need to grind the high spots or apply a self-leveling overlay in extreme cases
- Edges shifting or spreading: paver edging stakes pulled out of soft soil. Drive longer spikes and use a second row of edging in problem areas
- Polymeric sand washing out: joints weren't filled fully before activation, or the wrong watering technique was used. Refill joints and re-activate
- Concrete cracking: often from insufficient base, improper curing, or no control joints. For a patio over about 10 feet in any direction, cut control joints 1/4 the depth of the slab every 8–10 feet to give cracks a place to go predictably
- Frost heave: a gravel base that drains well is your best defense. Poorly drained bases trap water that expands when it freezes
Long-term durability
For concrete, reseal the surface every 2–3 years with a penetrating concrete sealer to resist moisture, stains, and freeze-thaw damage. For pavers, top up polymeric sand in joints every few years as it wears. To avoid issues, sweep the polymeric sand into the joints and follow the manufacturer’s activation technique, including mist control (with the nozzle set to “Shower” rather than a fine mist) top up polymeric sand in joints every few years as it wears.. Inspect the perimeter edging every spring and re-stake anything that has shifted. These small maintenance steps are the difference between a patio that looks great at 15 years and one that looks tired at 5.
Finishing details: borders, stairs/steps, and optional add-ons
Edging and borders
A clean border does two things: it locks the field pavers in place so they can't spread outward, and it gives the patio a finished, intentional look. You can use plastic or aluminum paver edging (functional and invisible once installed), a soldier course of pavers set vertically or on their ends, or a contrasting paver in a different color or material. If you want the border to be a design feature, plan the pattern from the outside in so your field pattern lands cleanly without awkward cuts at the edge.
Adding steps or stairs
If your patio sits higher than the surrounding grade, you'll need at least one step. A comfortable outdoor step has a rise of 6–7 inches and a tread depth of 12–15 inches. For paver patios, precast concrete step units or stacked paver steps both work well. Precast units are fast and heavy (they stay put). Stacked paver steps require a compacted base under each tier and should be pinned together with construction adhesive. For concrete patios, you can form and pour steps integrally with the slab, which is the most durable option.
Optional upgrades worth planning for now
A fire pit area needs a non-combustible surface (concrete pavers or flagstone work; avoid certain manufactured pavers not rated for heat directly under the fire bowl) and ideally a slightly thicker base underneath to handle thermal stress. If you plan to add a built-in grill, seating wall, or pergola later, set a concrete footing in those locations now while you're already excavating. Adding a footing after the patio is built means tearing up finished work. Raised sections or retaining wall elements add complexity and often require permits or engineer review, so if that's in your vision, factor it into planning from the start rather than treating it as an afterthought.
Budgeting, timelines, and DIY risk checks
Realistic cost ranges
Material costs for a 200 square foot paver patio typically run $1,500–$3,500 depending on paver selection, with gravel, sand, edging, and polymeric sand adding another $200–$400. Equipment rental (plate compactor, saw) adds $100–$200 for a weekend. A poured concrete patio for the same size runs roughly $800–$1,600 in materials plus about $150–$250 for forms, rebar, and finishing tools. Budget an extra 10–15% for waste, cuts, and the inevitable extra bags of sand or gravel you didn't think you needed.
How long does it actually take
A realistic timeline for a 200 square foot paver patio with two people working is: one full day for site prep and base work, one full day for paver laying and finishing. Add a day of buffer for things like unexpected rocks, re-leveling issues, or waiting on a delivery. Poured concrete patios can be done in a single long day if your prep is done, but you need a full week before heavy use. Plan to have the area clear and accessible before materials are delivered, because a pallet of pavers dropped in the wrong spot makes everything harder.
When to stop and reassess (or hire out)
There are a few situations where the honest advice is to pause and get professional input. If your yard has a significant slope (more than about 1 foot of grade change across your patio footprint), you're probably looking at a retaining wall or raised patio situation that involves structural engineering.
If you hit unexpected soil conditions, standing water, or a high water table during excavation, a drainage consultant or landscaping contractor can save you a lot of money compared to building on a bad base. Anything that touches your house structure (ledger connections, covered roof structures) needs a permit and often a structural review. These aren't reasons to not do the project yourself, but they are reasons to get the right information before you pour concrete.
Your immediate next steps: measure and sketch your patio area today, then call your local building department to ask about permit requirements for your size and type of project. If you want a complete checklist from layout to finishing details, follow this guide on how to make a back patio. Order a load of compactible gravel and reserve a plate compactor rental for your target weekend. If you're still working through the design side before you're ready to build, mapping out the full backyard layout first will make your construction decisions easier and help you avoid building yourself into a corner with future upgrades.
FAQ
Can I build a back patio on top of existing concrete or pavers?
Yes, but you need a drainage adjustment, not just a cosmetic overlay. If the patio will butt up to an existing concrete slab, plan on matching the existing slope or rebuilding the base to create the required drop away from the house (about 2%). If the old slab is cracked, spalling, or has standing water, adding pavers on top without removing and rebuilding the failed base can lock in drainage problems and cause new settling.
What should I do if it rains during patio excavation or base prep?
In most DIY builds, the easiest safe strategy is to keep all compaction and base work within the same day schedule and prevent water from washing gravel out of fresh trenches. If rain is forecast, cover excavated areas, stop work if water starts pooling, and do not place bedding sand or pavers until the base is dry enough to compact. Also, after rain you should re-check grade with string lines, because softened soil can change the slope.
How do I handle polymeric sand and paver joints if my weather is unpredictable?
If you’re using pavers, the joint material matters. Polymeric sand is typically intended for dry joints, so keep it dry during installation and avoid hosing it down more than the product directs. If you expect frequent heavy rain soon after installation, delay polymeric sand or follow the manufacturer’s curing/wetting steps, otherwise the sand can wash out and joints will loosen.
What’s the most common paver cutting mistake at the patio edge, and how do I avoid it?
For cut accuracy, measure twice and plan the edge pattern before you excavate. A common mistake is treating cuts as an afterthought, which results in narrow slivers at the border that look bad and can move. Use the outside border as your “full-paver line,” then adjust the field so your edge cuts stay reasonable and consistent.
Can I build a raised back patio myself, or will I need retaining-wall help?
Yes, but it changes the engineering and permits. If you want a patio that sits higher than surrounding grade, you typically need properly designed retaining support, adequate drainage behind the wall, and sometimes geogrid. Even if the patio surface is DIY-friendly, a raised build can involve structural review depending on height and how close it is to property lines or the house.
Why does my patio base keep shifting or settling, even though I used gravel?
Avoid using rounded landscaping stones as the main base. Rounded rock compacts poorly and can shift under load, especially near edges and step areas. For the base, stick with compactible angular gravel and compact in lifts, then top with the proper bedding layer before placing pavers or forms.
How do I prevent frost heave in freeze-thaw climates?
When frost is a factor, pay extra attention to the sub-base and separation layers. The geotextile helps keep base material from mixing with soft soil, but you also need the correct depth and full compaction. If you under-excavate or skip fabric on problematic soil, freeze-thaw can lift the patio unevenly.
How can I verify my patio slope is correct before I install the surface?
A practical check is to confirm slope in every stage, not just at the top. Measure the slope during excavation, again after base compaction, and again after bedding sand is placed. If you only check once, it’s easy to lose the 2% away-from-house grade when bedding sand settles or when forms are slightly off.
How do I decide whether I need a swale, French drain, or channel drain?
Don’t rely on the patio surface to “catch” water. If the patio is draining toward a fence or low spot, create a designed path such as a swale or a drain line, and keep outlet areas unobstructed. Also make sure any buried drainage outlet is not dumping water where it can undermine footing, landscaping, or neighboring areas.
What should I do if my finished paver patio starts to dip or rock?
If you notice settling, usually it shows up at seams, edges, or under points of load (chairs, grill, fire pit). For pavers, you can lift and re-level individual sections, but only if you maintain the base. If settlement keeps repeating, it usually means the subgrade or base was not compacted correctly, or the area is trapping water underneath.
How long should I wait before using a newly poured concrete patio?
For concrete patios, the wrong timing is a common cause of permanent surface issues. If you remove forms too early or let the slab dry out too fast, you can get cracking and weaker performance. Follow the curing approach (keep it moist and allow the full 28 days before heavy loading) and avoid putting heavy furniture or equipment on it early.
What’s the key thing to get right when building steps into a patio?
For steps, make sure the base is built to the same compaction standard as the patio, and pin or secure the step components so they don’t move at the junction. A typical mistake is setting steps directly on thinner base without matching slope transitions, which creates rocking and hairline gaps.
When should I run electrical or low-voltage wiring for a back patio?
Make sure you plan utility paths now. If you want outdoor lighting, a grill with electrical ignition, or low-voltage speakers, you typically need conduit installed before the final bedding/base or slab pour. Routing conduit after the patio is finished usually means cutting the surface, which can interrupt slope and drainage.
Do I need a structural engineer for a DIY patio if it’s attached to my house or has a roof?
If your patio plan involves changing grade near the house, connecting structural elements, or adding a roof structure, get guidance early. Even when you can build the patio itself, connections to the house and any covered elements often trigger permits and sometimes structural review, which can affect footing design and slope details.