You can build a backyard patio yourself in a weekend or two, even as a complete beginner. The basic process is: plan your layout, check for permits and buried utilities, excavate and compact a gravel base, add a sand setting layer, lay your surface material, install edging, and finish the joints. The biggest mistakes people make are skipping the base prep and not building in enough slope for drainage. Nail those two things and the rest is straightforward.
How to Make a Backyard Patio: DIY Planning to Cleanup

Nolan Carver
13 May 2026
Plan first: measuring, utilities, and permits
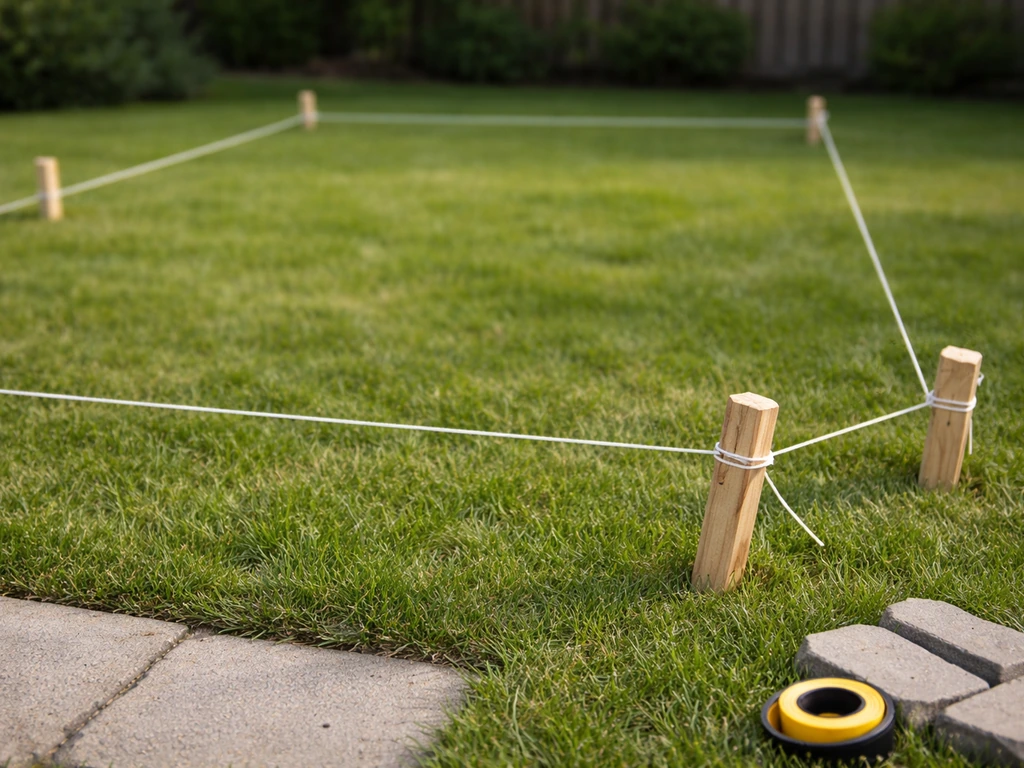
Before you touch a shovel, spend an afternoon on planning. Start by measuring your backyard and sketching out where the patio will go. Use stakes and string to mark the footprint on the ground so you can visualize it at full scale. Walk around it, sit in a chair inside the boundary, and make sure the size actually works for how you want to use the space. A common starting size for a simple seating area is around 12x12 feet, but most people go bigger once they see it laid out.
Once you have a rough footprint, call 811 before you dig anything. This is a free service in the U. S. that dispatches utility companies to come mark underground lines with paint and flags.
Make that call at least two full business days before you plan to excavate since many states require it by law. In the U. S. , you should call 811 a few business days before digging so utility lines can be marked with paint and flags [at least two full business days before you plan to excavate](https://call811.
com/before-you-dig). Keep in mind that 811 only marks public utility lines. Private lines (like the conduit running to your detached garage, or a buried irrigation line) are your responsibility to locate, so think through what you may have buried before you start.
On permits: requirements vary by municipality, but many areas require at least a zoning permit before you install, expand, or replace a patio. Setback rules, which dictate how close a structure can be to your property line, often apply. Check with your local building or zoning office before you start, especially if your patio will be attached to the house, covered, or elevated. A covered patio adds another layer of planning for the roof layout, posts, and how you will route water away from the structure. A quick phone call can save you from having to tear out work later.
Design your layout and pick your materials
Your layout should follow the shape of how you actually use your yard. Rectangular patios are the easiest to build and install. Curves and irregular shapes look great but take more cutting and patience. Think about traffic flow (do you need a path to the garden or gate?), sun exposure, and whether you want the patio attached to the house or freestanding. Sketch it on graph paper with rough dimensions before finalizing.
Material choice is where most beginners get overwhelmed, so here is a direct comparison of the three most common options.
| Material | Cost (approx.) | DIY Difficulty | Durability | Best For |
|---|---|---|---|---|
| Concrete pavers | $8–$20/sq ft installed DIY | Beginner-friendly | Very high | Most DIYers; forgiving, repairable |
| Poured concrete | $4–$8/sq ft materials | Moderate | High, but cracks over time | Large, simple slabs; cleaner look |
| Natural stone/flagstone | $15–$30/sq ft materials | Moderate to hard | Excellent | Rustic or premium aesthetic |
| Brick | $10–$20/sq ft installed DIY | Beginner-friendly | High | Classic look; similar process to pavers |
For most first-time DIYers, concrete pavers are the best choice. They come in consistent sizes, are easy to cut with a rented saw, can be relaid if something shifts, and require no curing time. Poured concrete is cheaper on materials but less forgiving: once it cracks, repairs are visible. Natural stone looks beautiful but the irregular shapes make layout slower and more complex. If you want inspiration for a specific style or want to think through your design more deeply before committing to materials, working through your patio design in detail before you buy anything is time well spent.
Site prep: excavation, base layers, and drainage
This is the most physically demanding part and the part most people underestimate. Do it right and your patio will last decades. Rush through it and you will be releveling pavers or patching cracked concrete within a few years.
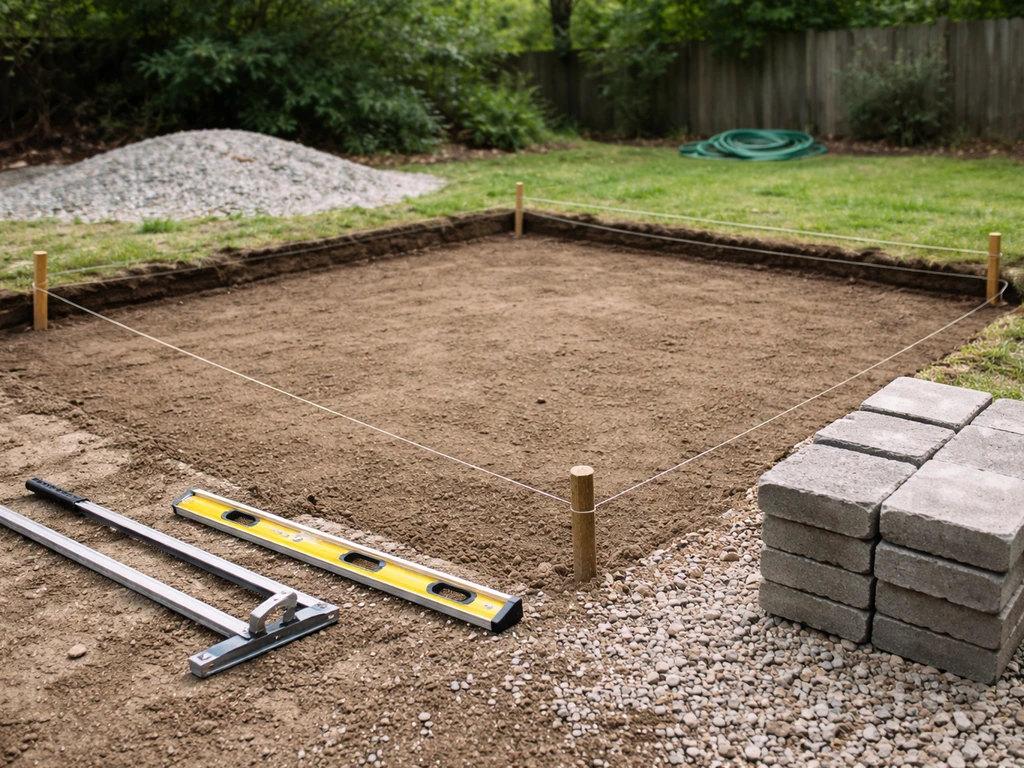
Excavation and grade
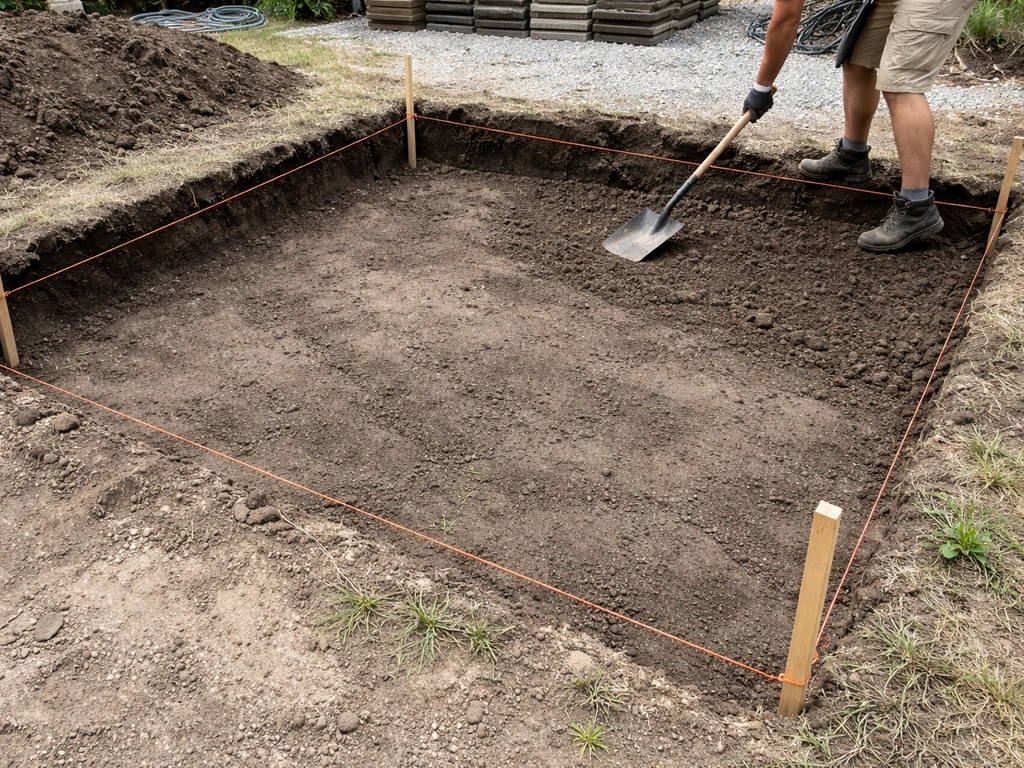
Mark your patio footprint with string lines and stakes. Excavate the topsoil and organic material within that boundary. For a paver patio you typically need to dig down 7 to 10 inches total to account for the base layers. Remove all grass, roots, and soft soil. The goal is to expose firm, undisturbed subgrade. If the ground is soft or loamy, you may need to go deeper or add geotextile fabric before your base to prevent base material from migrating into the soil over time.
Building the gravel base
Pour in compactable gravel (also called road base, crushed stone, or Class II base rock depending on your region). For a pedestrian patio, a compacted base depth of 4 to 6 inches is standard per ICPI guidelines. Add the gravel in layers, compacting each layer before adding more. Rent a plate compactor for this: a hand tamper will not give you enough compression and the base will settle unevenly later. Compact in roughly 3 to 4 inch lifts for best results.
Slope and drainage: the most important step
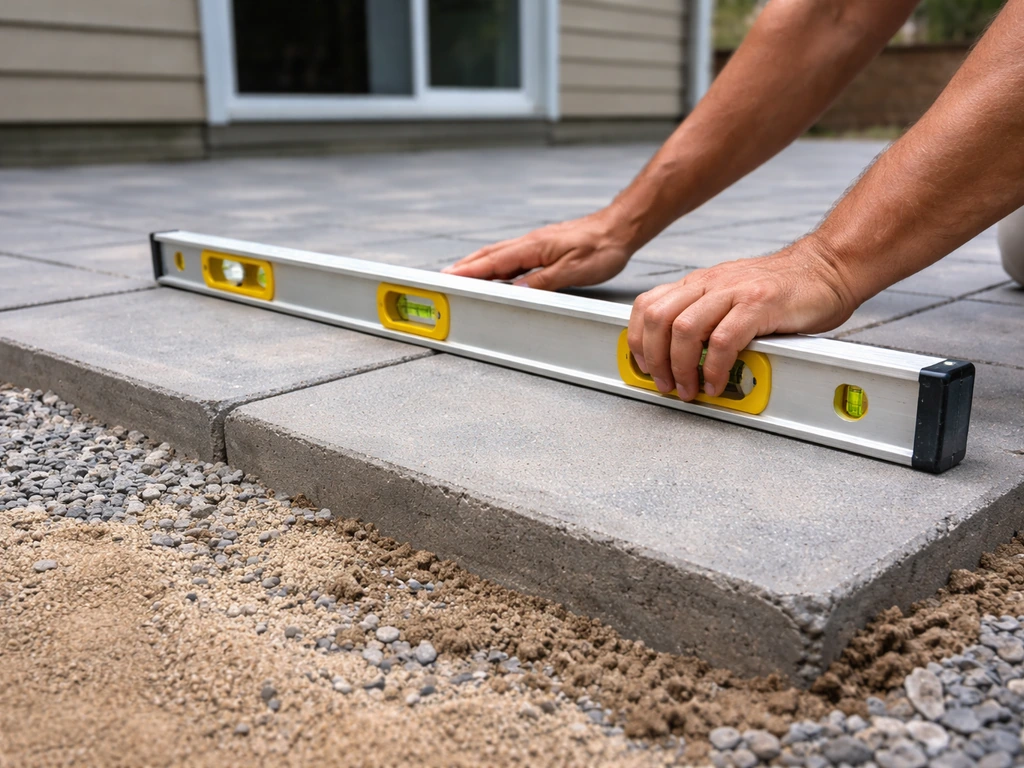
Your finished patio surface needs to slope away from your house (or toward a designated drainage point) at 1/4 inch per foot. So a 12-foot-wide patio should have 3 inches of total drop across its width. This sounds small but it is enough to move water off the surface instead of pooling in the middle or against your foundation. Build this slope into your gravel base from the start, not as an afterthought. Check it with a long level and a tape measure as you compact. This standard applies whether you are laying pavers, pouring concrete, or setting flagstone.
The sand setting layer (for pavers)
Once the compacted gravel base is in place, spread a 3/4 inch to 1-1/2 inch layer of coarse bedding sand (not play sand or mason sand) evenly across the surface. Screed it flat using a straight board pulled across pipe guides set at the correct height. Do not compact the sand before laying pavers: it needs to stay loose so the pavers can be tapped into a firm, even bed. Once all pavers are laid and the joints are filled, the compactor locks everything together.
How to build your patio, start to finish
Here is the full construction sequence for a concrete paver patio, which is the method most beginners should use. The same general logic applies to brick and flagstone, with minor differences.
- Mark and excavate the patio footprint. Remove topsoil, roots, and organic material to a depth of about 8 to 10 inches from your desired finished surface height.
- Check that utilities are marked and you are clear to dig. Call 811 at least two business days before you start if you have not already.
- Install landscape fabric over the bare subgrade if your soil is sandy or loamy. This helps prevent base material from migrating downward.
- Add your first 3 to 4 inch lift of compactable gravel base. Compact with a plate compactor until the surface is firm and does not shift underfoot.
- Add a second lift of gravel to reach your target compacted base depth of 4 to 6 inches. Compact again. Check your slope (1/4 inch per foot away from the house) as you go.
- Install plastic or steel edge restraints around the perimeter of the patio. Secure them with 10-inch spikes driven into the compacted base. These hold your pavers from shifting outward over time.
- Spread bedding sand 3/4 inch to 1-1/2 inch thick over the compacted base. Set screed pipes at the correct height and pull a straight 2x4 across them to create a flat, even sand bed. Do not compact the sand.
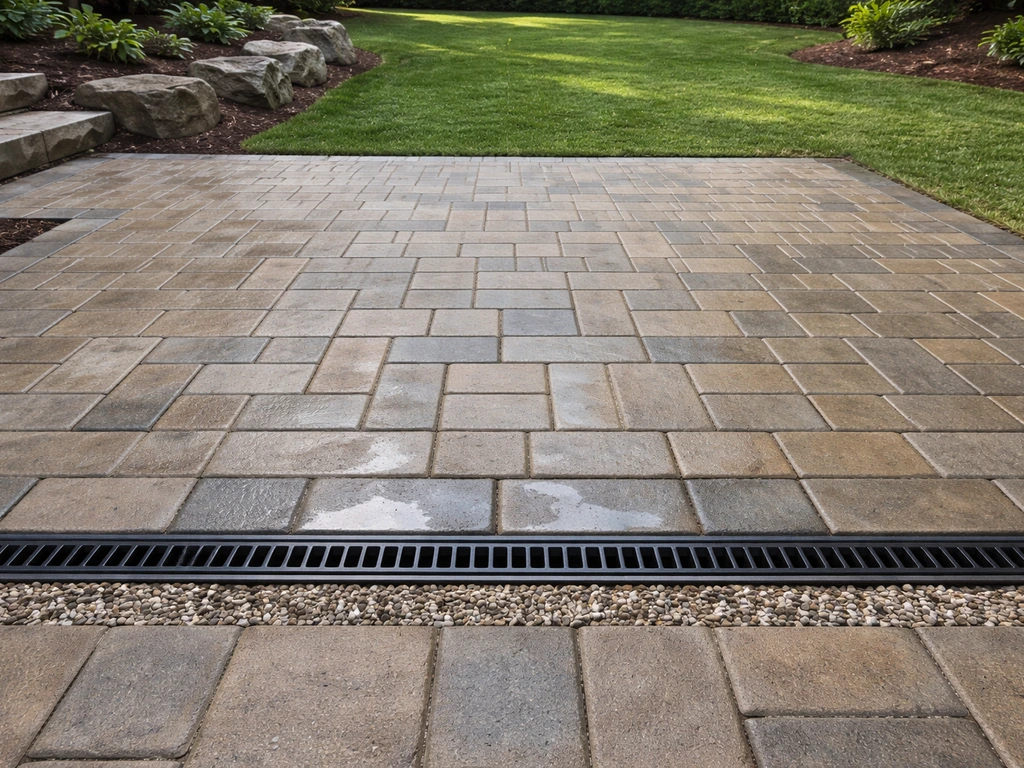
- Lay pavers starting from a fixed corner or straight edge, working outward. Keep consistent 1/8 inch to 1/4 inch joint spacing. Tap each paver gently into the sand with a rubber mallet. Use a level and straightedge frequently to catch any high or low spots early.
- Cut border pavers to fit using a rented masonry saw or an angle grinder with a diamond blade. Measure twice before every cut.
- Once all pavers are laid, run the plate compactor over the entire surface to set the pavers firmly into the sand bed. Make two or three passes in different directions.
- Sweep polymeric joint sand into all gaps between the pavers. Work it in with a stiff broom, making multiple passes. Blow off the excess with a leaf blower, then lightly mist the surface with water to activate the binding agent. Follow the manufacturer timing: most products like EZSAND require at least 90 minutes of dry time before rain or water exposure.
- Do a final check for any rocking or uneven pavers. Lift and re-bed any that are not sitting flat.
For poured concrete, the process differs significantly. You will form the slab with lumber, pour and spread the concrete, screed it level (building in that 1/4-inch-per-foot slope), float and finish the surface, and then cure it before applying any sealer. Do not seal fresh concrete too early: the standard recommendation is to wait at least 28 days before sealing, because sealing green concrete can trap moisture and cause a white haze or efflorescence on the surface.
Finishing details: edging, joints, sealing, and keeping it in good shape
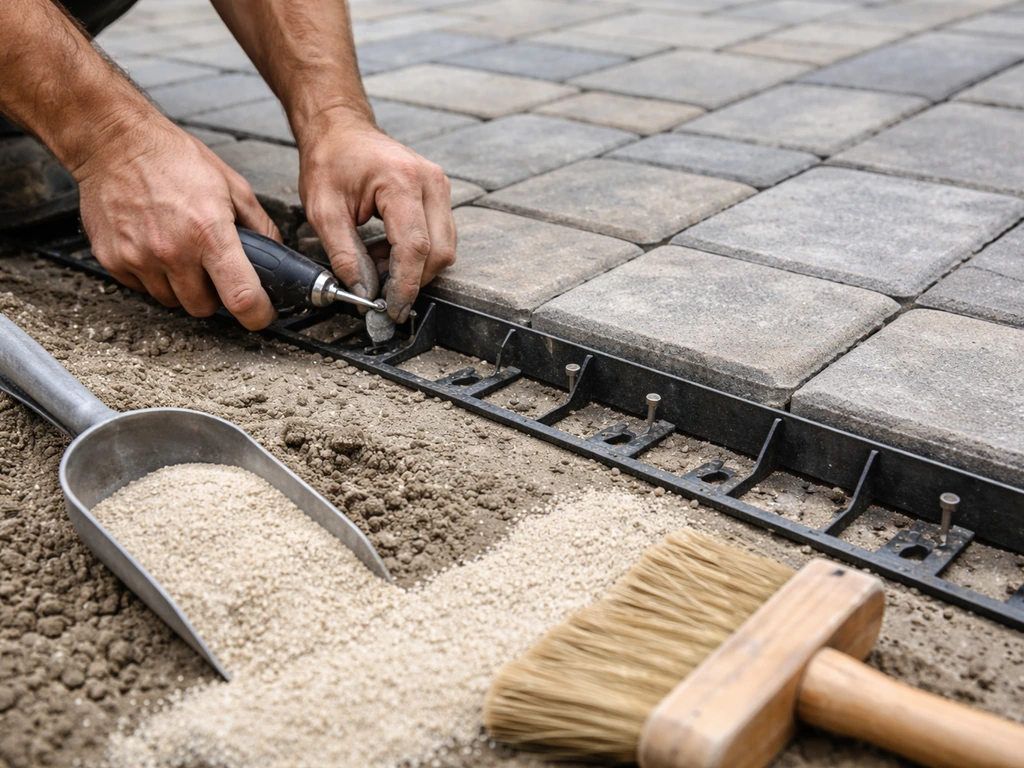
Edge restraints are non-negotiable for pavers. Without them, the perimeter pavers gradually migrate outward and gaps open up in your surface. Make sure your restraints are fully pinned and flush with the bottom of the paver height before you add sand.
For polymeric sand, timing matters. Do not install it in rain, and do not start if rain is expected within a few hours of completing the work. Rain before the sand cures will wash the binder out of the joints and smear it across your paver surface, which is difficult to clean. If you do get surprise rain shortly after application, you may need to re-sweep and re-activate.
Sealing paver surfaces is optional but recommended if you want to protect the color and make cleaning easier. The traditional recommendation is to wait at least 90 days after polymeric sand installation before applying a sealer. This gives the sand time to fully cure and harden in the joints. For concrete slabs, that 28-day minimum applies before sealing.
Long-term maintenance is minimal if you built the base correctly. Sweep pavers regularly to keep joints from collecting debris. Re-apply polymeric sand to any joints that thin out over time. Check that water still drains away from the house after heavy rain: if you see pooling, the patio may have settled and a section may need to be releveled. With pavers, this is easy: pull the affected area, re-grade the sand, and reset. With concrete, you are looking at grinding, patching, or in bad cases, saw-cutting and re-pouring.
Budget, tools, timeline, and mistakes to avoid
Realistic cost ranges
A DIY paver patio will typically run $8 to $20 per square foot when you supply the labor, depending on your material choice and region. A 12x12 patio (144 sq ft) might cost $1,200 to $2,900 in materials. Gravel base and sand are relatively cheap, around $200 to $400 for that footprint. Pavers themselves are the biggest cost. Renting a plate compactor and masonry saw adds another $100 to $200 for a weekend project. Poured concrete can be cheaper on materials ($4 to $8 per sq ft for a simple slab) but requires more skill to get right, especially if you are mixing and pouring yourself.
Tools you will need
- Tape measure, stakes, and string line
- Shovel, mattock, and wheelbarrow
- Plate compactor (rent this, do not skip it)
- Long level (4 ft minimum) and a carpenter's level
- Screed board (a straight 2x4 works fine)
- Rubber mallet
- Masonry saw or angle grinder with diamond blade (rent for cutting pavers)
- Stiff-bristle push broom
- Garden hose with mist setting
- Safety glasses, gloves, and ear protection for cutting
How long will it take?
For a 12x12 to 16x16 foot paver patio with one or two helpers, plan for two full weekends. Weekend one covers excavation, base compaction, and edge restraints. Weekend two covers sand, paver layout, cutting, compaction, and jointing. Concrete goes faster to pour but you need to plan around curing time. Working solo, add a weekend. Working in summer heat, take breaks and plan for hydration: this is heavy physical work.
Common DIY mistakes and how to avoid them
- Skipping the 811 call before digging. Always call at least two full business days in advance. Hitting a buried line is dangerous and expensive.
- Not building enough slope. The 1/4-inch-per-foot rule is not optional. Insufficient slope means standing water, which damages your foundation and your patio surface.
- Skimping on base depth or compaction. A thin or uncompacted base leads to settling, rocking pavers, and cracked concrete within a few seasons.
- Using play sand or fine sand for the bedding layer. Use coarse, angular bedding sand specifically for paver installation.
- Applying polymeric sand in wet or rainy conditions. It will wash out and stain your pavers.
- Sealing concrete before 28 days. You risk trapping moisture and causing efflorescence.
- Not installing edge restraints. Without them, paver edges will migrate and your pattern will eventually fall apart.
- Ignoring private utilities. The 811 service does not mark irrigation systems, low-voltage landscape wiring, or your neighbor's private lines. Know what you have buried.
Optional upgrades: raised patios, fire pits, and retaining walls
Once you are comfortable with the basic paver or concrete slab process, there are natural ways to take the project further. A raised patio, meaning a patio elevated above the surrounding grade, requires retaining walls to hold back the fill and base material. The walls need to be structurally sound with proper drainage behind them to prevent hydrostatic pressure from pushing them out. This is a real step up in complexity but very achievable as a second project once you have the base skills down.
Adding a fire pit to your finished patio is one of the most popular upgrades, and it is largely a separate project you can tackle after the patio is complete. Built-in fire pits typically involve a simple ring of block or stone set on a gravel base within or adjacent to your patio area. Make sure to check local fire codes before building, especially if your municipality has burn ordinances.
If your yard has significant slope, you may need a retaining wall as part of the patio project itself, not just as an upgrade. A retaining wall creates a level platform in a sloped yard and, when done correctly with drainage stone and a perforated drain pipe behind it, manages water that would otherwise undermine your base. Edge restraints and proper drainage that you practiced on your basic patio build are the same principles that apply at larger scale here.
If you are turning a heavily sloped or fully unpaved backyard into a usable patio space, thinking through the grading and wall approach before you start excavating will save you significant rework. If you are starting from a plain yard, this guide walks you through how to turn backyard into patio with proper layout, base prep, and drainage.
FAQ
How much extra area should I plan beyond my intended patio size?
Plan for at least an extra 6 to 12 inches around the footprint for string-line accuracy and for cutting materials, and allow room at the edges for full-depth restraints. If you are building a path to a door or gate, include that link in your measurements so the slope and drainage stay consistent across the full route.
What if my yard is not level, can I still build a paver patio without major regrading?
Yes, but you cannot “fake” drainage. You still need the 1/4 inch per foot slope, which may require removing more soil on the low side, adding base on the high side, or using a retaining wall if the grade change is large. If you see soft, loamy soil, plan on deeper excavation or geotextile to prevent the base from sinking later.
Do I need geotextile fabric under the gravel base?
Only in certain conditions, but it is a good idea when your subgrade is loamy, you suspect organic material, or your soil has a high chance of mixing with the base over time. Geotextile helps separate the base from native soil, reducing settlement and rutting, especially on patios built in areas with recurring moisture.
Can I install pavers directly over existing concrete or old paver slabs?
Usually no, unless you remove the old material and rebuild to the correct depth. Old slabs can create uneven support, trapped moisture, and hard-to-correct drainage. If you must work over something existing, the safer approach is to check whether you can still achieve the full base depth and the required slope.
How do I choose the right slope direction for drainage?
Slope away from the house, or toward a preplanned drainage outlet where water can safely go. If the patio will drain toward a lawn, consider how runoff will behave in heavy rain so you do not end up eroding soil or creating standing water near landscaping.
What drainage problem should I watch for during construction?
Look for low spots and soft areas after compacting the gravel base, and recheck the slope before you place bedding sand. If the base is uneven, the patio surface will mirror that, and later fixes typically mean lifting pavers, re-grading sand and base, and re-laying restraints.
What thickness should my patio base be if I want it to handle heavier loads?
The common pedestrian base depth (about 4 to 6 inches of compacted gravel) assumes light foot traffic. If you expect heavier loads like frequent rolling carts, plan for a thicker, well-compacted base and confirm local requirements, since underbuilding can lead to rocking pavers and joint failure.
How do I cut pavers accurately without damaging the edges?
Mark lines on the top face, support the piece fully while cutting, and cut from the face side so you reduce edge chipping. Also, dry-fit a few rows early so your cuts stay smaller and your layout looks intentional rather than leaving a narrow strip at one end.
How wet can the site be before I lay pavers?
Avoid starting if the subgrade or base is saturated. Wet soil prevents proper compaction, and once you compact, trapped moisture can still cause movement as it dries. If rain hits after you placed base but before you lay sand and pavers, let everything dry and then recheck levels and slope.
What is the best way to handle plants, sprinkler heads, or existing utilities in the patio area?
Treat them as a layout constraint before you excavate. Adjust your footprint or raise the patio with a small local build-up so sprinkler heads do not end up under the wrong joint lines, and call out any private lines you must reroute. Once you excavate, moving utilities is slow and expensive.
Should I use polymeric sand everywhere, or only in certain sections?
Polymeric sand is best on normal, dry paver installations where joints stay accessible for re-sweeping and where you can control rain exposure during curing. For areas that will get frequent heavy rainfall splashback or where joints will be disturbed (like along a gate swing), consider whether standard joint sand or a different jointing approach is more practical.
What if it rains right after I install polymeric sand?
Stop and protect the surface if you can, but if rain occurs before the binder cures, plan on re-sweeping. In some cases you will need to remove and replace the joint sand in the affected areas, because washed-out binder can leave haze, sticky residue, or weak joints.
How soon can I walk on the patio after finishing?
If you used pavers with polymeric sand, avoid aggressive sweeping and heavy loads until the joints have cured per weather conditions. If you used standard sand joints, you still should refrain from disturbing joints for the first day or two so edges and pavers settle properly.
When is sealing actually worth it for pavers or concrete?
Sealing is most worth it if you want easier cleaning, stain resistance, or you are trying to preserve color. It is not required for long-term function, and it does not fix construction problems like poor slope or weak base prep. If drainage is wrong, sealing will not prevent pooling.
How do I troubleshoot pooling after installation?
First, verify that water drains away from the house by using a long level and checking slope at multiple points. If pooling exists, the likely cause is a settled base or uneven sand bed, so you may need to lift pavers, re-grade, and reset. If pooling occurs only near the edges, check whether restraints and jointing allowed slight movement.
Is a DIY patio suitable if I’m concerned about permits or property-line setbacks?
Yes, but you should treat permits as a planning step, not an afterthought. Even for a weekend build, setbacks can force you to shrink the footprint or change the patio height, which affects excavation depth and slope. If your patio is attached, covered, or elevated, expect extra review and planning around roof water runoff.