You can absolutely build a patio on top of a retaining wall, but it requires treating the two structures as one integrated system rather than two separate projects. The wall has to handle lateral earth pressure from the soil behind it, and adding a patio on top changes the load, the drainage path, and the long-term stability if you get any of it wrong. Get the drainage right, build a proper compacted base, and detail the patio edge carefully where it meets the wall top, and you'll end up with a level outdoor space that lasts for decades.
Retaining Wall With Patio on Top: DIY Build Guide

Nolan Carver
1 Jun 2026
Why a Patio on a Retaining Wall Is a Different Animal
A standard ground-level patio only has to deal with surface water and frost heave. A patio that sits on or directly behind a retaining wall has a third problem: water that soaks into the ground above and behind the wall has nowhere to go unless you build a deliberate escape route. When that water gets trapped, it creates hydrostatic pressure against the back of the wall. Saturated soil weighs significantly more than dry soil and pushes harder against the wall face. That pressure is one of the leading causes of retaining wall failure, and adding an impermeable patio surface on top can make it dramatically worse if the drainage isn't thoughtfully designed.
The other big difference is structural support. A retaining wall top is not automatically a flat, stable platform ready to hold a patio. Block walls can be slightly uneven, the top course may not be perfectly level, and if you're building a concrete slab rather than pavers, you need to think carefully about how that slab bears on the wall versus on compacted soil. Getting this wrong causes cracking, settlement, and eventually a patio that tilts toward (or away from) the wall edge.
- Water pressure buildup behind the wall (hydrostatic pressure) is the number one structural risk
- A patio surface can block natural drainage paths that the wall depends on
- The top of a block or stone wall may need leveling before any patio surface goes on
- Frost heave is amplified when water is trapped near the wall and can displace both the wall and the patio
- Surcharge load from the patio and foot traffic adds force to the back of the wall that the original design may not account for
None of these risks make the project impossible. They just mean you need a plan for each one before you start digging.
Site Assessment: What to Check Before You Touch a Shovel
Walk the site and gather real information. Guessing at any of these items will cost you later.
Grade and Slope
Measure the slope of the ground behind and above the wall. A steeper uphill slope means more water and soil pressure funneling toward the wall. Also measure the drop in front of the wall (the exposed wall height). Under the International Residential Code, retaining walls taller than 48 inches measured from the bottom of the footing to the top of the wall require a permit and a design from a licensed engineer. If your wall is close to or over that threshold, check with your local building department before proceeding.
Soil Type
Clay soil drains poorly and retains water, which dramatically increases the pressure on a retaining wall. Sandy or gravelly soil drains quickly and puts far less pressure on the wall. If you're dealing with clay, your drainage system needs to be especially robust. Do a simple jar test: put a handful of soil in a jar with water, shake it, and let it settle overnight. Heavy clay will form a thick, murky top layer; sandy soil settles fast and clear.
Frost Depth
Find the frost depth for your region (your local building department or a quick search for 'frost depth map [your state]' will get you there). Your wall footing should already be below frost depth. If it isn't, that's a red flag about the existing wall's construction. Your patio base also needs to account for frost, particularly how water moves through the base layers during freeze-thaw cycles.
Existing Wall Condition
Inspect the wall carefully before you build anything on top of it. Look for bowing, leaning, cracked blocks or mortar, missing or clogged drainage, and any signs of settlement or movement. A wall that's already showing distress cannot safely support additional load from a patio. Fix the wall first, or get a structural assessment.
Site Assessment Checklist
- Measure exposed wall height from grade to top of wall
- Measure total wall height from footing bottom to wall top (or estimate if footing is buried)
- Note the slope direction and steepness of the area draining toward the wall
- Identify soil type (clay, loam, sand, or gravel) in the retained area
- Look up frost depth for your zip code
- Inspect the wall face for bowing, cracking, staining, or efflorescence (white salt deposits that signal water movement through the wall)
- Locate any existing drainage outlets, weep holes, or drain pipes
- Call 811 (in the US) to mark underground utilities before any excavation
- Check local permit requirements for your wall height and patio project
Drainage and Water Management: Plan This First, Not Last
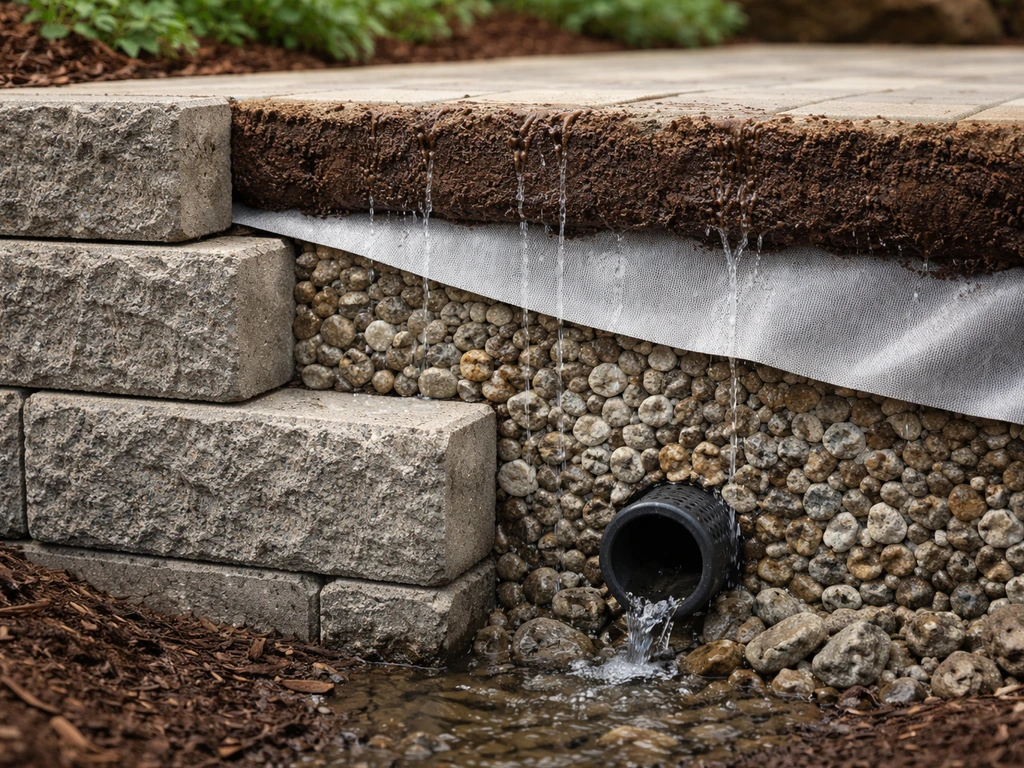
Drainage is not an afterthought here. It's the foundation of the whole project. Inadequate drainage saturates the retained soil, elevates lateral earth pressure on the wall, and can lead to complete wall failure. blank" rel="noopener noreferrer">Weep holes alone are not enough, and this is a mistake a lot of DIYers make. A full drainage system behind a retaining wall consists of three components working together: free-draining backfill, a perforated drain pipe, and a geotextile filter fabric separating the drainage gravel from the native soil.
The Three-Layer Drainage System
- Non-woven geotextile filter fabric: Line the area between native soil and your drainage gravel with this fabric. It lets water through but keeps soil particles from migrating into the gravel and clogging it over time. Without it, fine particles eventually fill the voids in your drainage stone and the whole system stops working.
- Clean drainage aggregate: Use 3/4-inch clean crushed stone (sometimes called 'clean' or 'washed' gravel with minimal fines) as the drainage layer directly behind the wall. This is your free-draining backfill. Avoid compactable gravel here; you want water to flow through it freely.
- Perforated drain pipe (subdrain): Lay a 4-inch perforated pipe, wrapped in its own filter fabric sock, at the base of the wall in the drainage gravel layer. This pipe collects water and routes it to a daylight outlet — a spot where the pipe exits the slope and water can discharge freely. This pipe must actually go somewhere. It can't just terminate in the gravel.
Weep holes, if your wall has them, provide supplemental drainage through the wall face. For segmental retaining walls (the interlocking concrete block type most homeowners build), the internal drainage system described above is the primary approach. Weep holes every 4 to 6 feet can help, but they're backup, not the main event.
Surface Drainage on the Patio
Your finished patio surface must slope away from any structures and, critically, away from the back of the retaining wall. A minimum slope of 1/8 inch per foot (about 1 percent) is the practical minimum, but 1/4 inch per foot is more reliable. If the patio surface slopes toward the wall, every rainstorm dumps water directly against the wall, which defeats your entire drainage system. Plan your finished grades before you start and check them constantly during installation.
If topography forces water toward the wall even with a paved surface, install a channel drain (also called a trench drain or linear drain) across the patio near the high side or along the edge where the patio meets the slope. Connect it to the same outlet as your subdrain pipe.
Patio Design Options on Top of a Retaining Wall
You have two main choices for the patio surface: concrete pavers or a poured concrete slab. Each interacts with the retaining wall differently, and neither is universally better. Your wall height, wall type, budget, and skill level all factor in.
| Factor | Pavers | Poured Concrete Slab |
|---|---|---|
| Drainage | Excellent — water drains through joints | Relies entirely on surface slope; no permeability |
| Settlement tolerance | High — individual pavers can be releveled | Low — cracks if base settles unevenly |
| DIY difficulty | Moderate — labor intensive but forgiving | High — requires formwork, mixing, and timing |
| Cost (materials) | Moderate to high ($4–$12/sq ft) | Lower ($3–$7/sq ft for basic slab) |
| Edge detail at wall top | Pavers can cantilever slightly or be cut flush | Slab must bear on wall or separate footing |
| Repair | Easy — lift and relay individual pieces | Difficult — crack repair is visible |
| Freeze-thaw performance | Good with proper base | Vulnerable if drainage is poor |
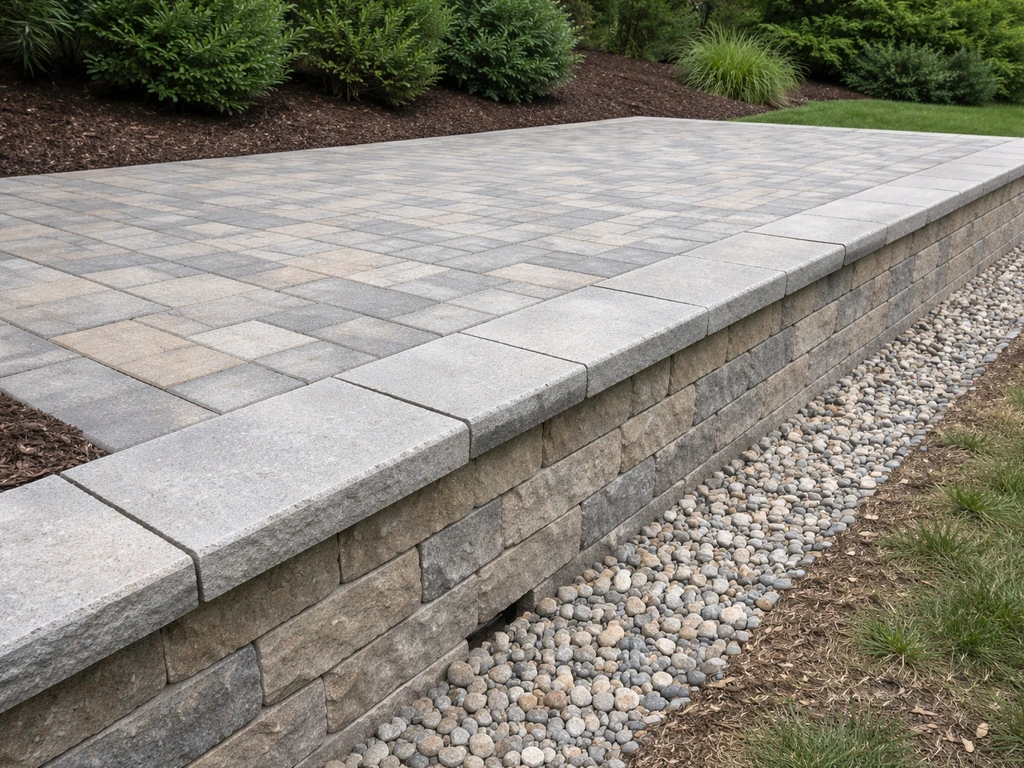
For most DIYers, pavers are the better choice on top of or adjacent to a retaining wall. The drainage benefit alone is worth it. Water that hits a paver surface can infiltrate through the joints into the base, reducing runoff toward the wall. If a section settles, you lift the pavers, add or remove sand, and relay them. No special tools, no professional help needed.
Coping and Cap Details
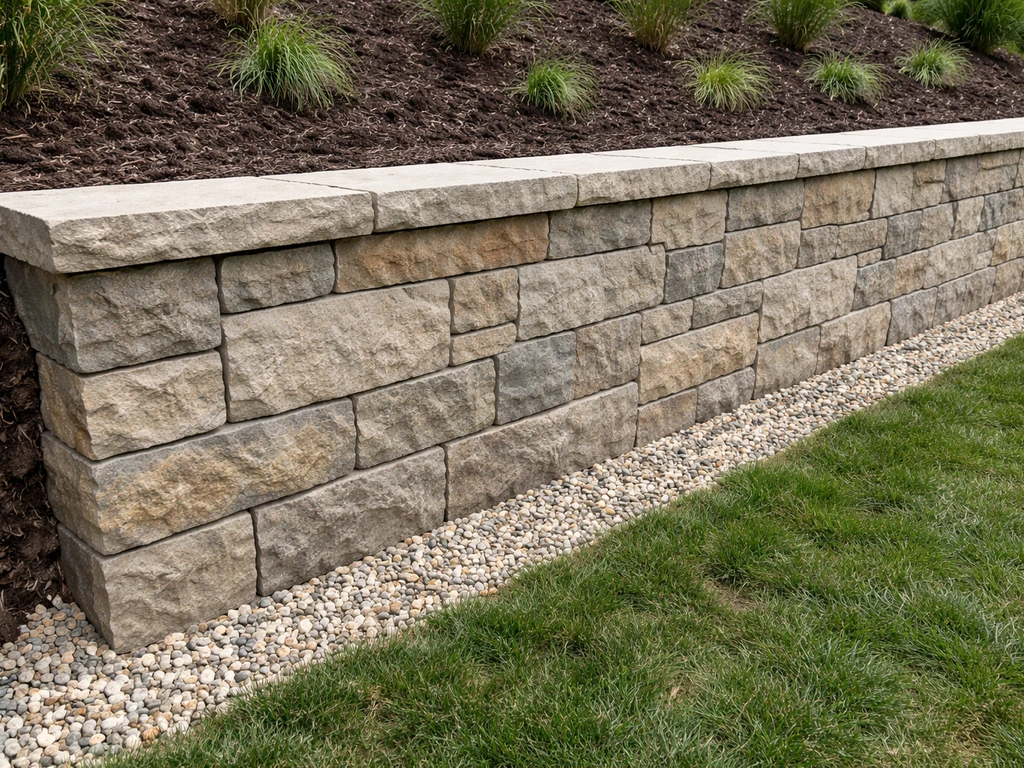
The top course of your retaining wall needs coping or cap blocks. These do two things: they give you a clean, finished edge for the patio to meet, and they protect the top of the wall from water infiltrating down through the block joints. Cap blocks are typically mortared or adhesively bonded to the top course. Make sure they're level before you start the patio base on top. If the wall top isn't level, shim the cap blocks with mortar to establish a level reference point. This is the foundation for everything that follows.
If you're building a concrete slab, the slab should not rest entirely on the wall top. A slab that spans from the wall to backfill soil is essentially a beam with two different support conditions, and the soil side will settle more than the wall side, causing cracking. Either extend the slab's footing below frost depth and use the wall as a form edge only, or design an expansion joint between the slab and the wall so they can move independently. For most residential patios, keeping the patio surface as a paver system avoids this problem entirely.
Base Construction and Leveling Over the Wall
The patio base is what keeps your surface from sinking, shifting, or cracking over time. Skipping or rushing base prep is the single most common cause of paver failure. On a retaining wall project, you're dealing with a base that sits partly on compacted backfill and partly (at the edge) on the wall cap. Once the wall top is stable, you can plan and build a patio wall bench on top using the same base, leveling, and drainage principles On a retaining wall project. These two zones compact and settle differently, so your base prep needs to account for that.
Base Layer Thickness

For a residential pedestrian patio, use a compacted dense-graded aggregate base that is 4 to 6 inches deep after compaction. This is the standard for a paver patio with foot traffic. Above that goes a 1-inch layer of coarse bedding sand (not stone dust, not polymeric sand, plain coarse sand), and then your pavers on top. Your total excavation depth is paver thickness plus 1 inch of sand plus 4 to 6 inches of base, typically 7 to 10 inches total depending on your paver thickness.
Compaction
Compact your base in lifts no thicker than 4 to 6 inches at a time using a plate compactor. For most residential paver work, a plate compactor with at least 7,000 lbf centrifugal force is recommended. Renting one costs around $80 to $120 per day and is non-negotiable for a quality result. Compact in multiple passes, working the plate compactor in overlapping rows. Check your level frequently as you compact, the goal is a consistent surface with the correct slope built in.
Leveling at the Wall Edge
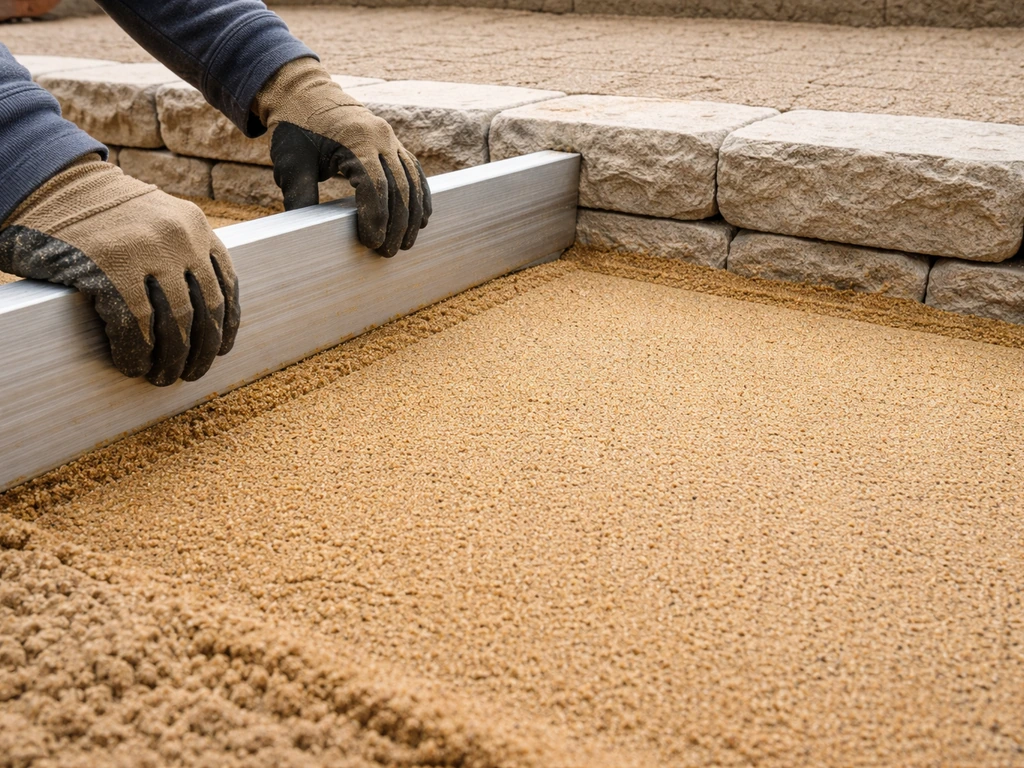
The trickiest part is where the patio base meets the wall cap. You want your finished paver surface to sit flush with or just slightly above the wall cap. Too high and you have a tripping hazard; too low and water pools at the wall edge. Set your string lines from the house or structure on one end to the wall cap on the other, accounting for your drainage slope, before you place any base material. Adjust the base thickness at the wall edge to hit your target grade.
Step-by-Step Construction
Step 1: Mark, Call 811, and Excavate
Mark the patio perimeter with spray paint or stakes and string. Call 811 at least three business days before digging so utilities can be marked. Excavate to your target depth (paver thickness + 1 inch sand + 4 to 6 inches base). Keep excavation walls clean and vertical. If you're excavating adjacent to the wall, don't undercut the wall footing. Stay at least 12 inches back from the wall base when removing soil near the footing zone.
Step 2: Install the Drainage System (If Not Already In Place)
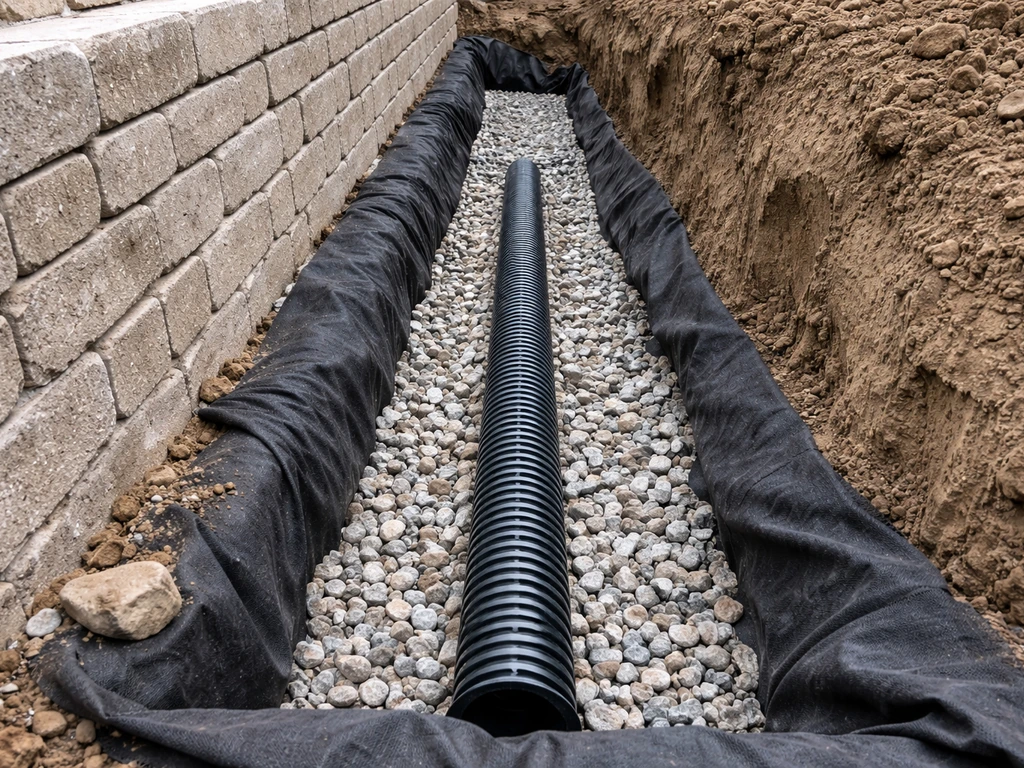
If you're building both the wall and patio from scratch, this is the moment to install your drainage system. Lay your geotextile fabric in the trench behind the wall, place your perforated drain pipe at the base of the wall (wrapped in filter sock, perforations down), and backfill with clean 3/4-inch drainage aggregate to within 12 inches of finished grade. For a complete guide on how to build a patio wall with wood, follow the same drainage-first approach and plan the wall details and supports before you add the patio surface. Fold the top of the geotextile fabric over the stone before placing any fill above. Run the drain pipe to a daylight outlet. If you're working with an existing wall, inspect whether drainage is already in place. If there are no visible outlets or weep holes, consider excavating along the wall base to retrofit a drain pipe before continuing.
Step 3: Backfill and Compact the Upper Zone
Above the drainage stone layer, backfill with compactable aggregate (road base or dense-graded aggregate) in 4 to 6 inch lifts, compacting each lift thoroughly. This is your patio subbase. Don't use native clay soil as backfill directly behind the wall, it retains water and increases wall pressure. Keep using compactable gravel up to within about 6 to 7 inches of your finished patio grade (leaving room for your base and sand layers).
Step 4: Install and Compact the Patio Base
Spread your dense-graded aggregate (often called road base, Class II base, or crusher run depending on your region) to a depth that compacts down to 4 to 6 inches. Compact in multiple passes, checking level and slope constantly. Use a long straightedge or screed board to confirm a consistent surface. The goal is a firm, unyielding base that doesn't shift when you press on it.
Step 5: Screed the Bedding Sand
Lay 1 inch of coarse bedding sand over the compacted base. Use 1-inch diameter screed pipes (conduit works well) laid parallel across the base to gauge your sand depth. Pull a screed board across them to level the sand. Don't compact the sand, it needs to be loose at this stage so the pavers can be bedded into it. Don't walk on screeded sand you plan to use; use a kneeling board to avoid disrupting the surface.
Step 6: Lay the Pavers

Start from a corner or a straight edge (often the house wall or a chalk line) and work outward. Lay pavers in your chosen pattern, keeping joints tight and consistent (typically 1/16 to 1/8 inch). Use a rubber mallet to seat each paver into the sand. Check your level and slope frequently with a 4-foot level. At the wall edge, cut pavers to fit using a wet saw or angle grinder with a diamond blade. The cut edge should land within a half inch of the wall cap face for a clean look.
Step 7: Edge Restraint, Compaction, and Jointing
Install plastic or aluminum edge restraints along all open patio edges (not the wall edge, the wall acts as your restraint there). Spike the restraints into the base every 12 inches. Run the plate compactor over the finished pavers with a rubber pad or paver protection pad attached to avoid surface scratching. This final compaction seats the pavers into the sand and locks the surface. Sweep polymeric sand into the joints, compact again lightly, and repeat until joints are filled to within 1/8 inch of the paver surface. Mist with water per the product directions to activate the binder.
Common Mistakes, Troubleshooting, and When to Get Help
Mistakes to Avoid
- Skipping the drainage layer and relying on weep holes alone: Weep holes provide supplemental drainage, not primary drainage. Without a gravel drainage layer and drain pipe, water pressure builds behind the wall regardless of weep holes.
- Using the wrong backfill material: Native clay soil behind a retaining wall acts like a sponge. Always use free-draining granular material in the zone directly behind the wall.
- Not separating drainage stone from native soil with geotextile fabric: Over time, fine soil particles migrate into the gravel, clogging it. Geotextile filter fabric prevents this.
- Sloping the patio surface toward the wall: Every bit of surface water on the patio should drain away from the wall, not toward it.
- Undercutting the wall footing during excavation: Removing soil from beneath the footing zone can destabilize the wall immediately. Stay clear of the footing.
- Compacting base in one thick lift: You won't get proper compaction through more than 6 inches of material in a single pass. Always compact in lifts.
- Using stone dust instead of coarse sand for bedding: Stone dust becomes hard and doesn't allow the pavers to seat properly. Use coarse, washed concrete sand.
- Building on a wall that's already failing: Cracks, bowing, or visible leaning are serious warning signs. Adding a patio to a compromised wall makes the problem worse, not better.
Troubleshooting Problems During Construction
- Pavers won't stay level near the wall edge: The wall cap may not be perfectly level. Re-check the cap with a level and adjust the bedding sand thickness in that zone to compensate.
- Water pooling on the finished patio surface: Your slope is insufficient or the surface is dipping in spots. Lift the low pavers, add bedding sand, and relay.
- Base feels soft or spongy after compaction: You likely have clay or organic material in the subgrade. Excavate deeper and replace with compactable gravel, or add a layer of geotextile under the base to stabilize it.
- Wall cap blocks are loose or uneven: Re-mortar or re-adhere them with landscape block adhesive before proceeding. Don't build a patio base over an insecure cap course.
- Drain pipe outlet not draining: Check for crushed pipe, a clogged filter sock, or a pipe that doesn't actually reach daylight. The outlet must be lower than the pipe inlet and open to air.
When to Call a Pro
Some situations call for professional help, and recognizing them early saves you from expensive failures. Get a structural engineer or licensed contractor involved if your wall is over 48 inches tall (measured footing to top), if the wall is already showing signs of movement or distress, if you have a steep uphill slope behind the wall with clay soil and no existing drainage, or if you're planning a heavy concrete slab rather than pavers. A one-time consultation with a structural engineer typically costs $300 to $600 and can tell you definitively whether your wall can handle the additional load. That's cheap compared to rebuilding a collapsed wall.
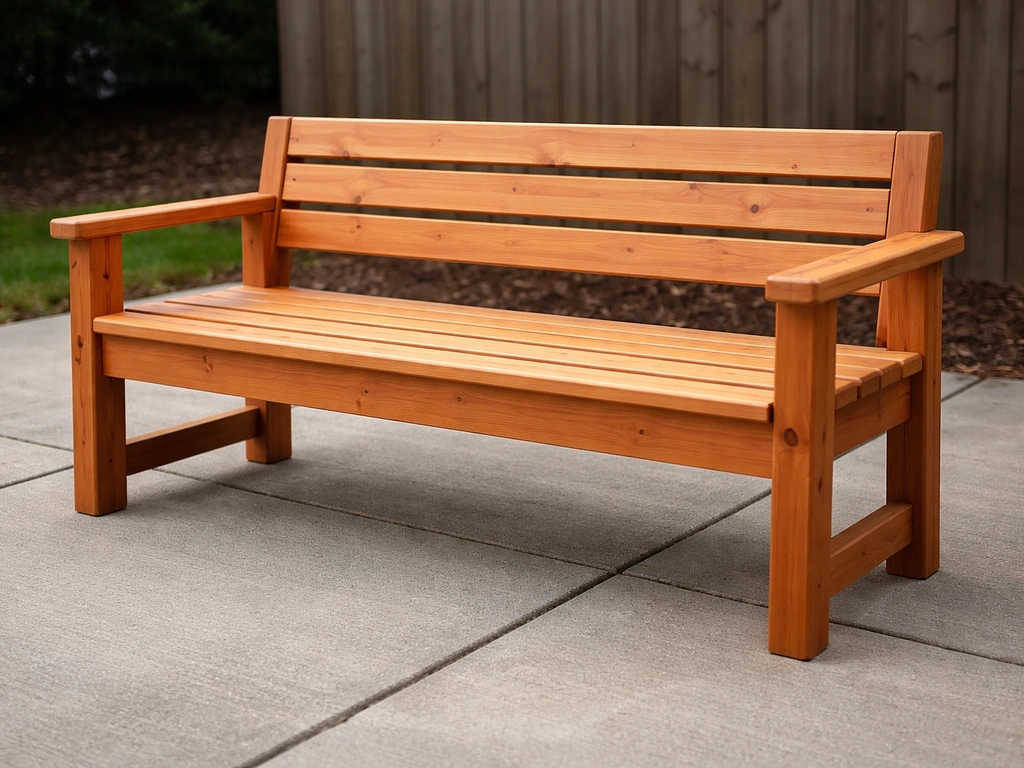
If you're starting from scratch and need to build the retaining wall itself before adding the patio, tackling those two projects in sequence (wall first, drainage verified, then patio) is the right order. If you want the short answer on how to build a small retaining wall for a patio, focus on proper drainage, compacted backfill, and a stable cap for the patio surface to meet how to build a small retaining wall for patio. The patio design decisions covered here connect directly with the specifics of building a patio retaining wall and the considerations for smaller-scale walls where the patio sits at grade adjacent to the wall rather than on top of it. If you want a practical approach to a seat that matches the patio, use these same base and drainage principles when you build a patio bench building a patio retaining wall.
Your Next Steps Right Now
- Walk the site and complete the assessment checklist above before buying anything
- Measure your wall height and check your local permit requirements
- Determine whether existing drainage is in place and functional (look for outlets, weep holes, and signs of water damage or staining on the wall face)
- Decide on pavers vs. slab based on the comparison table — pavers are the safer DIY choice for most situations
- Calculate your material quantities: square footage of patio times base depth (in feet) for aggregate volume, plus 1 inch sand, plus paver count
- Rent or borrow a plate compactor — don't try to compact by hand
- Call 811 before you dig, every time
FAQ
Can I just pour a concrete slab directly on top of the retaining wall cap and backfill?
Use the wall cap and the patio base as two separate load paths. Plan for the patio surface to be slightly supported by the wall cap, but not to rely on the retaining wall blocks as the only bearing layer, because the backfill side will settle differently than the wall top. The article already explains the slab pitfall, for pavers the practical check is to keep the edge paver height matched to the cap face and build the base so it is fully compacted across both zones before you start laying pavers.
What drainage setup is required if rainwater naturally runs toward the back of the wall?
If you have a terrace-like patio on top, you usually need a drainage “escape route” to an outlet, not just weep holes. A simple decision aid is this: if water can reach the wall face during heavy rain, you should assume it will, so design a subdrain outlet (daylight or sump) and connect your trench/linear drain to that same outlet when topography funnels flow toward the wall. Also confirm you are using free-draining backfill behind the wall, since saturated clay dramatically increases lateral pressure.
How do I know whether an existing retaining wall already has enough drainage for a patio on top?
Before starting, do a distress scan and a water scan. Look for any active weeping, damp soil above the wall line, leaning, bowing, or cracked mortar, then check whether existing weep holes or outlets actually discharge during or after a hose test. If you cannot find discharge paths, treat it as a non-working drainage condition and plan to retrofit a drain pipe along the wall base before building the patio load on top.
Can I substitute stone dust or polymeric sand in the paver base layers to save time?
A common mistake is using polymeric sand or stone dust when you actually need coarse bedding sand for the base-to-paver interface. The coarse bedding sand layer is meant to be un-compacted and to let pavers seat uniformly, while polymeric sand should only be for joint filling after the final paver compaction. If you skip the correct bedding sand, you can end up with pavers that rock or shift after freeze-thaw.
What should I do if the patio edge over the wall cap is settling more than the rest of the base?
Slight movement is normal in patios, the issue is uneven movement. Your “decision check” is to test base firmness and grade continuity before laying pavers: walk the base wearing flat shoes, it should feel uniformly firm with no soft spots, and your slope should stay consistent with the 1/8 inch per foot target or steeper. If you see humps or dips near the wall cap, adjust base thickness at the edge before placing sand, because you cannot reliably fix grade after pavers are set.
Why does my base feel solid in the field, yet the patio joints open near the wall edge later?
A plate compactor helps, but you still need to control lift thickness and prevent bridging at the wall edge. If you compact too thick per lift or leave voids behind the cap, you can create localized settlement that shows up as joint opening or a visible slope change. The edge zone that transitions between wall-supported and soil-supported areas is the most sensitive, so compact in thinner controlled lifts and recheck level and slope frequently as you approach the wall cap.
How high should the patio surface be where it meets the wall cap to avoid future pooling?
Height “that looks right” right after installation can still become wrong after freeze-thaw, especially if water pools at the interface. Use a simple target approach: aim for the finished paver surface to be flush to just slightly above the wall cap face, then verify that the top surface slope is away from the backfill side. If you expect occasional standing water, increase the patio slope toward outlets rather than raising the edge higher, because excessive height can trap water against the interface.
Do I need to change the patio base thickness or materials because I get frequent freeze-thaw?
If your region has deep freeze or frequent freeze-thaw, treat the base and subbase as a system, not a single thickness. Confirm the footing is below frost depth (or that the existing wall meets that requirement), then ensure the patio base drains and uses granular layers that do not hold water like clay. A practical next step is to avoid fine, water-holding backfill near the interface and keep the drainage path continuous to an outlet, since trapped moisture is what drives frost-related heaving.
Can I build a patio bench on top of the retaining wall after the pavers are installed?
Yes, but only if the wall top is already stable and level and you can maintain the correct drainage escape route. Pavers can accommodate minor movement because you can lift and reset, but adding a built-in bench can still concentrate loads at specific points, especially if you place posts or solid framing members. Build the bench using the same compacted base and drainage-first principles, and keep any water-sensitive connections away from direct contact with the wall cap and joint areas.
What’s the most common mistake with polymeric sand joints on a patio near a retaining wall?
Polymeric sand jointing needs weather and moisture control. Do not activate it when rain is imminent or when the surface is still wet, and follow the misting guidance precisely so the binder cures properly. If you compacted correctly and swept out fine debris, joints should lock up, but if curing is interrupted, joints can wash out and allow paver migration.