Building a patio retaining wall comes down to four things done right: a solid compacted base, at least 12 inches of free-draining gravel behind the wall, proper drainage out and away from the structure, and courses stacked with a slight backward lean. NCMA best practices emphasize SRW installation essentials like water management and proper use of geotextile and drainage to help prevent settlement and water buildup behind the wall [water management and geotextile-backed drainage](https://cornerstonewallsolutions. com/wp-content/uploads/2016/08/NCMA-SRW-Best-Practices-2016-Final-3-31-16-8. 5x11.
How to Build a Patio Retaining Wall Step by Step

Nolan Carver
27 May 2026
pdf). Get those four things right and your wall will hold for decades. Skip any one of them and you'll be watching the wall bow or lean within a few seasons. This guide walks you through every step, from picking the right wall type to the finishing details that tie the wall into your patio surface.
Choosing the right wall type for your patio
Before you buy a single block or stone, you need to decide what the wall is actually doing. There are two very different jobs a patio retaining wall can have, and the build approach changes depending on which one applies to you.
A border wall sits at the edge of a flat or gently sloped patio, mostly for aesthetics and to prevent erosion at the patio edge. These are low-load walls, usually under 2 feet tall, and they're the most forgiving for beginners. A raised patio support wall is a true retaining wall: it's holding back a significant mass of soil so your patio can sit level on a slope. These walls carry real lateral pressure and need to be built with that in mind, especially when they're over 2 feet tall.
For material, you've got three main options: segmental retaining wall (SRW) blocks (the interlocking concrete blocks from the home center), dry-stacked natural stone, and mortared stone or brick. SRW blocks are the most beginner-friendly because they're engineered to stack and interlock consistently. Dry-stacked natural stone looks beautiful but requires more skill to sort and fit stones properly. Mortared walls are the most permanent and structural but require masonry experience to do well.
Fine Homebuilding describes major retaining wall forms, including mortared walls filled with mortar and rubble, which aligns with this approach being structural and more demanding to build [Mortared walls are the most permanent and structural but require masonry experience to do well. ](https://www. finehomebuilding. com/pdf/MasonryComplete_Excerpt.
pdf). If this is your first build, SRW block or dry-stacked fieldstone in a border wall application is the right starting point.
| Wall Type | Best Use | Max DIY Height (no engineer) | Skill Level | Cost Range |
|---|---|---|---|---|
| SRW Block (no geogrid) | Raised patio support, border walls | Up to 4 ft | Beginner–Intermediate | $$ |
| SRW Block (with geogrid) | Taller raised patio support | Up to 6 ft (site-dependent) | Intermediate | $$$ |
| Dry-stack natural stone | Border walls, low raised patios | Up to 3–4 ft | Intermediate | $$–$$$ |
| Mortared stone or brick | Decorative walls, veneer over block core | Up to 4 ft | Advanced | $$$–$$$$ |
| Gabion baskets | Rustic look, good drainage, slopes | Up to ~6 ft | Intermediate | $$ |
One more thing to nail down before planning: permit requirements. Many jurisdictions require a permit for walls over 3 to 4 feet tall. For example, Oakland, CA doesn't require a permit for walls under 4 feet (measured from the bottom of the footing to the top of the wall), Montgomery County, MD sets the threshold at 3 feet of retained height, and Fairfax County, VA also triggers permits at more than 3 feet of retained earth. Check with your local building department before you dig. Walls supporting a surcharge (like a patio, deck, or driveway above) often have lower thresholds or always require a permit regardless of height.
Planning and measurements: layout, slope, height limits, and wall length
Measure your slope before anything else. Drive two stakes at the top and bottom of where the wall will run, tie a string level between them, and measure from the string down to the ground at the low end. That number is your retained height, and it's the single most important measurement in your entire project.
For unreinforced gravity walls (including most SRW block walls without geogrid), the practical DIY limit is around 3 to 4 feet of exposed face height. The actual structural limit depends on the block's depth front-to-back, its weight, the batter (backward lean) built into the units, and what kind of soil is behind it. A heavier unit with more depth will perform better at the same height than a lightweight decorative block.
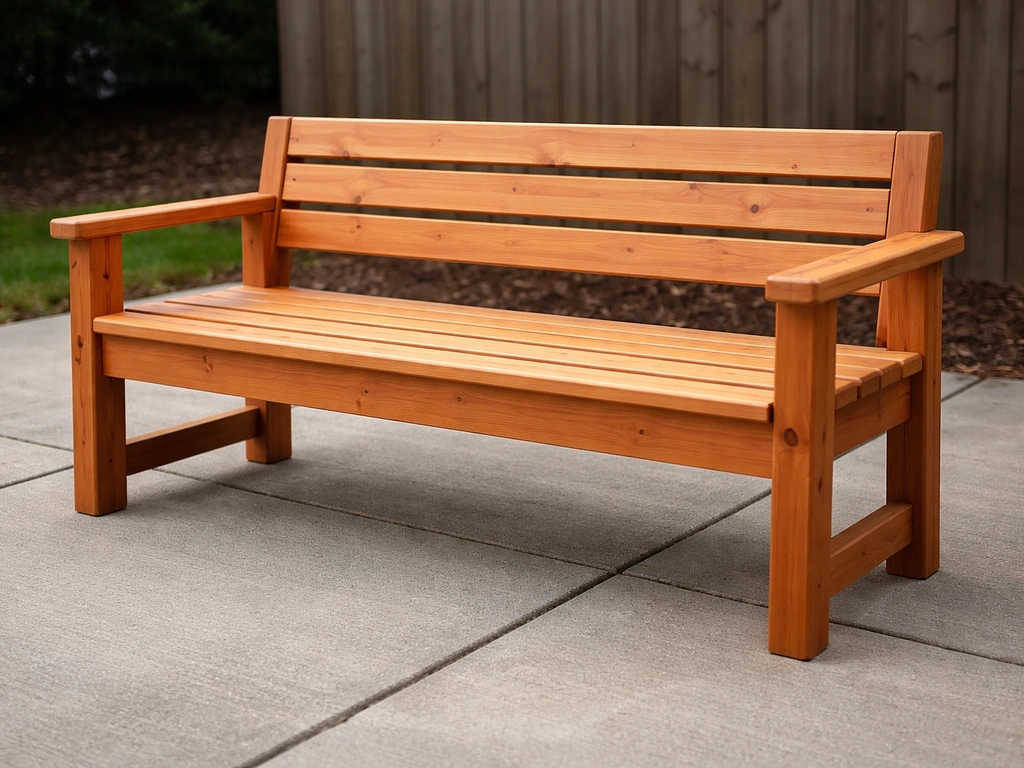
If your slope demands more than 4 feet of retention, either step the wall into two shorter tiers separated by a flat bench, or plan to add geogrid reinforcement and potentially consult an engineer. For an easy upgrade, you can combine your retaining wall with a built-in patio wall bench using the same solid base and drainage principles described here step the wall into two shorter tiers.
For wall length, measure along the face of the slope. Add at least 12 inches on each end beyond the patio edge to give the wall room to tie into the grade without abruptly terminating. Mark the wall footprint with spray paint or stakes and string. Check that the line is straight (or intentionally curved if you want a curved wall) and measure the diagonal corners to confirm you're square where it matters.
- Retained height = string level height at the low end of your slope; this drives all your design decisions
- Keep single unreinforced walls to 4 feet or less of exposed face height for safe DIY builds
- Step walls into two tiers if your slope exceeds 4 feet, with a flat planted bench at least as wide as the lower wall height
- Allow for at least 1 buried course below grade, so your excavation goes deeper than your visible wall height
- Mark your layout with spray paint or stakes and string before you dig a single shovelful
Materials and tools, especially for stone retaining walls
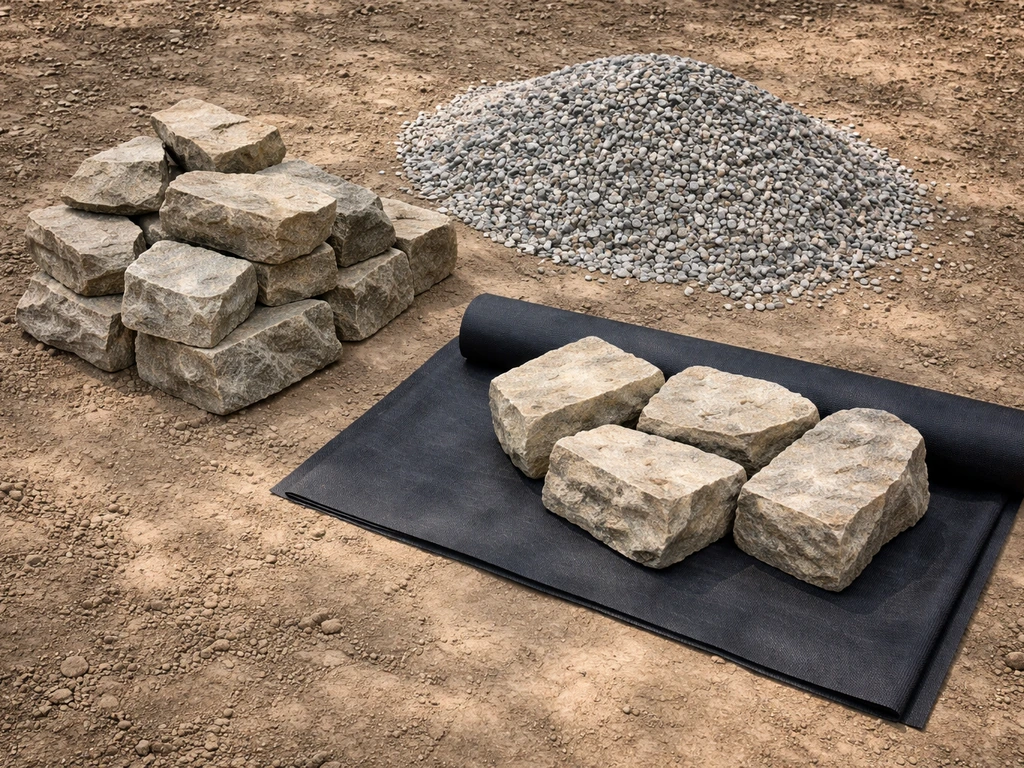
The materials list differs depending on whether you're building with SRW block or natural stone, but the drainage and base materials are the same for both. Here's what you'll need for a typical patio retaining wall up to 4 feet tall.
For SRW block walls
- Segmental retaining wall blocks (count by square footage of wall face, add 10% for cuts and waste)
- Cap blocks or coping units for the top course
- Crushed angular gravel (compactible) for the base: at least 6 inches deep under the footing trench
- Clean angular drainage gravel (not pea gravel) for the drainage zone behind the wall: minimum 12 inches wide for the full wall height
- Non-woven geotextile fabric to separate drainage gravel from native soil
- 4-inch perforated drain pipe (sock-wrapped) for the base drainage run
- Solid 4-inch drain pipe to daylight the outlet
- Geogrid reinforcement layers if wall exceeds 3 feet (follow manufacturer's specs for spacing)
- Construction adhesive for cap blocks
For natural stone walls
Natural stone walls use the same base and drainage setup but the stone selection matters a lot. You want angular stones, not rounded river rock, because flat-ish faces stack and interlock better. Fieldstone, quarried limestone, granite, or sandstone all work. Budget for roughly 1.5 tons of stone per 10 square feet of wall face for a typical dry-stack wall, because you'll have gaps and you'll reject pieces that don't fit. Bring in more than you think you need, as sorting through a pile to find the right fit stone is how dry-stack walls are actually built.
- Angular quarried or fieldstone (limestone, granite, sandstone): 1.5 tons per 10 sq ft of wall face
- "Tie stones" or "throughstones": long stones that span the full width of the wall for bonding strength, plan for at least one every 4–6 square feet of face
- Same base gravel, drainage gravel, geotextile, and drain pipe as SRW block walls
- Landscape fabric or geotextile to wrap the drainage pocket
- For mortared stone: Type S mortar (stronger than Type N, better for below-grade and structural applications)
Tools you'll need for either build
- Tape measure, line level, and builder's level (4-foot level minimum)
- Stakes and string or a laser level
- Plate compactor (rent one; don't try to compact base gravel with a hand tamper for anything over a few feet)
- Spade, pickaxe, and flat-bottom shovel for excavation
- Wheelbarrow for moving gravel and blocks
- Rubber mallet for seating blocks
- Cold chisel and hammer or angle grinder with diamond blade for cutting block or stone
- Caulk gun for construction adhesive on cap blocks
- Work gloves, safety glasses, and steel-toed boots
Site prep and excavation: base footprint, compaction, and geotextile
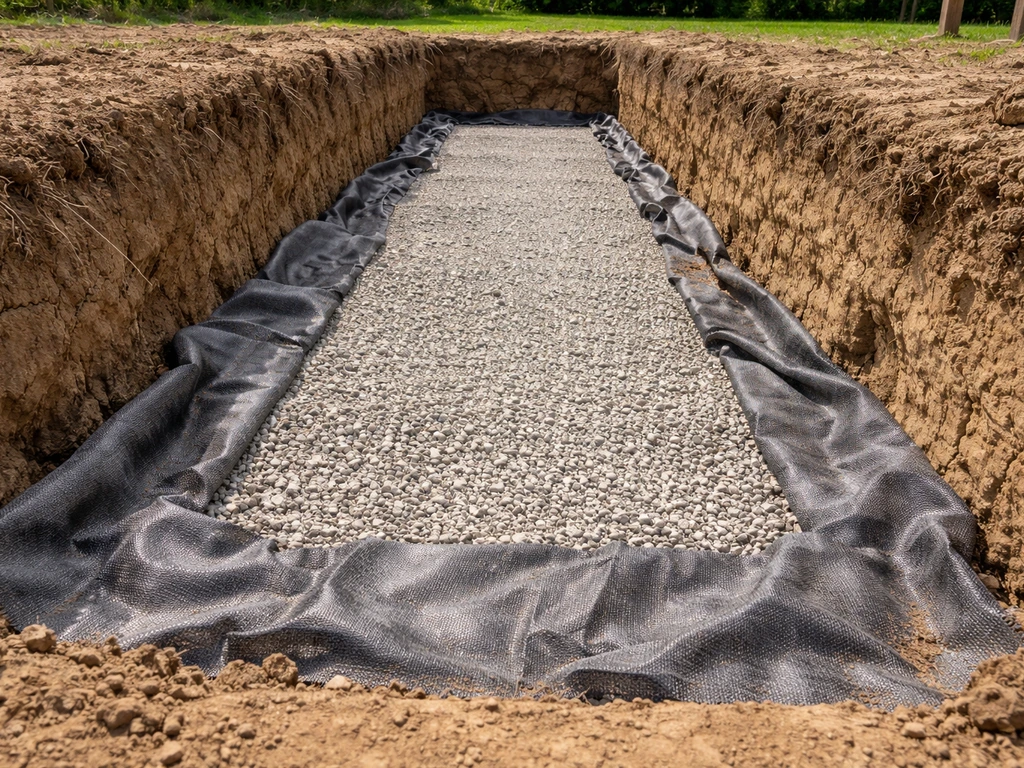
Good site prep is what separates walls that last 30 years from walls that lean after 3. This step is mostly invisible once the wall is built, but it does all the heavy lifting structurally.
Start by stripping all vegetation and organic topsoil from the wall footprint and the area directly behind it. Roots and organic material compress over time and cause settling. Your excavation needs to go down at least 6 inches below where the bottom of the first block will sit (for your gravel base), plus you'll bury the first course of block below finished grade for toe stability. As a general rule, bury about 1 inch of wall height per foot of exposed wall height, so a 3-foot visible wall means the first course starts about 3 inches below grade, though burying a full course (6 to 8 inches) is better practice and gives you more stability.
The trench should be as wide as the block depth plus your 12-inch drainage zone, plus room to work. For a standard 12-inch deep SRW block with a 12-inch drainage zone, you're excavating at least 24 inches back from the face of the wall at the base. Add a few more inches for working room. The bottom of the trench needs to be flat and firm.
Once you've excavated, compact the trench bottom with a plate compactor. The target is 95% of Standard Proctor density, which is the engineering benchmark for compacted soil and aggregate. In practice, this means multiple passes with the plate compactor until the soil stops sinking under it. Add your base gravel in 2 to 3 inch lifts, compacting each lift before adding the next, until you have at least 6 inches of compacted angular gravel as your leveling pad. This pad is what you'll set your first course on, and it needs to be dead flat and level.
Once the base is set and the first course is placed, lay your non-woven geotextile fabric up and over the back wall of the excavation. The fabric goes between the native soil and the drainage gravel you'll place behind the wall. It lets water pass through freely but keeps soil fines from migrating into and eventually clogging your drainage zone. This step is skipped by a lot of DIYers and it's a mistake: without it, silt moves into the gravel over years, reduces drainage capacity, and the water pressure behind the wall builds up.
Drainage and backfill behind the wall: the part DIYers most often get wrong
This is the most important section in this entire guide. Improper drainage is the leading cause of retaining wall failure, and it's the step most homebuilders either skip or underdo. Water trapped behind a retaining wall creates hydrostatic pressure that multiplies the force pushing on the wall, often to the point where the wall slides, tilts, or fails completely.
The drainage system has three components that all have to work together: a drainage gravel zone directly behind the wall, a perforated pipe at the base of that zone, and a discharge path that gets water away from the wall. Miss any one of them and the others can't do their job.
The drainage gravel zone
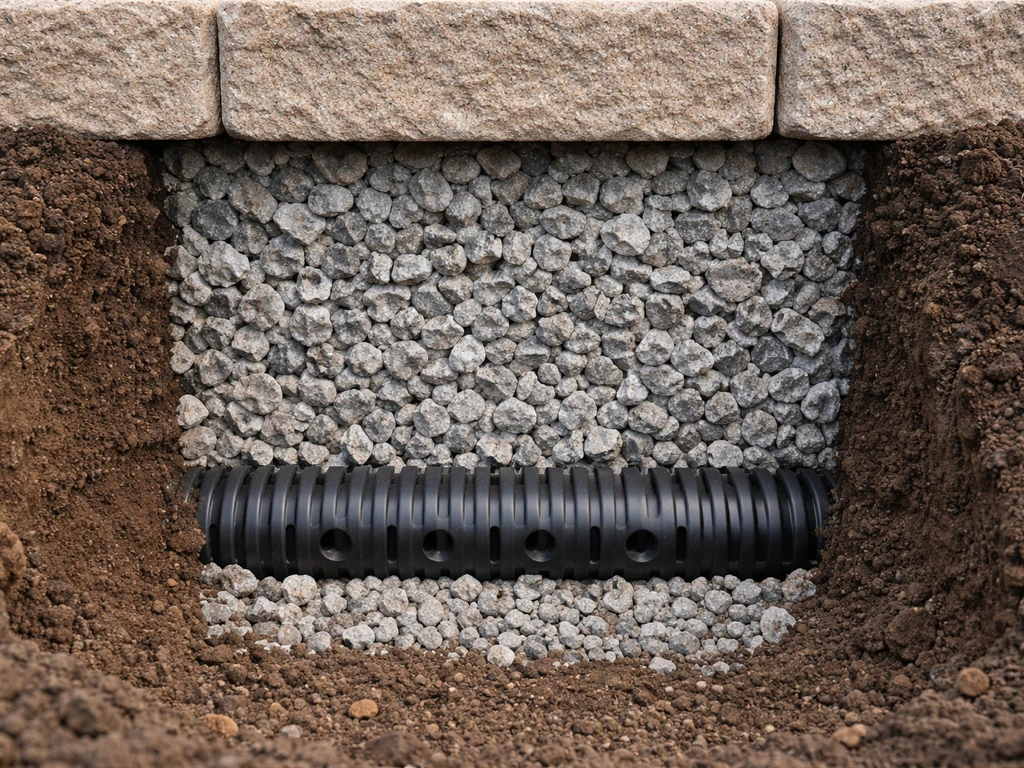
Place at least 12 inches of clean, angular, free-draining stone directly behind the wall units for the full height of the wall. This isn't pea gravel (which can migrate and settle), and it isn't the same soil you dug out of the trench. It's crushed angular gravel, typically a 3/4-inch clean crushed stone with little to no fines. This gravel zone is wrapped on the soil side with your non-woven geotextile fabric, which you draped into the excavation during site prep. Fold the fabric over the top of the drainage zone once it's filled.
The perforated drain pipe
At the base of the drainage gravel zone, at the same elevation as the base of the first course of blocks, lay a 4-inch perforated pipe with the perforations pointing down. The pipe should be pre-wrapped in a non-woven sock to keep fines out. The pipe needs to slope at roughly 1% grade (1 inch of drop per 8 feet of run) toward a daylight outlet, which is a point where the pipe exits into open air or a drainage swale away from your home's foundation. A pipe that ends in a closed low spot is useless: water needs somewhere to go. Connect the perforated pipe to a solid outlet pipe to carry water to the discharge point cleanly.
Backfill lifts behind the drainage zone
Once the drainage gravel zone is in place, backfill the area behind it with compacted soil in 6 to 8 inch loose lifts. Compact each lift before adding the next one. Never dump in a large mass of soil and compact it all at once; it won't compact uniformly and you'll get settling later. Keep your compactor at least 3 feet back from the wall face to avoid pushing the wall forward while the structure is still going up. Hand-tamp within 3 feet of the wall.
One more thing: if you're building a dry-stack stone wall, the gaps between stones act as weep holes naturally. But for SRW block walls and mortared walls, make sure water can actually reach the drain pipe. A drainage zone that's installed but can't connect to the pipe at the bottom is useless. The water path from behind the wall to the pipe outlet needs to be unobstructed.
Building the retaining wall: courses, stacking, alignment, and reinforcement
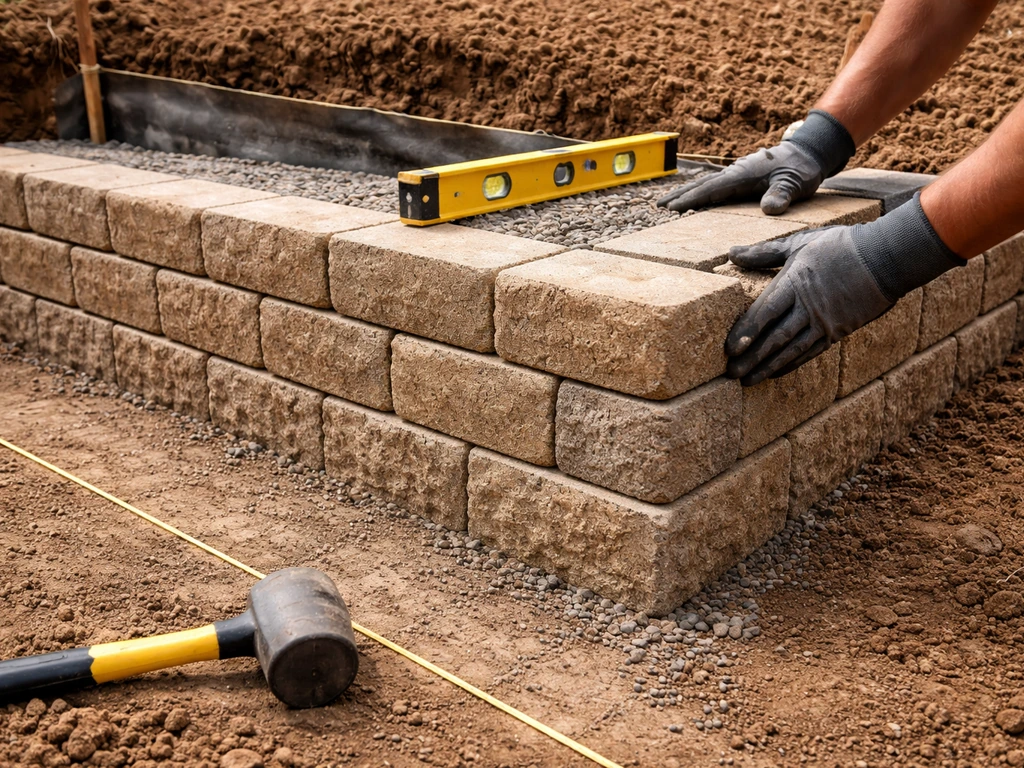
With your base compacted, your first course set level, and your drainage plan in place, you're ready to build up. The core principles are the same whether you're stacking SRW block or natural stone: consistent batter (backward lean), running bond (offset joints between courses), and building up in sync with your drainage backfill.
Setting the first course
The first course is the most important. Take your time getting it level in both directions and set at the right elevation. For SRW blocks, set each block by tapping it into position with a rubber mallet, check level, and brush off any gravel from the top surface before moving on. For dry-stack stone, select your largest, flattest stones for the base course and set them firmly into the compacted gravel base. Every stone in this course needs to be stable under your weight before you move on.
Stacking subsequent courses
Offset each course by half a block or stone width (running bond) so vertical joints never line up between two adjacent courses. This is what gives the wall its lateral strength. Most SRW blocks have a built-in setback of about 1/2 to 1 inch per course, which creates the batter automatically. For natural stone, you need to create this batter intentionally by leaning each course slightly back into the slope, roughly 1 inch of setback for every foot of wall height.
For dry-stack stone walls: after placing each course, backfill behind it with drainage gravel before stacking the next course. This is the correct sequencing, and it keeps the wall stable during construction. Don't build up several courses and then try to backfill all at once. Also, use tie stones (stones long enough to span the full width of the wall) at regular intervals, roughly every 4 to 6 square feet of face. These are the structural glue of a dry-stack wall.
Geogrid reinforcement for taller walls
If your wall is over 3 feet tall, adding geogrid reinforcement layers dramatically increases stability. Geogrid is a plastic mesh that gets laid horizontally at specified course heights, extends back into the compacted backfill zone, and effectively ties the wall to the soil mass behind it. Follow the manufacturer's specifications for geogrid spacing and length; it varies by wall height and the specific geogrid product.
A common approach is geogrid every 2 to 3 courses on taller walls, but always check the installation guide for the block system you're using. When geogrid is properly installed, the reinforced soil mass behind the wall acts together with the blocks as a unified structural system, not just a stack of blocks being pushed by loose dirt.
Alignment and course-by-course checks
Check alignment with a string line or level every 2 to 3 courses. It's much easier to correct a slight bow or lean at course 3 than at course 7. Use your rubber mallet to nudge blocks into place and brush debris off each course before laying the next. For long walls, run a string line the full length of the wall face as a guide to keep the face from bowing forward or wandering in plan.
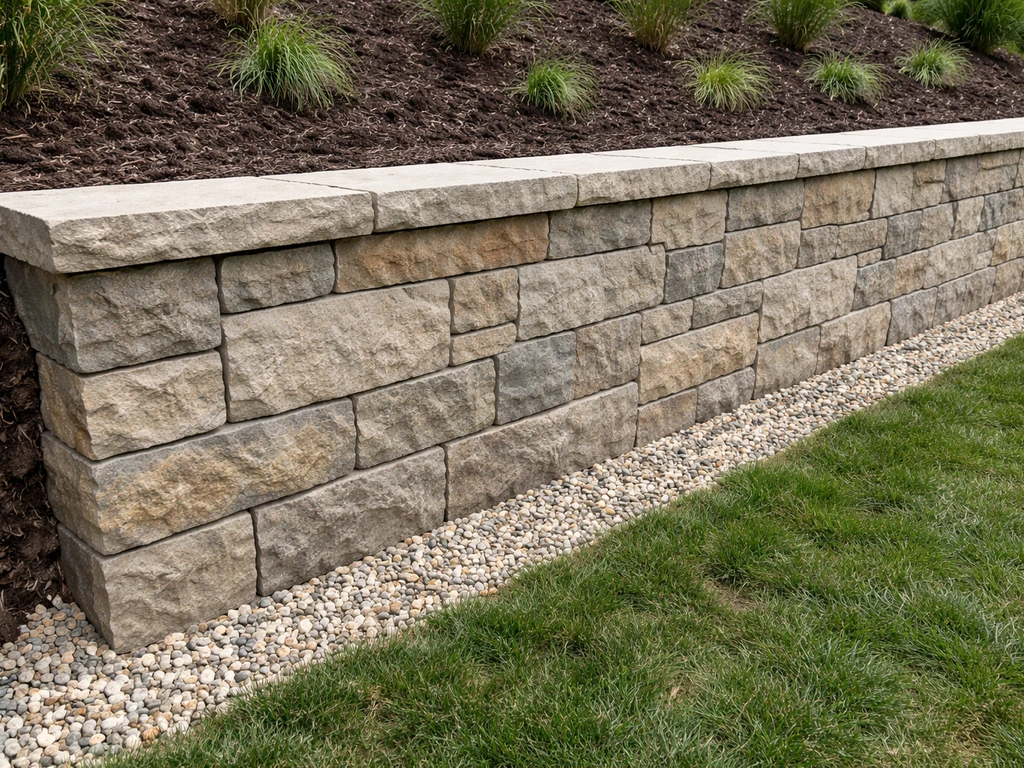
Patio integration and finishing: coping, grade tie-in, and waterproofing
How you finish the top of the wall and tie it into your patio surface makes a big difference in both appearance and long-term performance. This is also where a retaining wall becomes specifically a patio retaining wall rather than just a freestanding landscape wall.
If your goal is a retaining wall with patio on top, focus on the tie-in at the patio grade and how you protect the top of the wall from water and foot traffic retaining wall becomes specifically a patio retaining wall. Once you know how to build a patio retaining wall, you can adapt the same structure to create a patio seating wall with comfortable height and a stable top for benches.
If you need the exact step-by-step sequence, this guide will also walk you through building a small retaining wall for a patio from planning to backfill and drainage patio retaining wall.
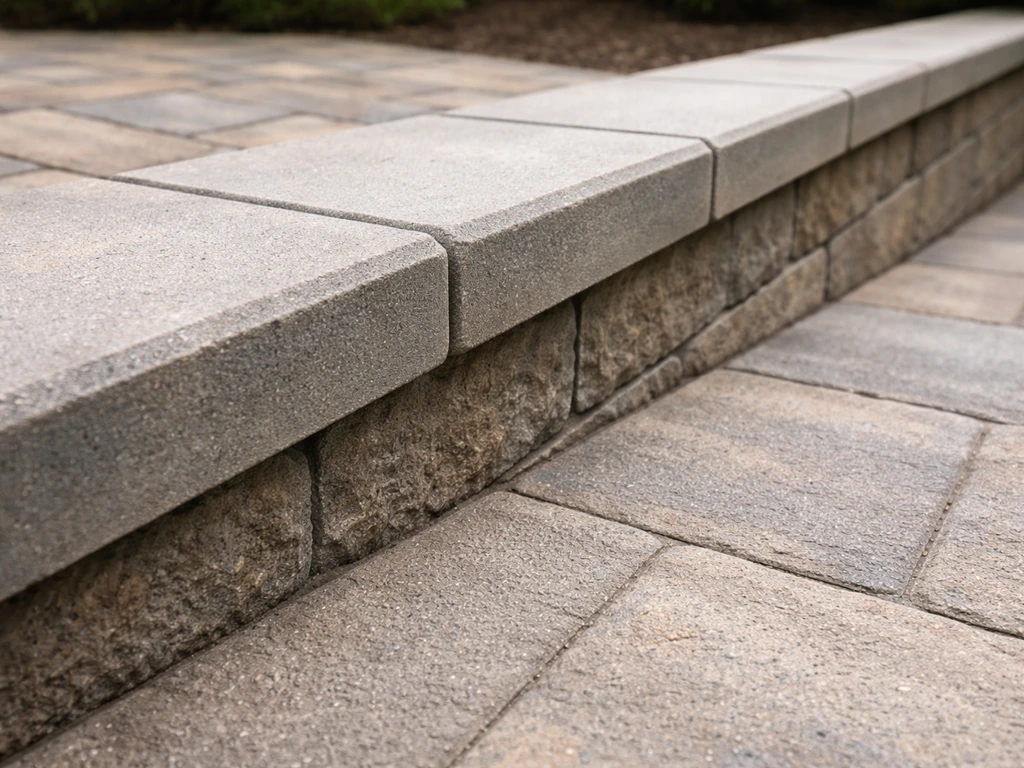
Coping and cap stones
The top course of your wall should be a cap or coping unit, which is a finished-face unit with a flat top. For SRW block, manufacturers sell matching cap blocks. Glue these down with construction adhesive rated for masonry; this keeps them from being shifted by foot traffic, frost, or kids sitting on the wall. For natural stone walls, select your flattest, most uniform stones for the top course and either dry-set them or mortar them in place depending on your wall type. A mortared cap on a dry-stack stone wall is a common hybrid approach that gives a clean look and keeps the top course stable.
Tying into the patio grade
The patio surface on top of or adjacent to the wall needs to slope slightly away from your home (toward the wall top or toward a drainage outlet) so water doesn't pool on the patio or funnel toward a foundation. Aim for at least 1/8 inch per foot of slope across the patio surface. If the patio sits directly behind the wall on the raised grade, the patio base (typically compacted gravel and sand or a concrete slab) should be installed after the wall is complete and fully backfilled, not before. This prevents undermining the wall during patio installation and allows the backfill to settle before you put a finished surface on it.
Waterproofing considerations
For mortared stone or brick walls, especially those in wet climates or walls that will have a patio surface directly behind them, applying a waterproof or water-resistant membrane to the back face of the wall (the soil side) adds a layer of protection. Products like hydraulic cement, crystalline waterproofing coatings, or rubberized membrane can be applied before backfilling.
This isn't required for SRW block or dry-stack stone walls since those rely on the drainage zone rather than a membrane to manage water. If you plan to use wood, the same base and drainage rules apply, but you will want to follow a patio wall build plan designed for wood construction how to build a patio wall with wood. For dry-stack stone, water moves through the wall naturally, which is actually a feature, not a bug.
For mortared walls where joints are sealed, the drainage zone and pipe do even more of the work, so get those right.
If you're planning a seating wall along the top of or adjacent to your patio retaining wall, the structural wall goes in first and any seating wall element is added after. Similarly, if a patio bench or built-in seating is part of your plan, design it as a separate structure that doesn't rely on the retaining wall for structural support.
Troubleshooting and final checks
Before you call the project done, do a thorough inspection. Walk the full length of the wall and check for a few specific things.
Settling and bowing
Some minor settling in the backfill zone in the first few months after construction is normal, especially if you had rain during the build. Top up any low spots with compacted fill. Bowing in the face of the wall, however, is a structural warning sign. A slight curve outward in the middle of a long wall often means the drainage zone is saturated (drainage isn't working) or the backfill wasn't compacted in lifts and is exerting more pressure than expected. Catch bowing early, before courses start to slide or tip.
Water issues
After the first heavy rain, check that water is actually exiting at your drain pipe outlet. If you're not seeing flow at the outlet during or after rain, the pipe may be blocked, installed without slope, or the drainage zone may not be connected to the pipe properly. Also check that water isn't pooling at the base of the wall face or appearing as weeping at spots along the face beyond just normal seepage through a dry-stack wall. Wet spots along a mortared or SRW wall face often indicate drainage zone problems.
Curing and settling timeline
SRW block walls are ready for use immediately, but wait at least one full season before installing any permanent patio surface behind a taller wall, since backfill settles over time. Mortared walls need at least 28 days for the mortar to cure fully before placing any load against them. During that time, keep the wall moist (cure it like concrete) and protect it from freezing temperatures if you're building in late fall. After the first winter, inspect mortared joints for cracking from freeze-thaw cycles and repoint any open joints promptly to prevent water infiltration.
Safety and final sign-off
If you pulled a permit, schedule your inspection before you backfill or cover up any drainage components. Inspectors need to see the base, geotextile, drainage layer, and pipe before it's buried. Even if you didn't need a permit, take photos at each stage of drainage installation for your own records. If anything ever goes wrong with the wall, those photos are invaluable for diagnosing what happened. A retaining wall that's built right doesn't need much maintenance, but a quick check each spring for shifting, bowing, or blocked outlets takes about 10 minutes and can catch small problems before they become expensive ones.
FAQ
Can I build a patio retaining wall on top of existing soil or pavers without excavation?
Usually not. You still need to strip topsoil and organic roots, excavate to the required depth, and compact a firm trench bottom and base gravel pad. If you skip excavation, settling and rot from organic material will undermine the first course and can cause early bowing.
How do I know if my soil behind the wall is too clay-heavy for a DIY drainage solution?
If water will not percolate (for example, soil stays saturated for days after rain), plan on heavier drainage and potentially reinforcement, even if you include the 12-inch drainage zone. Clayey backfill can reduce drainage performance and increase hydrostatic pressure, so consider testing drainage and, for taller walls or poor soils, get an engineer’s input.
Do I really need non-woven geotextile fabric behind the wall if I already have crushed stone drainage?
Yes, especially where you have fine soil. Without a separator, fines migrate into the drainage aggregate over time, shrinking flow pathways and increasing pressure behind the wall. If you must “substitute,” use a non-woven separator designed for drainage filtration, not landscaping fabric meant for weed control.
What happens if my perforated drain pipe daylight outlet is lower than expected or I cannot create a true outlet?
A perforated pipe still needs discharge in open air or into a functioning drainage run. If the outlet is trapped in a low spot that never drains, the pipe can become ineffective and pressure builds up. Re-route the outlet so it slopes to a real discharge point, such as a swale or connected drainage system.
Should the drainage gravel zone be the full height of the wall, or can it stop partway up?
It should run the full retained height behind the wall face. Stopping early leaves upper water pressure paths with nowhere to relieve hydrostatic force. If you are stepping tiers or using a bench, extend drainage appropriately within each tier so each section has its own relief path.
How much slope is “enough” for the patio surface near the wall, and where should the water go?
Aim for at least 1/8 inch per foot of slope across the patio so runoff moves away from your house and away from the wall base area. Direct drainage toward a lawful discharge location or existing drainage system, not toward the retaining wall face where it can saturate the backfill.
Can I install the patio base (gravel or slab) before finishing the retaining wall?
It is safer to build and fully backfill the retaining wall first, then install the patio base after the wall is complete. Placing a finished patio base too early can restrict settlement and create voids or concentrated loads that undermine the wall while you are still shaping and compacting backfill.
How long should I wait before using the patio, adding pavers, or placing heavy loads near the wall?
For SRW block walls, you can generally proceed immediately with the wall itself, but wait before placing a permanent patio surface behind a taller wall, because settlement occurs as backfill consolidates. For mortared walls, allow curing time before adding any load or applying patio base materials against the wall.
Do I need geogrid reinforcement on a wall that is only slightly over 3 feet?
Many DIYers use reinforcement when the wall approaches their practical unreinforced limit, but whether you need it depends on block depth, retained height, soil conditions, and batter. If you are near or above the DIY threshold, plan for geogrid or consult an engineer, and follow the manufacturer’s exact vertical spacing and embedment length.
Can I make the wall taller by simply using bigger blocks or stacking faster?
Higher walls require more than larger or faster stacking. You must maintain the correct setback (batter), base embedment and depth, and ensure the drainage system is fully functional. For taller retention, reinforcement (geogrid) and possibly engineering review are often necessary.
What are common signs that drainage is failing before the wall visibly collapses?
Look for persistent wet spots at the wall base, water appearing on the face after rain, or bowing that starts in the middle of longer runs. After heavy rain, confirm water is reaching and exiting at the outlet, otherwise the drain line may be blocked, incorrectly sloped, or not connected to the drainage gravel zone.
If my wall is dry-stacked, should I still worry about weep holes or water bypassing the drain pipe?
Dry-stacked walls often allow seepage through gaps, but you still need a functioning drainage path behind the wall to prevent saturation. For SRW or mortared walls, ensure the drainage zone can actually connect to the drain pipe at the bottom, otherwise the drainage system is effectively incomplete.
How do I handle corners, curves, or a wall that changes direction on a slope?
Keep the footprint straight or intentionally curved, and confirm squareness at diagonal corners when you have direction changes. For curves, maintain consistent course offsets and batter across the arc, and avoid “force-fitting” blocks or stones that create voids. Measure plan geometry frequently with strings so the face does not wander during stacking.
What mistake most often causes early bowing or leaning?
Improper drainage and inadequate compaction are the top causes. If backfill is not compacted in lifts, or if water cannot exit via the correctly sloped perforated pipe and unobstructed outlet, hydrostatic pressure builds up and pushes the wall outward.
Do I need to seal or waterproof the back of the wall if I already have a drainage zone?
Typically not for SRW block or dry-stack stone because the drainage system is designed to handle water management. Waterproofing or membranes can be helpful for mortared walls in wet climates or where patio materials sit directly against the wall, but you still must ensure the drainage zone and drain pipe remain installed and connected correctly.